

TABLE OF CONTENTS
Key Takeaways
- DeepSeek-V4 is a series of Mixture-of-Experts (MoE) language models featuring two variants: DeepSeek-V4-Flash (284B total / 13B activated) and DeepSeek-V4-Pro (1.6T total / 49B activated)
- Both models support a 1 million token context window, making them ideal for processing massive codebases, long documents, and complex multi-step tasks
- DeepSeek-V4 uses a Hybrid Attention Architecture combining Compressed Sparse Attention (CSA) and Heavily Compressed Attention (HCA), dramatically reducing long-context inference costs
- For the Flash variant, an 8×H100-80G-PCIe configuration is recommended; for the Pro variant, a multi-node H100 SXM setup is required
- This tutorial walks through deploying DeepSeek-V4-Flash on Hyperstack using vLLM via Docker, with API-compatible inference out of the box
- Hyperstack gives you on-demand access to high-performance NVIDIA GPUs without managing infrastructure.
DeepSeek-V4 is the latest generation of open-weight large language models from DeepSeek AI, representing a significant leap in efficiency and long-context reasoning. The collection includes four models spanning 284B to 1.6T total parameters with as little as 13B activated per forward pass, a native 1M-token context window, and FP4+FP8 mixed precision for efficient single-node deployment.
DeepSeek-V4 Model Variants
|
Model |
Total Params |
Activated Params |
Context Length |
Precision |
|---|---|---|---|---|
|
DeepSeek-V4-Flash-Base |
284B |
13B |
1M tokens |
FP8 Mixed |
|
DeepSeek-V4-Flash |
284B |
13B |
1M tokens |
FP4 + FP8 Mixed |
|
DeepSeek-V4-Pro-Base |
1.6T |
49B |
1M tokens |
FP8 Mixed |
|
DeepSeek-V4-Pro |
1.6T |
49B |
1M tokens |
FP4 + FP8 Mixed |
FP4 + FP8 Mixed: MoE expert parameters use FP4 precision; most other parameters use FP8.
DeepSeek-V4 Architecture
DeepSeek-V4 stacks a standard Transformer spine with three novel twists. Here is how the architecture works:
- Transformer Spine with RoPE: Tokens enter as embeddings with RoPE positional encoding, then pass through the deep stack of attention + FFN blocks.
- Hybrid Attention (CSA + HCA): Two mechanisms run in parallel — Compressed Sparse Attention (CSA) for broad context coverage and Heavily Compressed Attention (HCA) to slash the KV cache to just 10% of V3's size at 1M-token context.
- Manifold-Constrained Hyper-Connections (mHC): Each block is wrapped by an mHC residual path that stabilises gradient flow across the deep stack.
- Mixture-of-Experts FFN: The attention output routes through a MoE FFN, activating only 13B parameters (Flash) or 49B (Pro) out of the full 284B and 1.6T totals — keeping inference fast and cheap.

Features of DeepSeek-V4
Here are the key features of the latest DeepSeek-V4 model:
- Hybrid Attention Architecture: DeepSeek-V4 combines Compressed Sparse Attention (CSA) and Heavily Compressed Attention (HCA) to dramatically improve long-context efficiency. In the 1M-token setting, DeepSeek-V4-Pro requires only 27% of single-token inference FLOPs and just 10% of the KV cache compared to DeepSeek-V3.2.
- Manifold-Constrained Hyper-Connections (mHC): A novel technique that strengthens residual connections, improving signal propagation stability across layers while preserving model expressivity.
- Muon Optimiser: DeepSeek-V4 is trained using the Muon optimiser, delivering faster convergence and greater training stability compared to standard AdamW.
- Two-Stage Post-Training: The models undergo independent cultivation of domain-specific experts (via SFT and RL with GRPO), followed by unified model consolidation through on-policy distillation, integrating distinct domain proficiencies into a single model.
DeepSeek-V4-Flash Hardware Requirements
For DeepSeek-V4-Flash (284B total parameters, 13B activated, FP4+FP8 mixed):
- Recommended: 8×H100-80G-PCIe (640 GB total VRAM)
- This configuration provides sufficient memory bandwidth for efficient tensor parallelism.
For DeepSeek-V4-Pro (1.6T total parameters, 49B activated):
- A multi-node H100 SXM setup is required; this is out of scope for this single-VM tutorial.
- This tutorial focuses on DeepSeek-V4-Flash, which is fully deployable on a single 8×H100 VM.
How to Deploy DeepSeek-V4-Flash on Hyperstack
Now, let's walk through the step-by-step process of deploying the necessary infrastructure.
Step 1: Accessing Hyperstack
First, you'll need a Hyperstack account.
- Go to the Hyperstack console and log in.
- If you are new, create an account and set up your billing information. Refer to the Hyperstack documentation to get started.
Step 2: Deploying a New Virtual Machine
From the Hyperstack dashboard, you will launch a new GPU-powered VM.
- Initiate Deployment: Click the "Deploy New Virtual Machine" button on the dashboard.

- Select Hardware Configuration: Choose the "8×H100-80G-PCIe" flavour. This gives you 640 GB of combined GPU memory, which is required to load and serve DeepSeek-V4-Flash across 8 GPUs using tensor parallelism.

- Choose the Operating System: Select "Ubuntu Server 24.04 LTS R570 CUDA 12.8 with Docker". This image comes pre-installed with Ubuntu 22.04 LTS, NVIDIA drivers, CUDA 12.2, and Docker — providing a ready-to-use environment for AI workloads.

- Select a Keypair: Choose an existing SSH keypair from your account. Don't have one yet? See the Getting Started guide for instructions on creating a keypair.
- Network Configuration: Ensure you assign a Public IP to your Virtual Machine and enable an SSH connection so you can securely connect and manage your VM.
- Open Firewall Port: Open port
8000to allow inbound TCP traffic. This is the port vLLM will serve on. - Review and Deploy: Double-check all settings and click "Deploy" to launch your virtual machine.
Security Note: Opening a port exposes it to the public internet — anyone with your IP and port number will be able to access the API. Restrict this to your IP range in a production setting.
After deploying, the VM will initialise. This typically takes 2–5 minutes.
Step 3: Connecting to Your VM via SSH
Once your VM is running, connect to it from your local machine.
-
Locate your VM's Public IP: In the Hyperstack dashboard, navigate to your VM's details page and copy the public IP address.
-
Connect via SSH: Open a terminal on your local machine and run:
# Connect to your VM using your private key and the VM's public IP
ssh -i [path_to_your_ssh_key] ubuntu@[your_vm_public_ip]
Replace [path_to_your_ssh_key] with your local SSH private key file path, and [your_vm_public_ip] with your VM's actual IP address.
Once connected, you will see a welcome message confirming you are logged into your Hyperstack VM.
Step 4: Create a Model Cache Directory
DeepSeek-V4-Flash is a large model. Storing it on the VM's high-speed ephemeral disk ensures faster loading and avoids re-downloading across sessions.
# Create a directory for the Hugging Face model cache on the ephemeral disk
sudo mkdir -p /ephemeral/hug

# Grant full read/write permissions so the Docker container can access it
sudo chmod -R 0777 /ephemeral/hug
This creates a folder named hug inside /ephemeral and sets open permissions so the Docker container running vLLM can read and write model files to it.
Step 5: Pull the vLLM Docker Image
Because DeepSeek-V4 introduces brand-new attention kernels (CSA + HCA), FP4 MoE weights, and a custom tokenizer, we will use here the standard vllm/vllm-openai:latest image.
# Pull the vLLM OpenAI server image
docker pull vllm/vllm-openai:latest
This may take several minutes, depending on network speed. Once complete, verify the image is available:
docker images | grep vllmStep 6: Launch the vLLM Inference Server
Run the vLLM server container with DeepSeek-V4-Flash, distributing the model across all 8 GPUs using data parallelism combined with expert parallelism — the recommended strategy for V4's Mixture-of-Experts architecture:
docker run -d \
  --gpus all \
  --ipc=host \
  --network host \
  --name vllm_deepseek_v4 \
  -v /ephemeral/hug:/root/.cache/huggingface \
  vllm/vllm-openai:latest \
  /models/deepseek-v4-flash \
  --served-model-name DeepSeek-V4-Flash \
  --trust-remote-code \
  --tokenizer-mode deepseek_v4 \
  --reasoning-parser deepseek_v4 \
  --kv-cache-dtype fp8 \
  --block-size 256 \
  --data-parallel-size 8 \
  --enable-expert-parallel \
  --max-model-len 512 \
  --max-num-seqs 4 \
  --gpu-memory-utilization 0.90 \
  --enforce-eager \
  --host 0.0.0.0 \
  --port 8000
Note on these flags: DeepSeek-V4-Flash is a Mixture-of-Experts model, so we use --enable-expert-parallel together with --data-parallel-size 8 to distribute experts efficiently across all 8 GPUs — this is generally more efficient for MoE models than pure tensor parallelism. The --tokenizer-mode and --reasoning-parser flags are all set to deepseek_v4 — these are required for correct chat templating, tool calling, and the model's Thinking / Non-Thinking reasoning modes.
Step 7: Monitor the Startup Logs
The model download and initialisation can take 10–20 minutes, depending on network speed and model size. Monitor the progress with:
docker logs -f vllm_deepseek_v4_flashWatch the logs stream in real time. The server is ready when you see a line like:
INFO: Uvicorn running on http://0.0.0.0:8000 (Press CTRL+C to quit)You can exit the log stream at any time with Ctrl+C without stopping the container.
Step 8: Verify the Deployment
Once the server is running, confirm it is responding correctly. From inside the VM, test the local API endpoint:
# Check the available models
curl http://localhost:8000/v1/models
You should see a JSON response listing deepseek-ai/DeepSeek-V4-Flash as an available model.
Next, add a firewall rule in your Hyperstack dashboard to allow inbound TCP traffic on port 8000 (if not already done in Step 2). This is essential for external access. 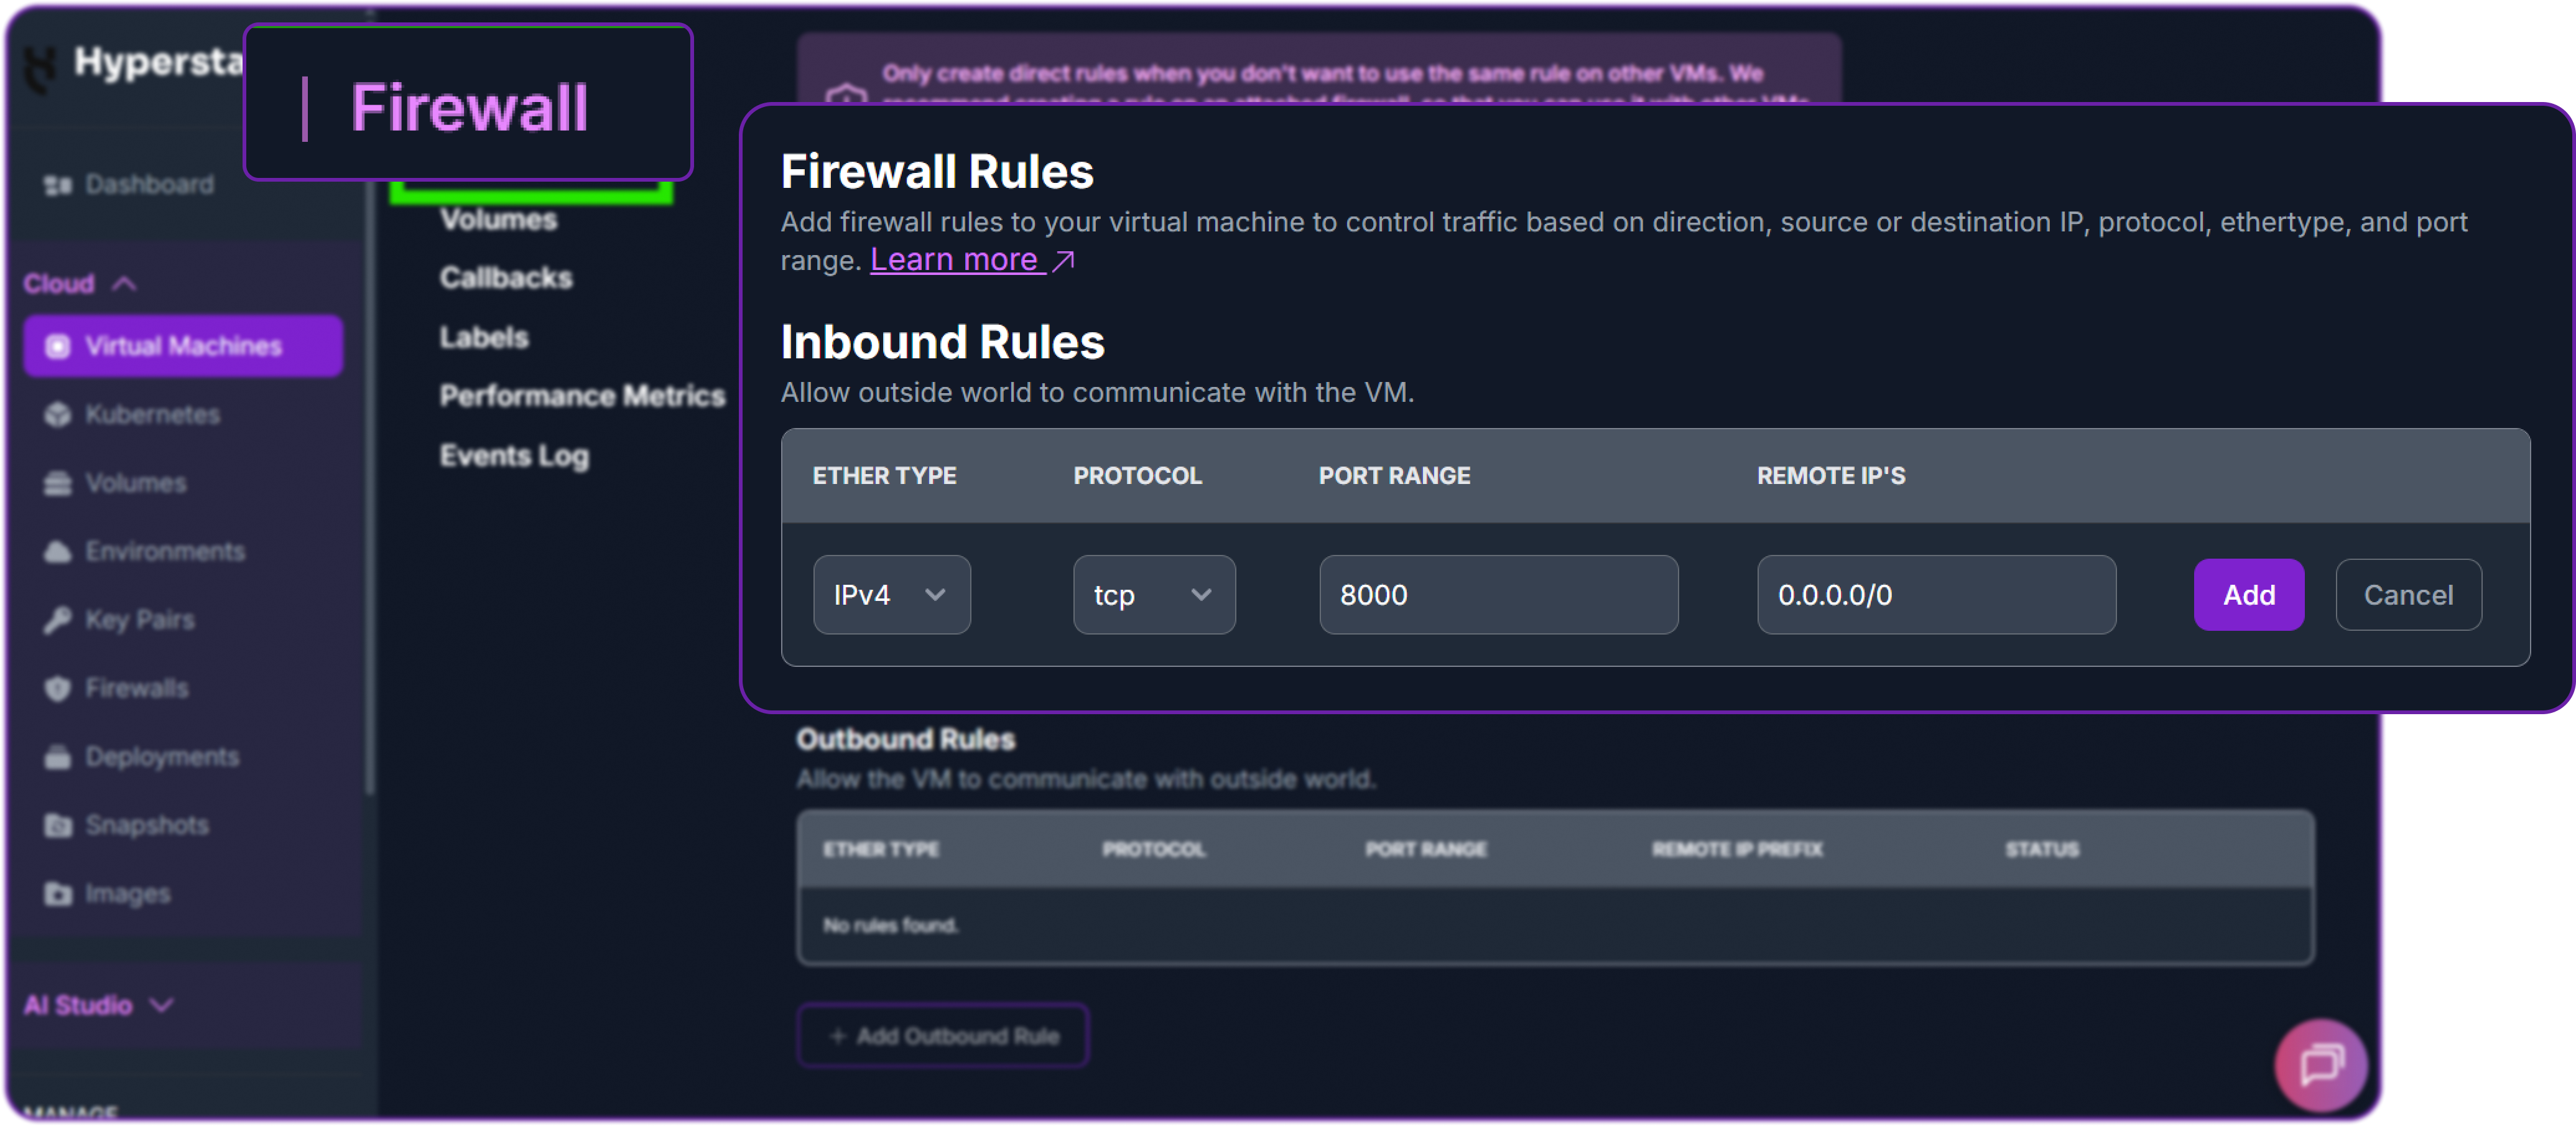
Then test from your local machine, replacing the IP address with your VM's public IP:
curl http://[YOUR_VM_PUBLIC_IP]:8000/v1/chat/completions \
  -H "Content-Type: application/json" \
  -H "Authorization: Bearer EMPTY" \
  -d '{
    "model": "deepseek-ai/DeepSeek-V4-Flash",
    "messages": [
      {
        "role": "user",
        "content": "Explain the difference between Compressed Sparse Attention and standard self-attention in two sentences."
      }
    ],
    "max_tokens": 300,
    "temperature": 0.6,
    "top_p": 0.95
  }'
A successful response will look like this:
{
  "id": "chatcmpl-abc123",
  "object": "chat.completion",
  "created": 1771900000,
  "model": "deepseek-ai/DeepSeek-V4-Flash",
  "choices": [
    {
      "index": 0,
      "message": {
        "role": "assistant",
        "content": "Standard self-attention computes attention scores between every pair of tokens, resulting in quadratic memory and compute costs as context length grows. Compressed Sparse Attention (CSA) addresses this by selectively attending only to a structured subset of tokens, dramatically reducing the KV cache footprint and inference FLOPs — enabling DeepSeek-V4 to efficiently handle contexts up to 1 million tokens."
      },
      "finish_reason": "stop"
    }
  ],
  "usage": {"prompt_tokens": 32, "completion_tokens": 74, "total_tokens": 106}
}
Your DeepSeek-V4-Flash deployment is live and serving requests.
Step 9: Interacting via the Python OpenAI Client
You can interact with your deployed model using the standard openai Python library from your local machine or within the VM.
First, install the OpenAI Python client:
pip install openaiThen create a Python script to send requests:
from openai import OpenAI

# Point the client to your Hyperstack VM's vLLM server
client = OpenAI(
    base_url="http://[YOUR_VM_PUBLIC_IP]:8000/v1",
    api_key="EMPTY",  # vLLM does not enforce API keys by default
)

response = client.chat.completions.create(
    model="deepseek-ai/DeepSeek-V4-Flash",
    messages=[
        {
            "role": "system",
            "content": "You are a helpful coding assistant."
        },
        {
            "role": "user",
            "content": "Write a Python function that implements binary search on a sorted list."
        }
    ],
    max_tokens=500,
    temperature=0.6,
    top_p=0.95,
)

print(response.choices[0].message.content)
Replace [YOUR_VM_PUBLIC_IP] with your VM's actual public IP address. Run the script:
python deepseek_v4_test.pyYou should receive a complete, well-formatted binary search implementation from the model.
Step 10: Streaming Responses
For real-time streaming output (useful for chat applications and long generations), enable streaming:
from openai import OpenAI

client = OpenAI(
    base_url="http://[YOUR_VM_PUBLIC_IP]:8000/v1",
    api_key="EMPTY",
)

stream = client.chat.completions.create(
    model="deepseek-ai/DeepSeek-V4-Flash",
    messages=[
        {
            "role": "user",
            "content": "Explain the architecture of a Mixture-of-Experts language model in detail."
        }
    ],
    max_tokens=800,
    temperature=0.6,
    top_p=0.95,
    stream=True,  # Enable streaming
)

for chunk in stream:
    if chunk.choices[0].delta.content is not None:
        print(chunk.choices[0].delta.content, end="", flush=True)

print()  # New line after streaming completes
Each chunk arrives as it is generated, giving you low-latency incremental output.
Step 11: Hibernating Your VM (Optional but Recommended)
When you are finished with your workload, hibernate your VM to stop compute billing while preserving your setup:
- In the Hyperstack dashboard, locate your Virtual Machine.
- Look for the "Hibernate" option.
- Click to hibernate — this stops billing for compute resources while preserving your model cache and configuration.
When you resume work, simply wake the VM and restart the Docker container:
docker start vllm_deepseek_v4_flashGet Started
Ready to deploy DeepSeek-V4-Flash on Hyperstack?

FAQs
What is DeepSeek-V4-Flash?
DeepSeek-V4-Flash is a 284B total parameter MoE language model from DeepSeek AI, with only 13B parameters activated per forward pass. It supports a 1 million token context window and uses FP4+FP8 mixed precision, making it significantly more efficient than its raw parameter count suggests.
How does DeepSeek-V4-Flash differ from DeepSeek-V4-Pro?
DeepSeek-V4-Flash has 284B total parameters (13B activated) — it is optimised for speed and cost-effective single-node deployment. DeepSeek-V4-Pro has 1.6T total parameters (49B activated) and is the highest-capability variant, requiring a multi-node GPU cluster to run. Flash-Max can achieve comparable reasoning to Pro when given a larger inference budget.
What is the recommended GPU configuration for DeepSeek-V4-Flash?
An 8×H100-80G-PCIe VM on Hyperstack is the recommended configuration, providing 640 GB of total GPU memory — sufficient to load the model and maintain efficient KV cache for long-context inference.
Can I use a smaller GPU configuration?
DeepSeek-V4-Flash in FP4+FP8 mixed precision requires a minimum of approximately 400–480 GB of VRAM. An 8×H100-80G (640 GB) configuration is the practical minimum for comfortable deployment with headroom for the KV cache.
What context length can I run?
The model natively supports up to 1 million tokens. However, the practical limit on a single 8×H100-80G VM depends on your KV cache budget. Starting with --max-model-len 32768 is recommended. Increase it as needed based on your workload and available VRAM headroom.
Is the API OpenAI-compatible?
Yes. vLLM exposes a fully OpenAI-compatible REST API, meaning you can use the openai Python SDK, curl, or any other OpenAI-compatible client to interact with your DeepSeek-V4-Flash deployment by changing only the base_url.
Subscribe to Hyperstack!
Enter your email to get updates to your inbox every week

