
.png)
TABLE OF CONTENTS
NVIDIA H100 SXM GPUs On-Demand
Key Takeaways
- Qwen3.6 is an open-weight, native vision-language foundation model designed specifically to power high-performance agentic coding and autonomous digital agents.
- It utilises a highly efficient Mixture-of-Experts (MoE) architecture with 35B total parameters, but only activates 3B per forward pass for extreme speed and cost-effectiveness.
- The model supports an enormous context window of up to 1 million tokens, allowing it to easily process massive codebases, long documents, and hour-long videos.
- Due to its efficient total parameter count, loading the 35B weights is much more accessible, making a single A100 or H100 GPU configuration highly capable.
- The tutorial walks through deploying Qwen3.6 on Hyperstack using high-performance, GPU-powered virtual machines.
- Hyperstack simplifies the deployment of efficient, agentic AI models like Qwen3.6 by providing instant access to cutting-edge hardware without the need for physical infrastructure management.
What is Qwen3.6?
Qwen3.6 is a cutting-edge, open-weight AI model engineered for elite agentic coding and complex multimodal reasoning across text, code, images, and video. It utilizes a highly optimized "Mixture-of-Experts" architecture, housing 35 billion total parameters while only activating 3 billion parameters per token, allowing it to rival the performance of much larger dense models while maintaining exceptional inference speed. With its groundbreaking "Thinking Preservation" capability and a context window extensible to 1 million tokens, it seamlessly manages repository-level development, hour-long visual analysis, and intricate multi-step agentic workflows in a single, highly efficient process.

A major reason Qwen3.6 is so smart is its advanced training system and highly efficient "Sparse" architecture, which allows it to act like a much larger model while remaining incredibly fast. Here is how the architecture works:
- Sparse MoE System: Uses a Mixture-of-Experts design where only a small subset of experts (e.g., 8 out of many) are activated per task, making it fast while still leveraging the power of a much larger model.
- Hybrid Brain (DeltaNet + Attention): Combines linear attention (for long context tracking) with standard attention (for precise reasoning), balancing memory and accuracy.
- Thinking Preservation: Keeps track of its reasoning steps across turns, helping it stay consistent and avoid repeating mistakes in ongoing tasks.
- Multi-Token Prediction (MTP): Predicts multiple tokens at once instead of one-by-one, significantly improving speed and throughput.
- Native Multimodal Fusion: Integrates vision directly into the model, allowing it to process images and text together more effectively.
- YaRN Context Scaling: Extends context length to very large sizes (up to ~1M tokens) without losing performance over long inputs.
Qwen3.6 Features
Qwen3.6 goes beyond just chatting, it introduces major upgrades focused on getting complex, real-world tasks done efficiently:
- Sparse MoE Efficiency: Uses a Mixture-of-Experts system that activates only ~3B of 35B parameters per task, delivering large-model intelligence with much faster performance.
- Agentic Coding Power: Built for full-project understanding, not just snippets handles repository-level reasoning and complex workflows with high accuracy.
- Reasoning Memory: Retains prior reasoning steps across interactions, helping maintain consistency during long, multi-step problem solving.
- Multimodal & Spatial Intelligence: Natively processes text, images, and video, with strong ability to interpret UI layouts and visual structures.
- Ultra-Long Context: Supports very large inputs (hundreds of thousands to ~1M tokens), enabling it to work with entire codebases or large documents.
- High Throughput (MTP): Uses multi-token prediction to generate multiple outputs at once, improving speed and responsiveness in real-world use.
How to Deploy Qwen3.6 on Hyperstack
Now, let's walk through the step-by-step process of deploying the necessary infrastructure.
Step 1: Accessing Hyperstack
First, you'll need an account on Hyperstack.
- Go to the Hyperstack website and log in.
- If you are new, create an account and set up your billing information. Our documentation can guide you through the initial setup.
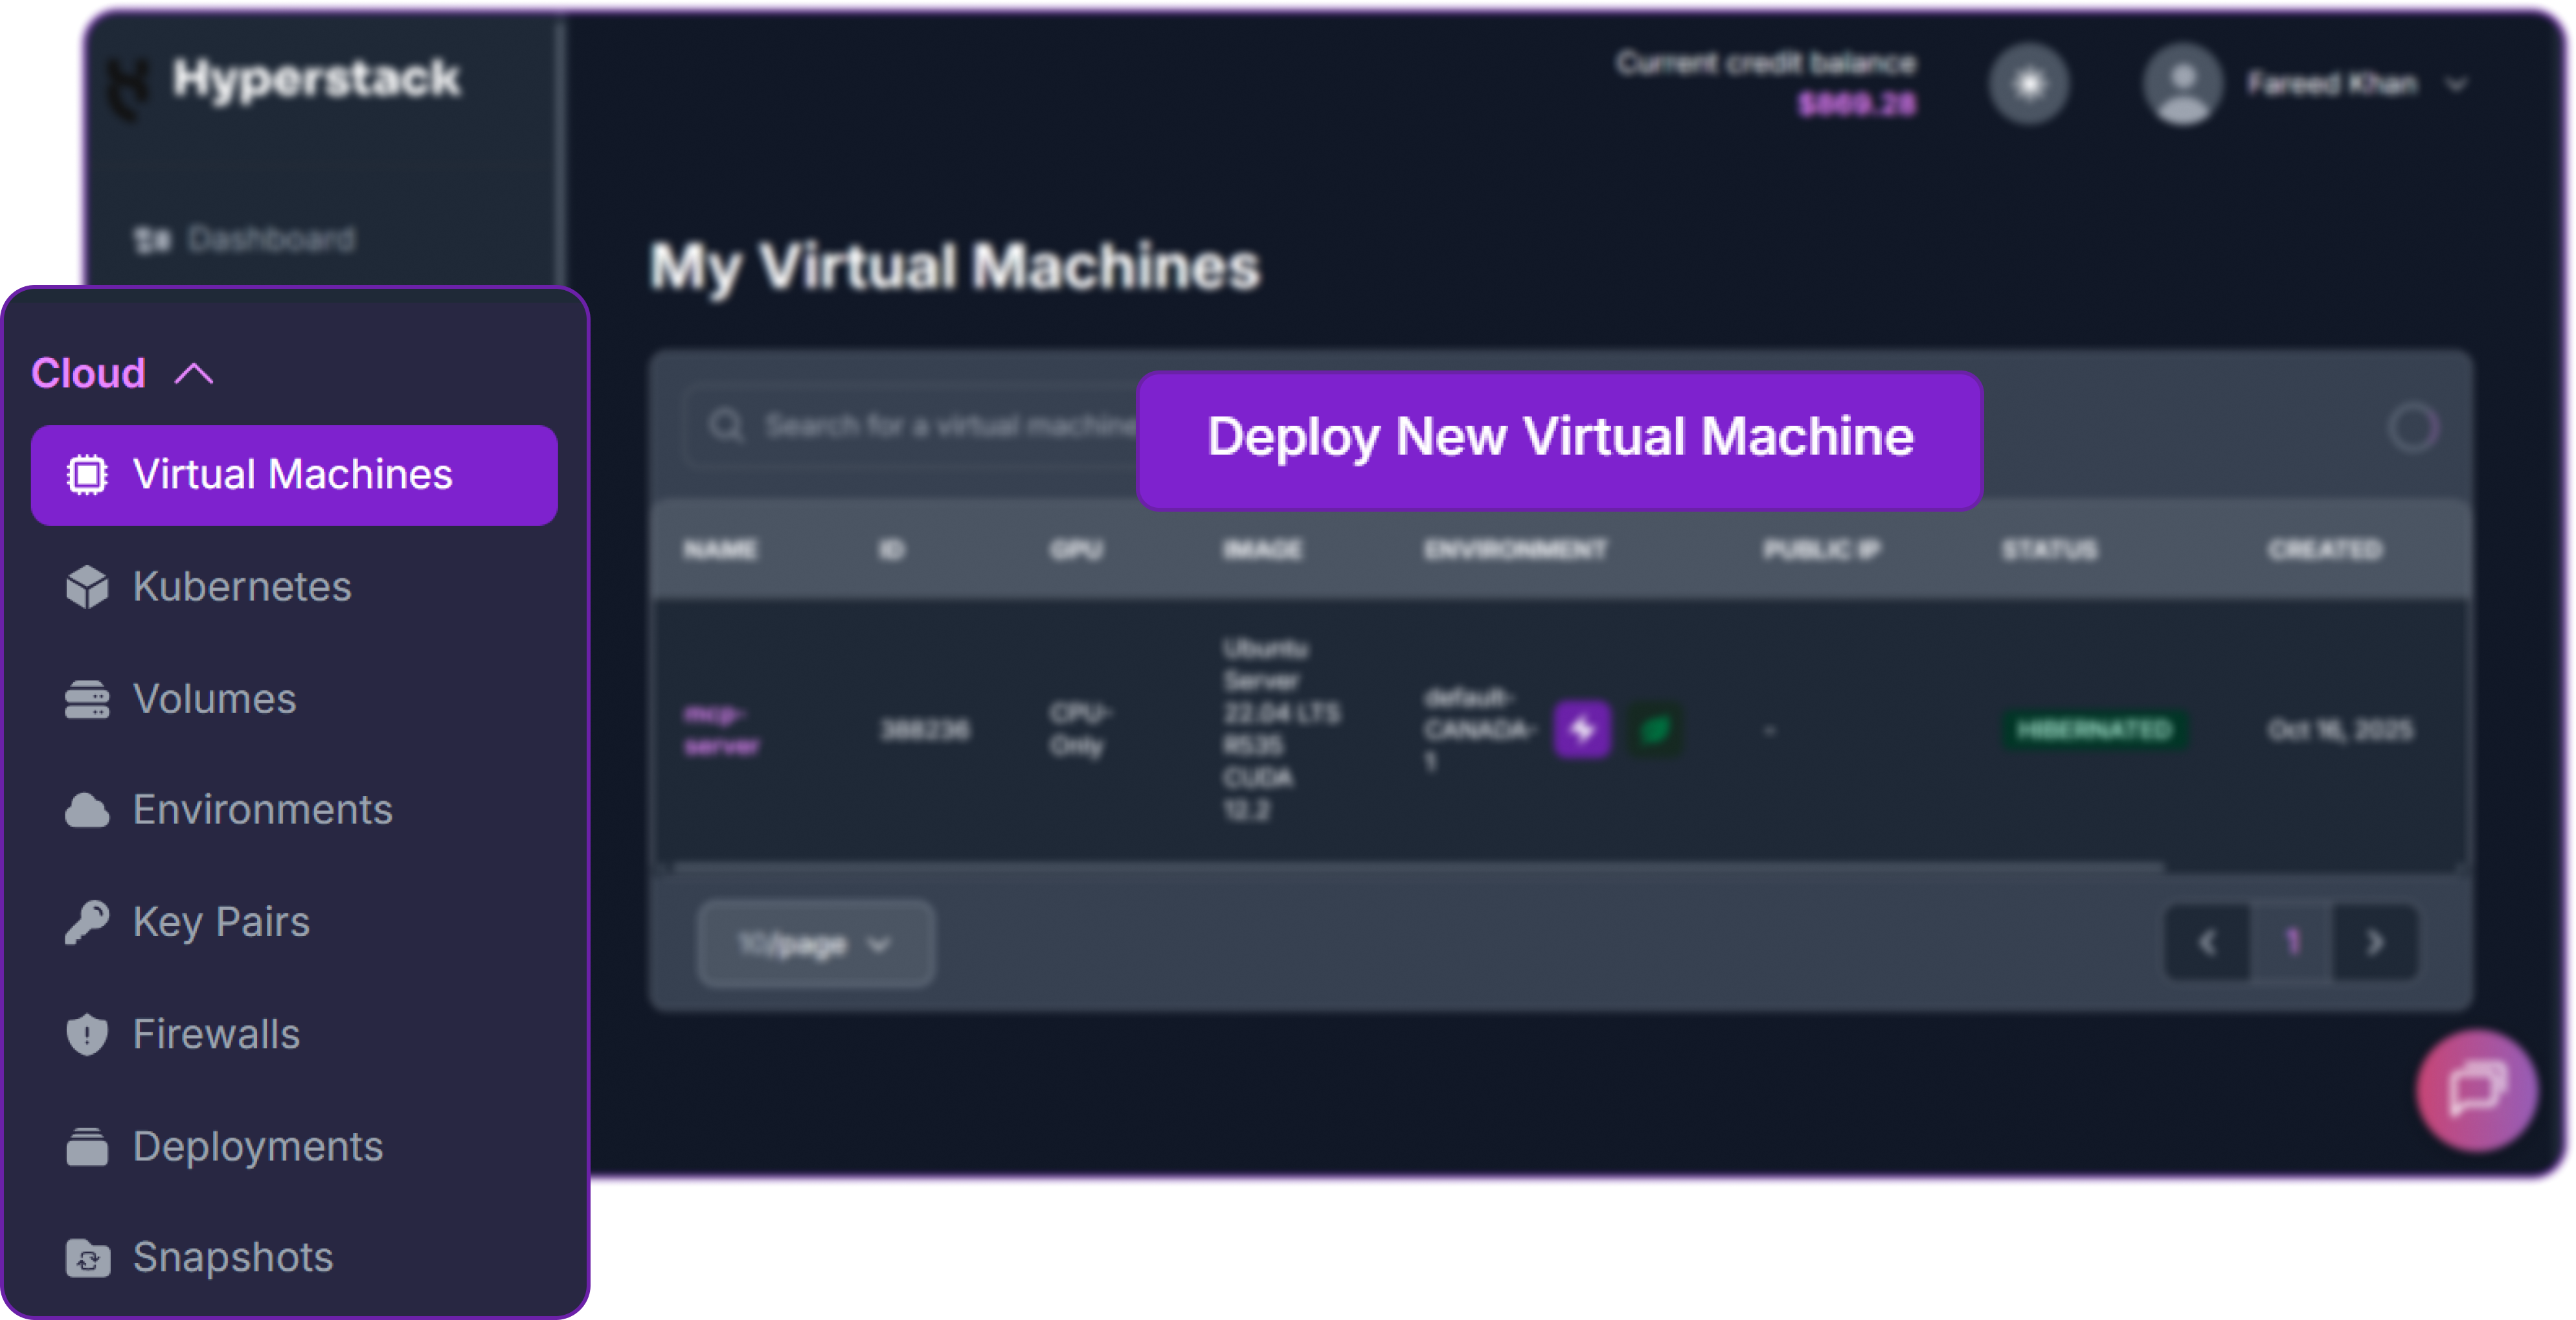
Step 2: Deploying a New Virtual Machine
From the Hyperstack dashboard, we will launch a new GPU-powered VM.
- Initiate Deployment: Look for the "Deploy New Virtual Machine" button on the dashboard and click it.
- Select Hardware Configuration: For efficient inference with tensor parallelism is key. Choose the "8xH100-80G-PCIe" flavour to ensure sufficient VRAM and memory bandwidth.

- Choose the Operating System: Select the "Ubuntu Server 22.04 LTS R535 CUDA 12.2 with Docker" image. This provides a ready-to-use environment with all necessary drivers.
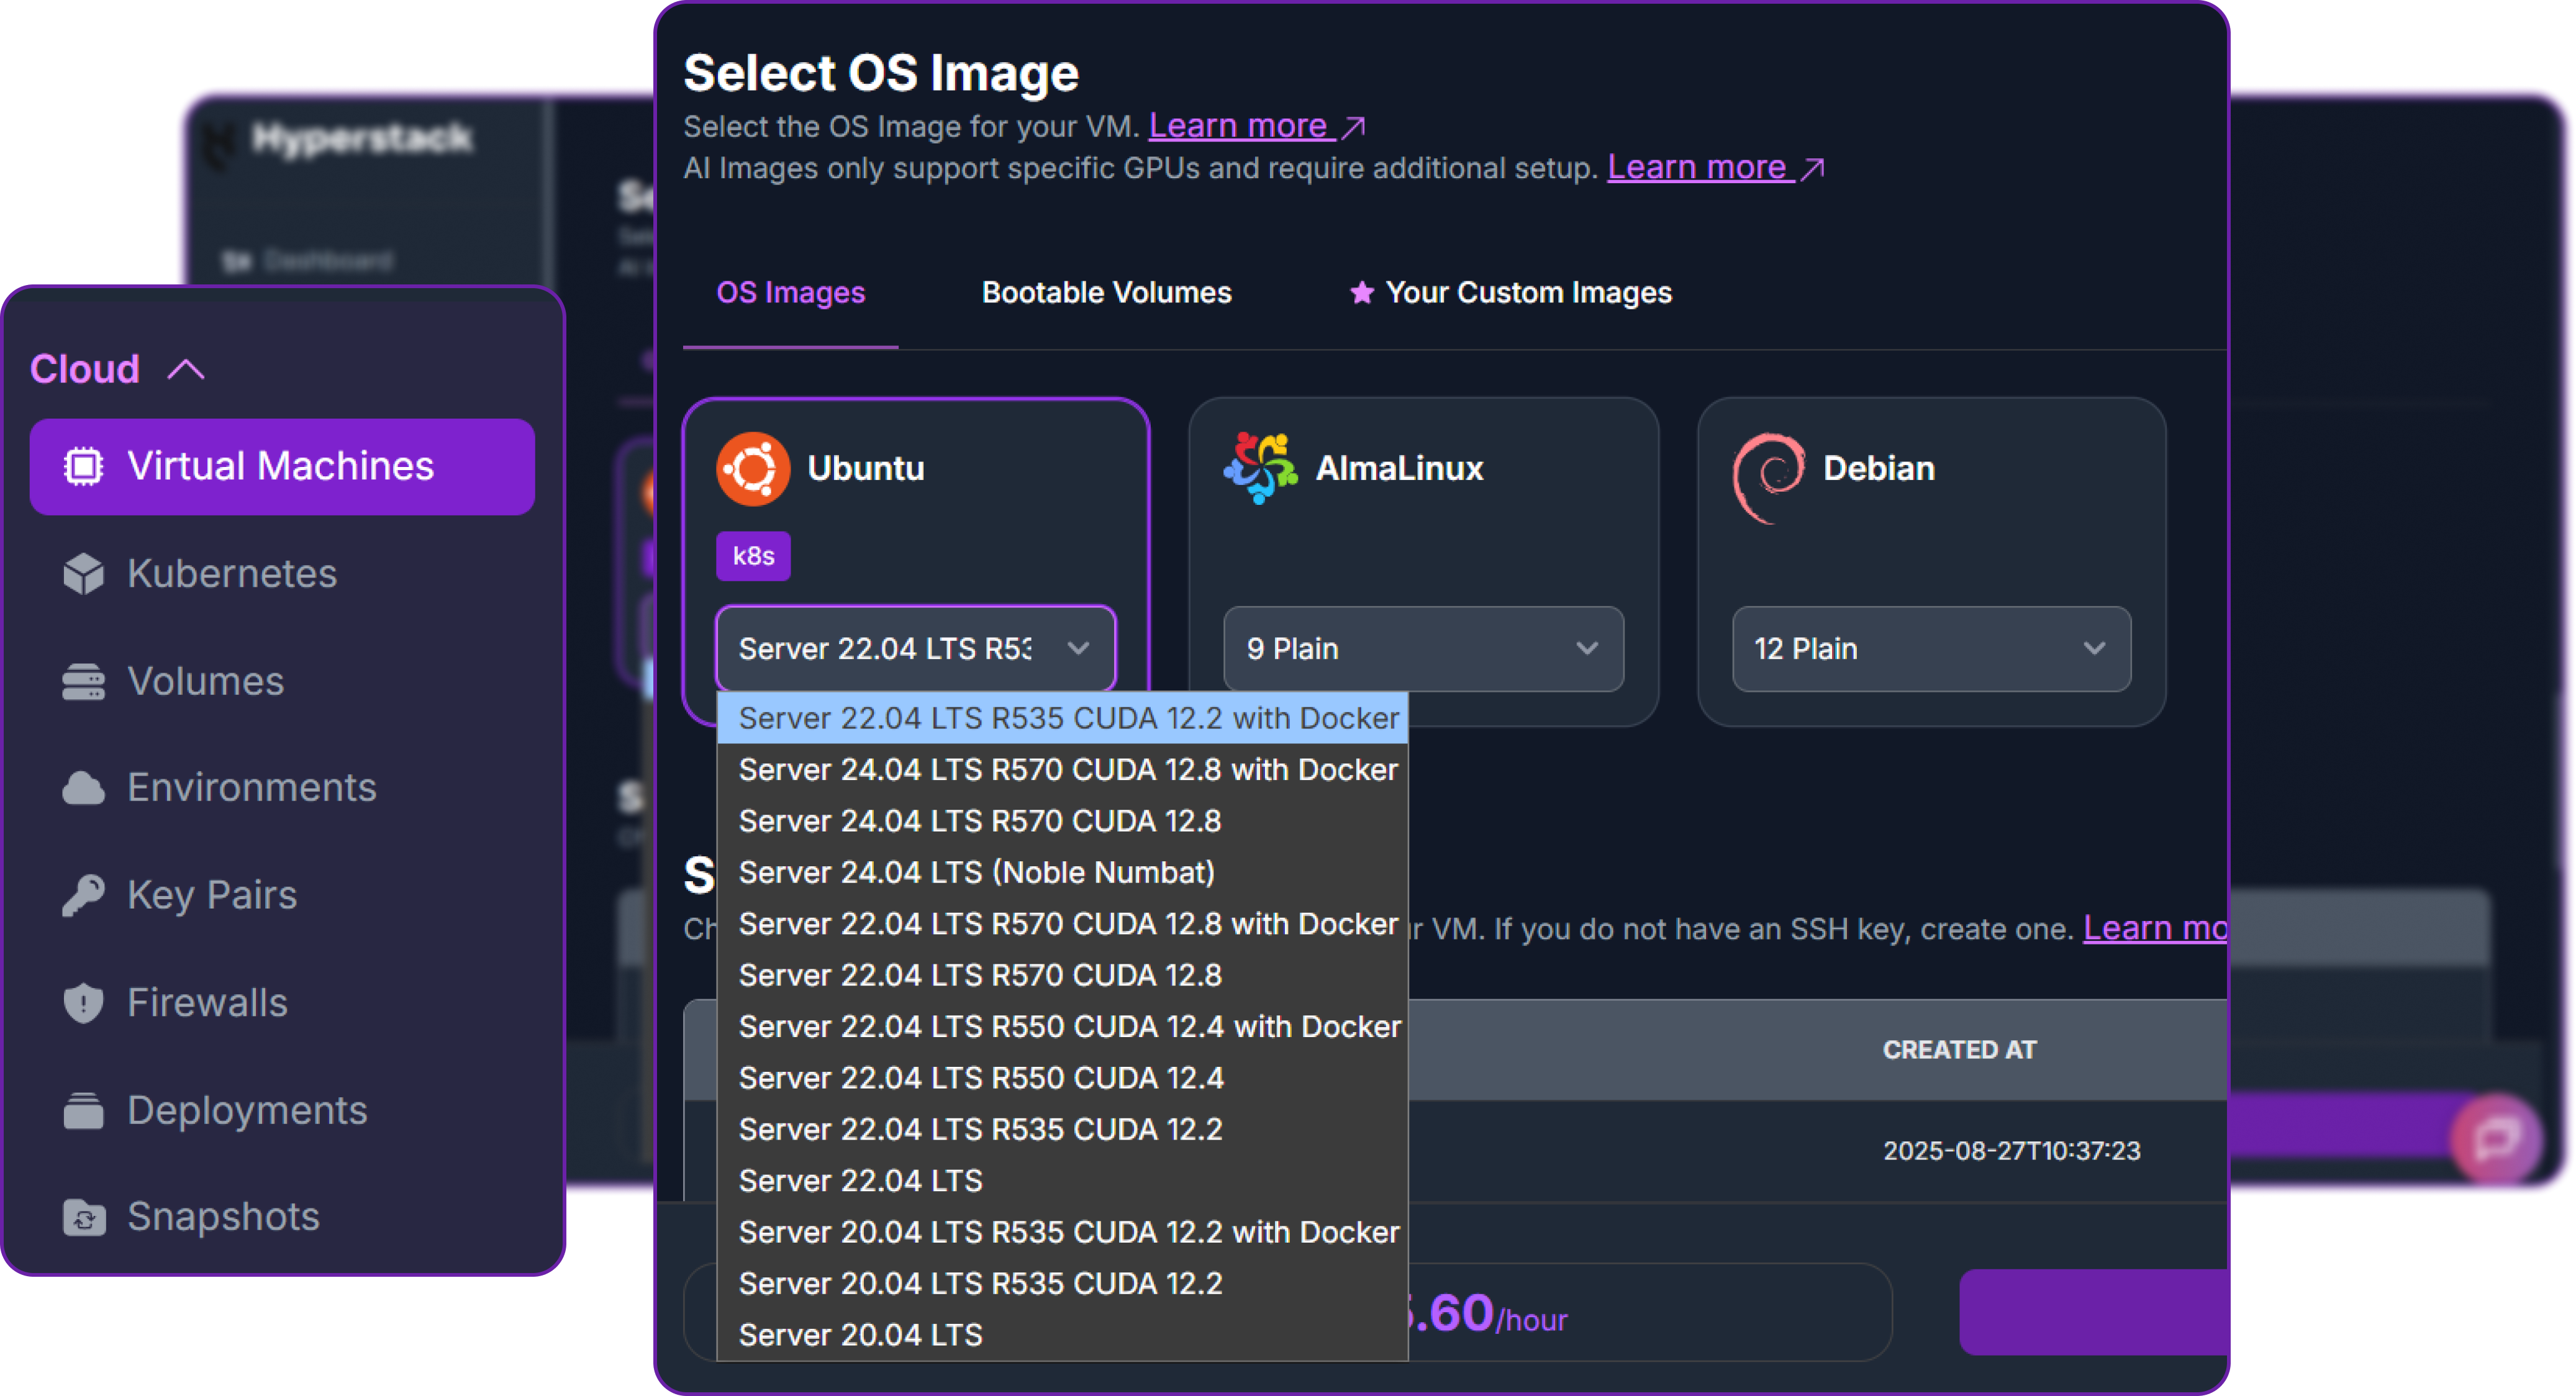
- Select a Keypair: Choose an existing SSH keypair from your account to securely access the VM.
- Network Configuration: Ensure you assign a Public IP to your Virtual Machine. This is crucial for remote management and connecting your local development tools.
- Review and Deploy: Double-check your settings and click the "Deploy" button.
Step 3: Accessing Your VM
Once your VM is running, you can connect to it.
-
Locate SSH Details: In the Hyperstack dashboard, find your VM's details and copy its Public IP address.
-
Connect via SSH: Open a terminal on your local machine and use the following command, replacing the placeholders with your information.
# Connect to your VM using your private key and the VM's public IP
ssh -i [path_to_your_ssh_key] ubuntu@[your_vm_public_ip]
Here you will replace [path_to_your_ssh_key] with the path to your private SSH key file and [your_vm_public_ip] with the actual IP address of your VM.
Once connected, you should see a welcome message indicating you're logged into your Hyperstack VM.
Now that we are inside the VM, we will use Docker to launch the vLLM server.
Step 4: Create a Model Cache Directory
We'll create a directory on the VM's high-speed ephemeral disk. Storing the model here ensures faster loading times on startup.
# Create a directory for the Hugging Face model cache
sudo mkdir -p /ephemeral/hug

# Grant full read/write permissions to the directory
sudo chmod -R 0777 /ephemeral/hug
This command creates a folder named hug inside the /ephemeral disk and sets its permissions so that the Docker container can read and write the model files.
Step 5: Launch the vLLM Server
We will use the latest vllm-openai Docker image, note that we are using specific flags like --tool-call-parser to enable the advanced agentic features of Qwen3.6.
# Pull the latest vLLM OpenAI image from Docker Hub
docker pull vllm/vllm-openai:latest

# Run the container with the specified configuration
docker run -d \
 --gpus all \
 --ipc=host \
 --network host \
 --name vllm_qwen36 \
 -e VLLM_ALLREDUCE_USE_SYMM_MEM=0 \
 -v /ephemeral/hug:/root/.cache/huggingface \
 vllm/vllm-openai:latest \
 Qwen/Qwen3.6-35B-A3B \
 --tensor-parallel-size 8 \
 --max-model-len 262144 \
 --enforce-eager \
 --reasoning-parser qwen3 \
 --enable-auto-tool-choice \
 --tool-call-parser qwen3_coder \
 --gpu-memory-utilization 0.90 \
 --host 0.0.0.0 \
 --port 8000
This command instructs Docker to:
--gpus all: Use all available NVIDIA GPUs on the host machine.--ipc=host: Share the host’s IPC namespace to improve multi-GPU communication performance.--network host: Expose the container directly on the host network for simpler API access.-v /ephemeral/hug:/root/.cache/huggingface: Mount the Hugging Face cache directory to persist downloaded model weights and avoid re-downloading.Qwen/Qwen3.6-35B-A3B: Load theQwen/Qwen3.6-35B-A3Bmodel from Hugging Face.--tensor-parallel-size 8: Split the model across 8 GPUs for large-scale tensor parallelism.--max-model-len 262144: Set the maximum supported context length to 262,144 tokens.--reasoning-parser qwen3: Enable the Qwen3 reasoning parser for structured reasoning outputs.--enable-auto-tool-choice: Allow the model to automatically decide when to invoke tools.--tool-call-parser qwen3_coder: Use the Qwen3 coder-specific tool-call parser for agent-style tool interactions.--gpu-memory-utilization 0.90: Allocate up to 90% of available GPU memory for model weights and KV cache.
Step 6: Verify the Deployment
First, check the container logs to monitor the model loading process. This may take several minutes.
docker logs -f vllm_qwen36
The process is complete when you see the line: INFO: Uvicorn running on http://0.0.0.0:8000.
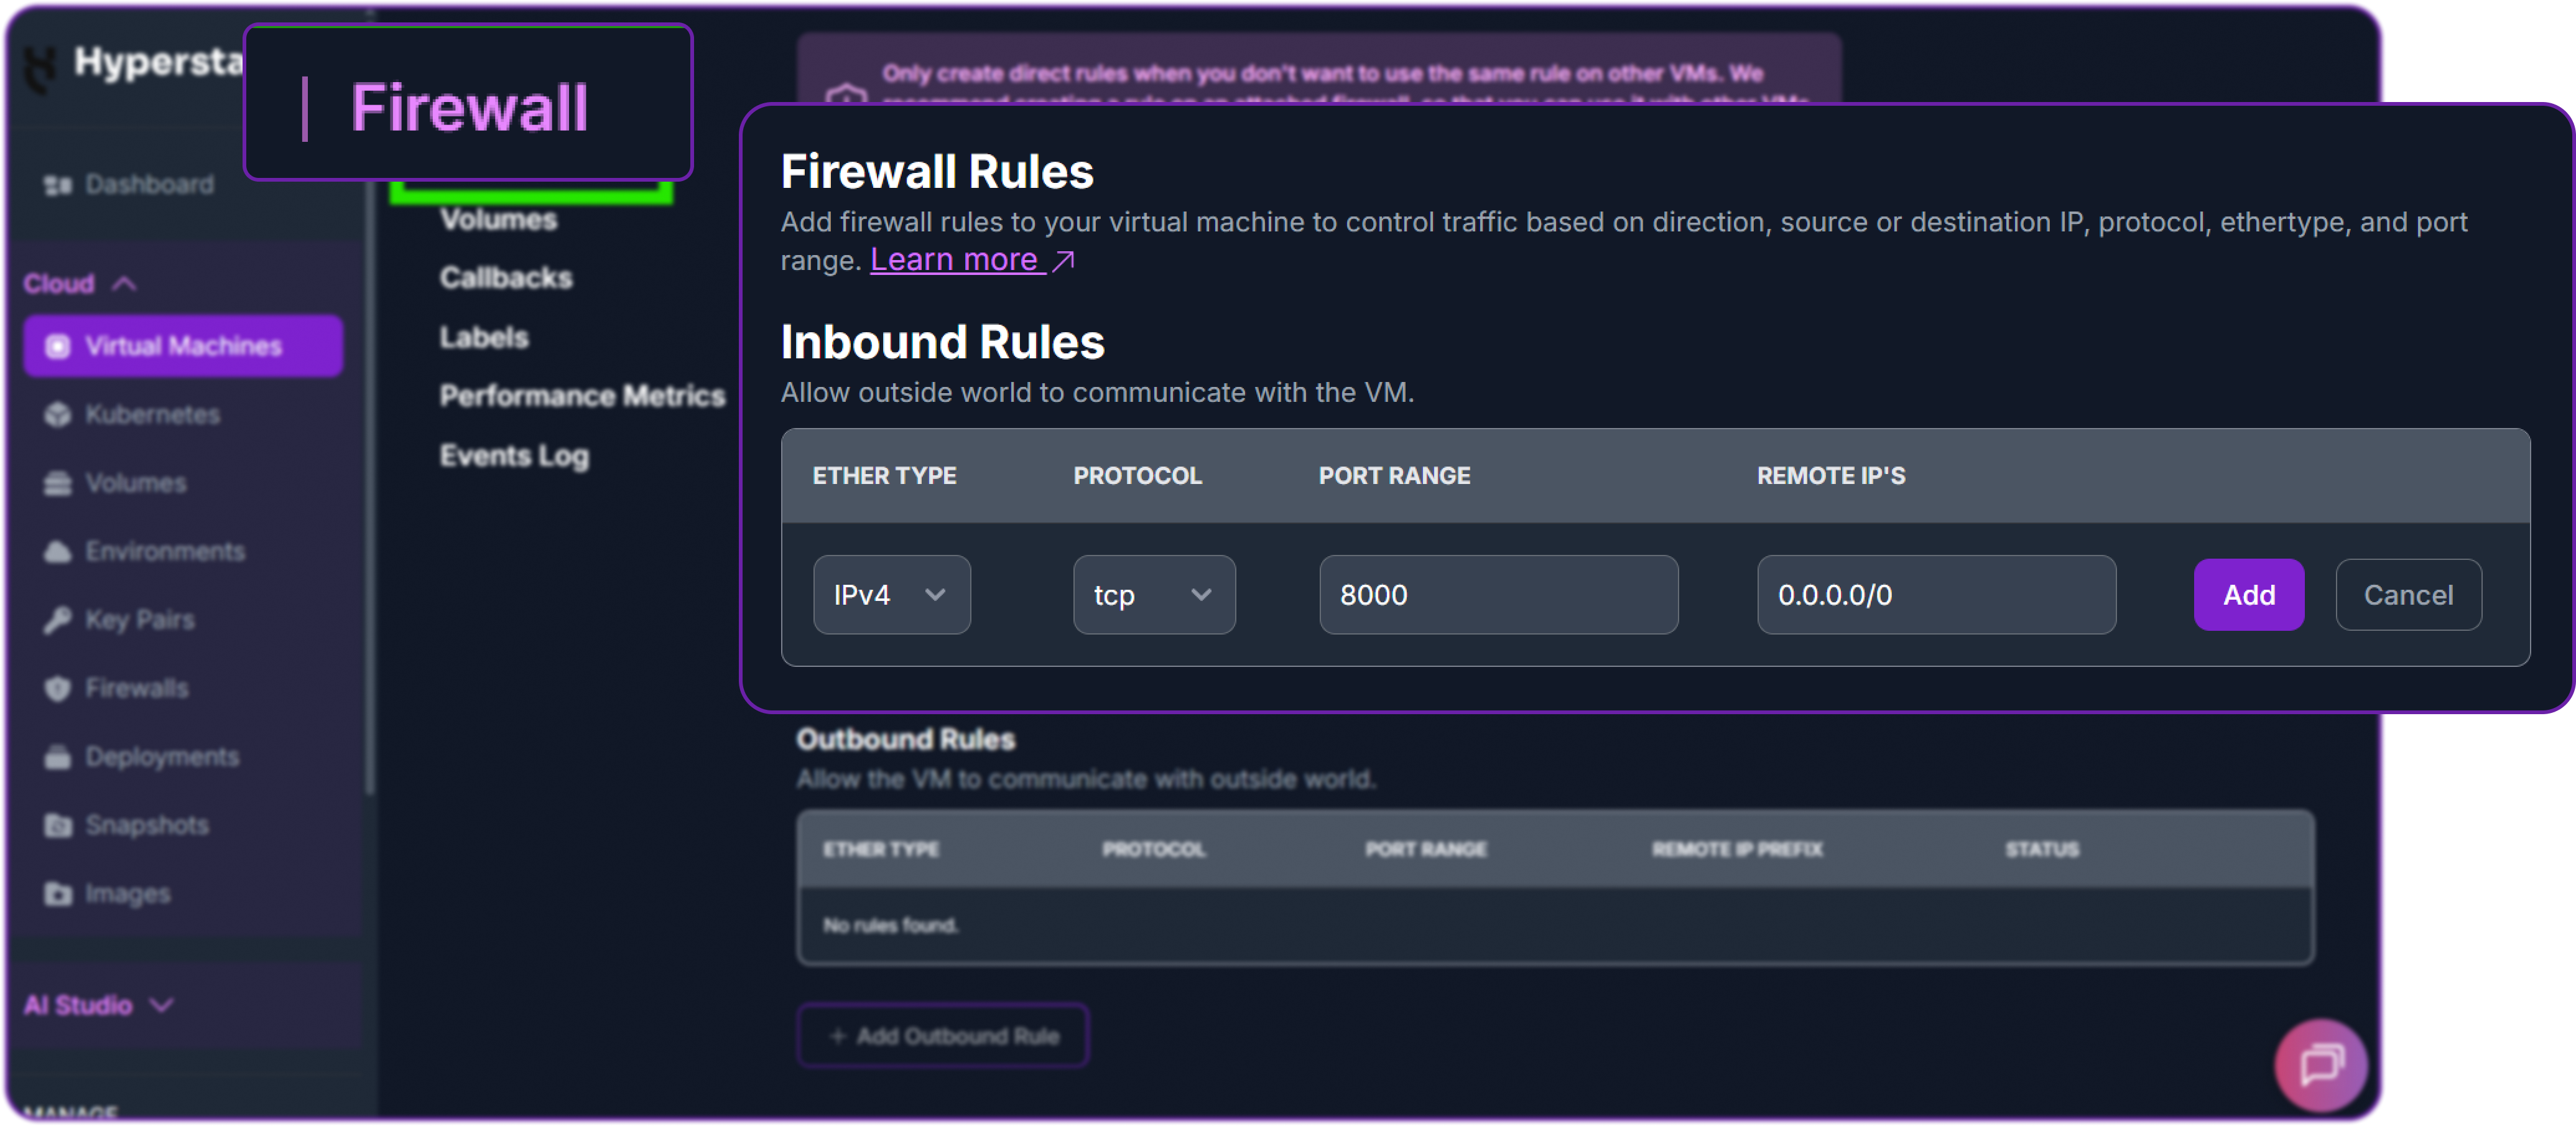
Next, add a firewall rule in your Hyperstack dashboard to allow inbound TCP traffic on port 8000. This is essential for external access.
Finally, test the API from your local machine (not the VM) by replacing the IP address with your VM's IP address.
# Test the API endpoint from your local terminal
curl http://<YOUR_VM_PUBLIC_IP>:8000/v1/chat/completions \
  -H "Content-Type: application/json" \
  -H "Authorization: Bearer EMPTY" \
  -d '{
    "model": "Qwen/Qwen3.6-35B-A3B",
    "messages": [
      {"role": "user", "content": "Type \"I love Qwen3.6\" backwards"}
    ],
    "max_tokens": 200,
    "temperature": 0.6,
    "top_p": 0.95,
    "extra_body": {
        "top_k": 20
    }
  }'
You can see that we have a successful response as a JSON object containing the model reply:
{
  "id": "chatcmpl-b290028506a93865",
  "object": "chat.completion",
  "created": 1771864485,
  "model": "Qwen/Qwen3.6-35B-A3B",
  "choices": [
    {
      "index": 0,
      "message": {
        "role": "assistant",
        "content": "Thinking Process:\n\n1. **Analyze the Request:**\n   * Input: \"Type \"I love Qwen3.6\" backwards\"\n   * Task: Reverse the string \"I love Qwen3.6\".\n\n2. **Perform the Reversal:**\n   * Original string: `I love Qwen3.6`\n   * Reversed: `6.3newQ evol I`\n\n3.",
        ...
      },
      "finish_reason": "stop"
    }
  ],
  ...
}Note that Qwen team recommends using the following set of sampling parameters for generation:
# Thinking mode for general tasks
temperature=1.0, top_p=0.95, top_k=20, min_p=0.0,
presence_penalty=1.5, repetition_penalty=1.0

# Thinking mode for precise coding tasks (e.g. WebDev)
temperature=0.6, top_p=0.95, top_k=20, min_p=0.0,
presence_penalty=0.0, repetition_penalty=1.0

# Instruct (or non-thinking) mode for general tasks
temperature=0.7, top_p=0.8, top_k=20, min_p=0.0,
presence_penalty=1.5, repetition_penalty=1.0

# Instruct (or non-thinking) mode for reasoning tasks
temperature=1.0, top_p=0.95, top_k=20, min_p=0.0,
presence_penalty=1.5, repetition_penalty=1.0
You can see that our model is responding correctly to our query which means Qwen/Qwen3.6-35B-A3B is successfully deployed on Hyperstack.
Step 7: Hibernating Your VM (OPTIONAL)
When you are finished with your current workload, you can hibernate your VM to avoid incurring unnecessary costs:
- In the Hyperstack dashboard, locate your Virtual machine.
- Look for a "Hibernate" option.
- Click to hibernate the VM, which will stop billing for compute resources while preserving your setup.
Disabling "Thinking" Style for Concise Responses
Now that we have successfully deployed the vLLM server with the Qwen 3.6 model, we can interact with it using the OpenAI API format. First, we need to install the OpenAI Python client library to send requests to our local vLLM server.
# Install the OpenAI Python client library to interact with the vLLM server
pip3 install openai
We can now instantiate an OpenAI-compatible client in Python that points to our local vLLM server. Since vLLM typically does not enforce API keys, we can use a placeholder value for the api_key parameter.
from openai import OpenAI

# Create an OpenAI-compatible client that points to a local vLLM server.
client = OpenAI(
    base_url="http://localhost:8000/v1",  # Local API endpoint exposing OpenAI-style routes
    api_key="EMPTY",                      # Placeholder key; vLLM typically does not enforce API keys
)
Since Qwen 3.6 is a thinking model with advanced reasoning capabilities, but thinking requires more tokens and may not be suitable for all use cases, we can disable the "thinking" style on inference to get more concise responses.
This can be useful when tasks are pretty straightforward and don't require the model to show its internal reasoning process, such as simple code generation or direct question answering.
# Define the conversation payload sent to the model.
# Here, the user asks for a short Python script that reverses a string.
messages = [
    {"role": "user", "content": "Write a quick Python script to reverse a string."}
]

# Send a chat completion request to the local vLLM server via the OpenAI-compatible client.
chat_response = client.chat.completions.create(
    model="Qwen/Qwen3.6-35B-A3B",         # Model to use for generation
    messages=messages,                    # Chat history / prompt messages
    max_tokens=500,                       # Maximum number of tokens in the model response
    temperature=0.7,                      # Sampling randomness (higher = more creative)
    top_p=0.8,                            # Nucleus sampling threshold
    presence_penalty=1.5,                 # Penalize repeated topics to encourage novelty
    extra_body={
        "top_k": 20,                      # Restrict sampling to top-k candidates
        "chat_template_kwargs": {
            "enable_thinking": False      # Disable internal "thinking" style output
        },
    },
)
In here we are asking the model to generate a Python script that reverses a string. By setting enable_thinking to False, we are instructing the model to skip the detailed reasoning process and directly provide the final answer, which should be a concise Python code
Finally, we can print the generated response from the model, which should contain a Python script that reverses a string.
# Print the generated text from the first returned choice.
print("Chat response:", chat_response.choices[0].message.content)
This is what we are getting:
Chat response: Here is a quick and efficient Python script to reverse a string using slicing:

```python
def reverse_string(text):
    return text[::-1]

# Example usage
if __name__ == "__main__":
    user_input = input("Enter a ...
Our Qwen 3.6 model successfully generated a Python script that reverses a string, and it did so without including the internal "thinking" process in the output, resulting in a concise and direct answer.
Multimodal Capabilities with Qwen 3.6
Qwen 3.6 is also a multimodal model, which means it can process and understand both text and images. This allows us to create prompts that include images along with text questions, and the model can analyze the image to provide relevant answers.
For example, we can build a multimodal chat prompt that includes an image URL and a text question about the image.
# Build a multimodal chat prompt with one user message:
# - an image URL
# - a text question about the image
messages = [
    {
        "role": "user",
        "content": [
            {
                "type": "image_url",
                "image_url": {
                    # Public image to analyze
                    "url": "https://qianwen-res.oss-accelerate.aliyuncs.com/Qwen3.5/demo/RealWorld/RealWorld-04.png"
                }
            },
            {
                "type": "text",
                # Question for the model based on the provided image
                "text": "Where is this?"
            }
        ]
    }
]
In our messages payload, we have a single user message that contains two parts: an image URL and a text question. The model will process the image at the provided URL and attempt to answer the question "Where is this?" based on the visual content of the image.
# Send the request to the local vLLM server via OpenAI-compatible client
chat_response = client.chat.completions.create(
    model="Qwen/Qwen3.6-35B-A3B",         # Model identifier
    messages=messages,                    # Multimodal user prompt
    max_tokens=600,                       # Max tokens in generated response
    temperature=0.6,                      # Sampling randomness
    top_p=0.95,                           # Nucleus sampling threshold
    extra_body={
        "top_k": 20,                      # Restrict sampling to top-k candidates
    },
)

# Print the first completion text returned by the model
print("Chat response:", chat_response.choices[0].message.content)
We can initialize the OpenAI-compatible client and send the multimodal prompt to our local vLLM server. This is what we get back from the model:
Chat response: The user wants to know the location of the image.

1.  **Analyze the image:**
    *   **Foreground:** There's a large statue of a person (looks like
        an indigenous figure) with a golden headband.
        Below it, there's a sign that says "@rigen" in a cursive font.
        There's also a colorful floor or platform. ...
You can see that the model is able to analyze the image and provide a detailed response about its content, demonstrating its multimodal understanding capabilities.
We can also process video inputs in a similar way by providing a video URL in the prompt. The model can analyze the video frames and answer questions about the video content.
# Build a multimodal prompt:
# - one video input (URL)
# - one text question about the video content
messages = [
    {
        "role": "user",
        "content": [
            {
                "type": "video_url",
                "video_url": {
                    # Public video to analyze
                    "url": "https://qianwen-res.oss-accelerate.aliyuncs.com/Qwen3.5/demo/video/N1cdUjctpG8.mp4"
                }
            },
            {
                "type": "text",
                # Question based on the video
                "text": "How many porcelain jars were discovered in the niches located in the primary chamber of the tomb?"
            }
        ]
    }
]
In our messages payload, we have a user message that includes a video URL and a text question about the video content.
# Send the chat completion request to the local vLLM server
chat_response = client.chat.completions.create(
    model="Qwen/Qwen3.6-35B-A3B",        # Model identifier
    messages=messages,                   # Multimodal conversation payload
    max_tokens=600,                      # Maximum tokens in response
    temperature=0.6,                     # Sampling randomness
    top_p=0.95,                          # Nucleus sampling threshold
    extra_body={
        "top_k": 20,                     # Restrict token sampling to top-k candidates
        # Video frame sampling config: sample frames at 2 FPS
        "mm_processor_kwargs": {"fps": 2, "do_sample_frames": True},
    },
)

# Print the generated answer from the first completion choice
print("Chat response:", chat_response.choices[0].message.content)
In here we are specifying additional parameters in the extra_body to configure how the model processes the video input. By setting do_sample_frames to True and specifying fps: 2, we are instructing the model to sample frames from the video at a rate of 2 frames per second for analysis.
This is what we get back from the model:
Chat response: The user is asking about the number of porcelain jars
discovered in the niches located in the primary chamber of a tomb, based
on the ...
You can see that the model is able to analyze the video content and provide a relevant response to the user's question, demonstrating its ability to understand and process video inputs in a multimodal context.
Agentic Use Case with Qwen 3.6
One of the most powerful features of Qwen/Qwen3.6-35B-A3B is its advanced agentic tool-calling capability.
Unlike a standard chat interaction where the model simply generates text, an agentic workflow allows the model to:
- Decide when external tools are needed
- Call tools automatically
- Receive tool outputs
- Continue reasoning using those outputs
- Complete multi-step tasks autonomously
Qwen team recommends using Qwen-Agent, a Python framework for building agent applications, to fully leverage these capabilities. First, let's install Qwen-Agent in your local Python environment:
# Install Qwen-Agent for building agent applications
pip3 install qwen-agent
We will configure Qwen-Agent to use our locally deployed vLLM server instead of external APIs.
import os
from qwen_agent.agents import Assistant

# Define LLM configuration pointing to our local vLLM server
llm_cfg = {
    # Use our OpenAI-compatible vLLM endpoint
    'model': 'Qwen/Qwen3.6-35B-A3B',
    'model_type': 'qwenvl_oai',
    'model_server': 'http://localhost:8000/v1',  # Local API endpoint
    'api_key': 'EMPTY',  # Placeholder key (vLLM does not enforce API keys)

    'generate_cfg': {
        'use_raw_api': True,
        # When using vLLM OpenAI-compatible API,
        # enable or disable thinking mode using chat_template_kwargs
        'extra_body': {
            'chat_template_kwargs': {'enable_thinking': True}
        },
    },
}
In this configuration, we are doing the following:
model_serverpoints to our local vLLM deployment.enable_thinkingis set toTrueto allow structured reasoning.use_raw_apiensures Qwen-Agent sends requests in OpenAI-compatible format.
Now we define a tool using the Model Context Protocol (MCP). This example uses the official MCP filesystem server.
# Define available tools for the agent
tools = [
    {
        'mcpServers': {
            # Filesystem MCP server configuration
            "filesystem": {
                "command": "npx",
                "args": [
                    "-y",
                    "@modelcontextprotocol/server-filesystem",
                    "/ephemeral/agent_workspace"  # Directory accessible to the agent
                ]
            }
        }
    }
]
This configuration:
- Launches an MCP filesystem server using
npx - Grants the model access to
/ephemeral/agent_workspace - Allows the model to read, write, edit, and organize files within that directory
For security purposes, it is recommended to expose only a dedicated workspace directory rather than the entire system.
Now we can initialize the agent with the specified LLM configuration and tools.
# Initialize the agent
bot = Assistant(llm=llm_cfg, function_list=tools)
At this point, the model is capable of:
-
Understanding user instructions
-
Deciding when to use filesystem tools
-
Executing file operations
-
Continuing reasoning after tool execution
Example 1: Organizing the Desktop
We now provide a user instruction that requires filesystem interaction.
# Streaming generation example
messages = [{'role': 'user', 'content': 'Help me organize my /ephemeral/agent_workspace desktop. There are many files and folders all over the place.'}]

# Run the agent with the provided messages and stream responses
for responses in bot.run(messages=messages):
    pass

# Print the final responses from the agent after processing the instruction
print(responses)
We are asking the agent to help organize the /ephemeral/agent_workspace desktop. The model will autonomously decide to use the filesystem tool to analyze the desktop contents, create folders, and move files accordingly.
This is what happens internally:
- The model analyzes the request.
- It decides that filesystem access is required.
- It calls the MCP filesystem tool.
- The tool returns file listings.
- The model generates a plan to organize files.
- It may create folders and move files accordingly.
- It returns a summary of actions performed.
I have included couple different files in the /ephemeral/agent_workspace desktop for testing. After running the above code, we get the following output from the agent:
<think>
Checking the contents of the desktop...
The desktop contains multiple files including documents, images, and scripts.

I created the following folders:
- Documents
- Images
...
You can see that the model is able to analyze the desktop contents, decide on an organizational structure, and perform file operations autonomously using the MCP filesystem tool.
Example 2: Develop a Website and Save It to the Desktop
Now we provide a more advanced instruction:
# Streaming generation example
messages = [{'role': 'user', 'content': 'Develop a cat website and save it on the /ephemeral/agent_workspace desktop.'}]

# Run the agent with the provided messages and stream responses
for responses in bot.run(messages=messages):
    pass

# Print the final responses from the agent after processing the instruction
print(responses)
In here, we are asking the agent to develop a cat-themed website and save it on the /ephemeral/agent_workspace desktop.
This is what happens internally:
- The model interprets the request.
- It generates HTML content for a cat-themed website.
- It calls the filesystem tool.
- It creates
index.htmlin the specified directory. - It writes the generated HTML code into the file.
- It confirms completion.
I have created a file named "index.html" on the desktop.

The website includes:
- A header section
- A description of cats
- An image placeholder
- Basic styling with CSS

You can open the file in your browser to view the website.
The actual directory now contains:
/ephemeral/agent_workspace/index.htmlThis file can be opened directly in a browser. This is what our simple website looks like:

Perfect, it includes a header, description, image placeholder, and basic styling, all generated autonomously by the agent using the Qwen 3.6 model and the MCP filesystem tool.
Integration with Third-Party Coding Assistants
Qwen3.6 advanced reasoning and multimodal capabilities make it an ideal backend for third-party coding assistants and since we have hosted it on Hyperstack, it can be easily integrated with various tools and platforms. Let's look how this is possible.
Integrating with Claude Code
Since we are running our vLLM server with an OpenAI-compatible API, we can integrate it with any tool that supports OpenAI-style endpoints, such as Claude Code.
When we deploy the Qwen/Qwen3.6-35B-A3B model with the --reasoning-parser qwen3 and --tool-call-parser qwen3_coder flags, we can leverage the advanced agentic features of Qwen 3.6 directly within the Claude Code environment.
By default, the server runs on port 8000. You can point Claude Code to your local vLLM instance by setting the following environment variables before launching the application:
# Point Claude Code to the local vLLM server
export ANTHROPIC_BASE_URL="http://localhost:8000"
export ANTHROPIC_API_KEY="dummy"
export ANTHROPIC_AUTH_TOKEN="dummy"

# Specify the model name for all tiers
export ANTHROPIC_DEFAULT_OPUS_MODEL="Qwen/Qwen3.6-35B-A3B"
export ANTHROPIC_DEFAULT_SONNET_MODEL="Qwen/Qwen3.6-35B-A3B"
export ANTHROPIC_DEFAULT_HAIKU_MODEL="Qwen/Qwen3.6-35B-A3B"

# Launch Claude Code
claude
Environment Variables Overview
| Variable | Description |
|---|---|
| ANTHROPIC_BASE_URL | Points to your vLLM server (default: http://localhost:8000). |
| ANTHROPIC_API_KEY | Required by the client; can be any dummy value for local vLLM. |
| ANTHROPIC_AUTH_TOKEN | Required placeholder for the Claude authentication layer. |
| ANTHROPIC_DEFAULT_OPUS_MODEL | The specific Qwen model identifier to use for the "Opus" tier. |
Efficiency Tip: You can add these environment variables to your shell profile (e.g., .bashrc or .zshrc) or define them within the Claude Code settings file at ~/.claude/settings.json for a persistent setup.
Performance Warning: Claude Code recently began injecting a per-request hash in the system prompt. This can break prefix caching because the prompt changes on every request. While fixed in vLLM > 0.17.1, users on older versions should add "CLAUDE_CODE_ATTRIBUTION_HEADER": "0" to the "env" section of their settings.
Once Claude Code launches, verify the connection with a simple prompt:

If the model responds correctly, your local agentic coding environment is fully operational. You can now leverage Qwen 3.6's reasoning capabilities directly for complex development tasks.
Deployment with OpenClaw
The reasoning-heavy architecture of Qwen 3.6 makes it a perfect engine for OpenClaw, a powerful, self-hosted open-source AI agent. By utilizing our local vLLM server as the backend, you can experience a fully autonomous coding environment directly in your terminal without relying on external API latency.
To begin, install the OpenClaw CLI and prepare your environment. Since our vLLM container is already running with --tool-call-parser qwen3_coder, OpenClaw will be able to execute complex file operations and terminal commands automatically.
# Install OpenClaw (Requires Node.js 22+)
curl -fsSL https://molt.bot/install.sh | bash

# Set a dummy API key for the local vLLM endpoint
export OPENCLAW_API_KEY="EMPTY"

# Launch the OpenClaw Dashboard
openclaw dashboard
Configuring the Local Provider
To bridge OpenClaw to your vLLM container, you need to modify the configuration file located at ~/.openclaw/openclaw.json. Merge the following provider block into your existing settings to point the agent to your local GPU resources:
{
  "models": {
    "providers": {
      "local-vllm": {
        "baseUrl": "http://localhost:8000/v1",
        "apiKey": "EMPTY",
        "api": "openai-completions",
        "models": [
          {
            "id": "Qwen/Qwen3.6-35B-A3B",
            "name": "Qwen-3.6-Local",
            "reasoning": true,
            "contextWindow": 262144
          }
        ]
      }
    }
  }
}Configuration Tip: Ensure that the id in the JSON file matches the exact model name used in your docker run command. This allows the OpenClaw orchestrator to correctly route agentic instructions to the vLLM reasoning parser.
Once configured, you can launch the OpenClaw TUI by running openclaw tui in a new terminal window. From here, you can provide high-level coding instructions, and the Qwen-backed agent will autonomously begin architecting your project, utilizing the full power of your local H100 or A100 infrastructure.
Terminal Efficiency with Qwen Code
For developers seeking a first-party experience, Qwen Code is a dedicated terminal-based AI agent engineered specifically to exploit the unique architectural strengths of the Qwen series. By pairing Qwen Code with your local Qwen 3.6-35B deployment, you get an ultra-low latency coding assistant that understands your local environment perfectly.
The Qwen Code CLI allows for deep interaction with your local files and system commands. Use the following steps to install the global package and initialize your first agentic session:
# Install the Qwen Code CLI (Requires Node.js 20+)
npm install -g @qwen-code/qwen-code@latest

# Launch the interactive terminal agent
qwen
Authentication and Setup
Upon your first launch, the CLI will guide you through an authentication process. While Qwen Code is optimized for Model Studio cloud endpoints, you can easily redirect it to your local vLLM instance (running at localhost:8000) to maintain data privacy and leverage your own GPU hardware.
# Within the Qwen Code session, use these commands to manage settings:

/auth    # Configure your API credentials or switch providers
/help # Access the full list of agentic terminal commandsOptimization Tip: To get the most out of Qwen Code locally, ensure your vLLM server is started with the --enable-auto-tool-choice flag. This allows the Qwen Code agent to autonomously decide when to use terminal "tools" (like file searching or package installation) to complete your requests more accurately.
With Qwen Code initialized, you can perform complex, multi-step operations like "Refactor all files in /src to use async/await" or "Write unit tests for the authentication controller," with the model reasoning through every step on your own secure infrastructure.
Why Deploy Qwen3.6 on Hyperstack?
Hyperstack is a cloud platform specifically engineered to accelerate AI and machine learning workloads. Here is why it’s the definitive choice for Qwen3.6:
Access the latest GPUs like the NVIDIA H100 on-demand, purpose-built for large language models.
One-click deployments and pre-configured environments remove the complexity of setting up advanced AI architectures.
Instantly scale your GPU resources up or down to match your real-time computational demands.
Pay only for what you use with our highly competitive GPU pricing model.
Hyperstack offers native compatibility with the most popular AI frameworks and diagnostic tools.

FAQs
What is Qwen3.6?
Qwen 3.6 is an open-weight vision-language model using a sparse MoE architecture (35B total, ~3B active), delivering strong reasoning with high efficiency.
What is Qwen 3.6's context window?
Qwen 3.6 supports 262K tokens natively, extendable up to ~1M tokens for very large inputs like codebases or long documents.
Does Qwen 3.6 support “thinking” mode?
Yes. Qwen 3.6 uses structured reasoning and can retain prior logic across turns, improving consistency in multi-step tasks.
What hardware is needed for Qwen 3.6?
Qwen 3.6 can run on a single high-end GPU (e.g., A100/H100). Larger setups are recommended for heavy workloads or long contexts.
What are the main use cases of Qwen 3.6?
Qwen 3.6 is best for agentic coding, full-project reasoning, UI/visual understanding, and complex multimodal tasks.
Subscribe to Hyperstack!
Enter your email to get updates to your inbox every week

