
.png)
TABLE OF CONTENTS
AI-powered developer tools have changed the way we write and maintain code. Instead of juggling multiple platforms and documentation, we now have intelligent assistants that live right inside our IDEs. Among the growing ecosystem of AI coding partners, Kilo Code stands out for its flexibility, open-source friendliness, and deep integration with multiple large language model (LLM) providers.
In this blog, we will explore how to integrate Hyperstack AI Studio with Kilo Code inside VS Code a combination that gives us full control over which AI model powers our workflow.
We’ll start by understanding what Kilo Code is, why it’s useful, then we will discuss Hyperstack AI Studio and its role in powering intelligent code generation. Finally, we’ll walk through detailed, step-by-step instructions to connect them together and testing examples.
Understanding Kilo Code
What is Kilo Code?
So, Kilo Code is an AI-first development tool that acts as a multi-agent coding assistant inside your editor including VS Code. It’s built to help developers accelerate software development through intelligent automation, multi-agent collaboration, and natural-language understanding.
Kilo Code transforms our editor into a smart environment that can:

- Understand our codebase contextually
- Generate, refactor, and debug code through natural language
- Execute tasks using specialized AI agents (like Ask, Code, Debug, Architect, etc.)
- Integrate with multiple LLM providers including OpenAI, Anthropic, and of course, Hyperstack AI Studio
It’s essentially our AI dev team inside VS Code, designed to automate repetitive work so we can focus on what truly matters: architecture, design, and problem-solving.
Why use Kilo Code?
We use Kilo Code because it bridges the gap between AI-powered reasoning and real software engineering. Some reasons it stands out include:
- Agentic Workflow: different AI agents specialize in coding, debugging, documentation, and refactoring.
- Cross-Model Flexibility: supports OpenAI, local, and third-party APIs (like Hyperstack).
- Deep VS Code Integration: built directly into our favorite editor.
- Contextual Intelligence: understands our repo, dependencies, and structure for more accurate responses.
- Open Ecosystem: supports custom LLMs, open-source integrations, and BYOK (bring-your-own-key) setups.
In short, Kilo Code allows us to customize how our AI assistant works and with Hyperstack, we can customize which model it runs on.
What is Hyperstack AI Studio and why does it matter?
Hyperstack AI Studio is a complete generative AI platform that allows us to train, deploy, fine-tune, and monitor large language models all from one place. It’s built for developers and enterprises who want full control over their model stack without managing infrastructure.
Here’s why Hyperstack is the perfect match for Kilo Code:
- OpenAI-Compatible API: Works natively with Kilo’s “OpenAI provider” option.
- Flexible Model Choices: Choose between lightweight or heavy-duty LLMs for different coding tasks.
- Custom Fine-Tuning: Train your model on your company’s codebase and plug it into Kilo for personalized responses.
- Fast Benchmarking: Evaluate how your model performs before deploying it in your dev workflow.
- Playground Testing: Experiment interactively in Hyperstack before connecting to Kilo.
- Scalable & Secure: Get enterprise-grade model hosting with data privacy.
- Cost-Effective: Only pay for what you use, while enjoying GPU-backed performance.
So in our workflow, Hyperstack acts as the model layer, while Kilo Code is the user interface. Together, they make a complete, intelligent, and fully customizable AI development environment.
Integration of Hyperstack AI Studio with Kilo Code in VS Code
Now that we understand both tools, let’s walk through how to actually connect them.
Step 1: Download and Install VS Code
First, we will need to install Visual Studio Code if we haven’t already.
- Visit their official website to download the installer.
- Click on Download for your OS.

- Once downloaded, run the installer and follow the setup instructions.

Once the installation completes, open VS Code from your desktop or applications menu.
Great, so now we have VS Code installed, we can move on to adding the Kilo Code extension.
Step 2: Install the Kilo Code Extension
Now that we have VS Code ready, let’s add the Kilo Code extension that will allow us to interact with AI agents directly inside our editor.
- Open VS Code.
- Click on the Extensions icon on the left sidebar or press
Ctrl + Shift + X(Windows/Linux) orCmd + Shift + X(macOS). - Search for “Kilo Code” in the marketplace search bar.
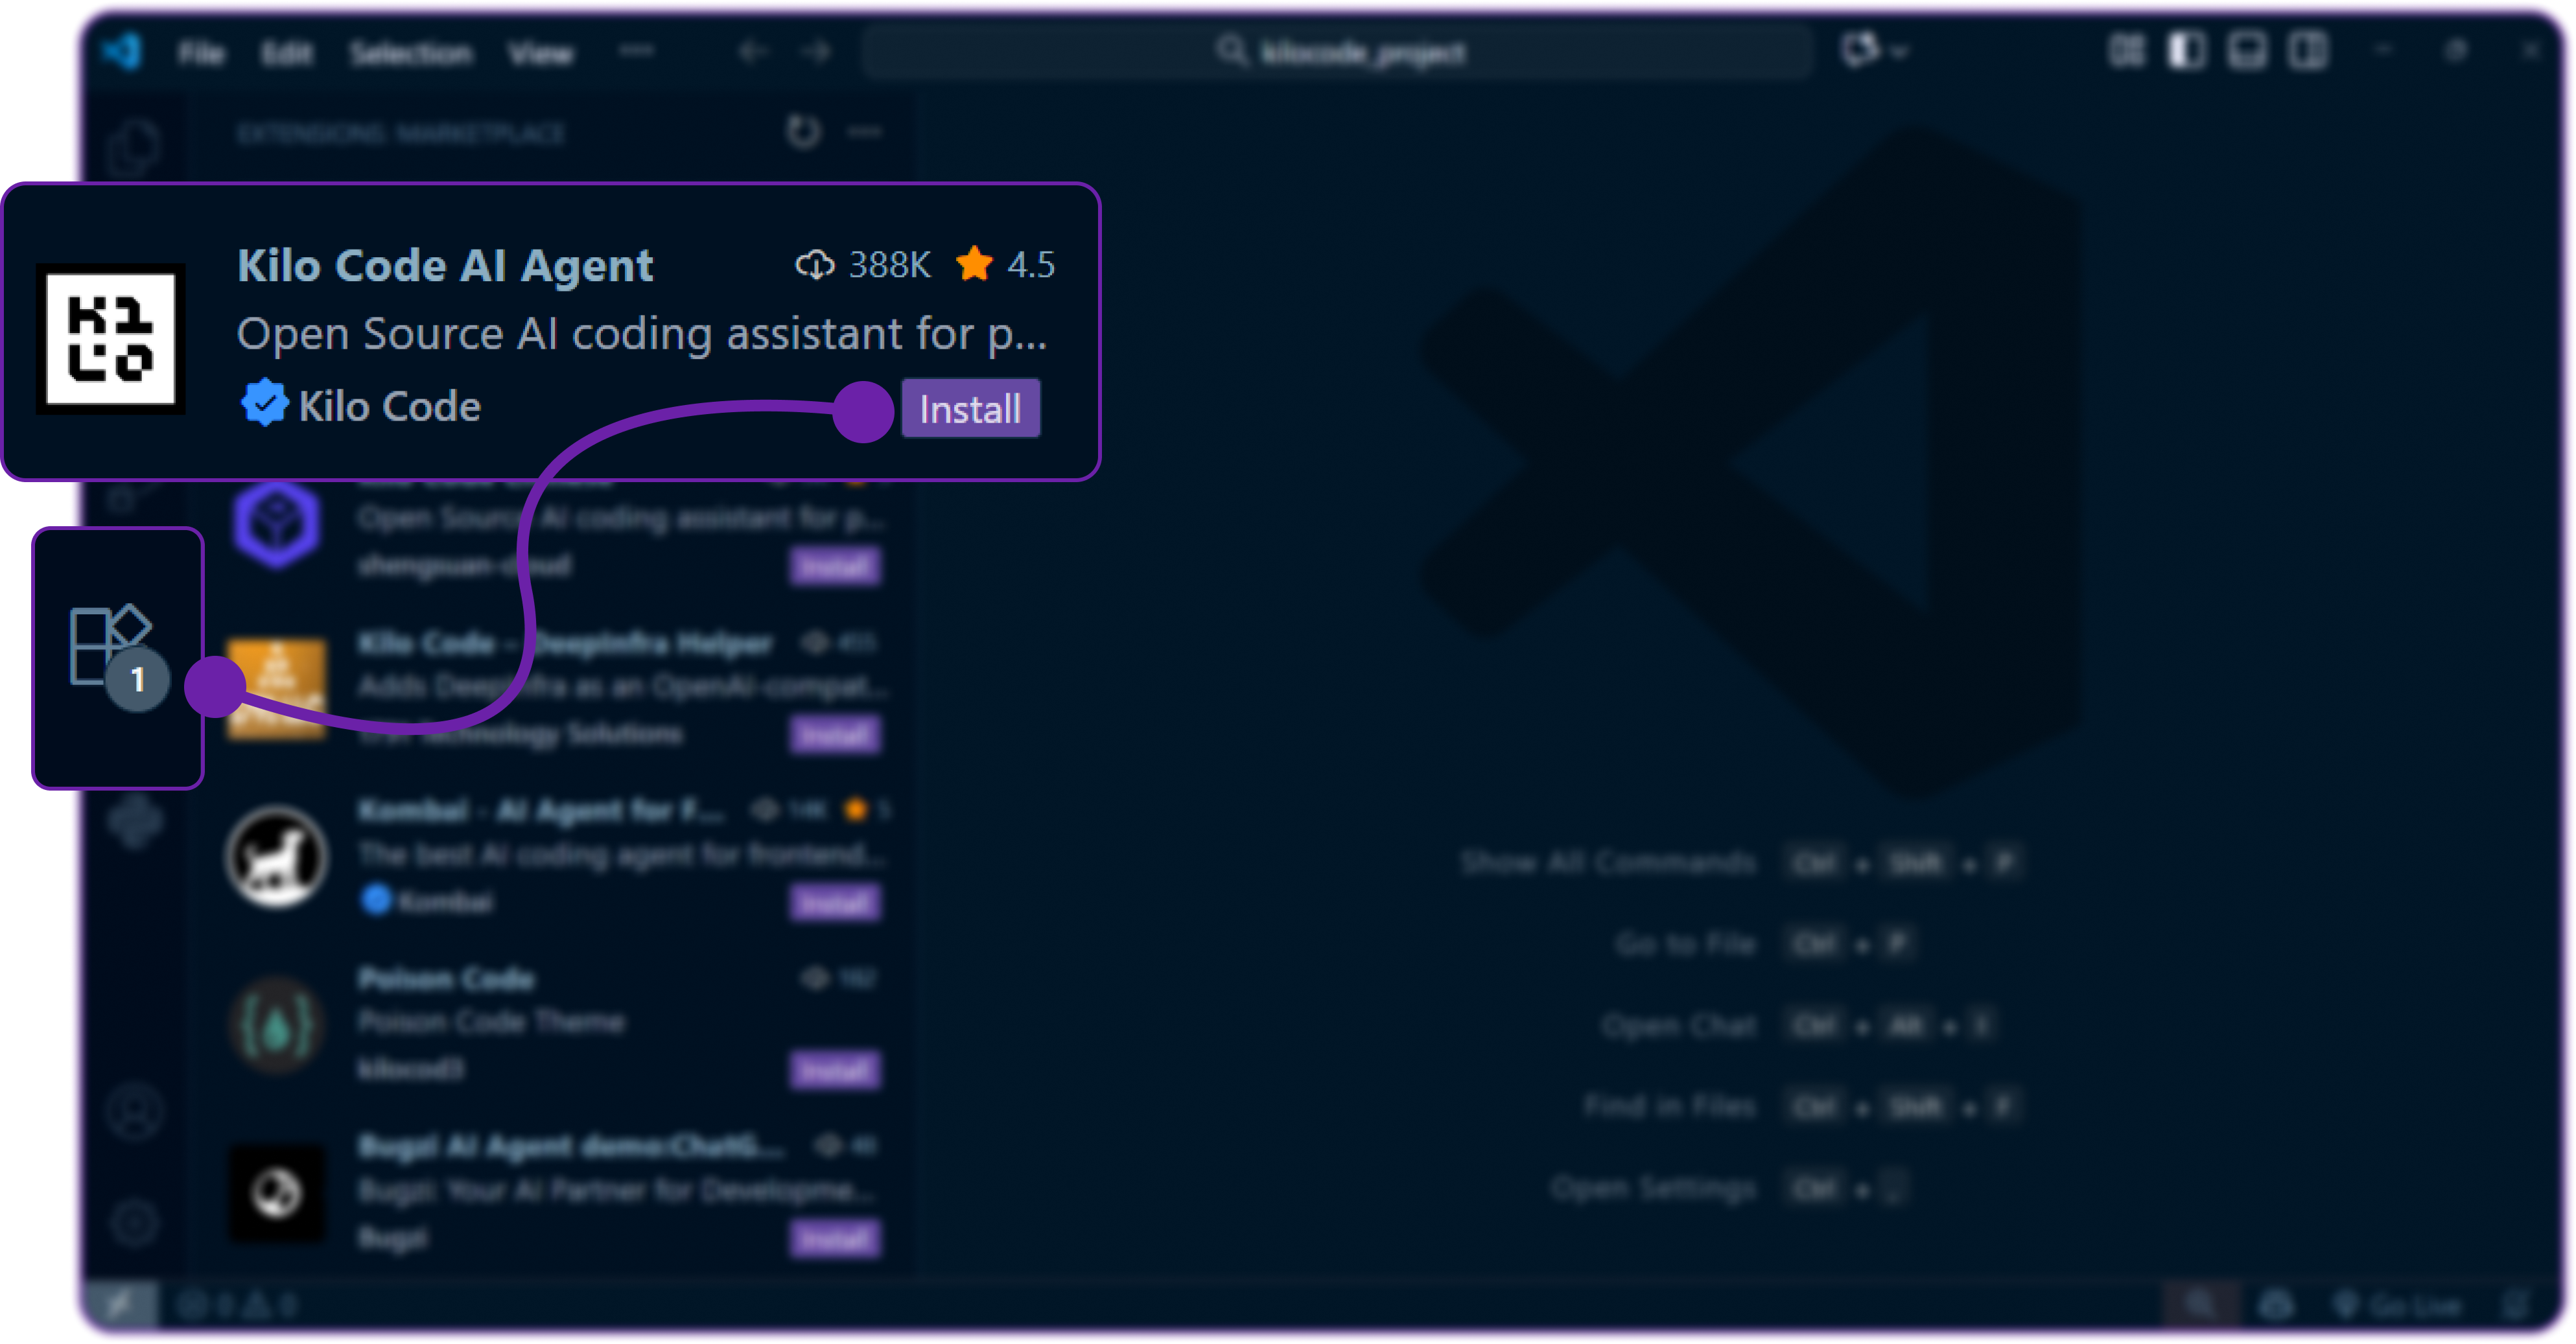
- Click Install and it will start downloading the extension and add it to your VS Code environment.
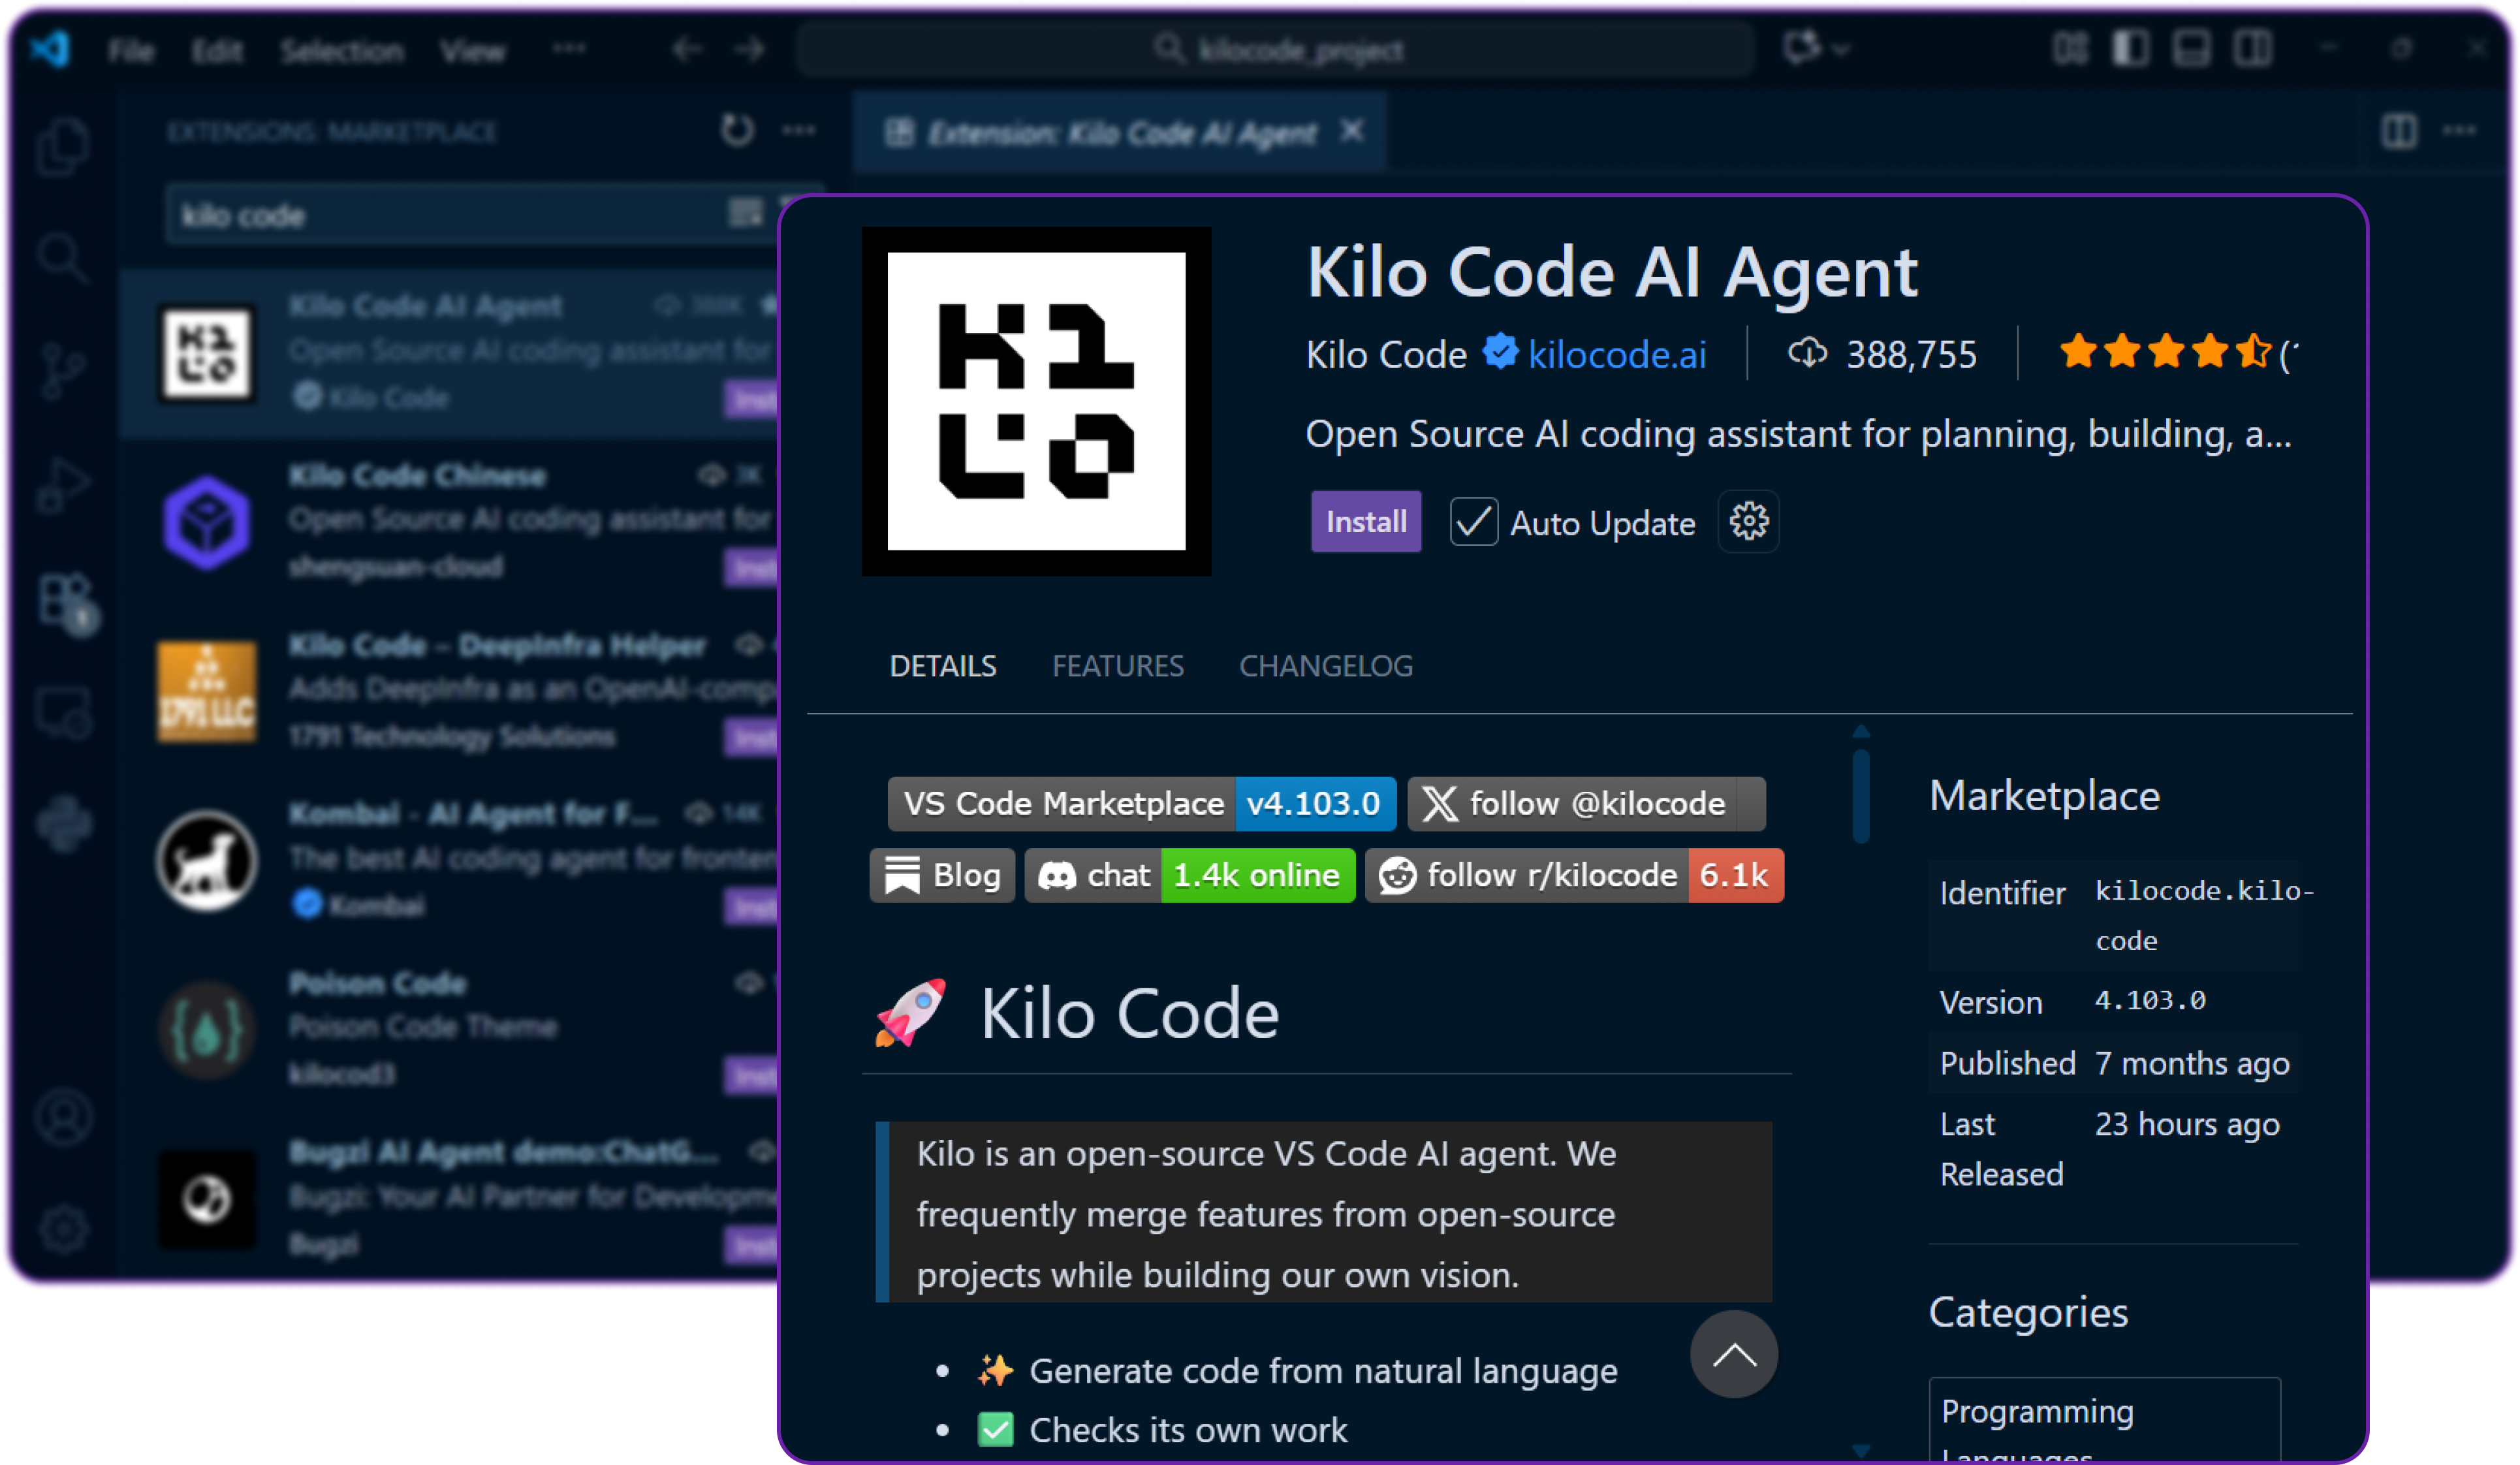
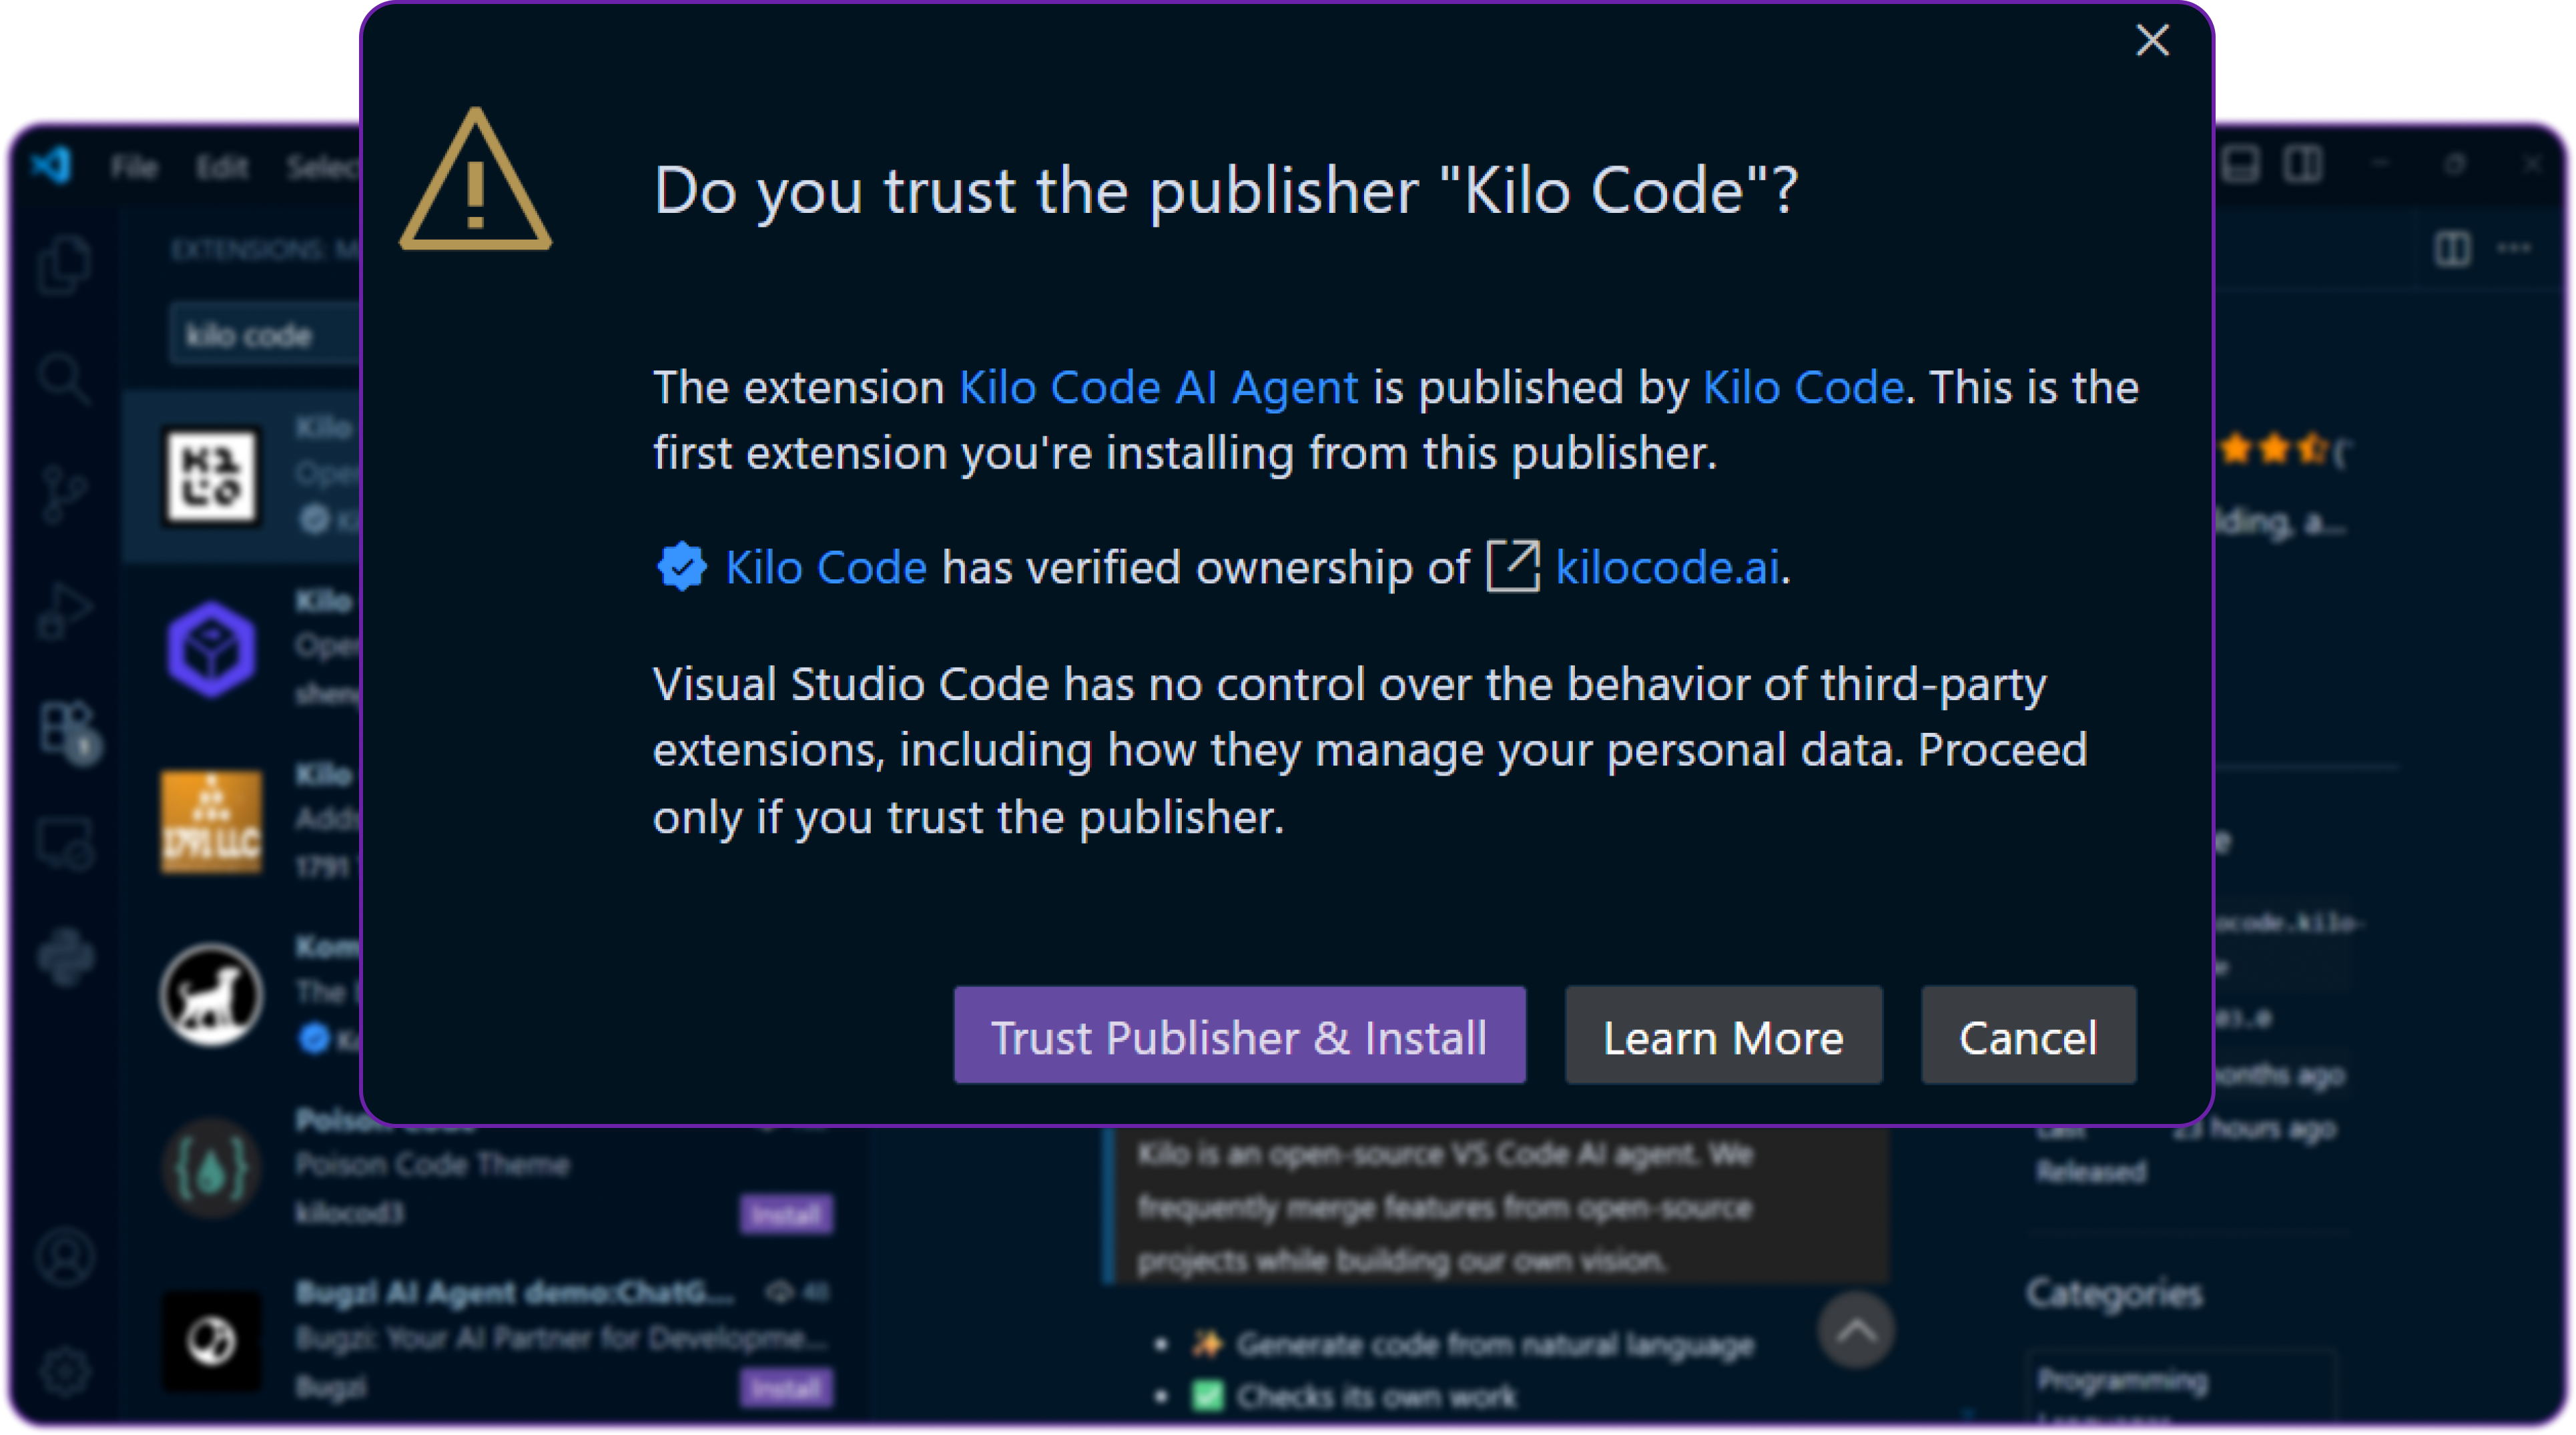
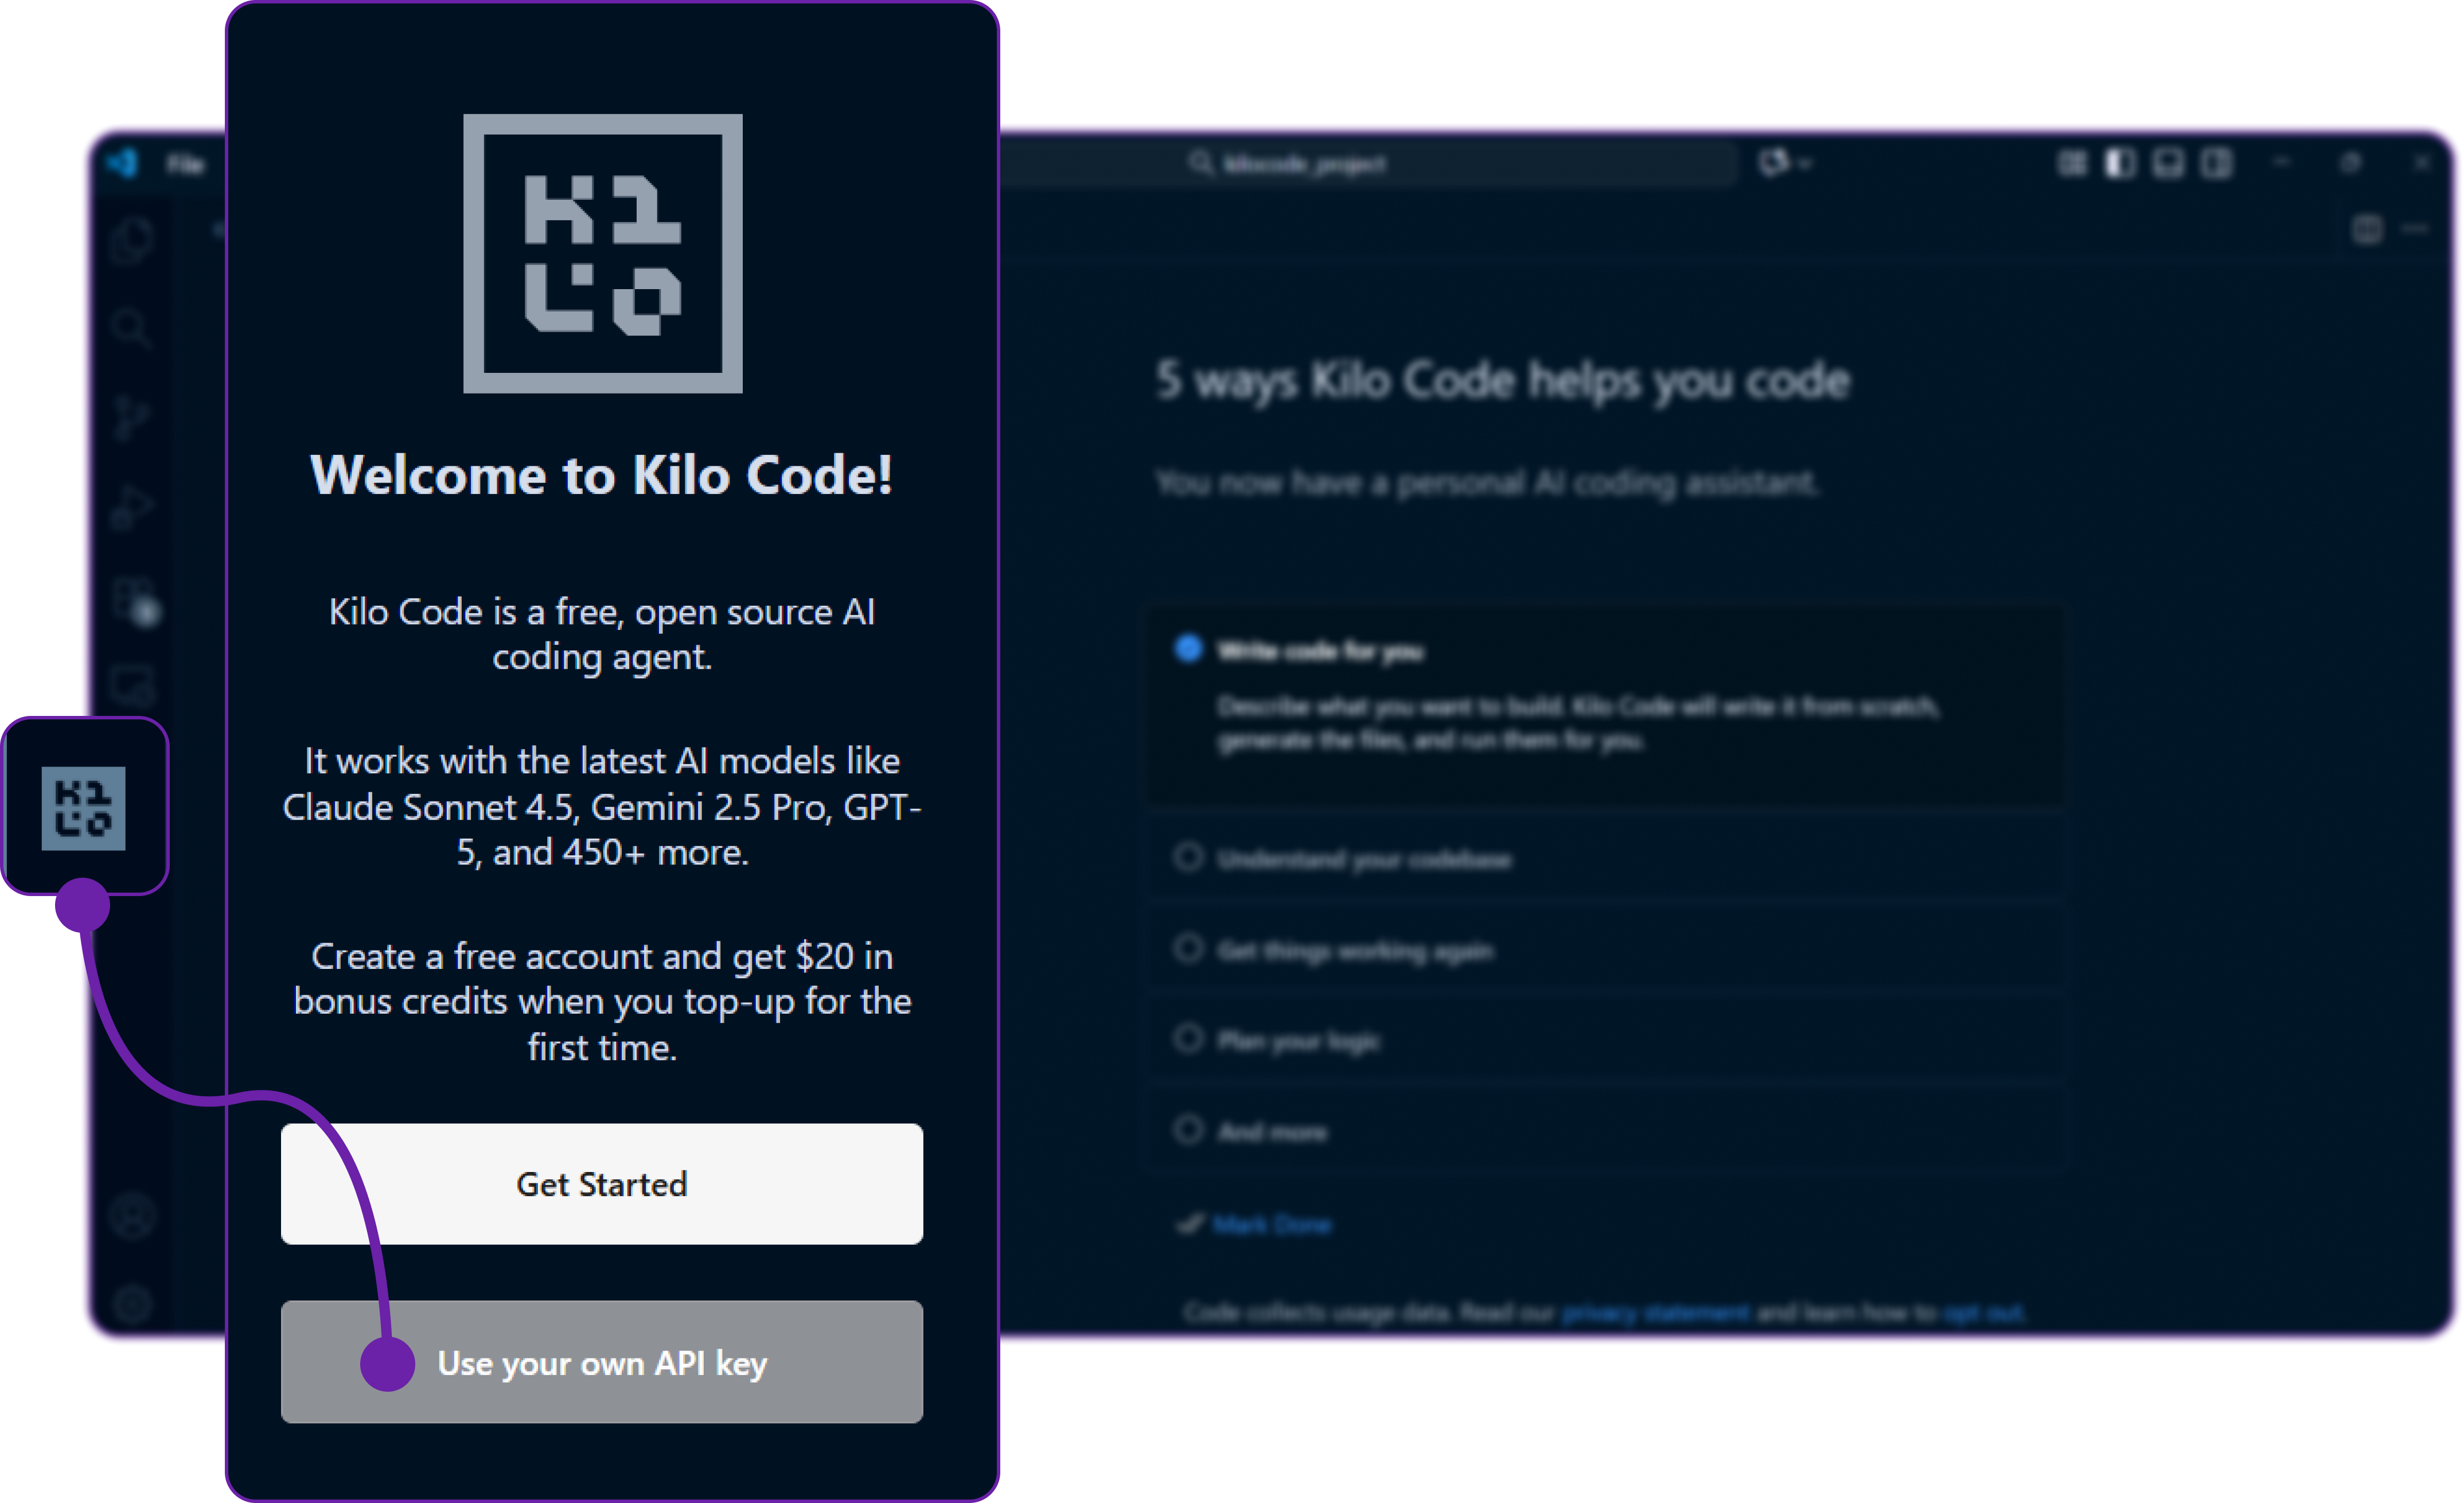
You might be ask to accept the publisher of kilo code extension, just click Accept. Since it's an AI agent, it will need permissions to read and write files in your workspace.
After installation, you’ll see Kilo Code appear in your VS Code sidebar. We can now open the Kilo Code panel to start configuring it.
Step 3: Setting Up Kilo Code
There are two ways we can use Kilo Code:
-
Using Kilo’s default API key (hosted service)
We can sign up at their website, generate an API key, and use Kilo’s built-in models directly.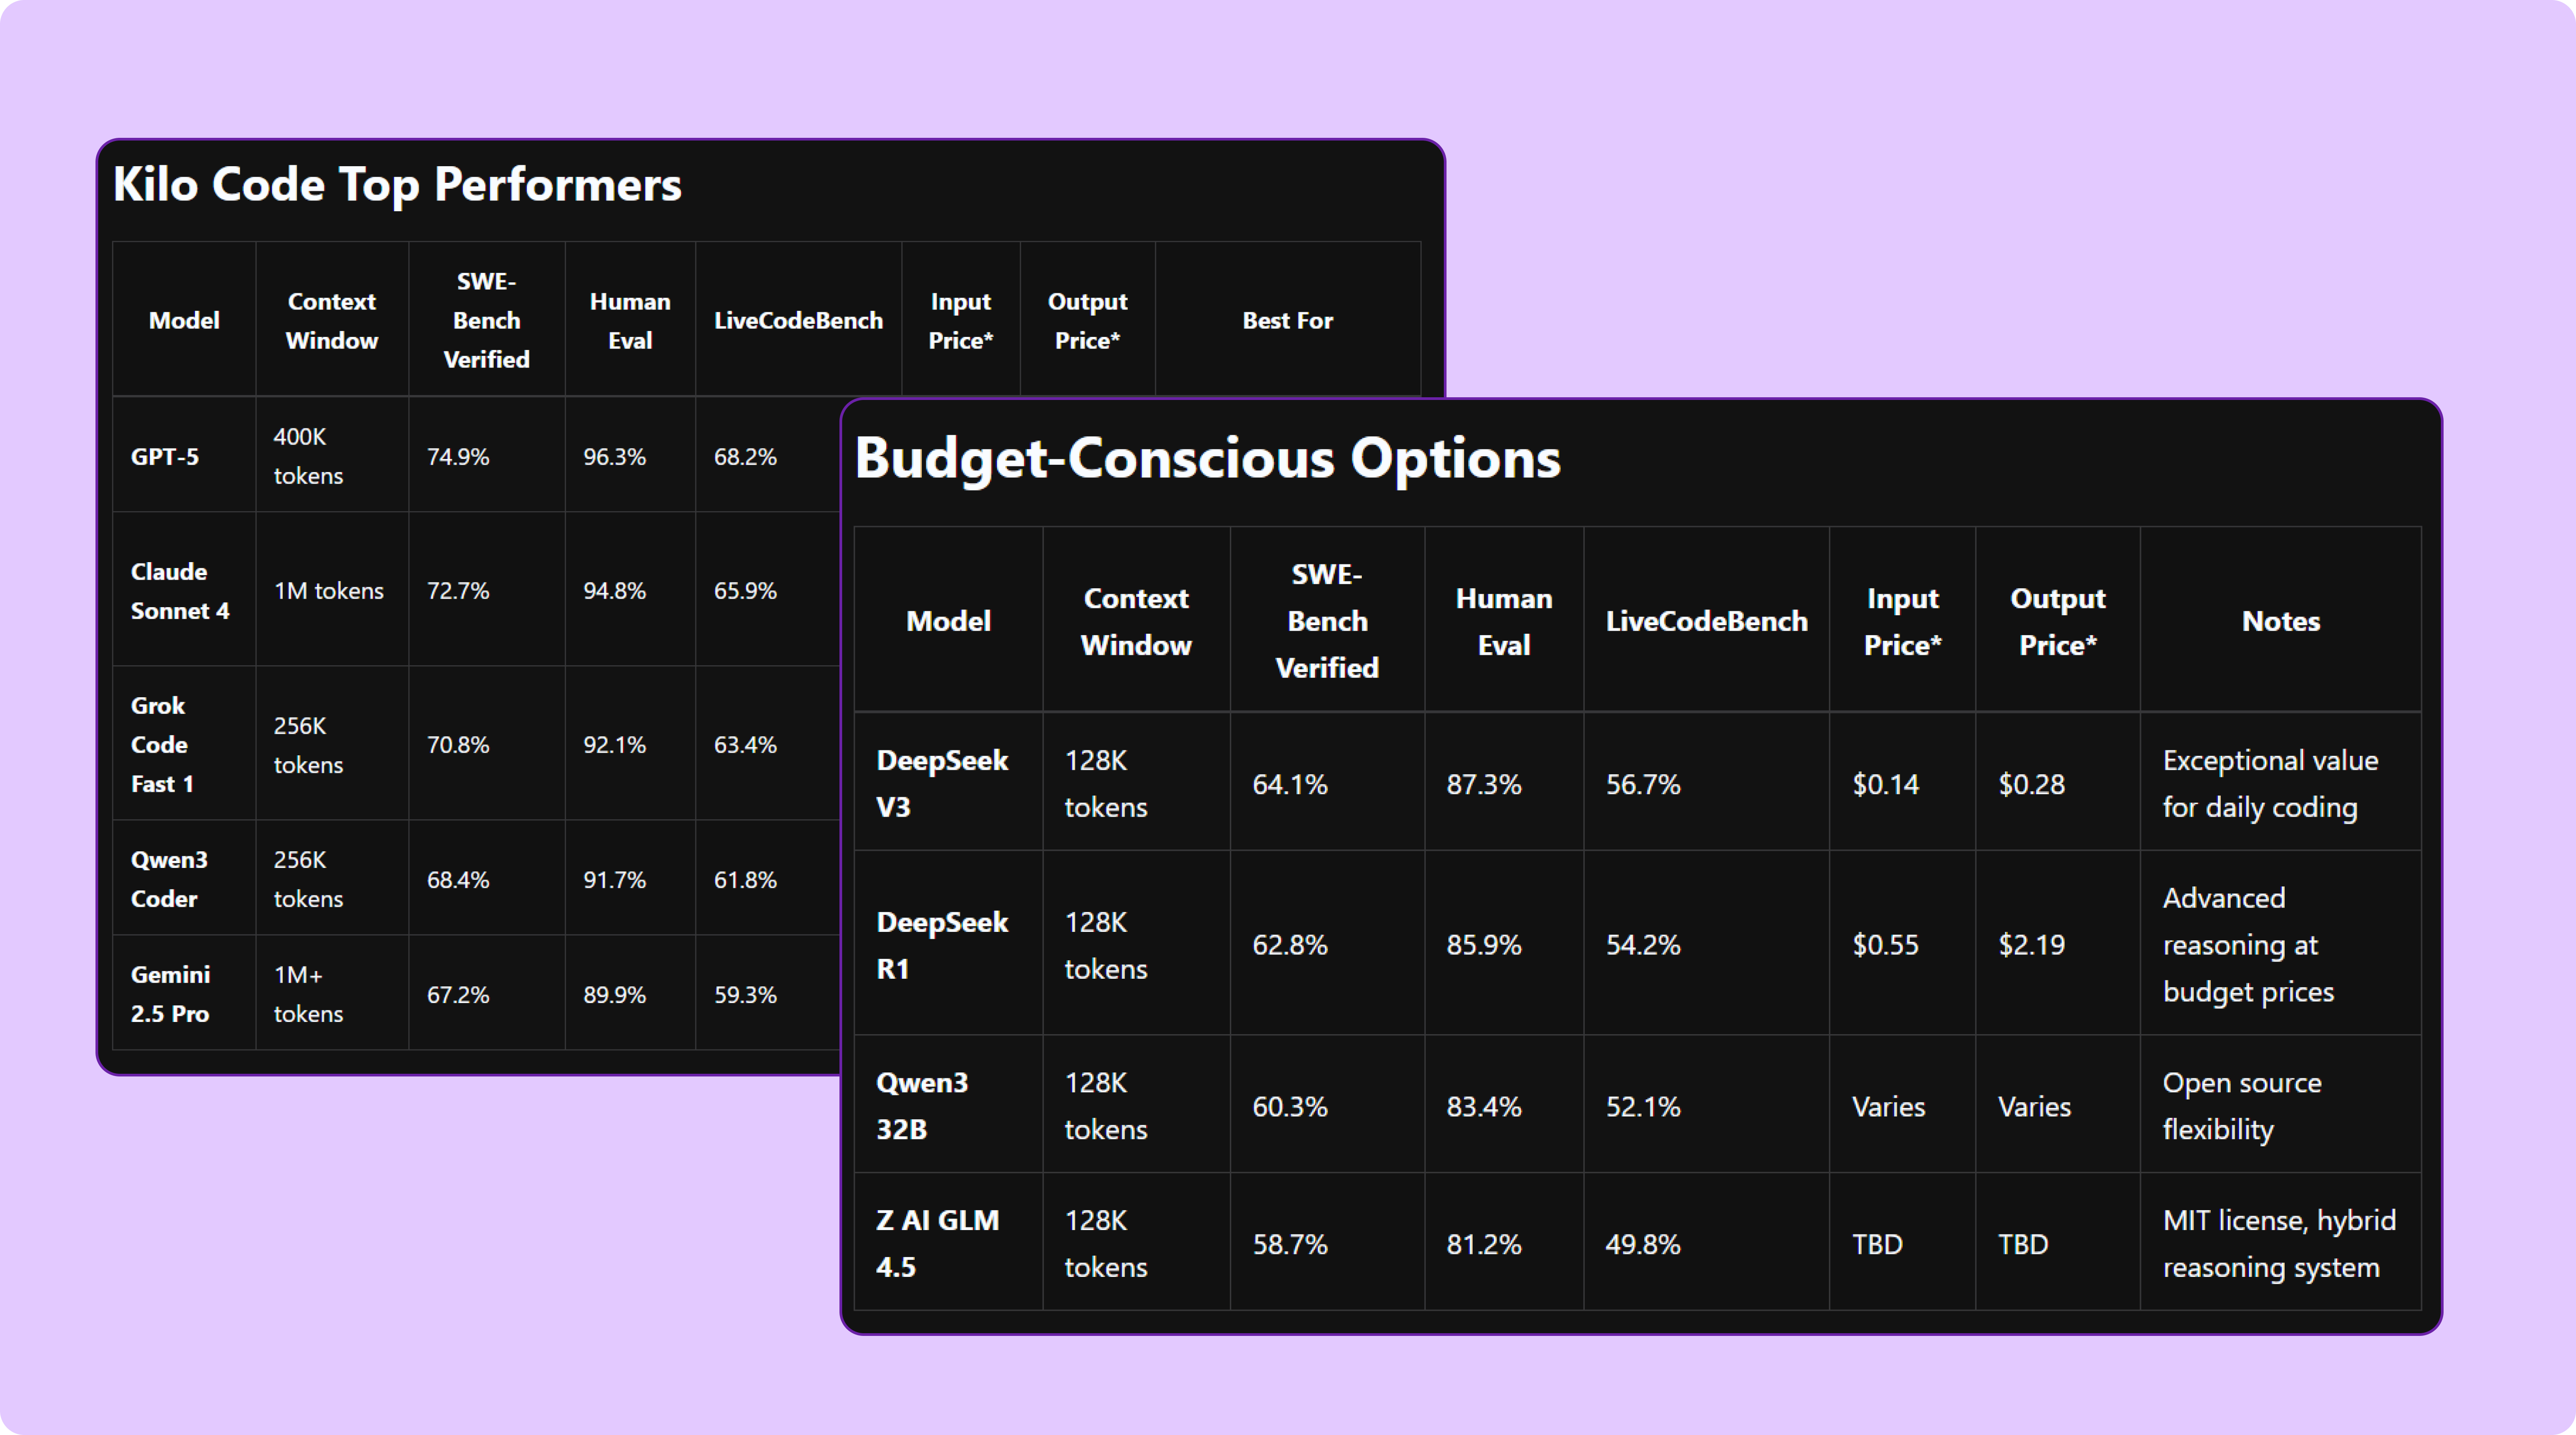
There are many other LLM provider that kilo code supports like OpenAI, Anthropic, etc.
-
Using our own LLM provider (custom integration)
This is what we’ll do, we’ll connect Kilo Code to our own LLM hosted on Hyperstack AI Studio.Since Hyperstack follows the OpenAI-compatible schema, Kilo Code can easily connect to it without any custom adapters.
Now head over to the Kilo Code settings in VS Code by clicking the gear icon in the Kilo sidebar and selecting Settings.
Here, we are clicking on use your own api key to configure our own LLM provider.
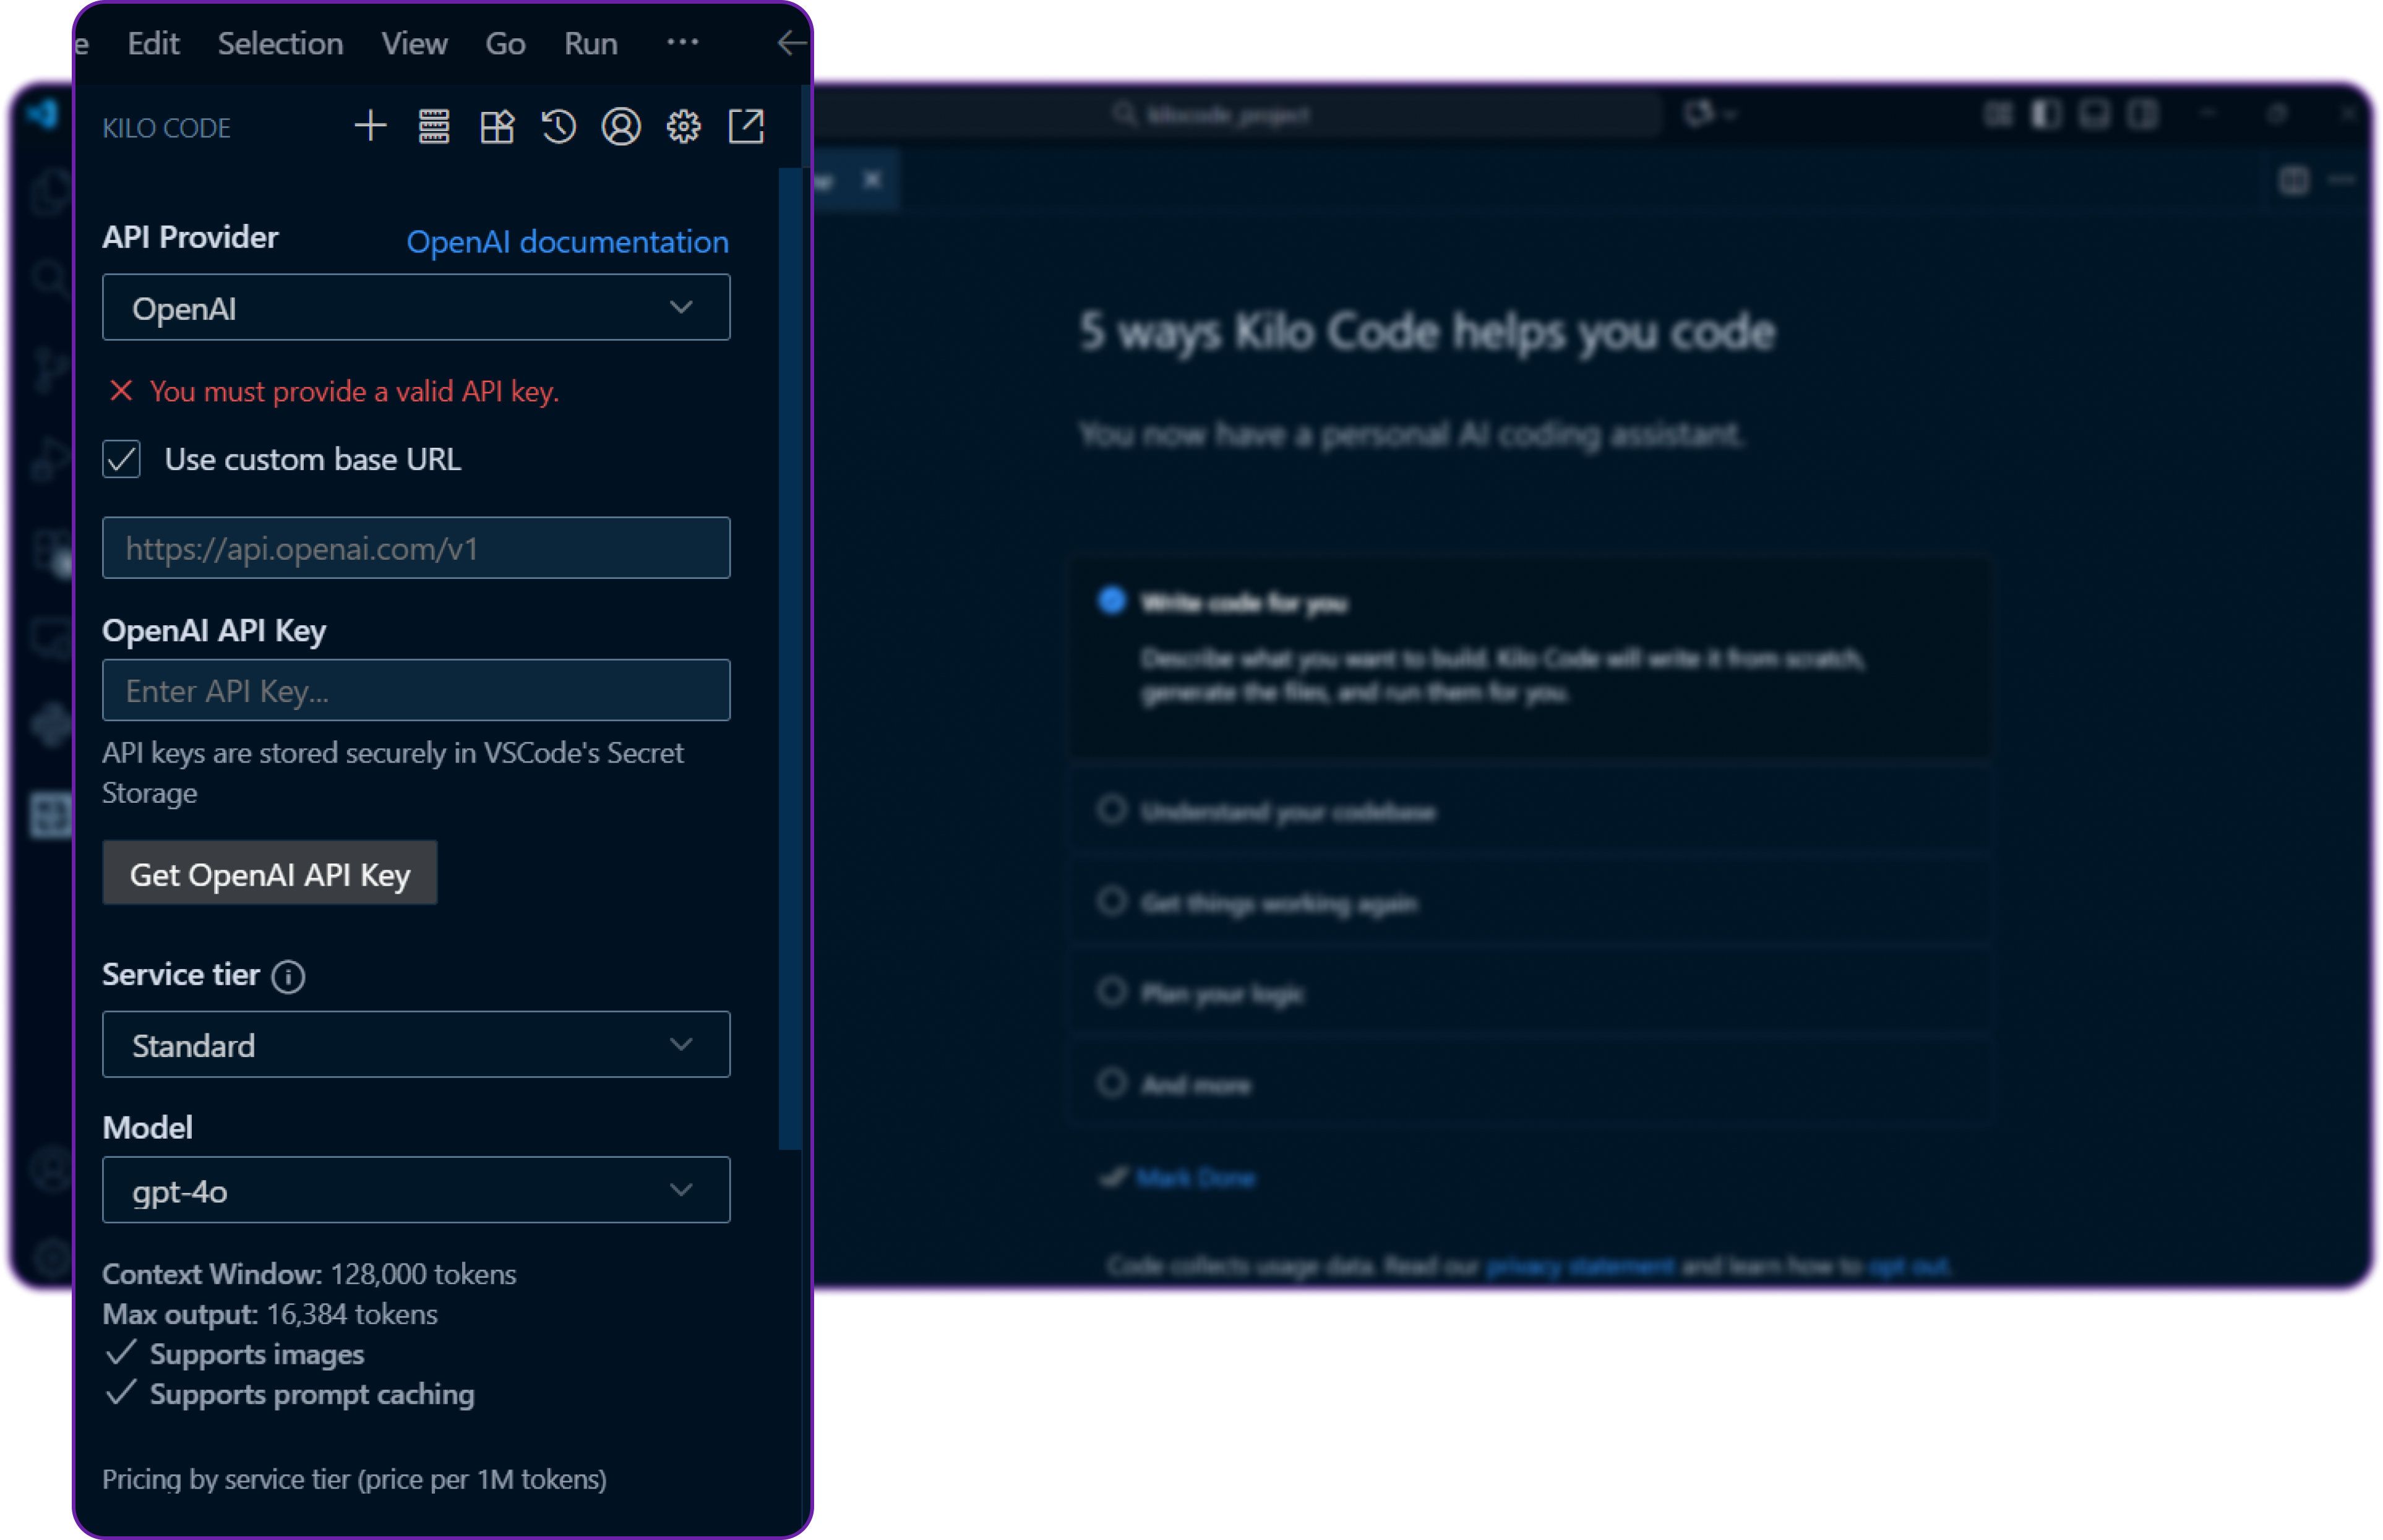
You can see it requires couple of things like BASE URL, MODEL NAME and API KEY to connect to our custom LLM provider.
Let's move on to the next step to get these details from Hyperstack.
Step 4: Retrieve Hyperstack API Details
- Go to the Hyperstack Console and log in with your credentials.
- Navigate to the AI Studio Playground to explore available models before integration them with KiloCode.
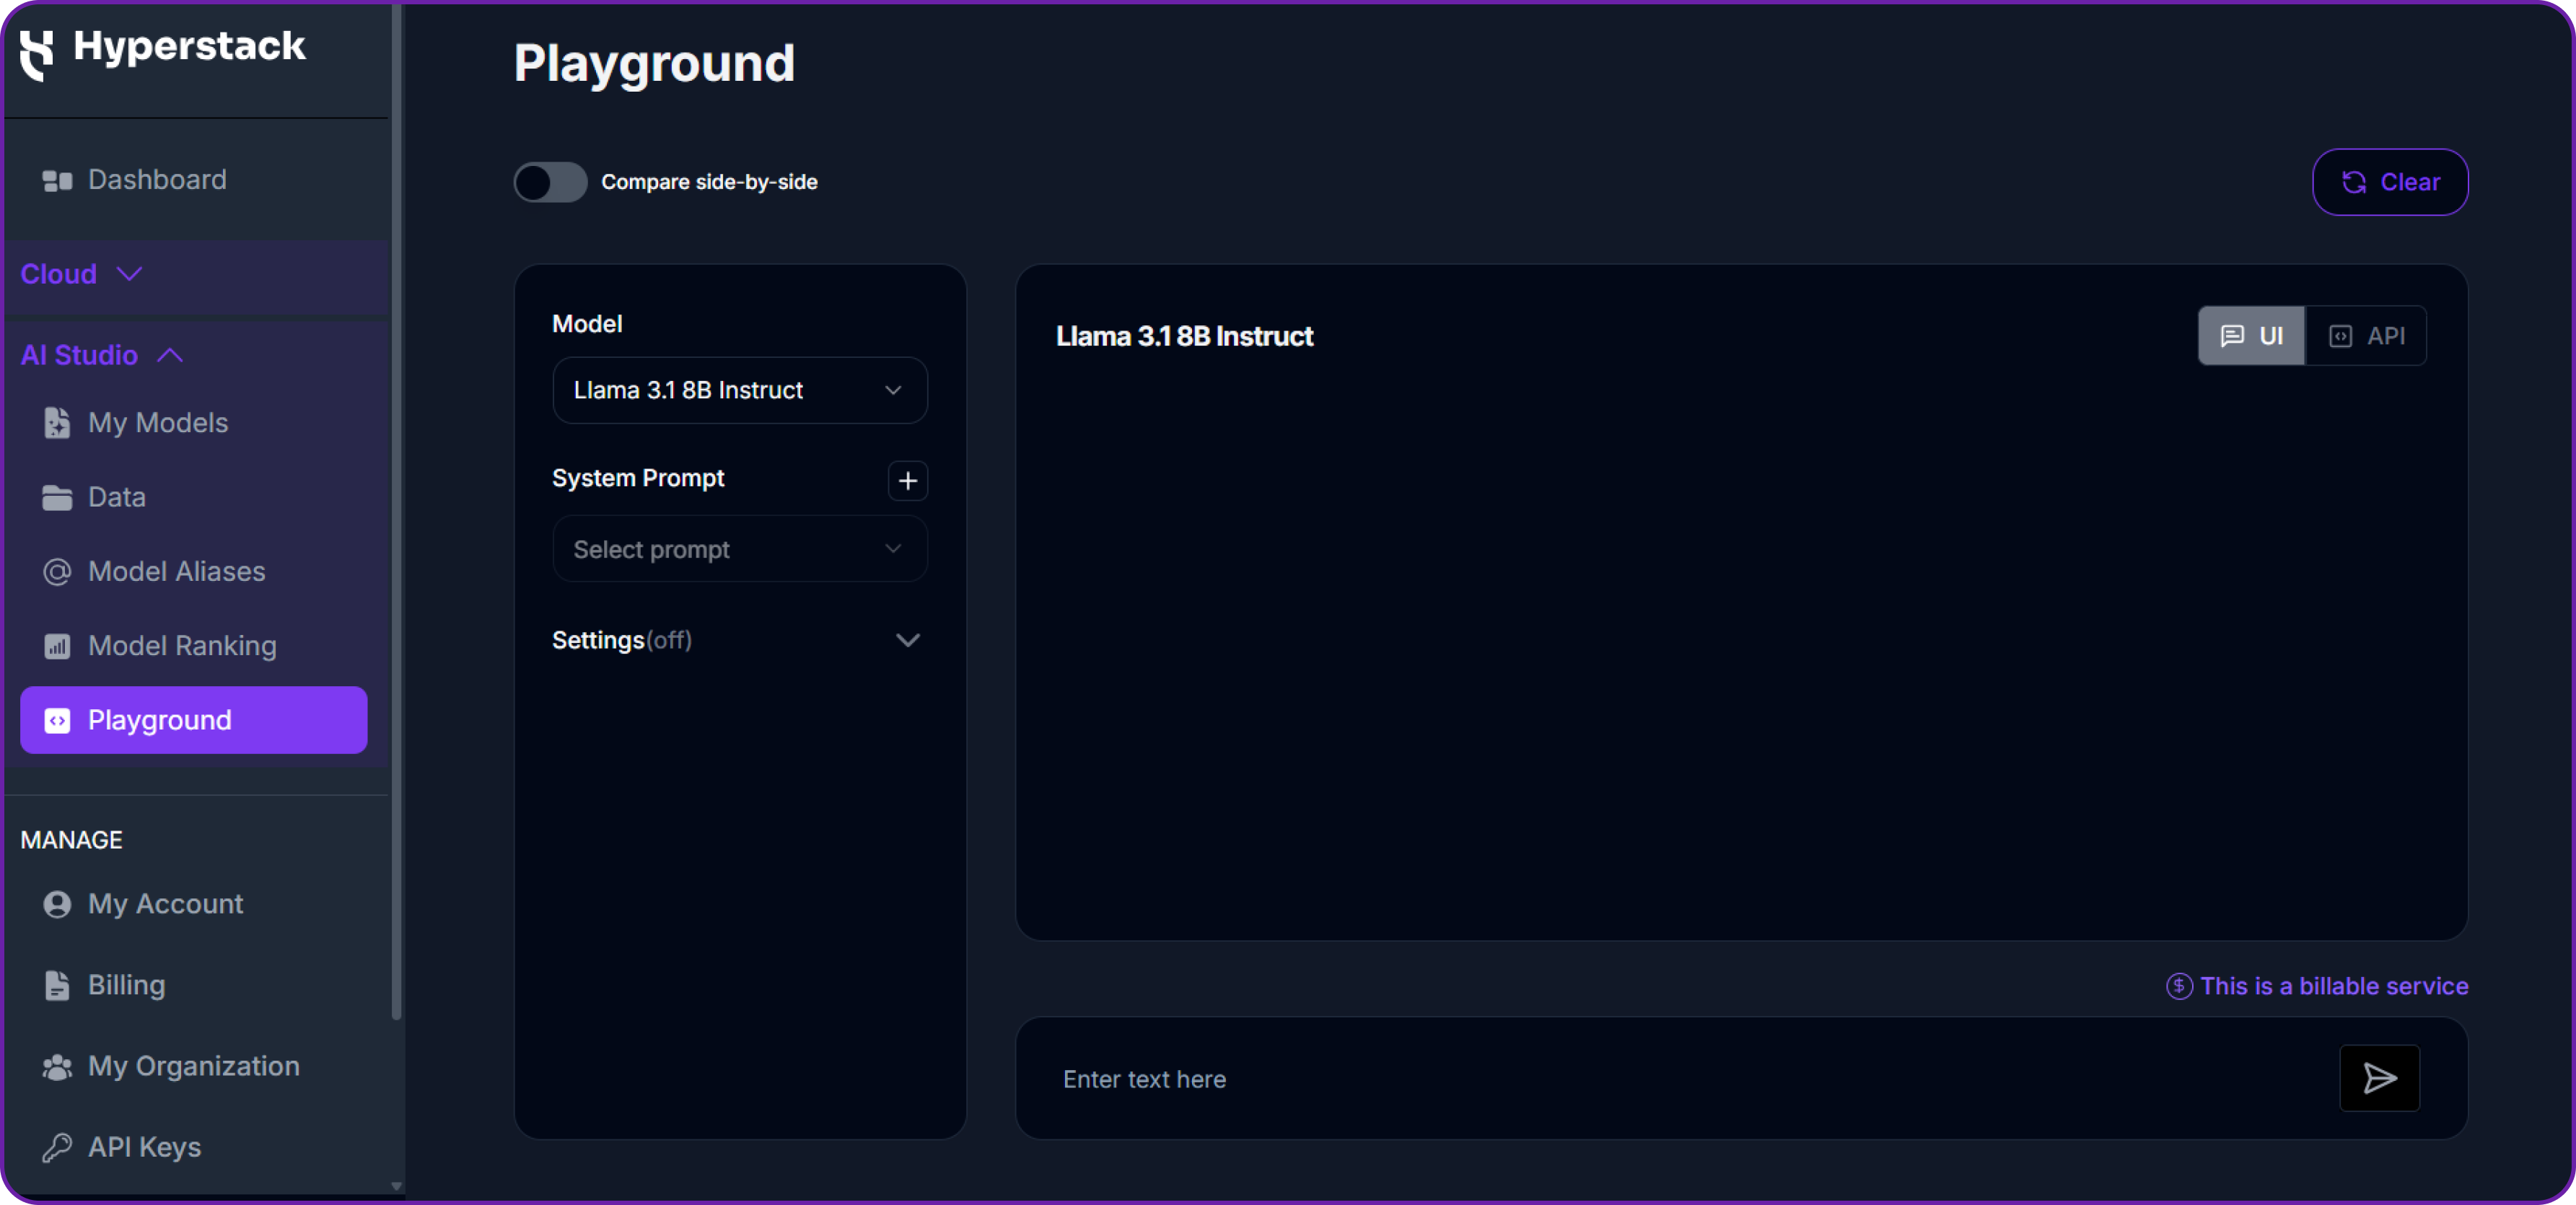
In the playground, Select your desired model after quick testing it on the interface. We are going with openai/gpt-oss-120b for this integration.
Then click on the API section to get the Base URL and Model ID.
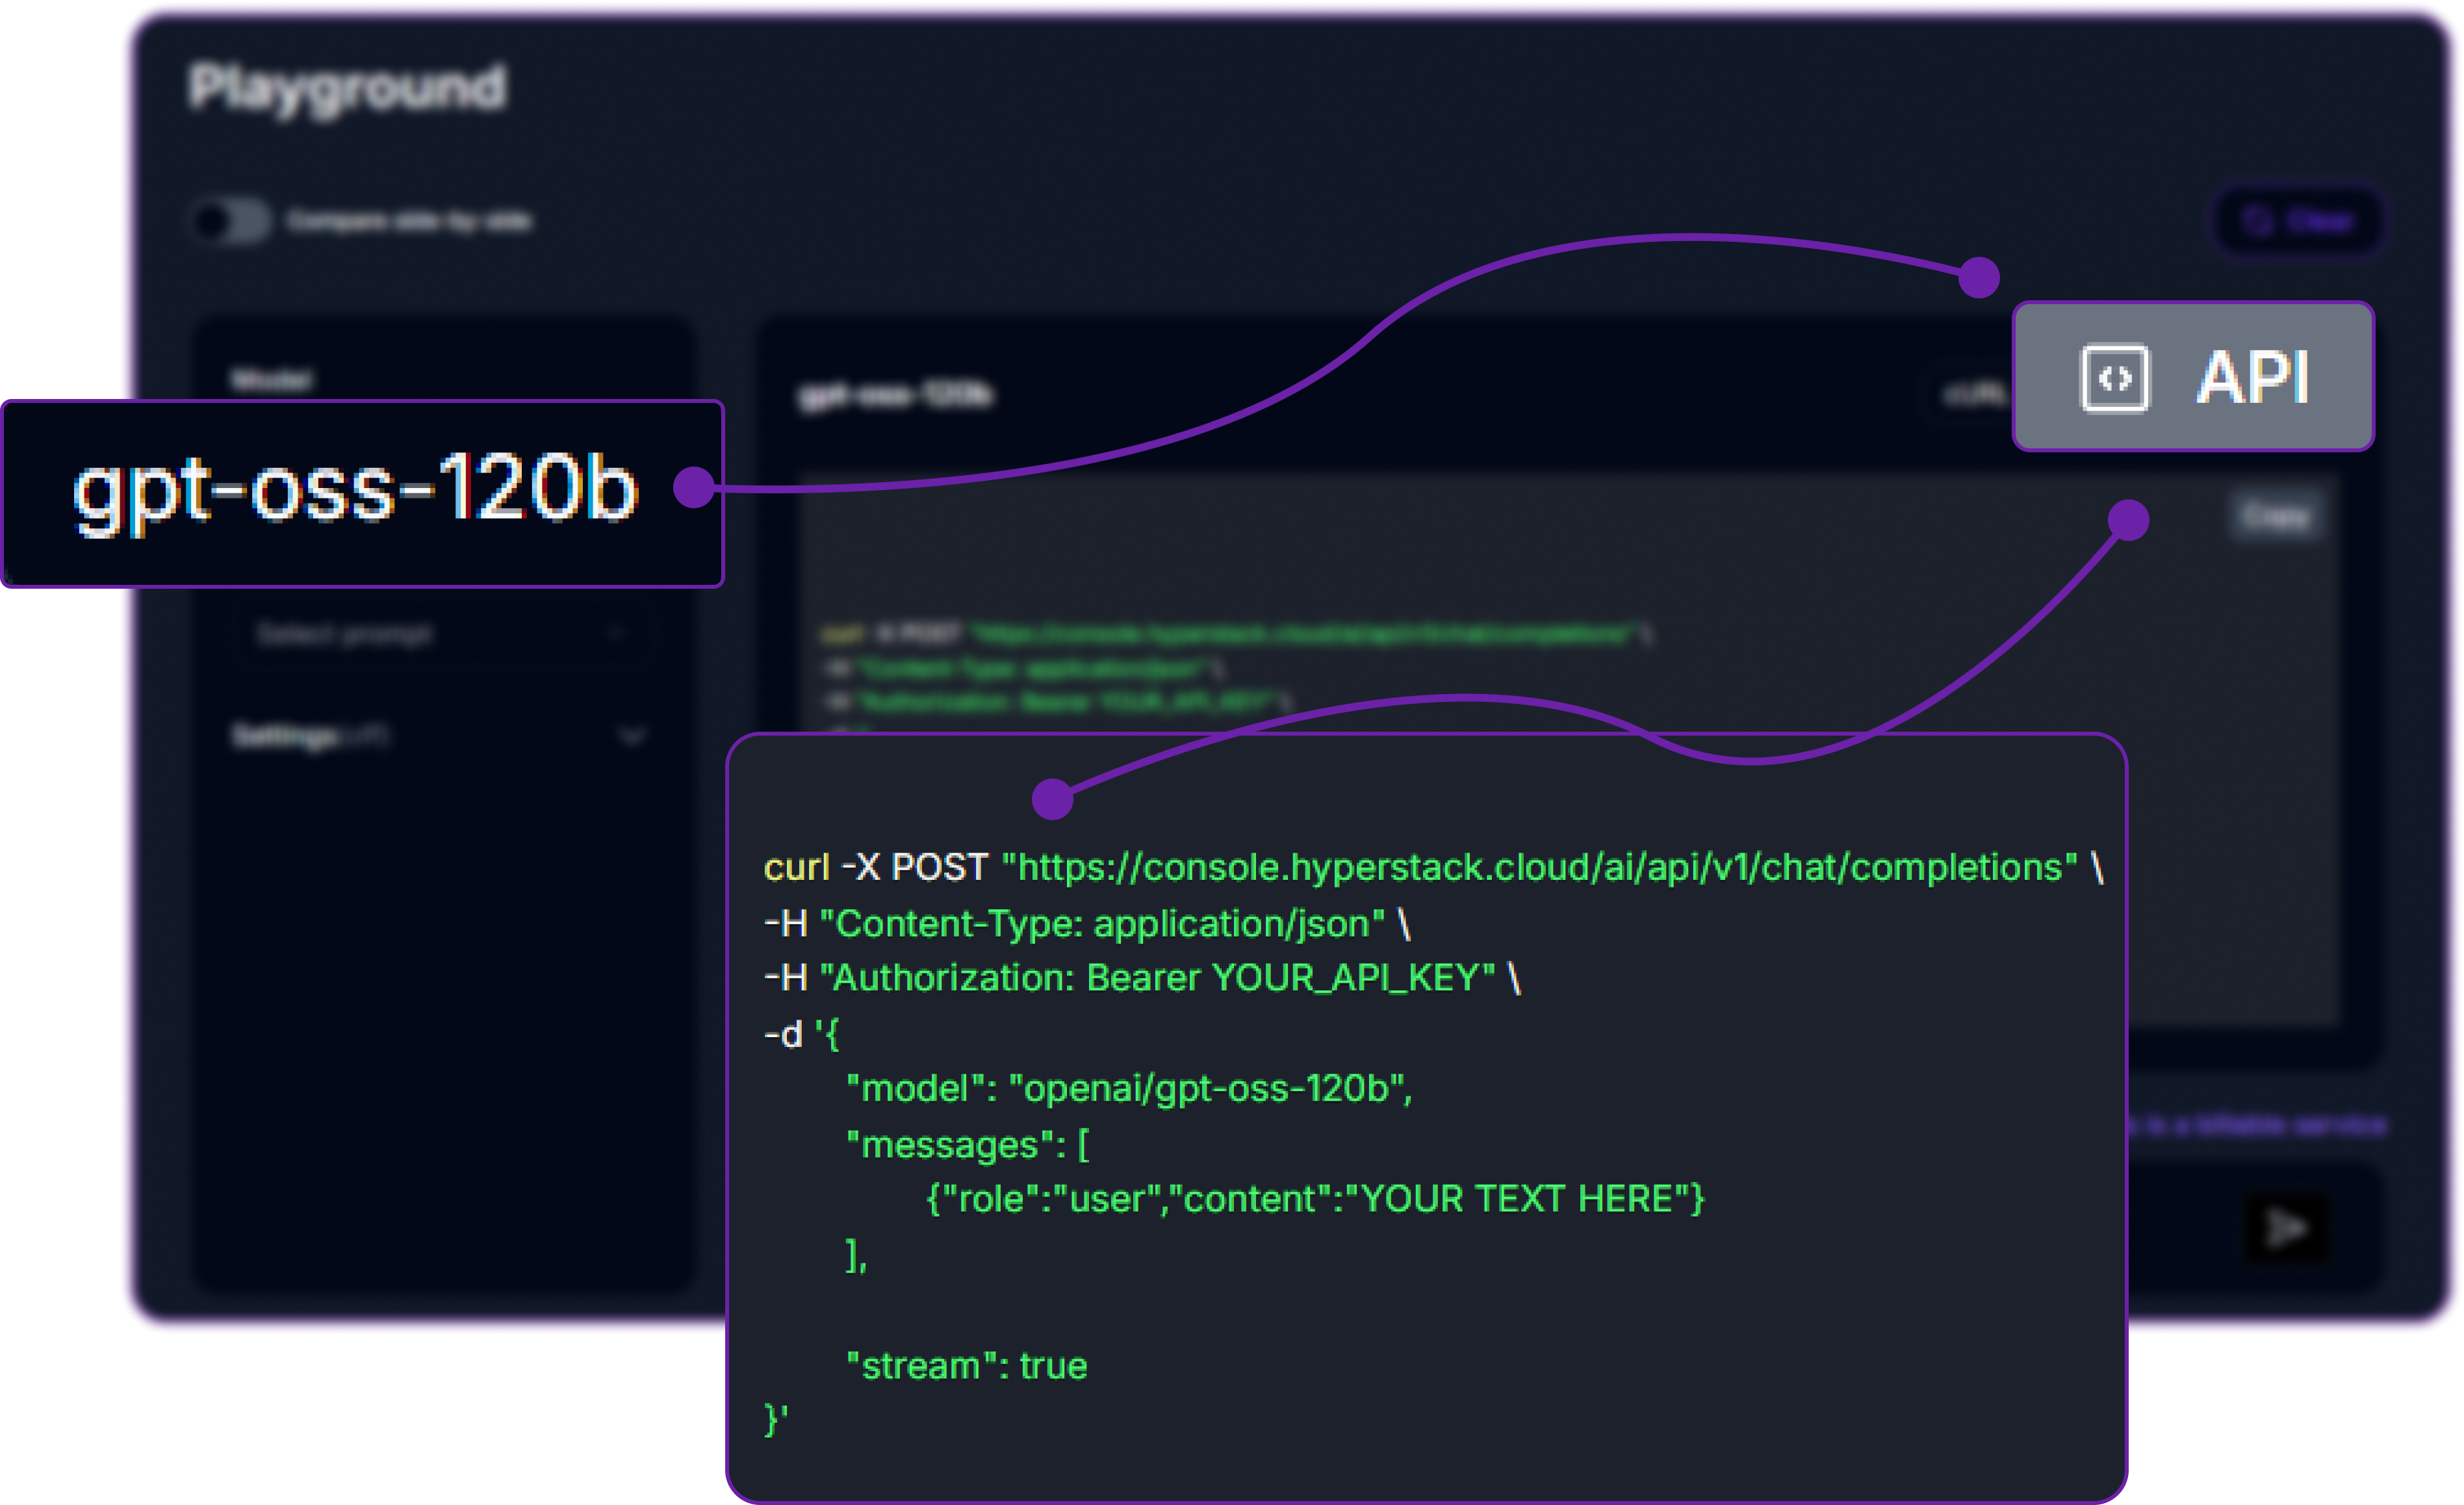
You can check the available models on their base model documentation page. You can copy the model id and base url from here, we will need it in the next step.
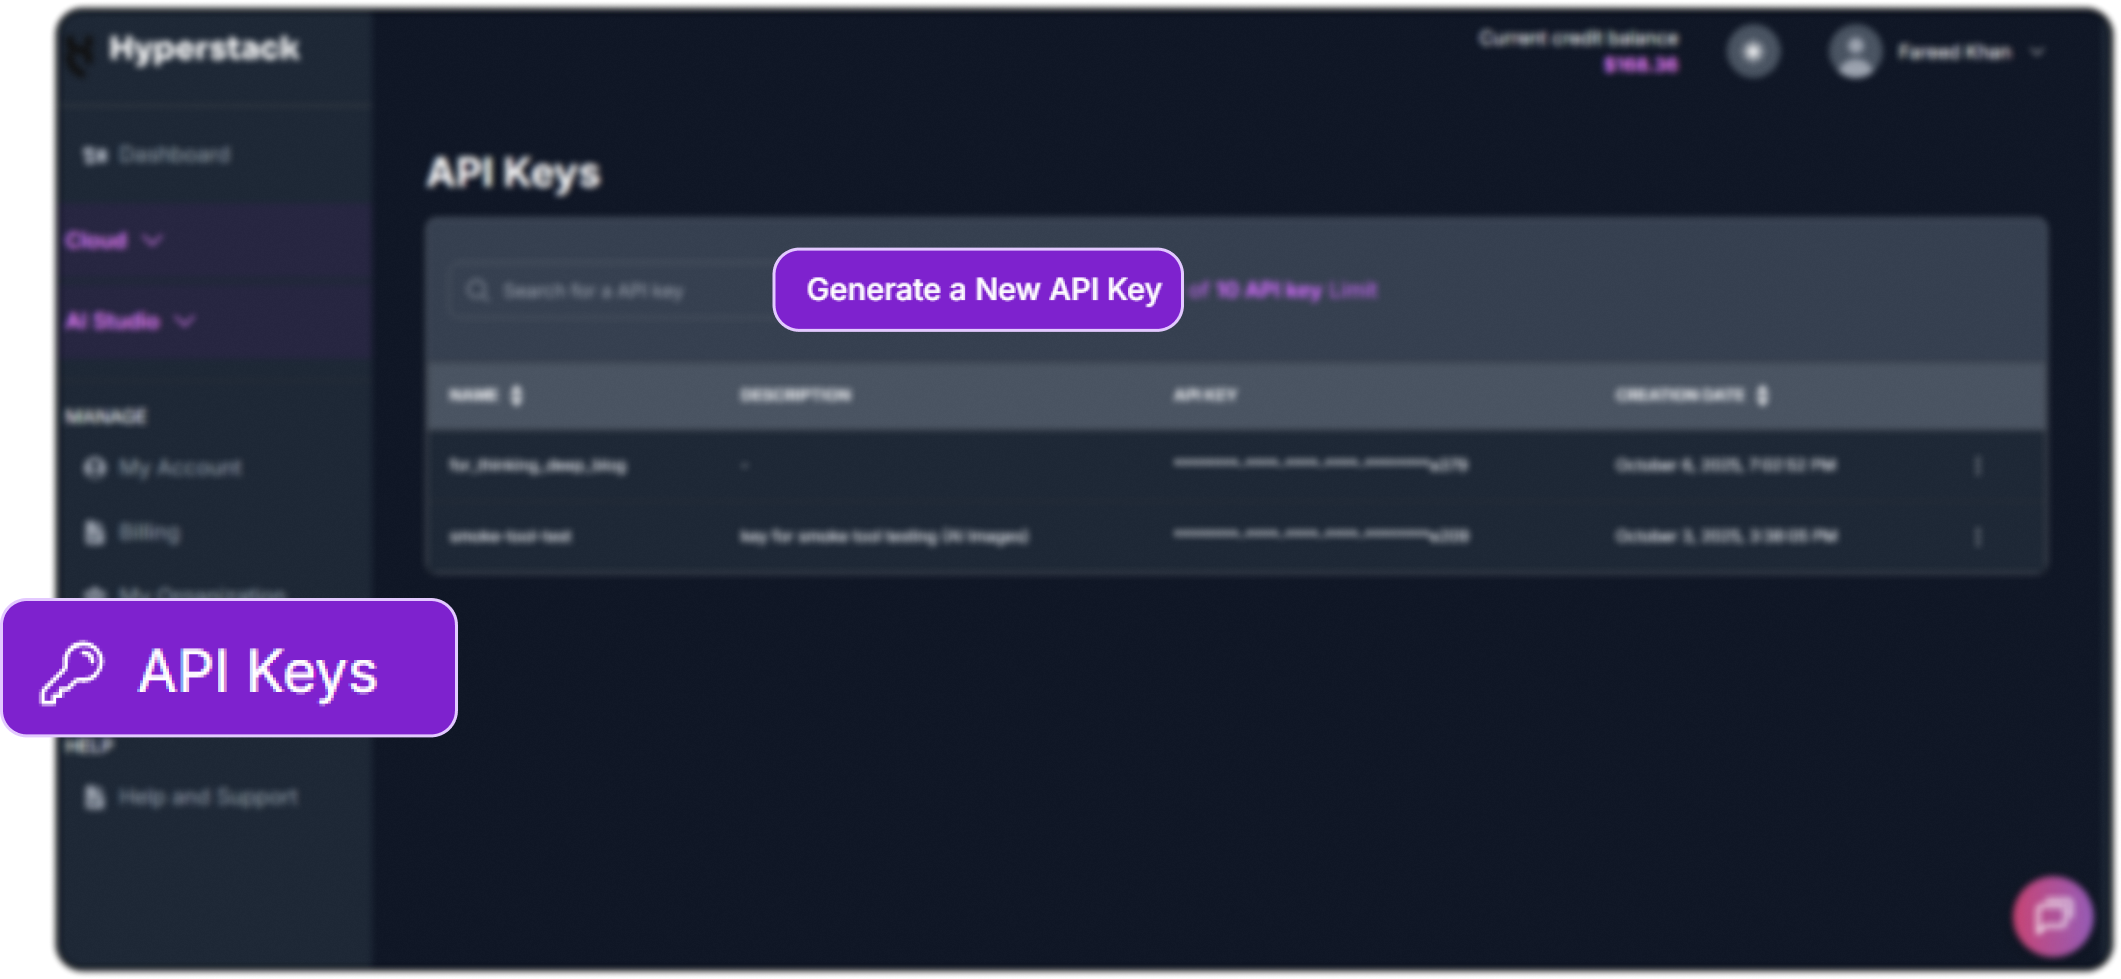
Step 5: Generate an API Key
To authenticate, we will need a valid API key from Hyperstack AI Studio.
-
Go to the API Keys section in the Hyperstack console.
-
Click Generate New Key.
-
Give it a name (e.g.,
kilocode-integration-key). -
Copy the generated key, we will use it in Kilo Code extension.
Now that we have the required details for kilo code, let's now use them in the kilo code extension.
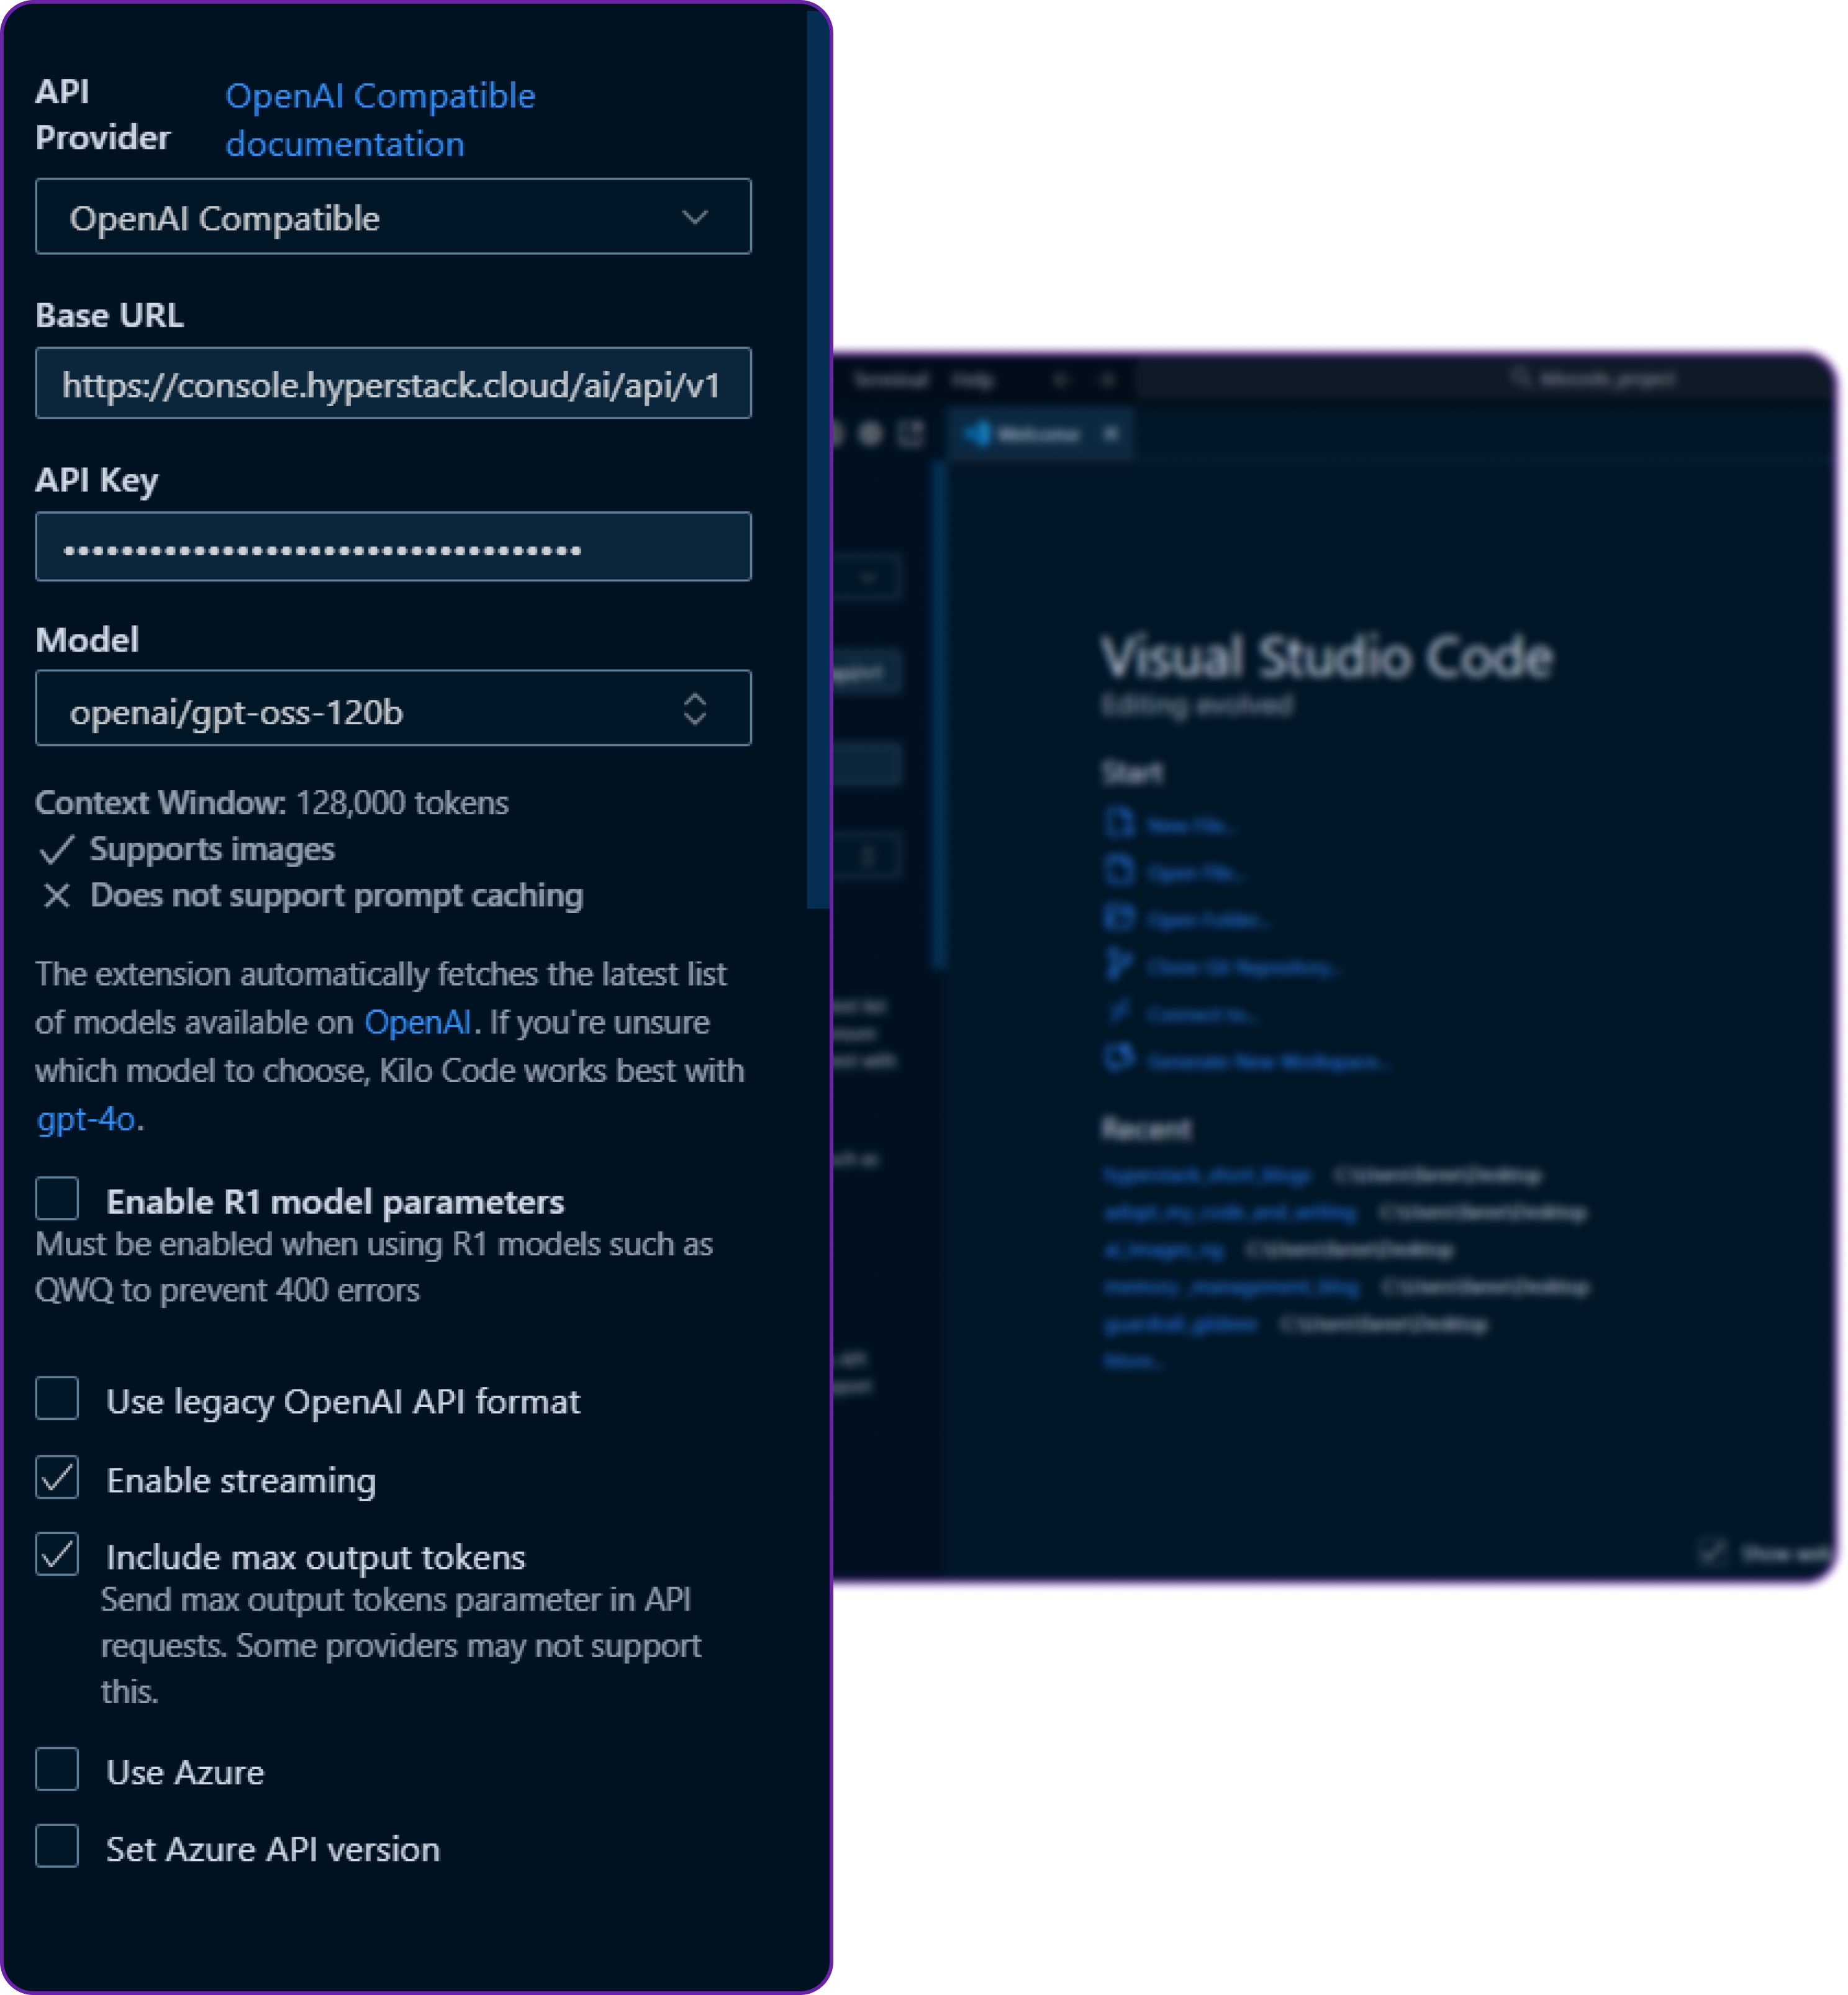
Step 6: Add Hyperstack Details into Kilo Code
Now that we have our Base URL, Model Name, and API Key from Hyperstack, let’s plug them into Kilo Code.
First we have to select the correct API provider which is OpenAI Compatible since Hyperstack follows the OpenAI schema.

Then we fill in the details we copied from Hyperstack:
- Base URL →
https://api.hyperstack.cloud/v1 - Model Name →
openai/gpt-oss-120b - API Key → Paste your newly generated Hyperstack key
Once we save the configuration, Kilo Code will treat Hyperstack as a valid model providers exactly like OpenAI.
We have named this configuration to Hyperstack profile, which is totally an optional step but better for organization if we have multiple profiles.
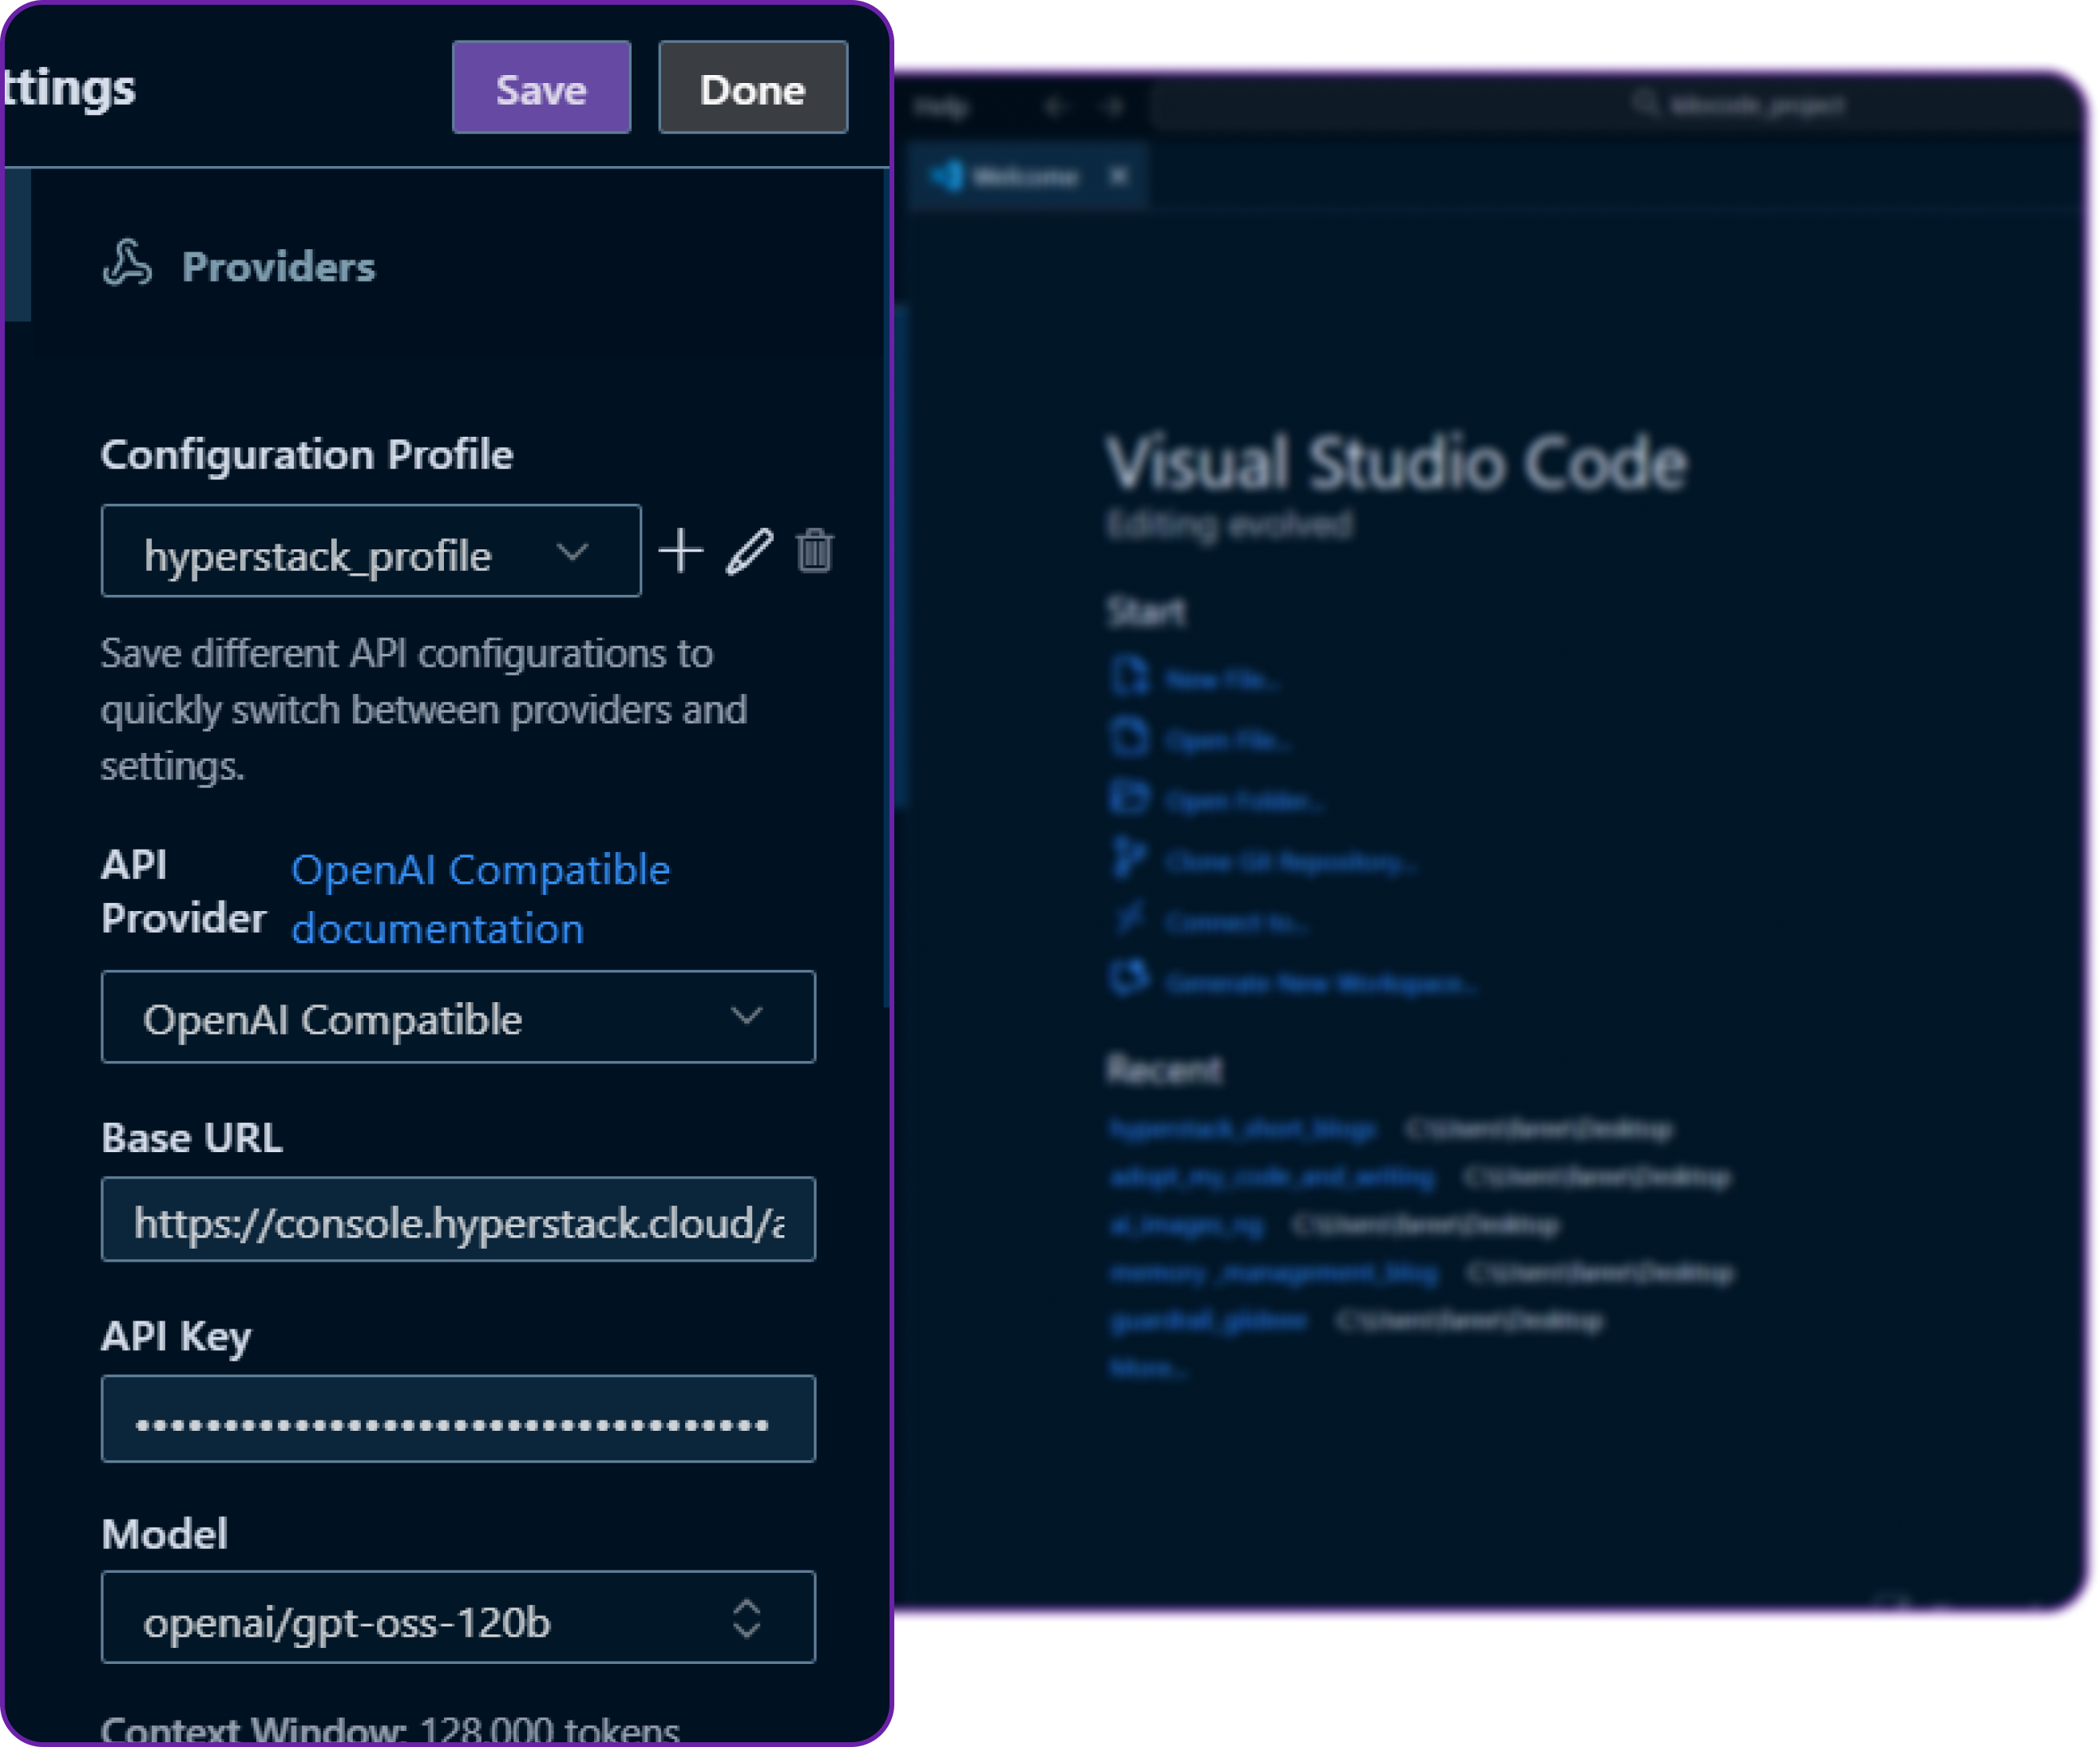
Click on save and then done, and we are all set our Kilo Code is now connected to our Hyperstack-hosted model!
Step 7: Test the Connection
Alright, now we need to test that if our integration is working or not.
- In VS Code, open the Kilo Code Ask panel.
- Make sure the selected model is
openai/gpt-oss-120b. - Let’s pass a simple prompt like
"Hi"to see how our Kilo Code Ask feature is handling the request.
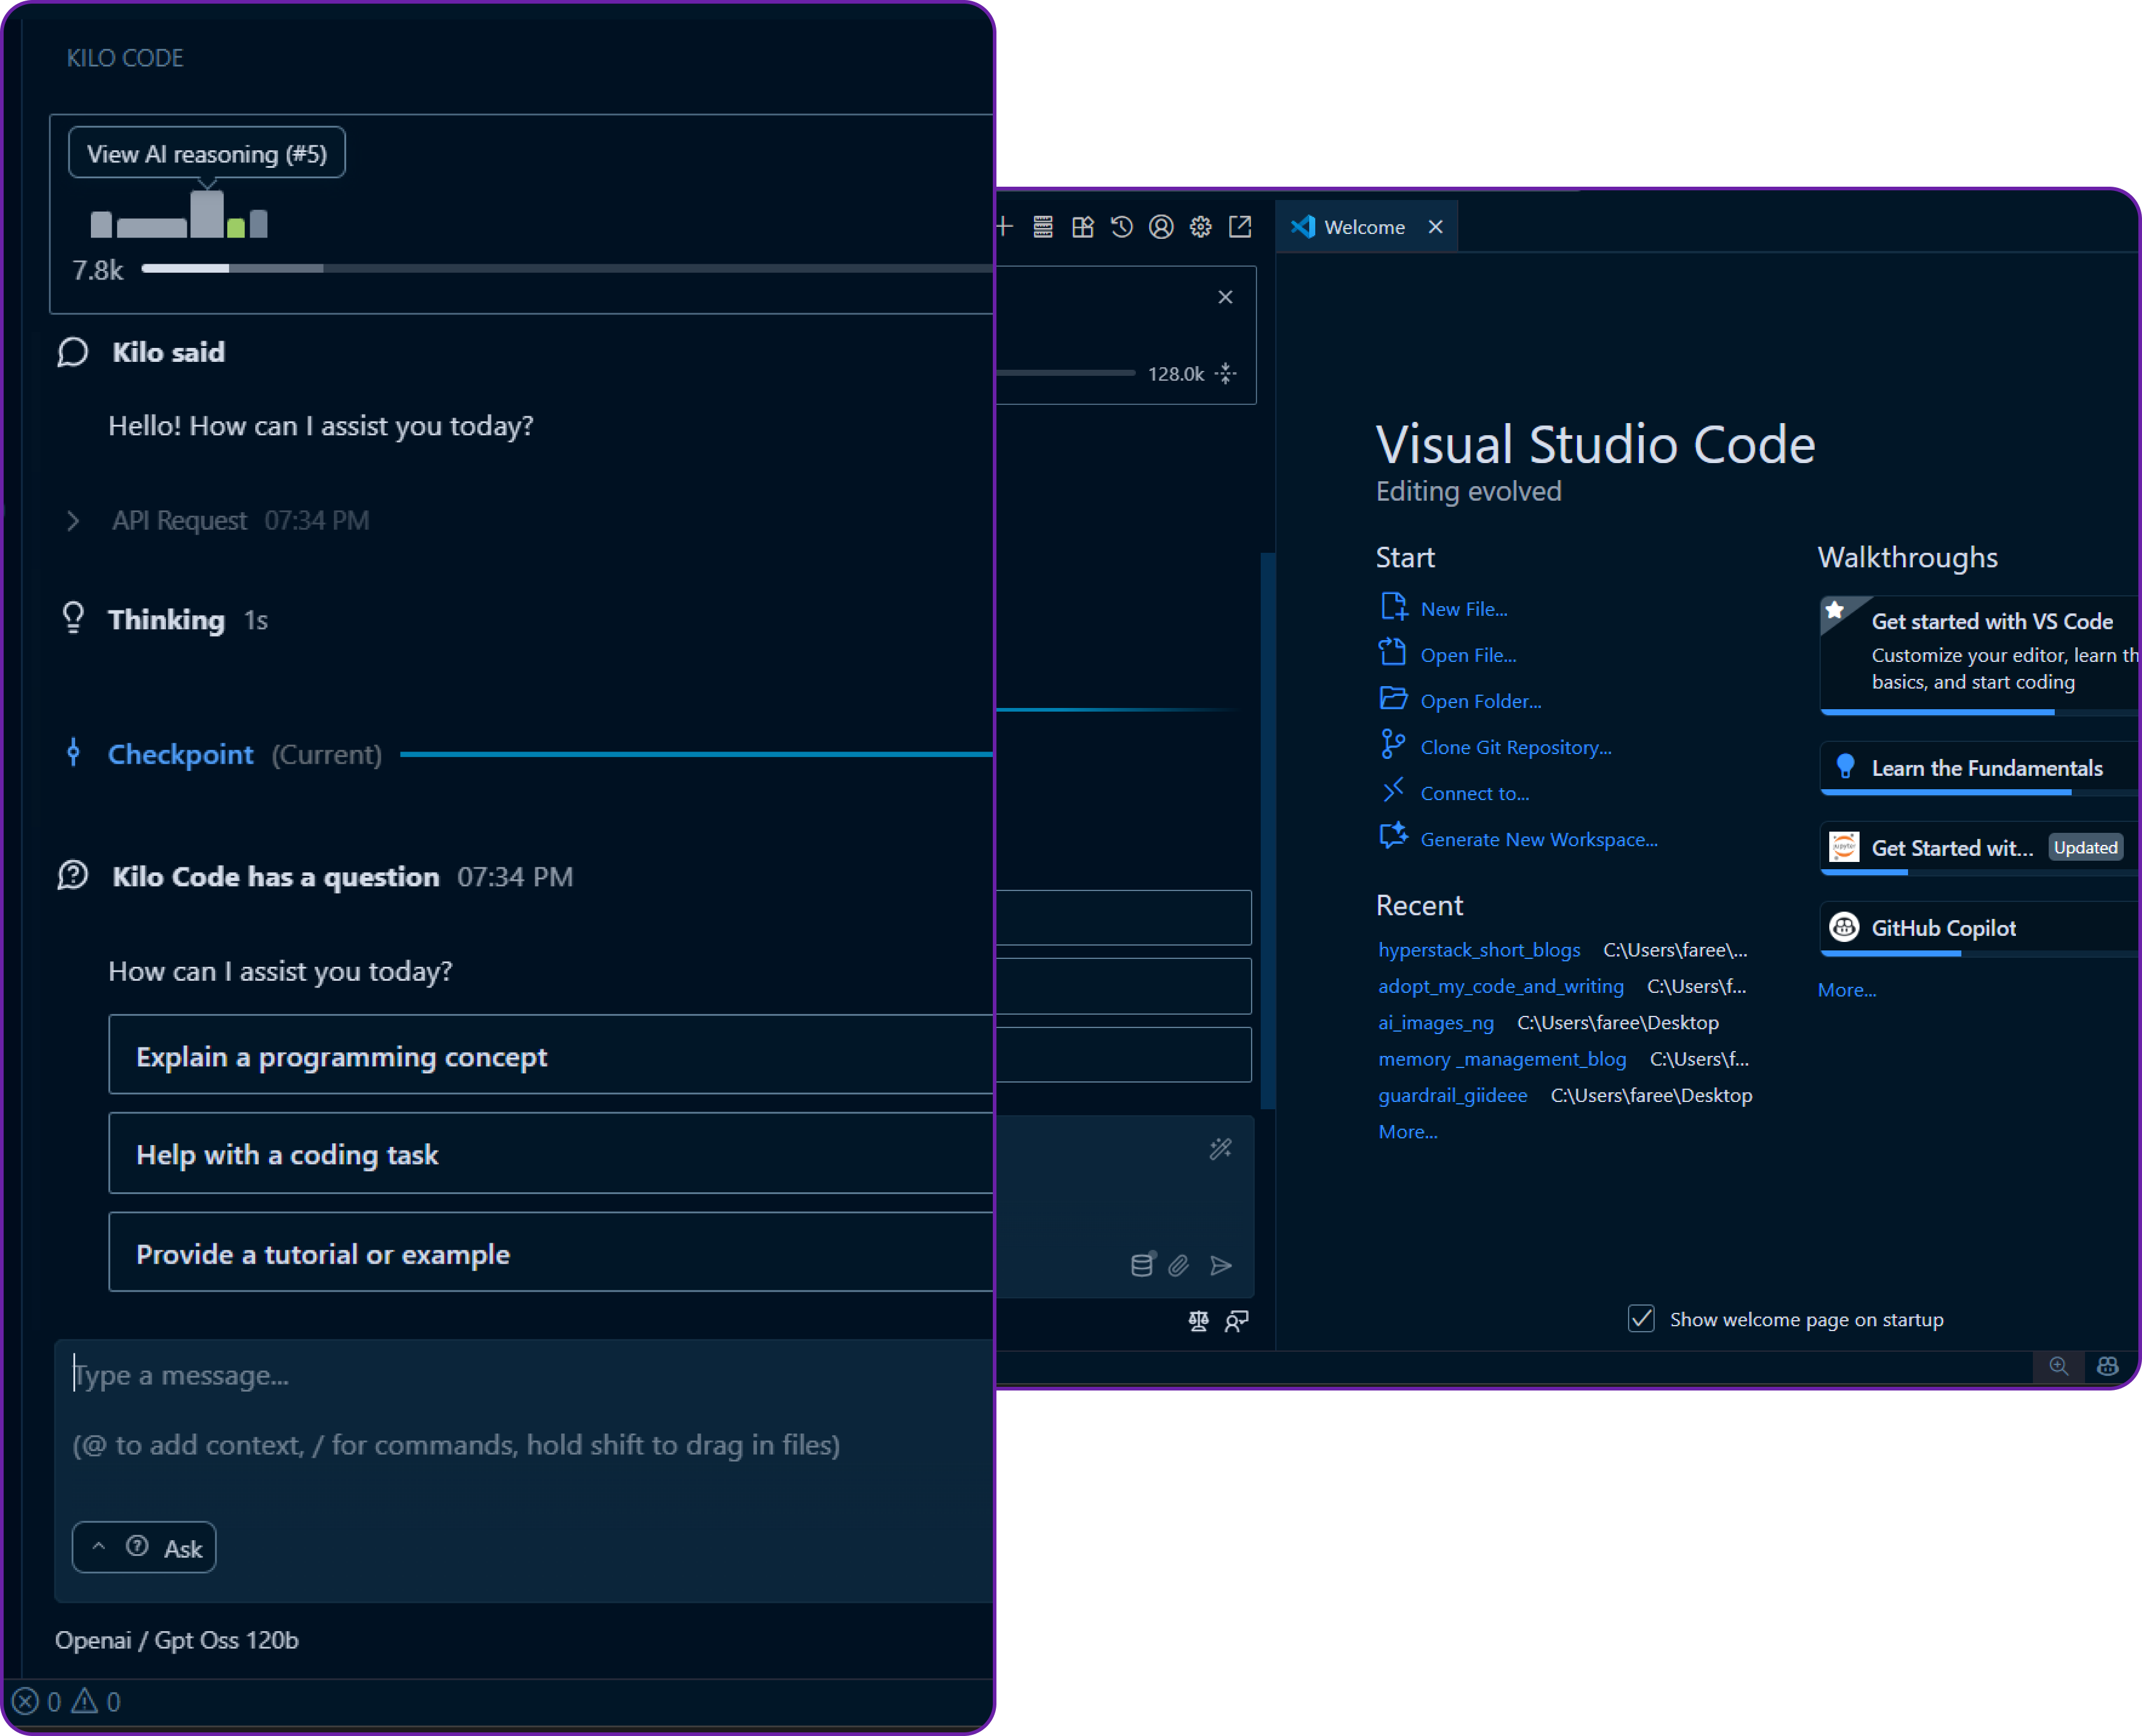
We get a response of ...
“Hello! How can I assist you today?”
then our integration is working perfectly! That means Kilo Code is successfully talking to our Hyperstack-hosted model.
You can also see that since it's a code editor tool it has print out several other important things like the next expected query, checkpoint to avoid data loss, and the latency of the request.
There is a serious potential here, we can now use Kilo Code’s powerful agentic workflow powered by our own custom model in Hyperstack!
Step 8: Test Agent Mode (Code Generation)
Now that we know our setup works, let’s try something more practical. Similar to how we would use Kilo Code in a real development scenario.
Open the Code or Agent panel in Kilo Code and this time, let’s ask it to create a simple Python file that prints "Hello, World!".
create a python file "hello_world.py"
that contains a simple function that prints "Hello, World!"
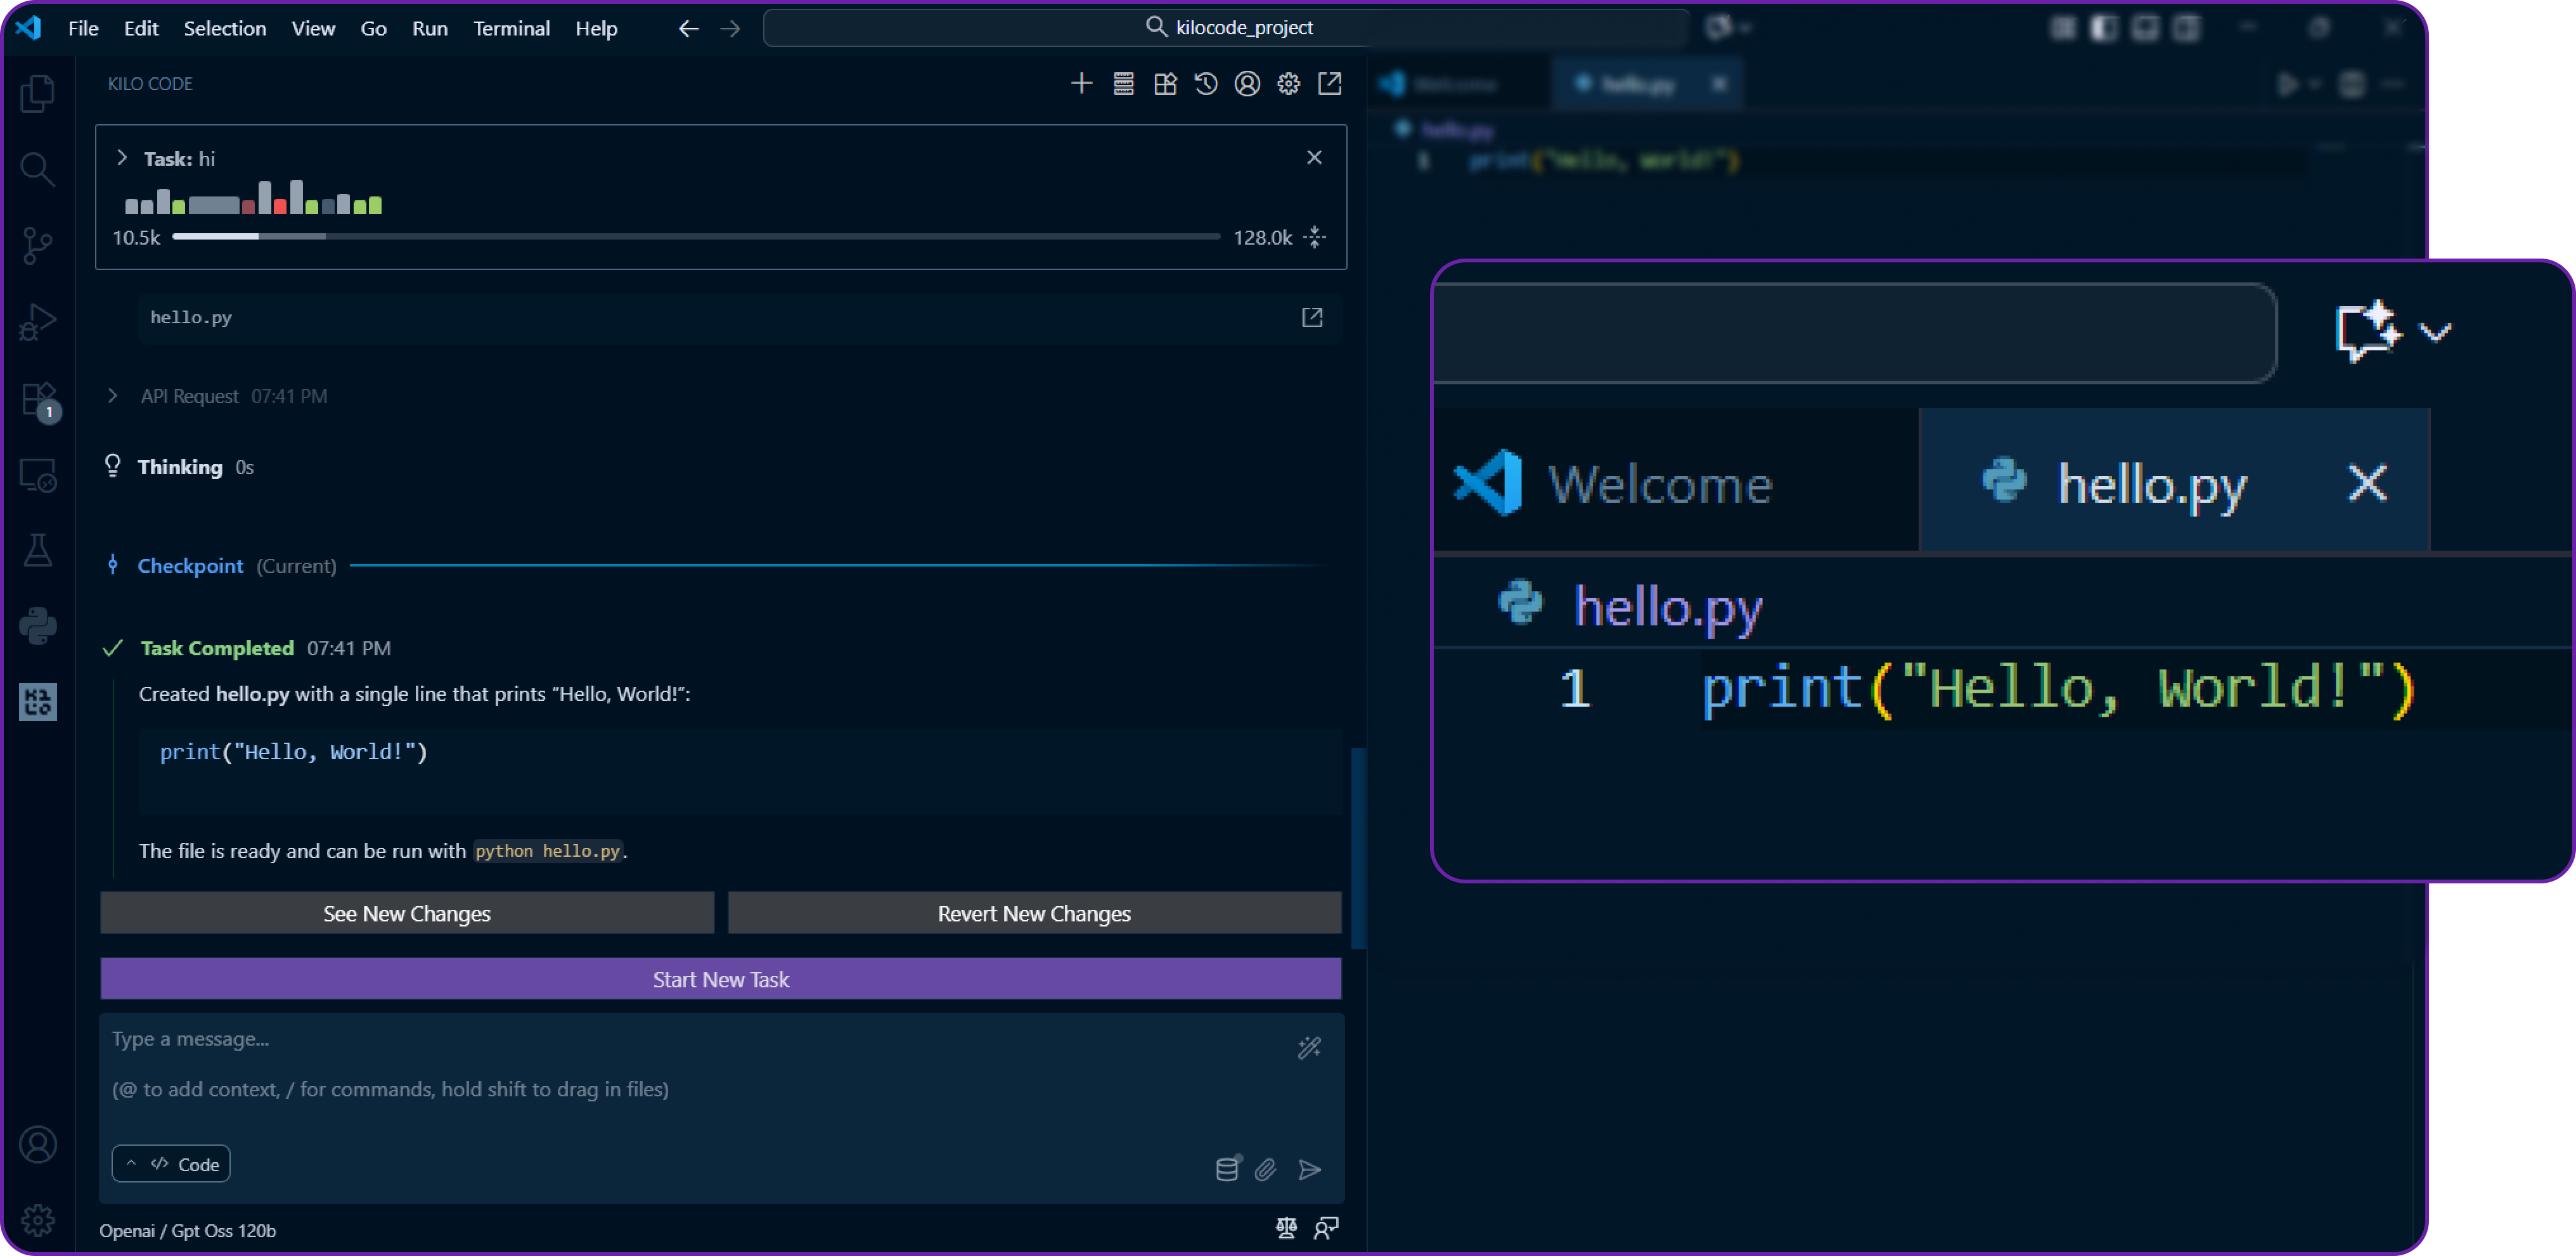
Within a few seconds, Kilo Code will generate the Python file and insert it into your workspace.
We can open hello_world.py and verify that it contains our function.
Perfect our Hyperstack-powered model is now generating code inside VS Code using Kilo Code!
We can also monitor the changes our AI Agent makes to the file by clicking on the Changes tab in Kilo Code.
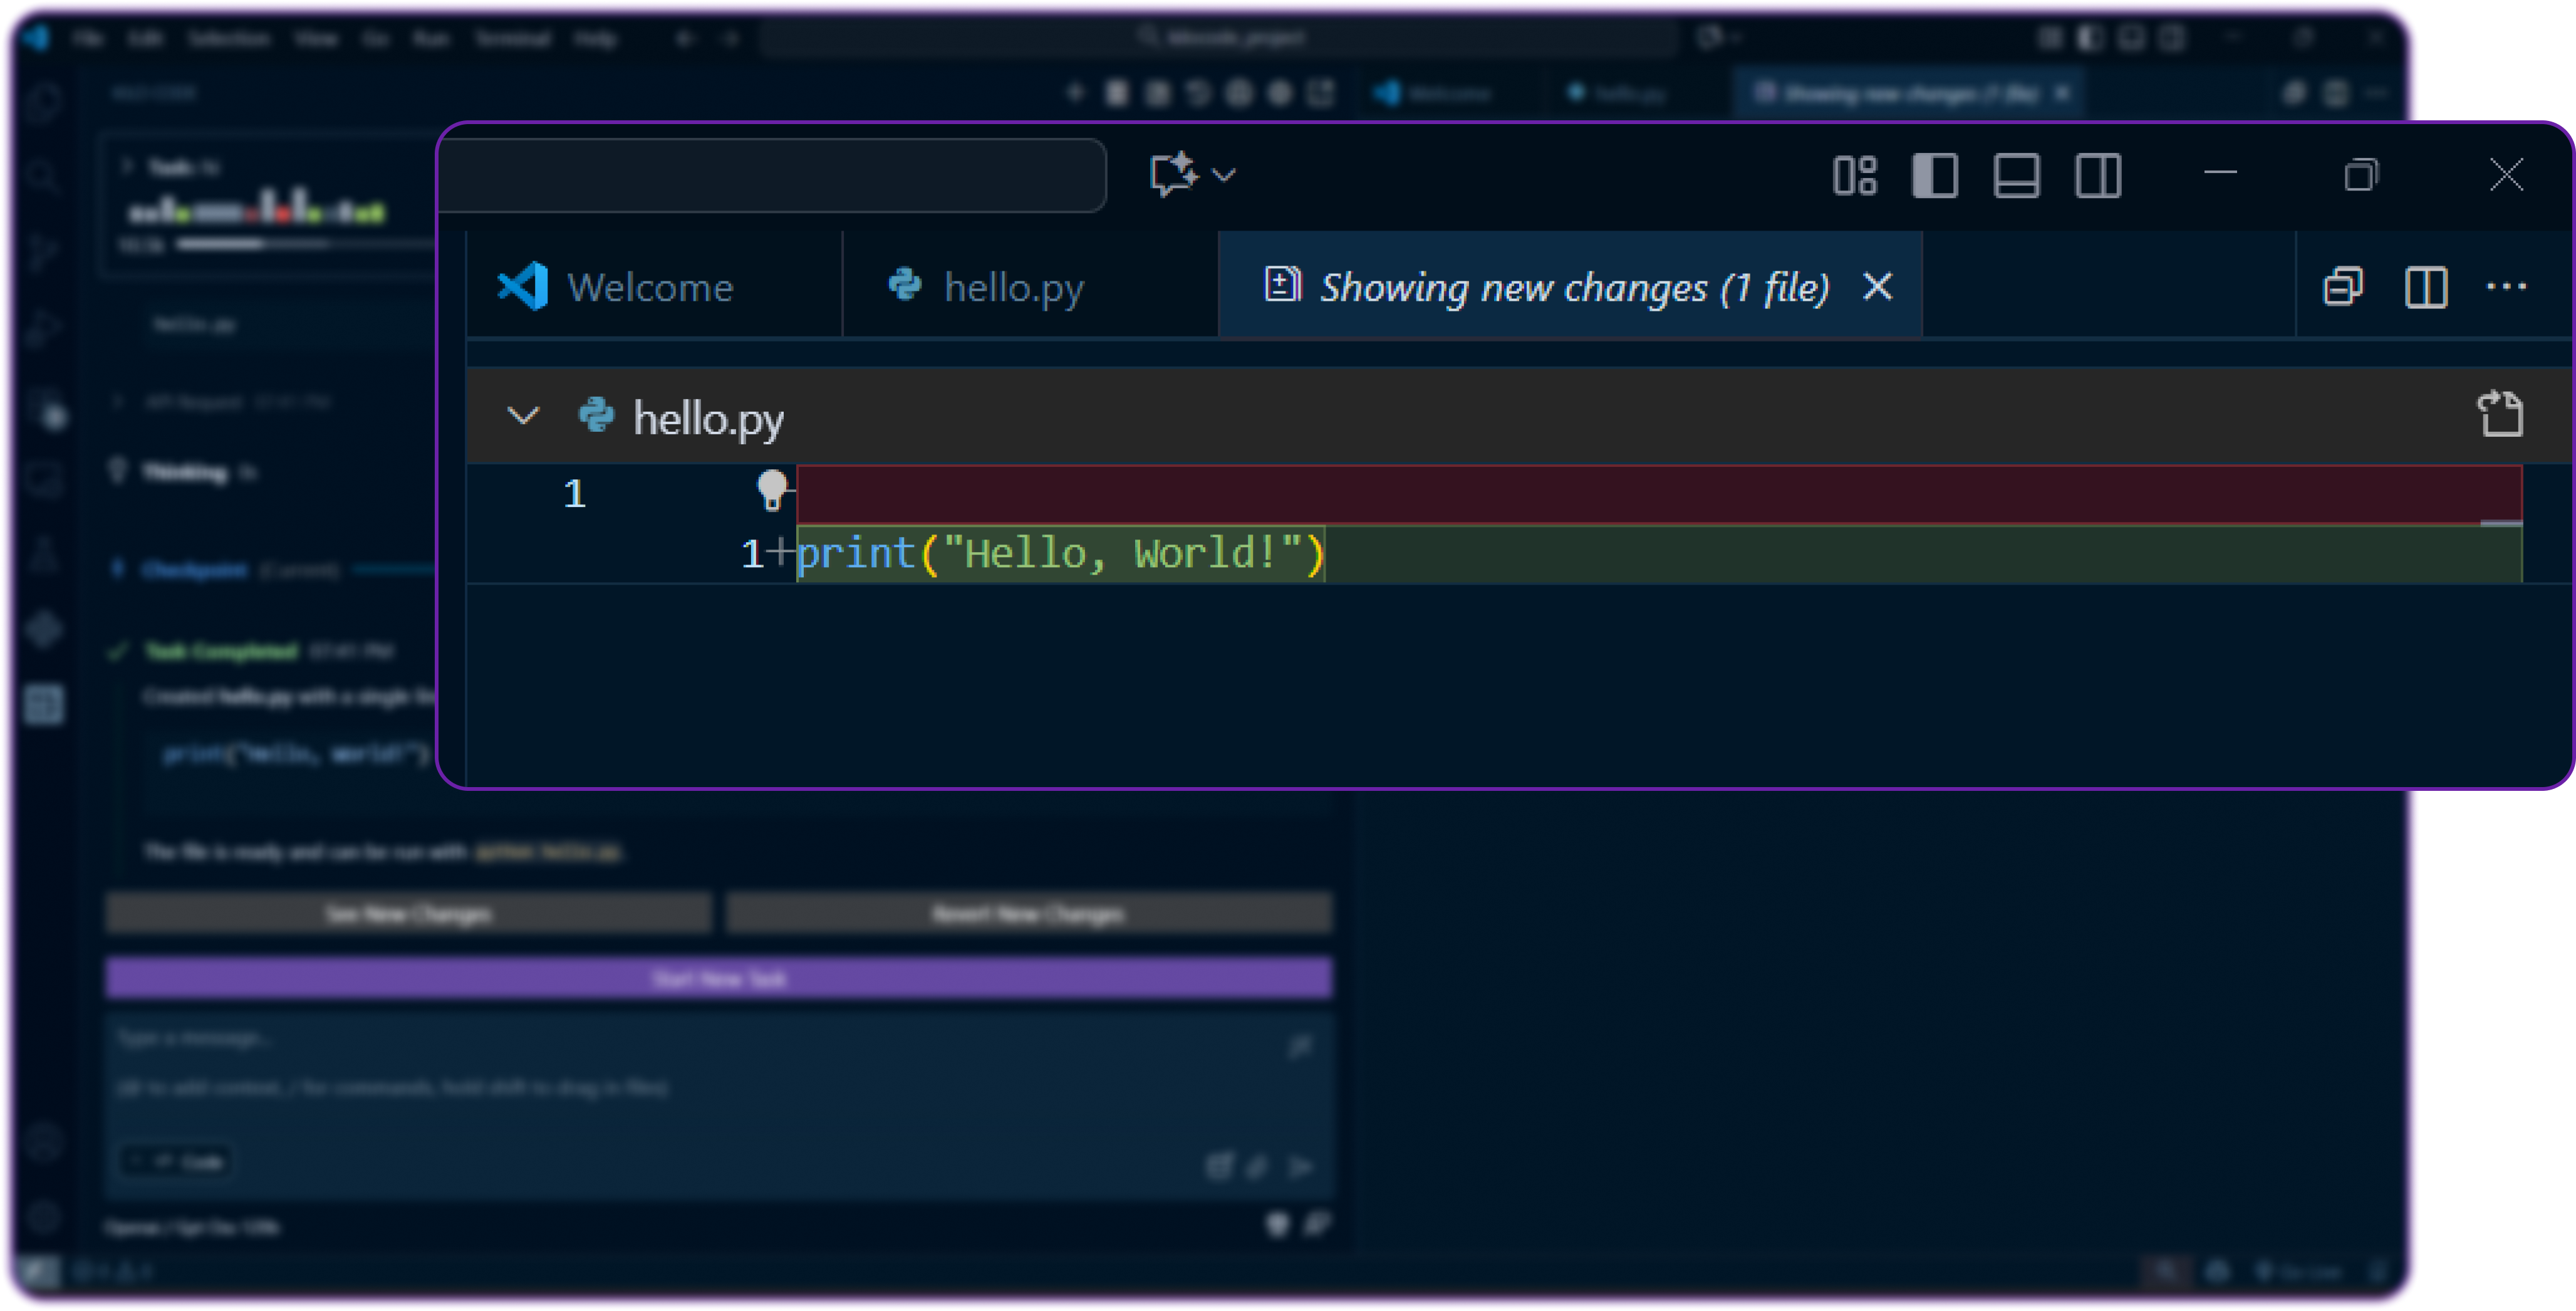
This tells us exactly what modifications were made, which is great for transparency and review and audit purposes.
Step 9: Monitoring the Usage
Once everything is integrated, we can monitor how our models are performing.
- Hyperstack Console: Go to the Usage Dashboard under billing to see API call metrics, token usage, and costs associated with your models.

-
Kilo Code Logs
Inside VS Code, Kilo Code also provides logs and metrics for model requests helping us track latency and response history.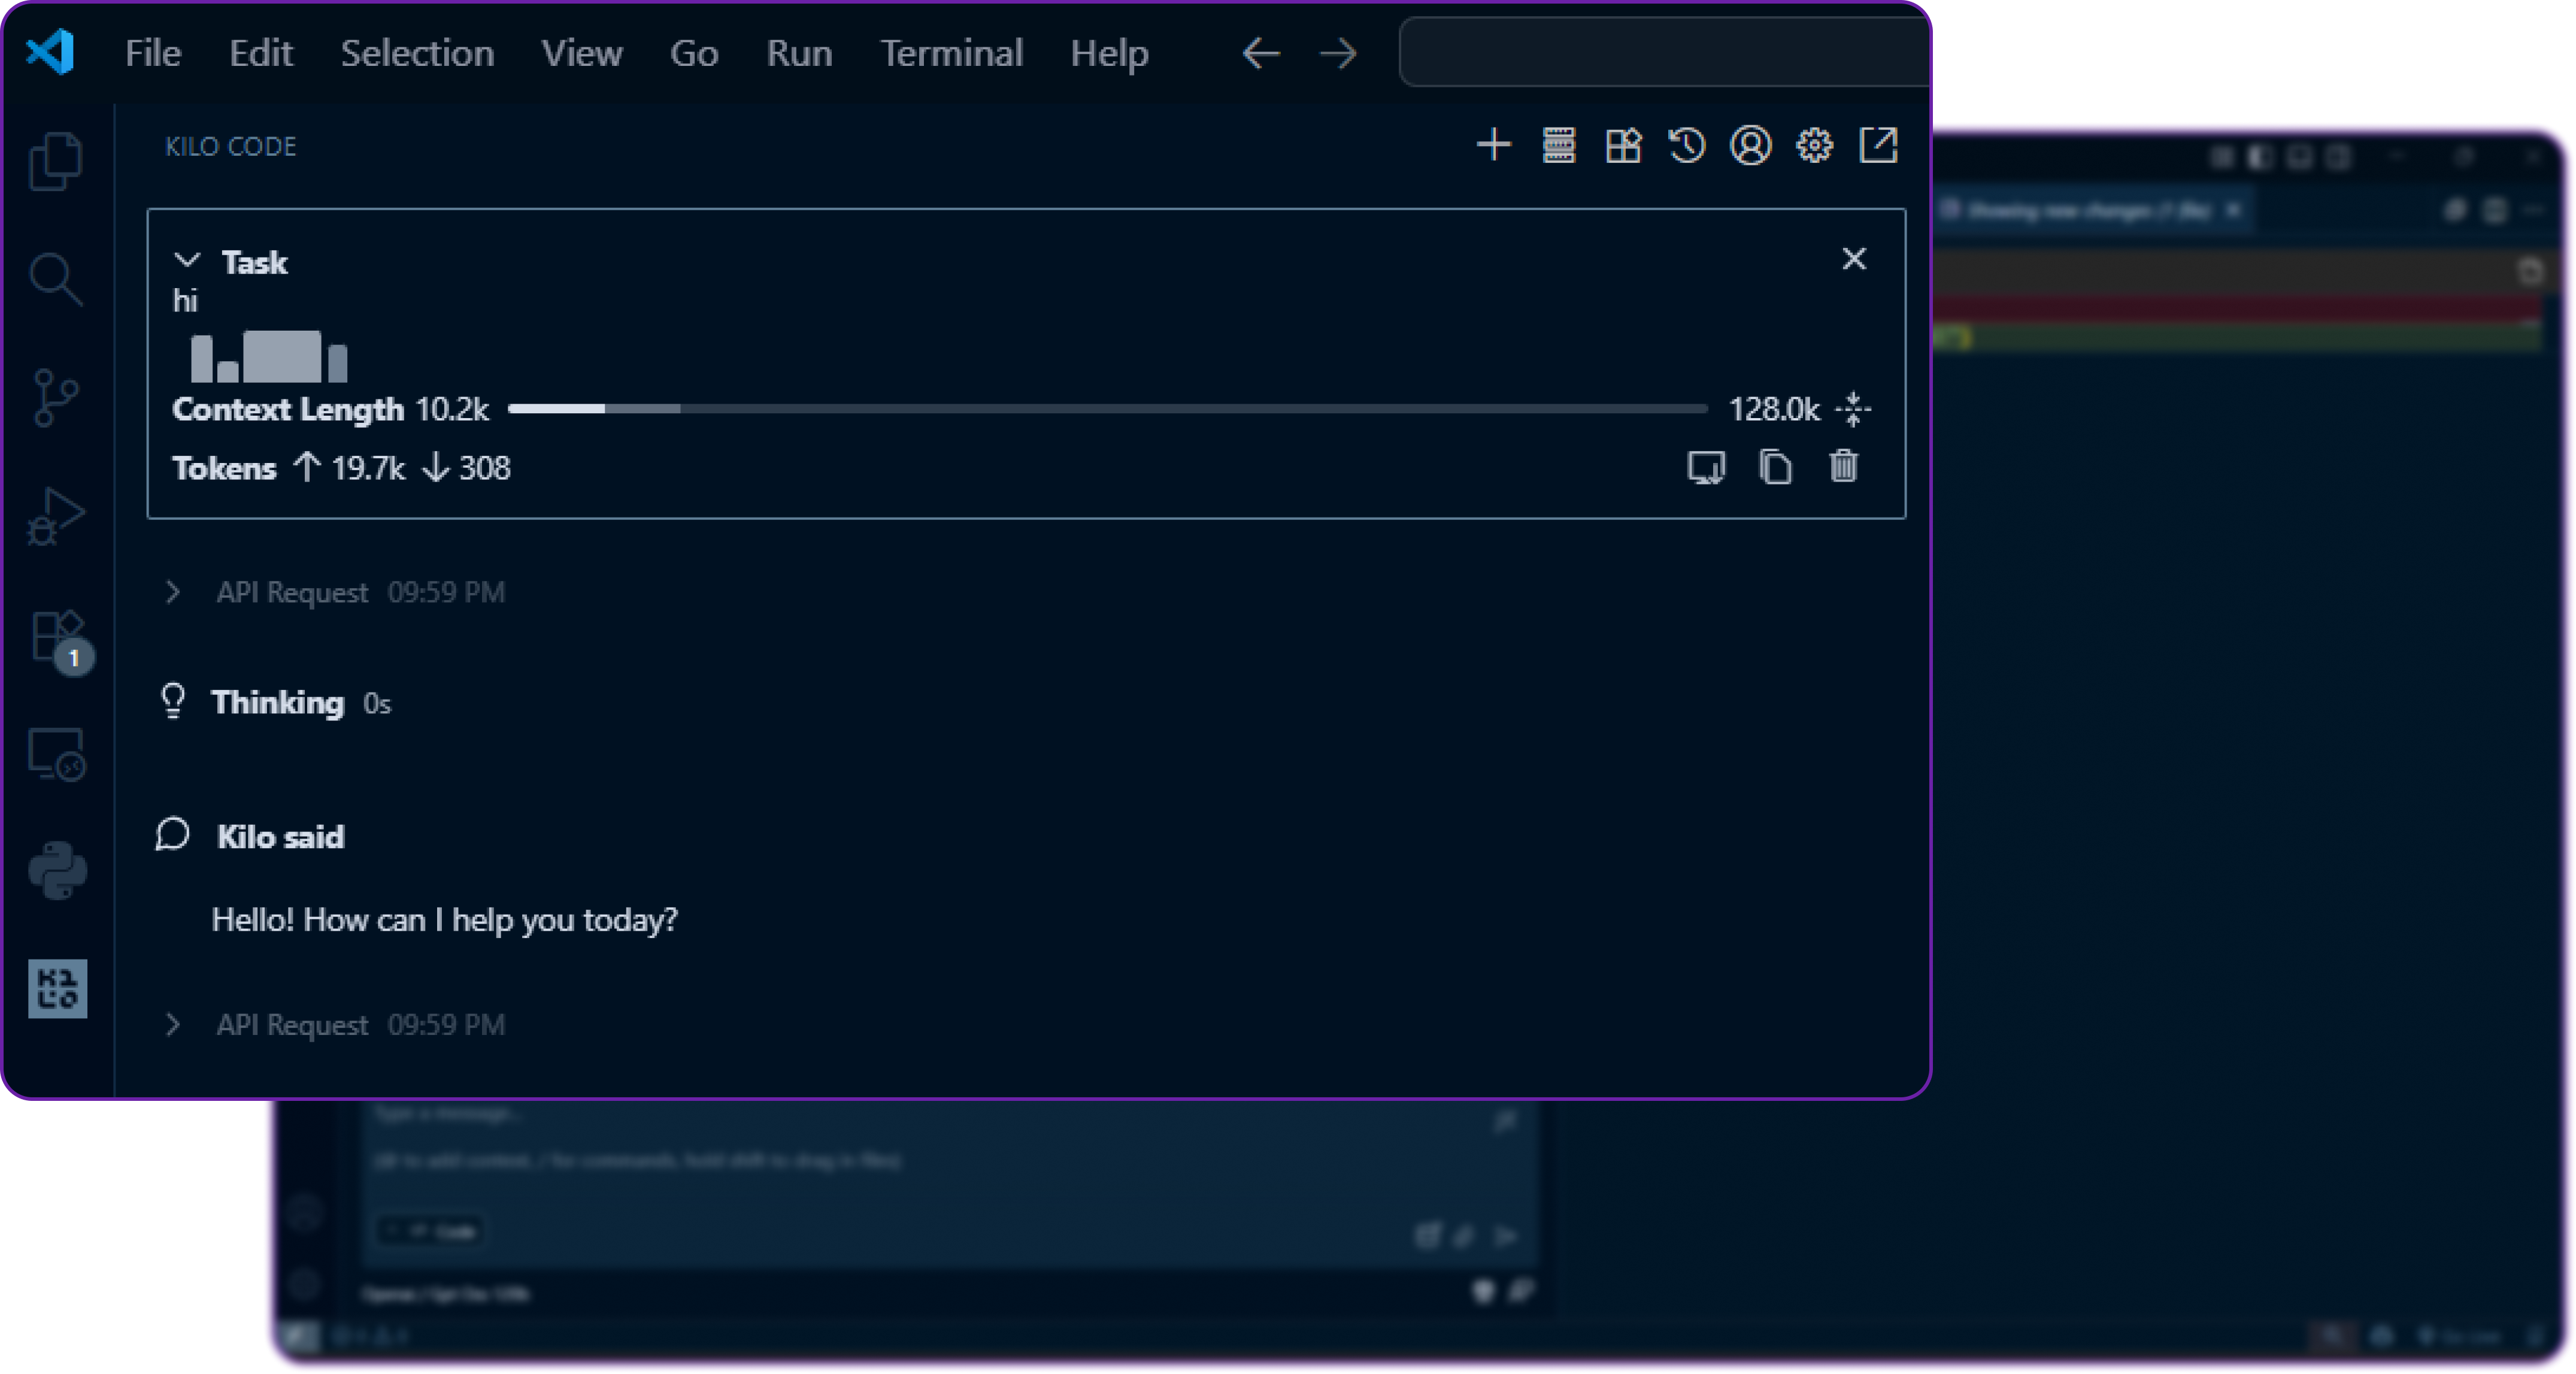
It also gives us insights into the context length used, which is crucial for optimizing prompt design.
Why This Integration Matters
By connecting Hyperstack AI Studio to Kilo Code, we get the perfect developer experience:
- Kilo Code gives us the developer-facing interface and agentic workflow.
- Hyperstack AI Studio gives us the power, control, and flexibility of running our own models.
This setup is ideal for:
- Fine-tuning models: train them on your company’s private codebase.
- Security-focused projects: keep all data and requests within your infrastructure.
- Team standardization: ensure every developer uses the same model backend.
- Cost optimization: scale up or down depending on workload.
With this integration, we’re not just using an AI assistant we’re building a custom AI coding stack.
What’s Next?
Now that we have everything running smoothly, here are a few things we can explore next:
- Fine-Tune Custom Models: Train domain-specific LLMs in Hyperstack for your projects.
- Run Benchmarks: Use Hyperstack’s evaluation tools to test response quality.
- Experiment with Different Models: Try smaller or larger models depending on your needs.
- Team Rollout: Share configuration across your team to ensure consistent model behavior.
- Automate with Agents: Build custom workflows in Kilo Code powered by Hyperstack.
Conclusion
By integrating Hyperstack AI Studio with Kilo Code in VS Code, we’ve unlocked a powerful, secure, and highly customizable AI development environment.
- Kilo Code gives us the smart, agent-driven developer interface.
- Hyperstack AI Studio provides a customisable, scalable model backend.
Together, they empower us to code faster, smarter, and with full control over our AI stack no vendor lock-in, no compromises.
So go ahead fine-tune your model in Hyperstack, plug it into Kilo Code, and watch your development workflow transform.
Related Blogs
-
How to Integrate Hyperstack AI Studio with Zed Code Editor for Powerful Coding Agent
-
How to Integrate Hyperstack AI Studio with Roocode for Next‑Gen Coding Support
-
A Beginner’s Guide to Integrating Hyperstack AI Studio with Claude Code
FAQ
1. Do I need a Kilo Pro account for integration?
No, you can integrate any OpenAI-compatible endpoint with the free version, though some advanced features (like multi-agent orchestration and team management) may require a paid plan.
2. Which Hyperstack model should I start with?
We recommend starting with openai/gpt-oss-120b since it provides excellent reasoning performance and context handling for development tasks.
3. How do I get my Hyperstack API Key and Base URL?
Go to Hyperstack API Keys, generate a new key, and copy the Base URL and Model ID from the Playground.
4. How can I confirm if my connection is working?
Open the Kilo Ask panel and send a simple message like "Hi". If you get a valid response, the integration is live and working properly.
5. Can I use fine-tuned Hyperstack models in Kilo Code?
Absolutely. Once you fine-tune and deploy a model in Hyperstack AI Studio, just copy its endpoint and model name, then add it in Kilo Code’s model settings no extra setup required.
Subscribe to Hyperstack!
Enter your email to get updates to your inbox every week

