


.png)
TABLE OF CONTENTS
NVIDIA H100 SXM GPUs On-Demand
Key Takeaways
- Hyperstack Dedicated Inference puts one open-weight model on GPUs reserved for your organisation, behind a private, API key-protected HTTPS endpoint.
- The Deploy AI wizard sizes the GPU to the model, its context and its concurrency, checks stock, creates the machine and installs vLLM in one pass.
- Sizing is arithmetic: model weights plus KV cache plus runtime overhead, checked against 90 per cent of the card’s advertised VRAM.
- Every endpoint speaks the OpenAI-compatible chat completions API, so existing SDKs and client libraries work unchanged; agentic tool calling works too, described in the prompt rather than the OpenAI tools parameter, since vLLM only turns that parameter on when its server is launched with matching tool-call flags.
- The endpoint provisions on demand and bills per minute at the flavour’s hourly rate, for as long as the machine runs.
Hyperstack Dedicated Inference puts a single open-weight model on GPUs reserved for your organisation, reachable at an HTTPS endpoint that only its own API key can call. It sits next to the shared, per-token AI Studio service as a second shape for the same job: instead of sending tokens to a model that other customers also call, you get a private machine, a private endpoint and a bill measured in GPU hours rather than tokens.
The Deploy AI wizard does the part that would otherwise be a manual deployment: it sizes the GPUs to the model, its context length and its concurrency, checks a configuration is in stock, creates the virtual machine, installs the serving runtime and issues the endpoint URL and key.
This guide walks the whole path end to end, from the console login through a live deployment to calling the endpoint from Python, including the pattern for pointing an agent or a tool-calling loop at it.
Everything below follows the wizard exactly as it renders in the console, and every external claim links back to the official Dedicated Inference documentation or to the relevant Hyperstack product page. Where a Hyperstack GPU is named, it is named in full, because the card matters: sizing, cost and concurrency all follow directly from which NVIDIA GPU the wizard puts under your model.
Dedicated Inference at a Glance
What one Deploy AI run gives you, before any of the detail below.
Every figure here is unpacked, with its own screenshot or worked example, in the sections that follow.
How Hyperstack Dedicated Inference Works
AI Studio serves models through a shared endpoint billed per token, with nothing to provision. Dedicated inference is the other shape: one model, on hardware reserved for you, provisioned on demand and metered by the minute for as long as the machine runs. Use it when:
- You need predictable latency.
- You need a private endpoint that other customers never touch.
- The shared catalogue does not serve the model at all.
The choice between the two is a question of stage and workload rather than one being an upgrade of the other, and Hyperstack’s own comparison of the two inference shapes covers the trade-off in more depth.
Two inference shapes, side by side
The same model catalogue, served two different ways.
Billing, hardware and setup are the three questions that decide between them; model choice and idle cost usually follow from the answer.
Three Doors, One Wizard
The wizard opens as a modal from three places, and it is the same wizard from all three: the Dashboard using its Deploy AI Model button, the Virtual Machines page using Deploy AI next to Deploy New Virtual Machine, or the Endpoints tab of the Inference page using its own Deploy AI button. Closing it with Cancel discards the deployment at any step and returns you to the page you started from.
Three entry points, one modal
Wherever it opens from, the wizard is the same three steps.
Deploy AI Model on the Dashboard, and Deploy AI on the Virtual Machines page and the Inference page, all open the identical wizard.
One Deploy AI Run Creates Seven Things
A single wizard run creates all of the following, and none of it is configured by hand:
- A virtual machine sized to the model.
- A public IP address with SSH, HTTP and HTTPS opened in its firewall.
- A GPU image with the NVIDIA driver, CUDA and Docker preinstalled.
- A pinned version of the vLLM serving runtime.
- The model weights themselves.
- A generated hostname with HTTPS terminated on the machine.
- An API key that every request must present.
What one Deploy AI run creates
Seven pieces of infrastructure from a single wizard pass, none of them touched by hand.
Reproduced from the component table in the Dedicated Inference documentation.
Sizing a Dedicated Endpoint
Sizing runs the moment you pick a model, before you have filled in anything else, so an unavailable configuration surfaces immediately rather than at the end of the form.
The recommendation accounts for three things, shown as a single Fits the model line:
- The model weights.
- The key-value cache, a product of the context length and the number of concurrent requests you ask for.
- A reserved allowance for the serving engine’s own runtime overhead, which the panel itself flags as an uncalibrated estimate rather than a measured figure.
That total is checked against the usable VRAM of a candidate configuration, which is 90 per cent of the card’s advertised VRAM; the remaining 10 per cent is held back as headroom outright, before any model is even loaded. On a 48 GiB card that is 43.2 GiB usable, and every figure in the panel below is measured against that number rather than the full 48 GiB.
A real sizing result, one NVIDIA RTX A6000
The Hosting setup step for a Qwen3-14B deployment at 8,192 tokens of context and a starting request of 4 concurrent requests, on the wizard’s default sizing setting, named Cost and explained below.
From the wizard’s own “Fits the model” line: 38.4 GiB of 43.2 GiB usable is committed, leaving 4.8 GiB free within the usable share, on top of the 4.8 GiB the engine holds back.
The wizard sizes to the nearest configuration that fits rather than to the exact number typed in, so this NVIDIA RTX A6000 serves 7 concurrent requests even though 4 was asked for, and the arithmetic below is computed against that served figure.
The panel also reports what the configuration serves, which can exceed what you asked for, as it does here. The machine behind it carries 28 vCPUs and 58 GB of RAM, and the quoted rate was $0.5067 an hour, close to $370 a month if left running continuously.
Three Sizing Profiles
A Sizing profile sits alongside context length and concurrency, and decides which fitting configuration the wizard recommends.
Cost, Fast or Experiment
The same model and the same context and concurrency, sized three different ways.
Cost is the default and the one used throughout this example.
Context length runs from 4,096 to 32,768 tokens and concurrency from 1 to 32 concurrent requests. For a longer context or higher concurrency than the wizard offers, both dropdowns carry a link to contact sales directly.
Clicking Change the configuration opens every configuration that serves the model at the chosen context and concurrency, ranked from cheapest to most expensive, with the flavour, usable VRAM and hourly rate of each. Only configurations that are in stock can be selected; the rest are listed as unavailable with a contact-sales link in place of a rate.
Regions follow stock, not the other way round. Only regions with the recommended configuration in stock are selectable, and since each environment belongs to one region, that choice also decides which environments and SSH keys are available.
What contains what
From this deployment: CANADA-1 as the region, example-environment inside it.
The same nesting the Hosting setup step walks through: pick the region, then the environment inside it, then the SSH key.
When Nothing Is in Stock
Stock is checked live, so the wizard sometimes finds that every configuration matching the recommendation is unavailable everywhere. When that happens, the Hosting setup step says so directly and hides the region and environment controls rather than letting you continue towards a machine that cannot be created.
Try a different size then offers the same three levers in reverse:
- Shorten the context.
- Lower the concurrency.
- Switch the sizing profile.
A smaller key-value cache usually lands on a smaller GPU class, and a smaller GPU class is the one more likely to have stock somewhere.
Where nothing fits even after that, Contact support opens a request with the model already filled in, so the only thing left to add is what you need.
Before You Deploy
Two things are worth having ready before you open the wizard: a Hugging Face token and the right permissions in your Hyperstack organisation.
A Hugging Face token with Read scope is required. It is used once to download the model weights and never stored. Generate one from the Hugging Face access tokens page.
Organisation owners already hold every permission the wizard needs. An organisation member needs virtual machine, environment and SSH key permissions in their user role, which an owner or administrator assigns.
| Permission | What it allows in the wizard |
|---|---|
virtual-machine:create |
Creating the endpoint’s virtual machine. |
environment:list |
Choosing the environment to deploy into. |
keypair:list |
Choosing the SSH key. |
environment:create |
Creating a new environment from inside the wizard. |
keypair:create |
Creating a new SSH key from inside the wizard. |
The simplest role that grants all five is the VirtualMachinePermissions policy plus the two individual permissions environment:create and keypair:create. The policy grants the first three outright, and also grants every other virtual machine permission, so the same member can manage the endpoint’s machine afterwards: opening its console, editing its firewall rules and deleting it.
Log In and Open the Console
Sign in at console.hyperstack.cloud with your email and password, or through Google, Microsoft or GitHub. The dashboard is the first of the three places the wizard opens from.
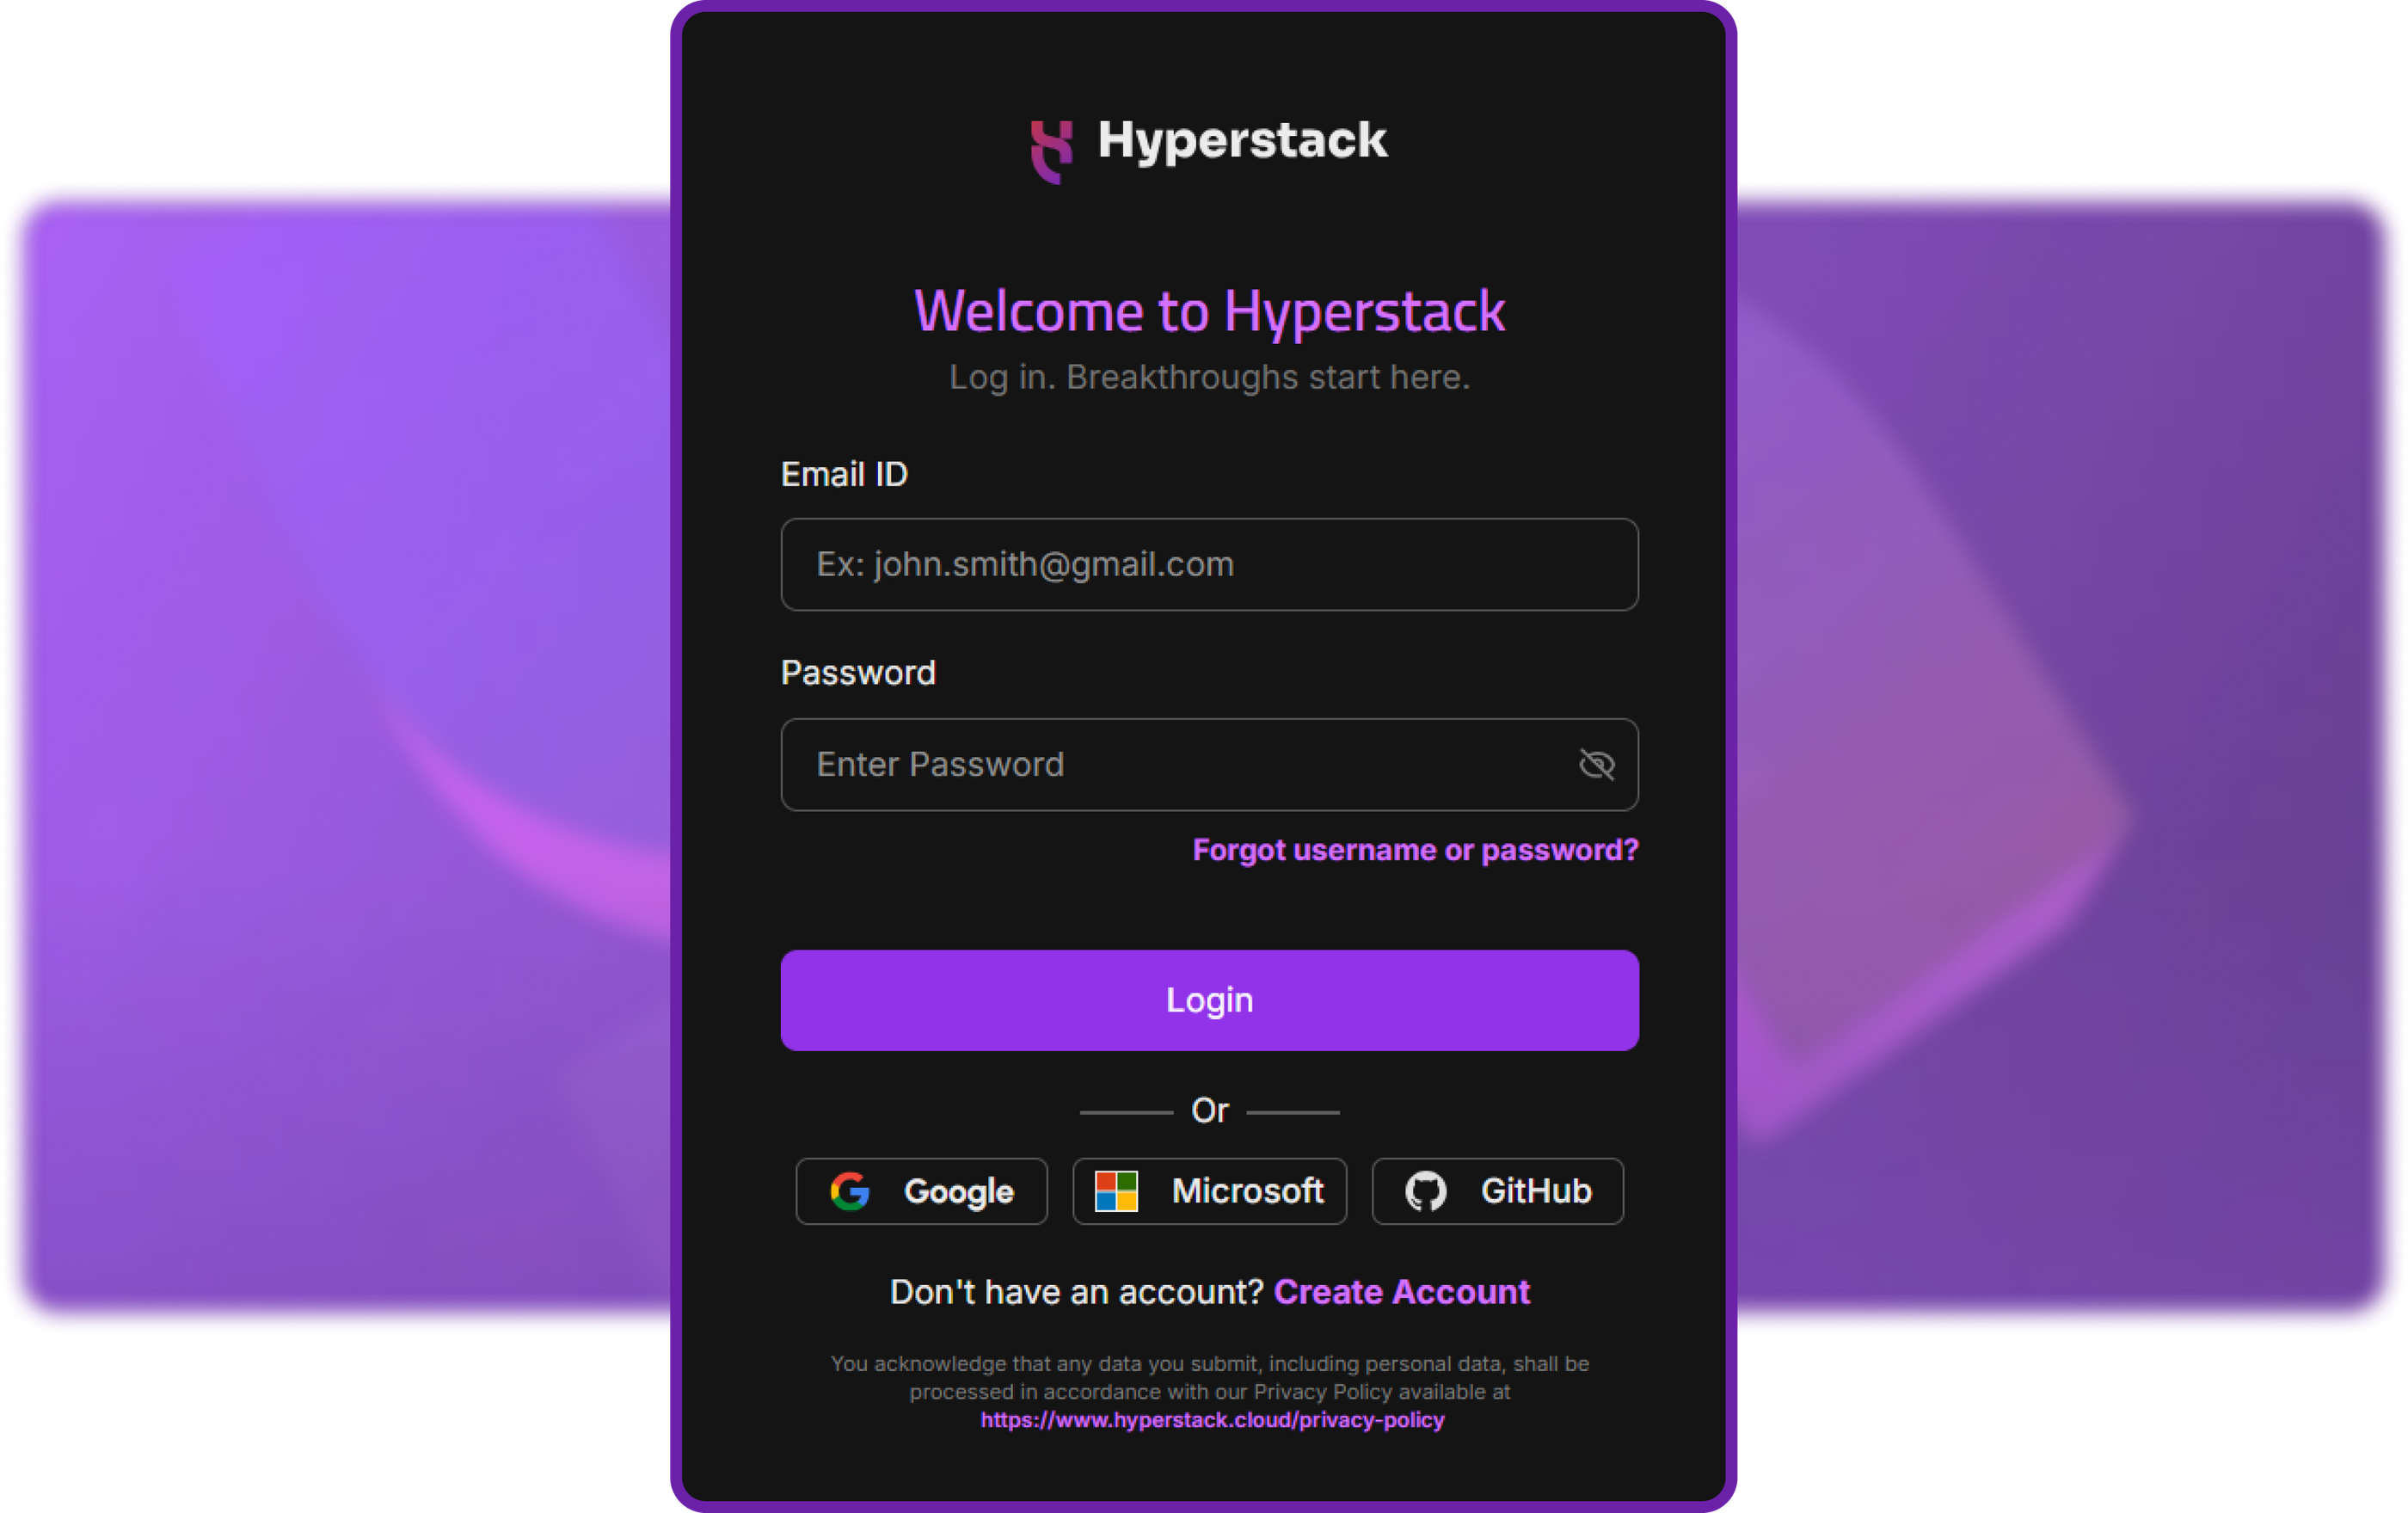
Signing in to the Hyperstack console.
The welcome card on the dashboard carries two buttons: Deploy Virtual Machine for general compute, and Deploy AI Model for a dedicated endpoint like the one this guide builds.
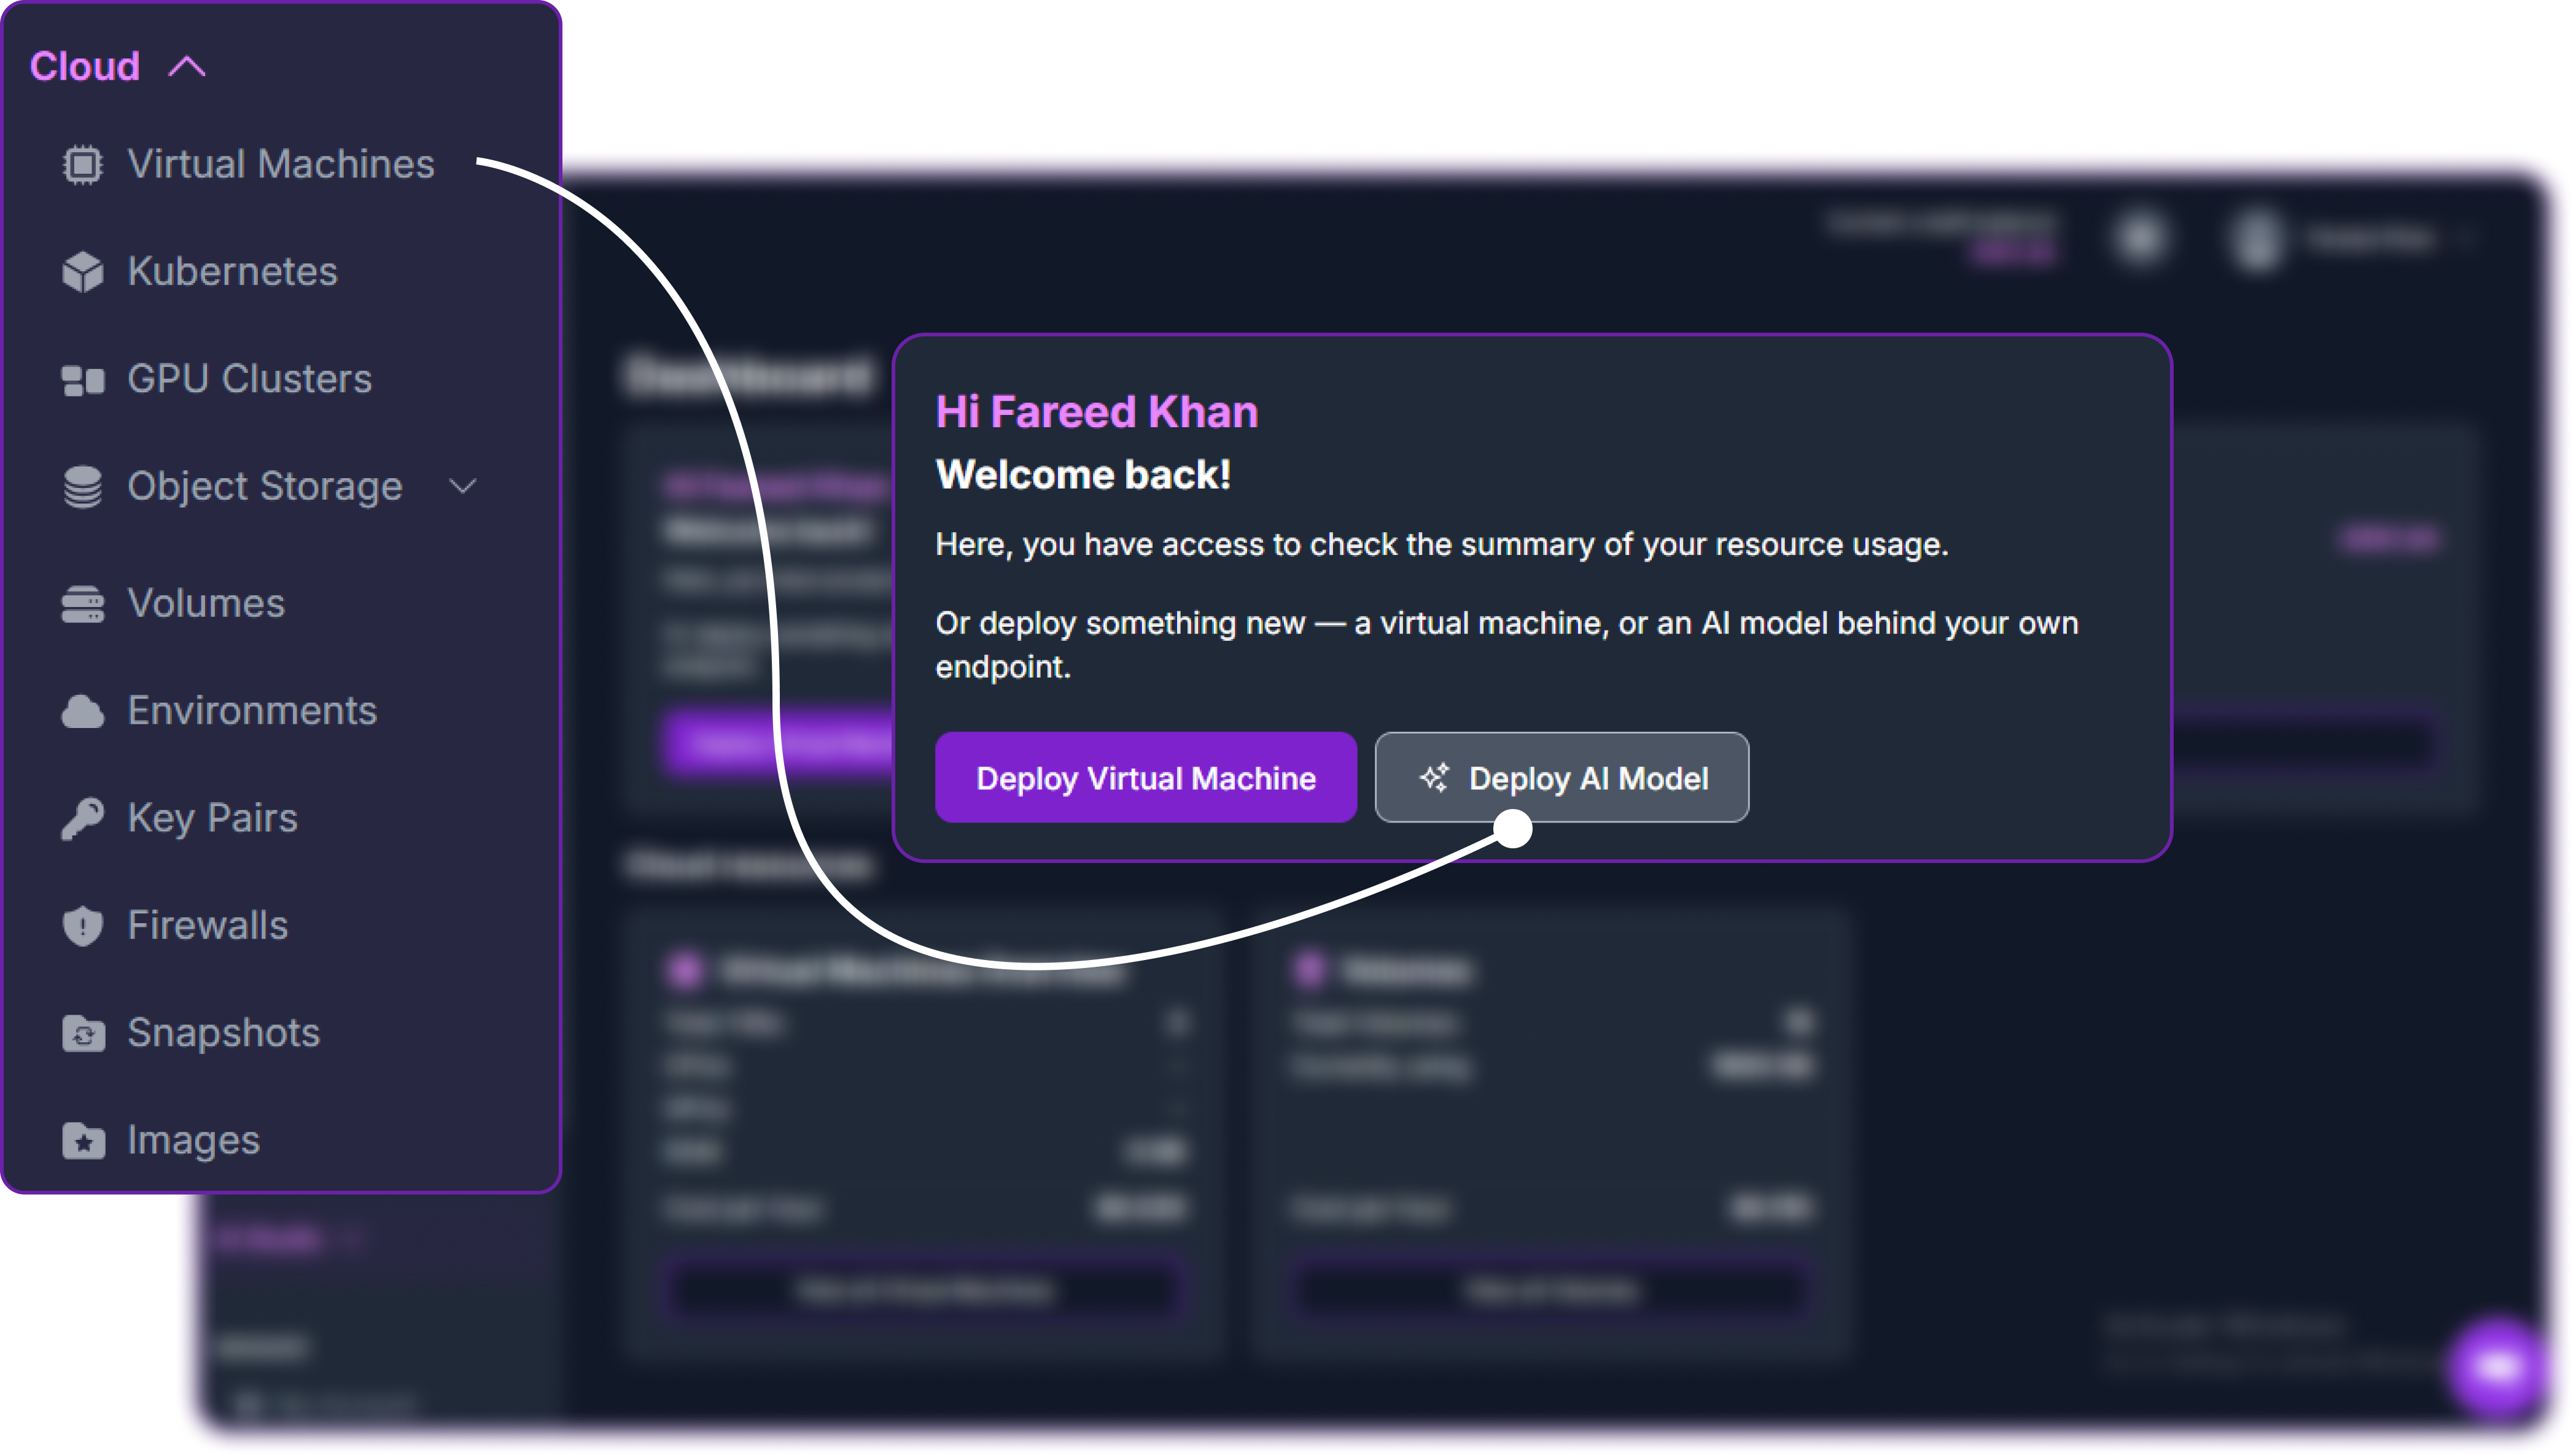
The dashboard’s Deploy AI Model button is one of three ways to open the wizard.
Deploying a Model, Step by Step
The wizard is three steps: pick a model, set up hosting, then review and deploy. The walkthrough below follows a Qwen3-14B deployment, and every figure quoted is taken directly from the console screens shown.
Browse or search the catalogue, and filter to models that support dedicated hosting.
Choose Hyperstack dedicated, supply a Hugging Face token, and set context, concurrency and region.
Check the deployment summary and estimated cost, then click Deploy Endpoint.
Step 1. Pick a Model
The catalogue is filtered by modality. It also grows over time, so treat the counts below as a snapshot and check the models overview for the current total.
Each row carries the model’s repository id, its approximate parameter count, and how it can be served: Partner API for the shared, per-token service, or Dedicated for your own GPUs. The Hyperstack dedicated filter chip narrows the list to only the models that support the path this article covers.
The catalogue, by modality
Counts from the run shown below. A model can carry more than one tag, so these do not sum to the 160 total.
Filtered further with the Hyperstack dedicated chip, the Partner API chip, or a free-text search across model and provider names.
If the model you want is not listed, Add from Hugging Face takes a Hugging Face token and the exact model repository id. The match is exact rather than fuzzy, and Hyperstack checks both that the model exists and that the supplied token can reach it before offering to deploy it.
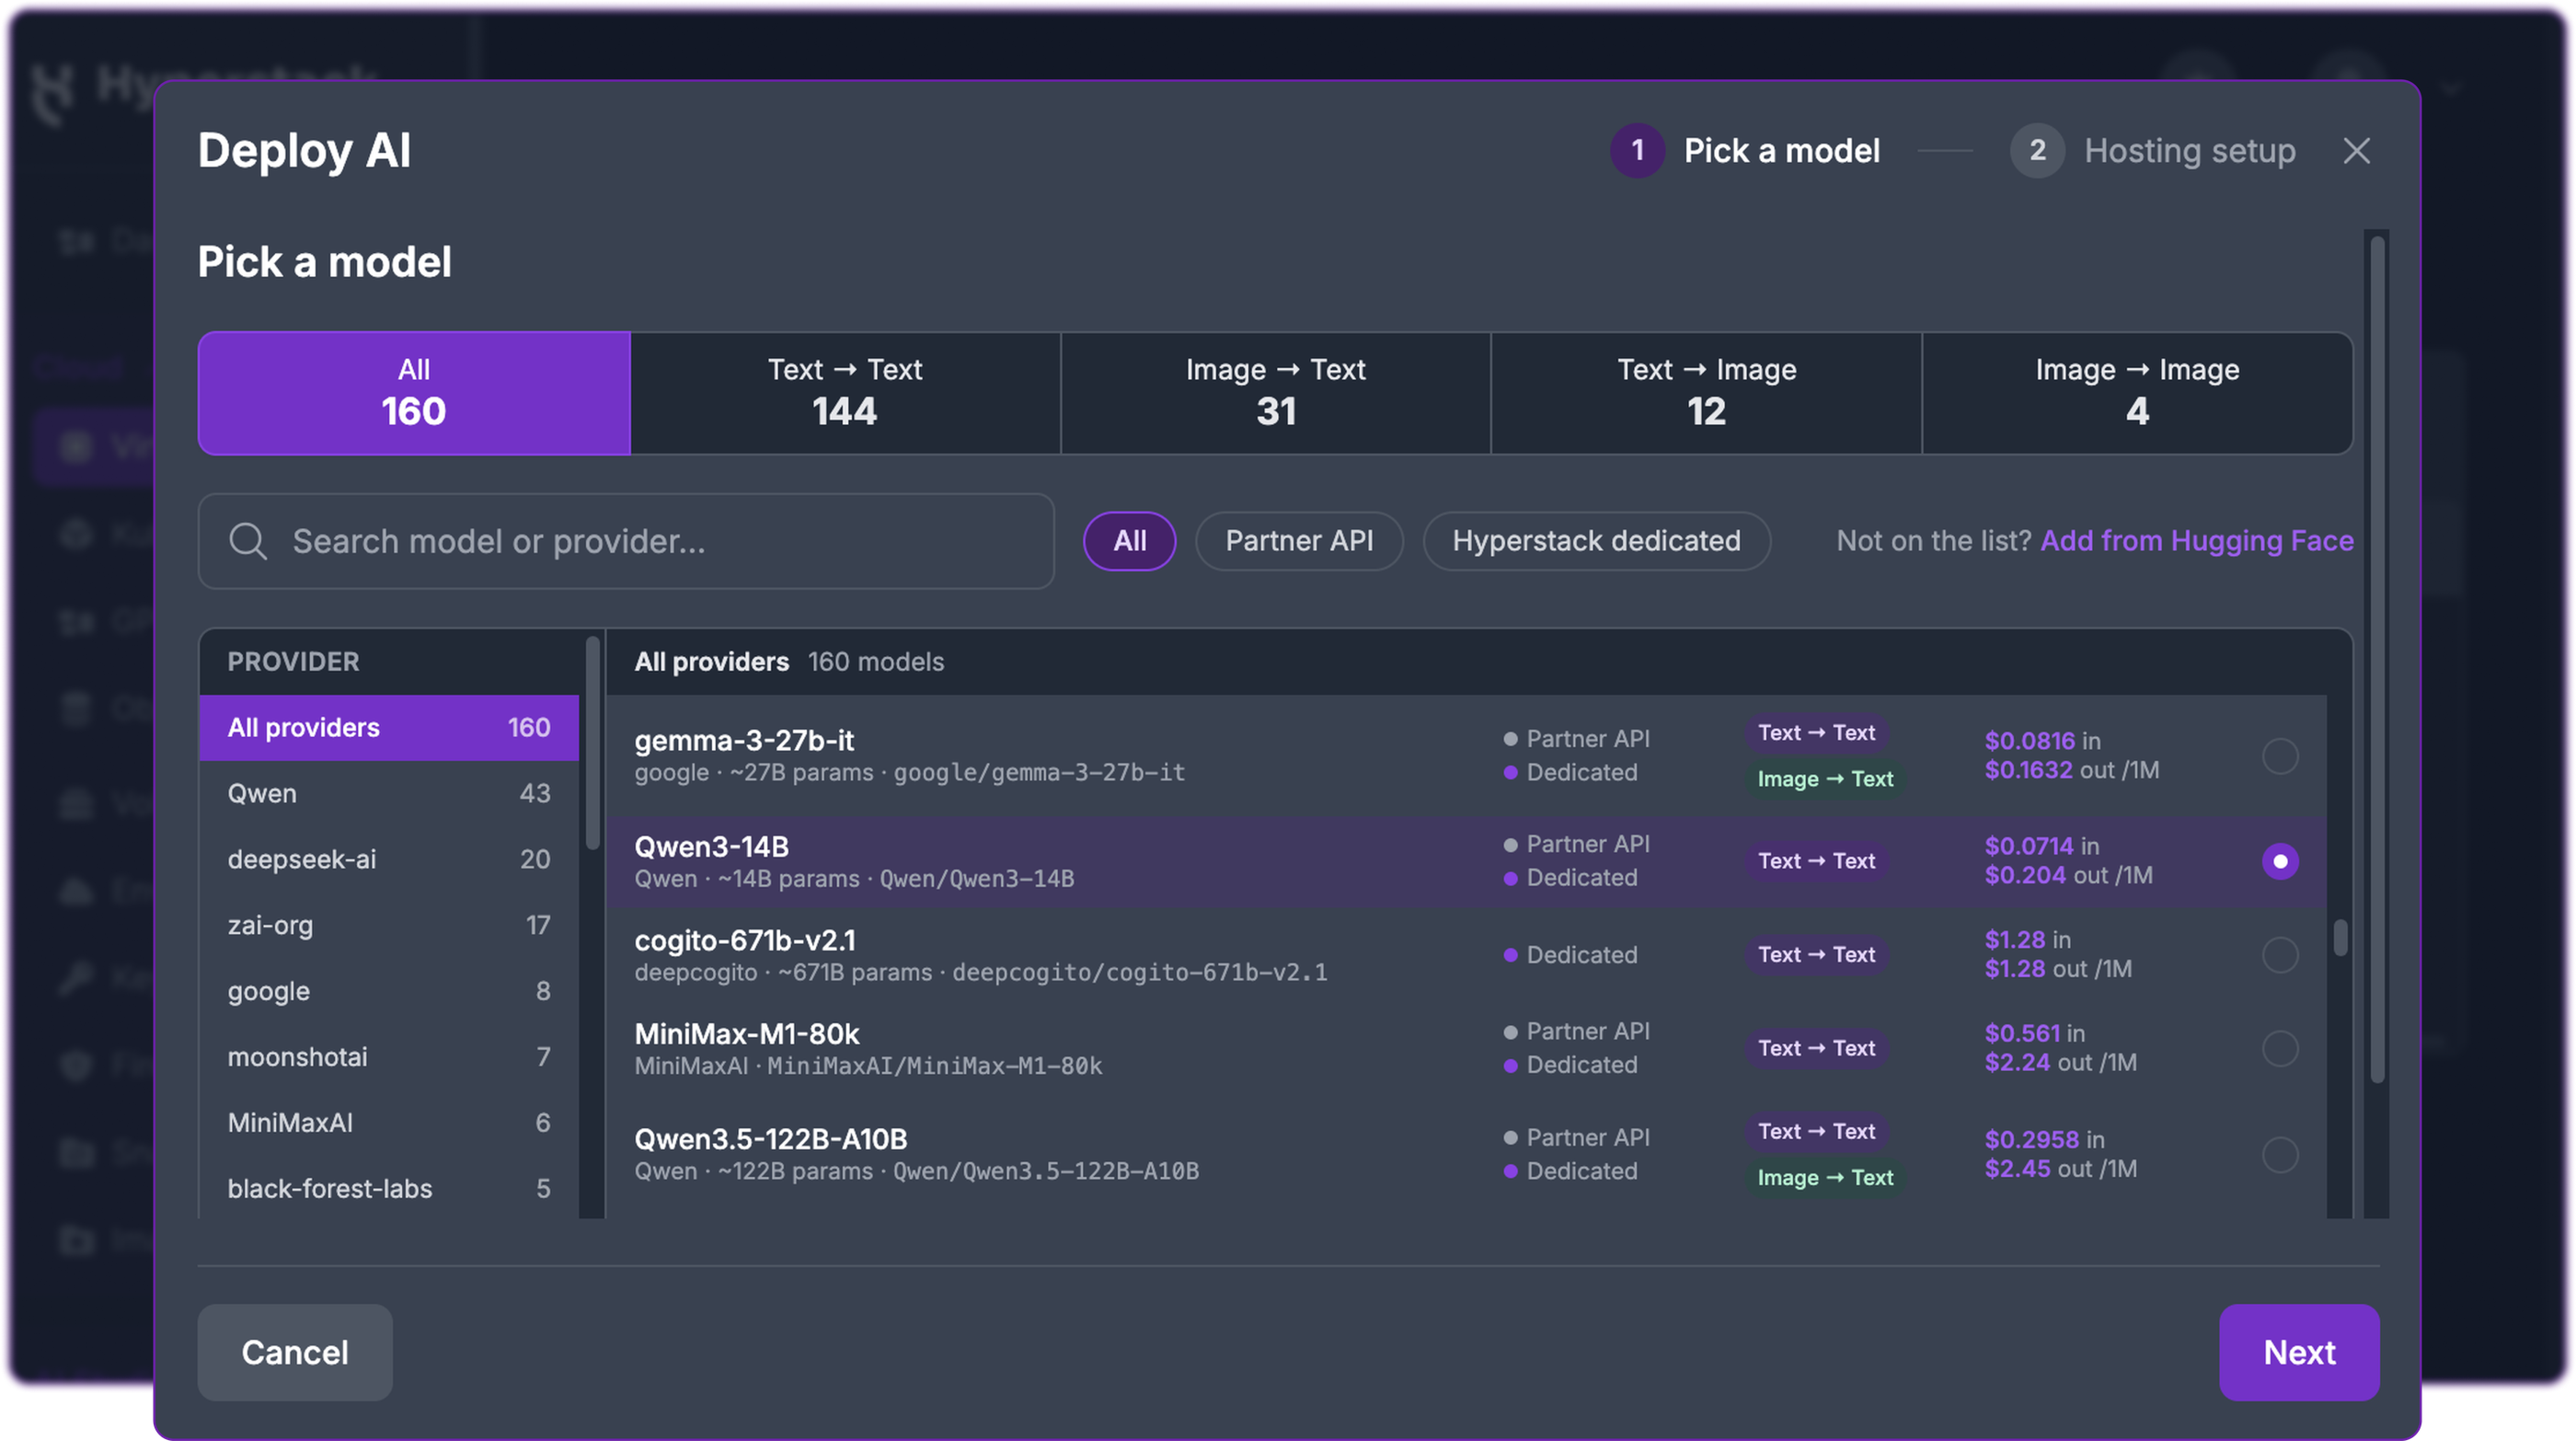
Qwen/Qwen3-14B selected in the unfiltered catalogue; the Hyperstack dedicated filter chip, next to All and Partner API, narrows this further.
Step 2. Hosting Setup
Hosting setup opens with two cards, Partner API and Hyperstack dedicated. For a model the shared service also serves, the Partner API card is selected by default, so switching to the dedicated card is the first action here. Next stays unavailable until a Hugging Face token has been applied.
This step also sets the Context length, Concurrency and Sizing profile the recommendation is built from; this example uses the wizard’s starting values of 8,192 tokens, 4 concurrent requests and the Cost profile.
With the Hugging Face token applied, the panel below updates to show the recommended configuration:
- Which GPU it picked.
- How the model fits into the usable VRAM.
- What the configuration serves.
- What the hourly rate is, with an always-on monthly estimate.
- What the machine’s CPU and memory are.
The exact figures for this Qwen3-14B example are covered in the sizing section above.
From here you also choose the region and environment, an SSH key, and can click Change the configuration to override the recommendation with any other in-stock configuration that serves the same model.
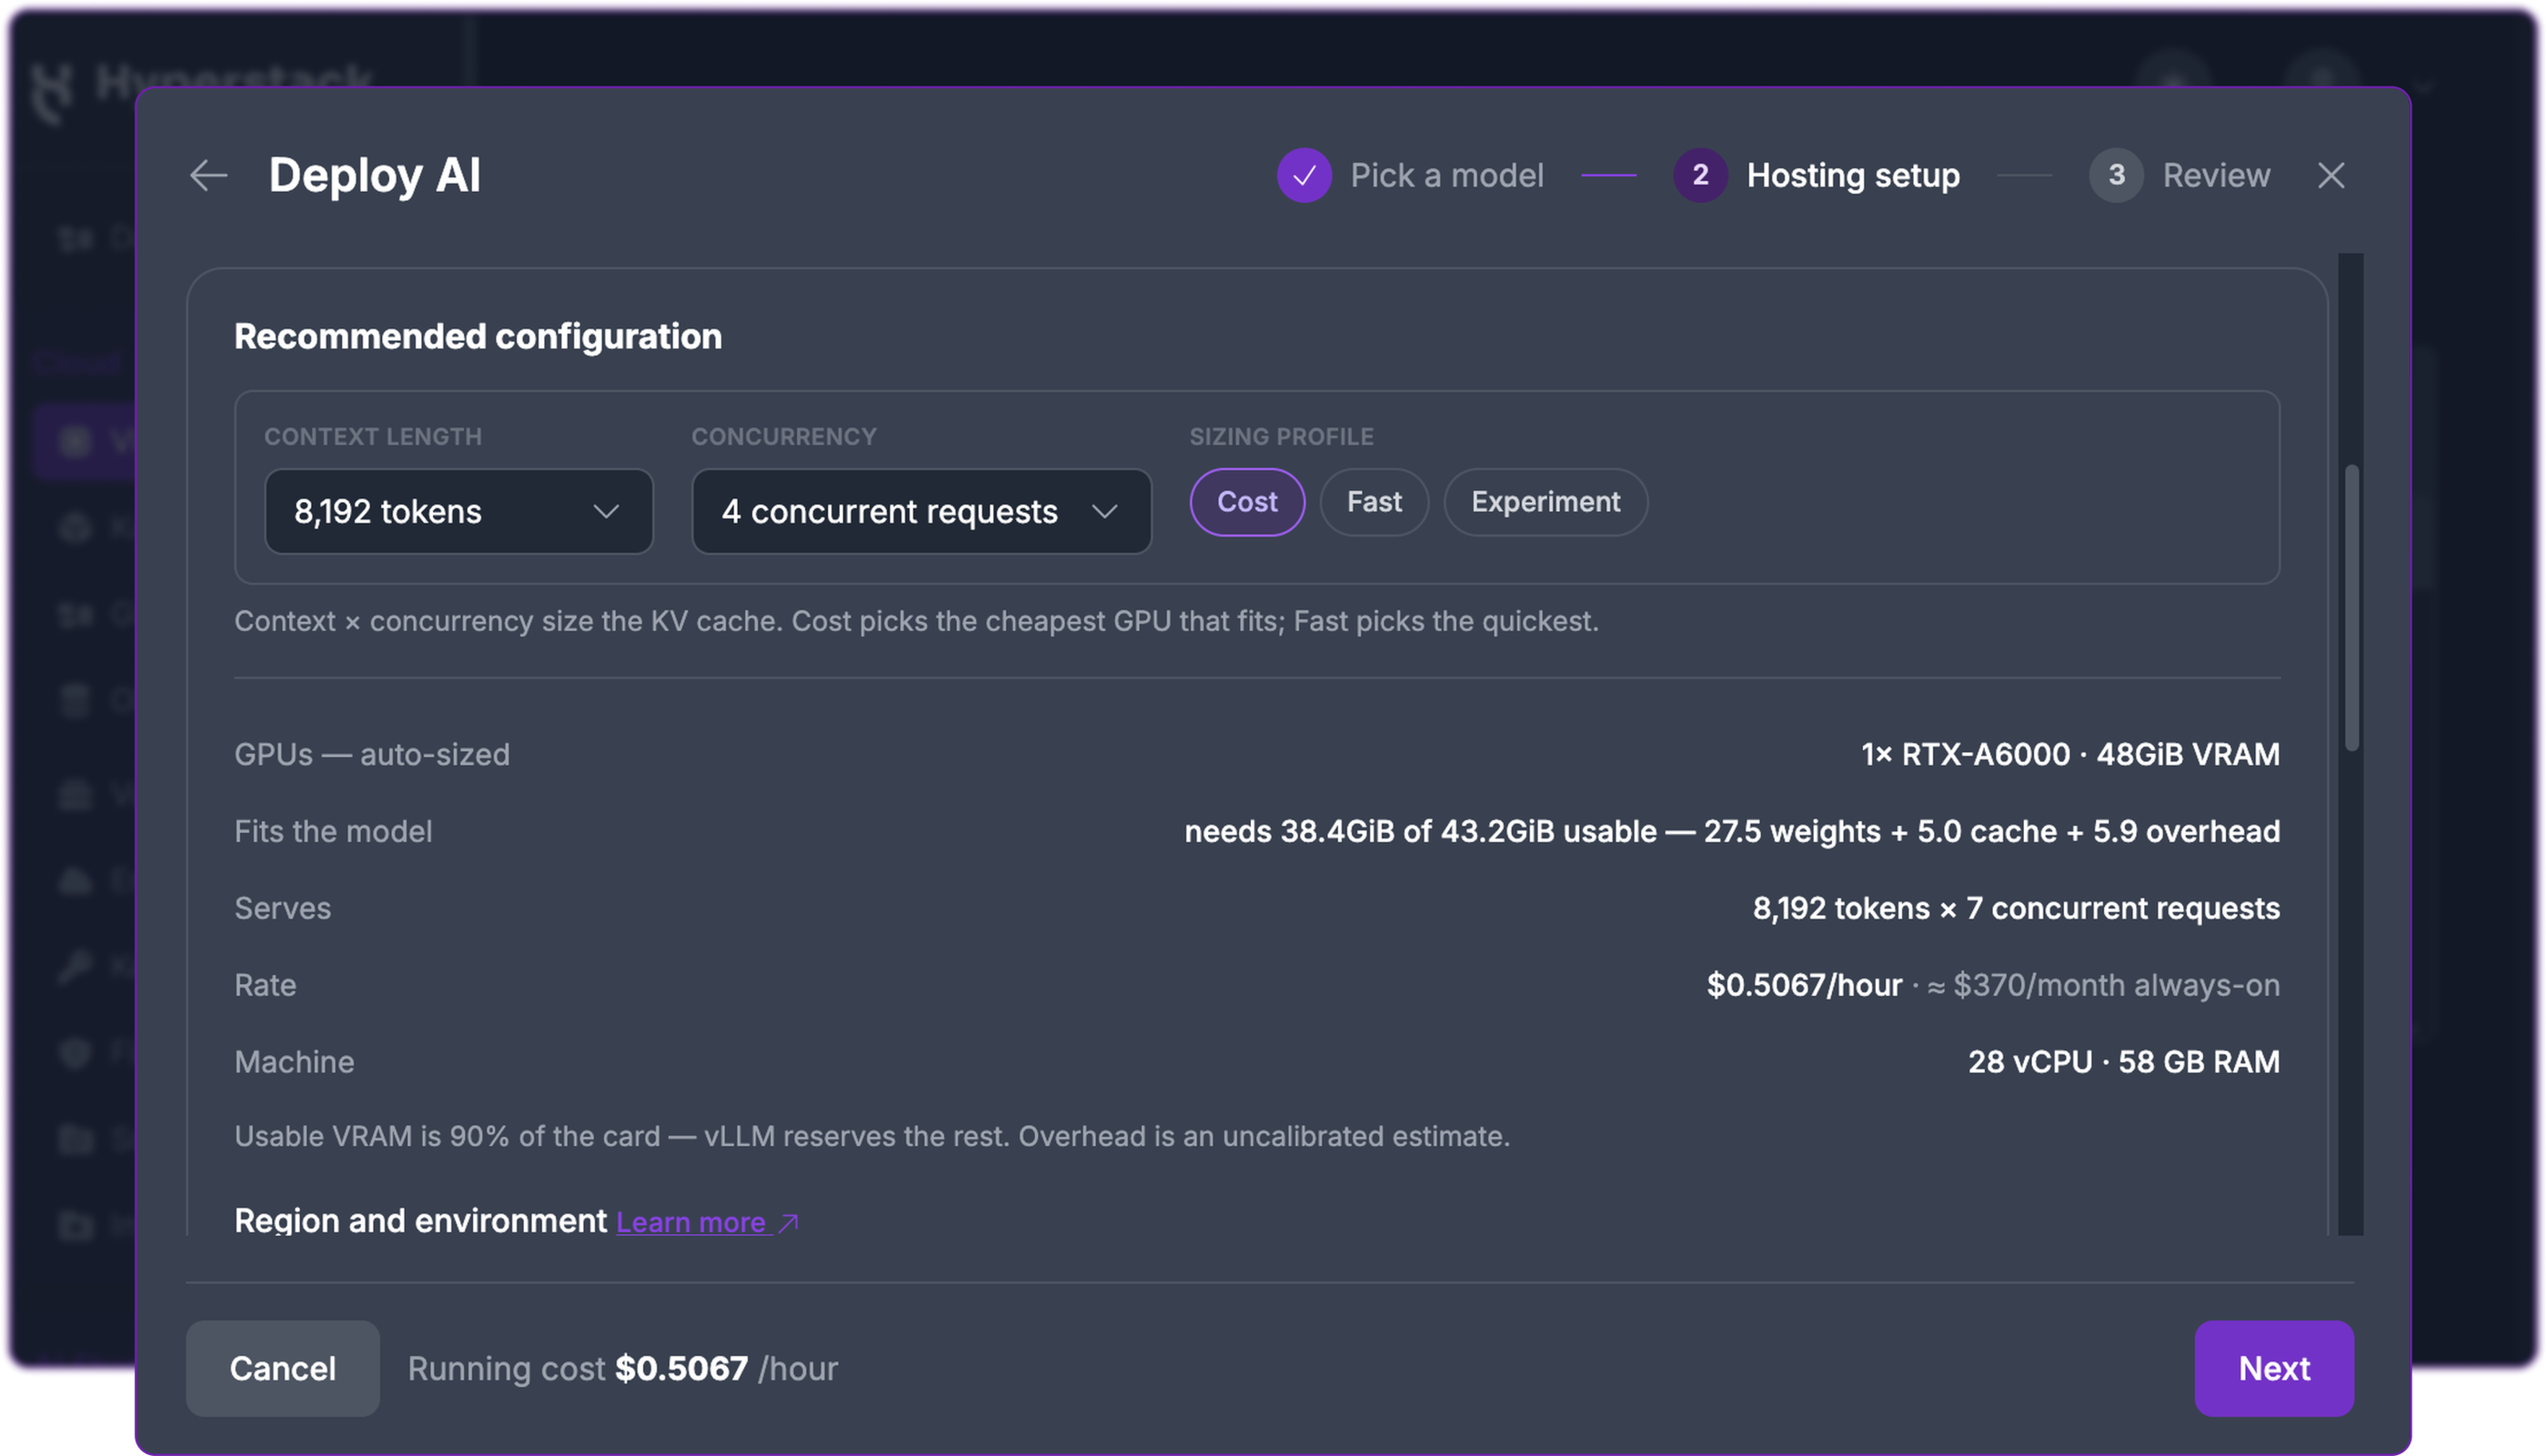
The recommended configuration panel: one NVIDIA RTX A6000, sized for 8,192 tokens of context and serving 7 concurrent requests.
Step 3. Review and Deploy
The final step is Review & deploy, which restates the whole deployment as a summary before anything is created.
Deployment summary, this Qwen3-14B run
Every field the wizard commits to before creating the machine.
| Field | Value |
|---|---|
| Model | Qwen3-14B |
| Model id | Qwen/Qwen3-14B |
| Runs on | Hyperstack dedicated |
| Runtime | vLLM |
| Region | CANADA-1 |
| Environment | example-environment |
| SSH key | example-key |
| Weights pull | Hugging Face token, masked in the console, used once and never stored |
The endpoint URL sits under the ai.hyperstackcustomers.cloud domain and is protected by a generated API key from the moment it is live.
Estimated cost, before you commit
Shown alongside the summary, on the same screen.
| Item | Value |
|---|---|
| Rate | $0.5067 / hour |
| If always on | ≈ $370 / month |
| Deploys and builds | Free |
Provisioning time depends on the size of the model weights; this deployment pulls 27.5 GiB on first boot.
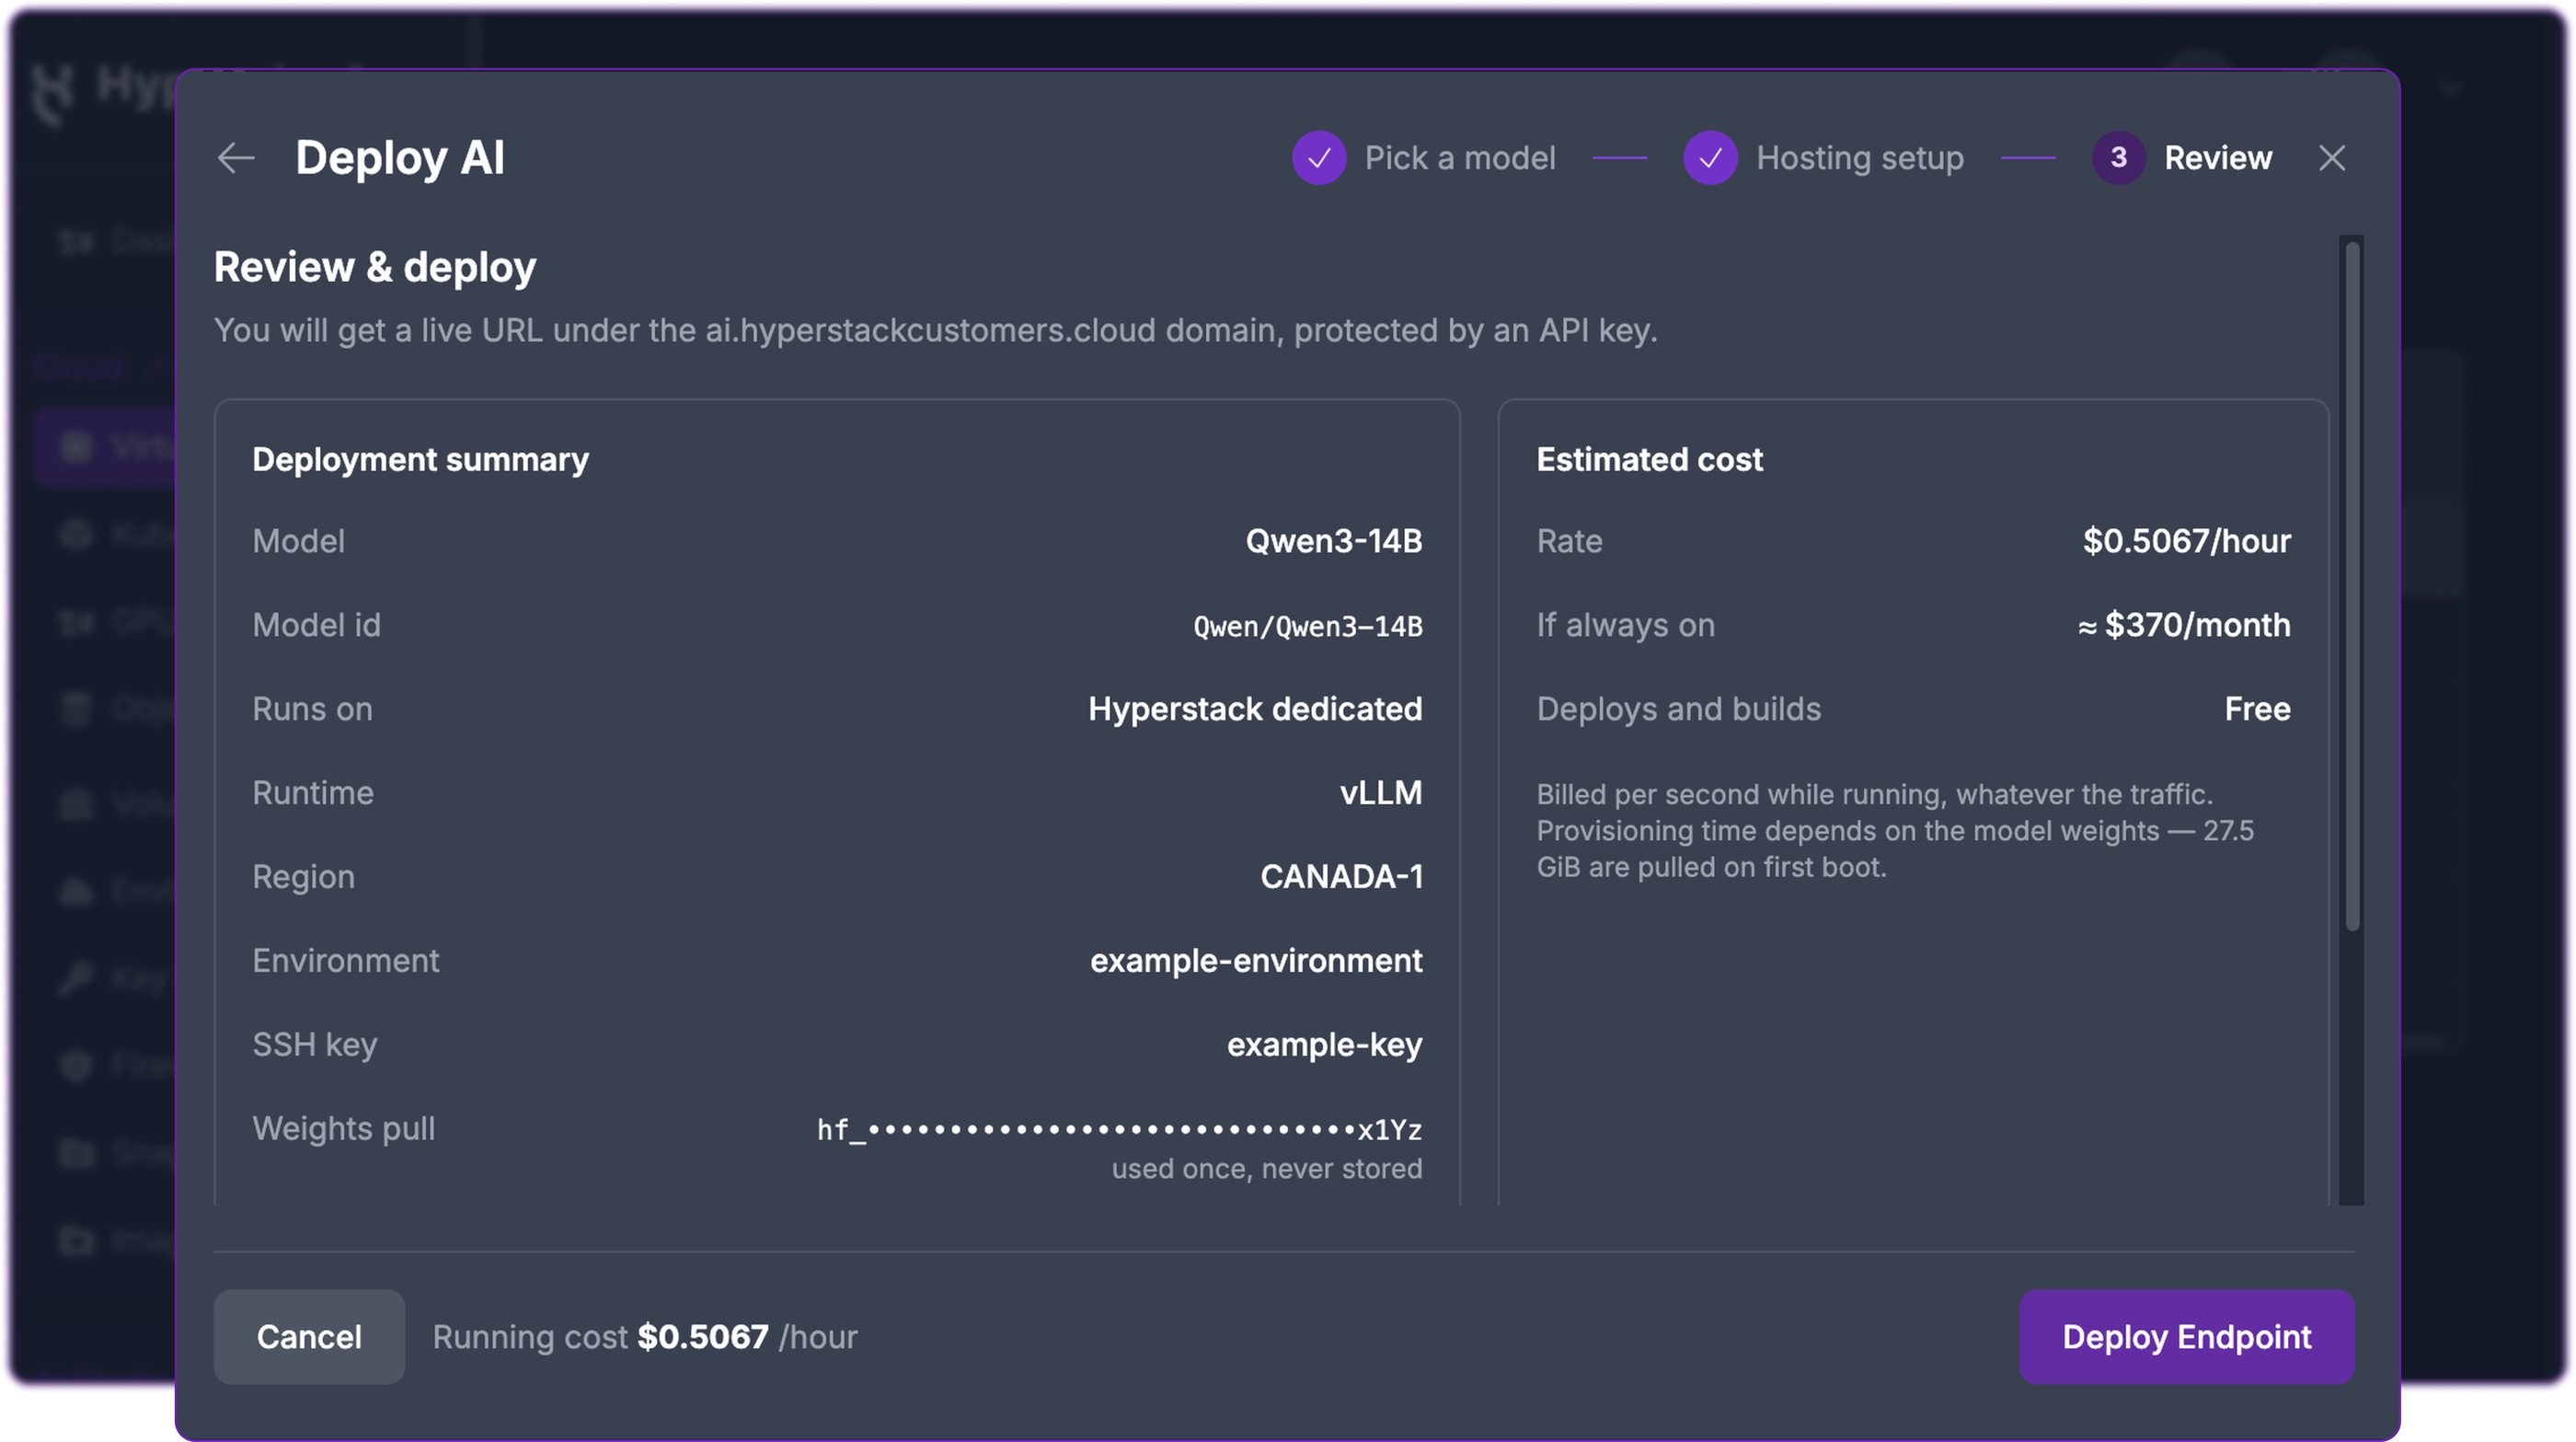
Review & deploy, immediately before clicking Deploy Endpoint.
What Happens After You Click Deploy Endpoint
The wizard stays open and reports provisioning as it happens, then hands off to the endpoint’s own page once the engine is serving.
From Deploy Endpoint to a live endpoint
The four stages the console reports, in order.
Provisioning time is dominated by the weight download, which starts as soon as the machine is active.
You are notified by email, not by watching the screen. One arrives when the endpoint is live, another if it fails. The API key is never emailed, only ever read from the console.
Managing Your Endpoint
Every dedicated endpoint is listed on the Endpoints tab of the Inference page in AI Studio, alongside Base Models Pricing and Vision Models Pricing tabs for the shared service. The list shows each endpoint’s name, model, the GPUs it runs on, region, status and running cost.
A live endpoint on the Endpoints tab
One dedicated endpoint, serving Qwen/Qwen3-14B on a single NVIDIA L40.
| Endpoint | Model | Runs on | Region | Status | Running cost |
|---|---|---|---|---|---|
| qwen3-14b-9f558e | Qwen/Qwen3-14B | 1× NVIDIA L40 | CANADA-1 | Live | $1.0067/hr |
Clicking the endpoint’s name, or View, opens its own page.
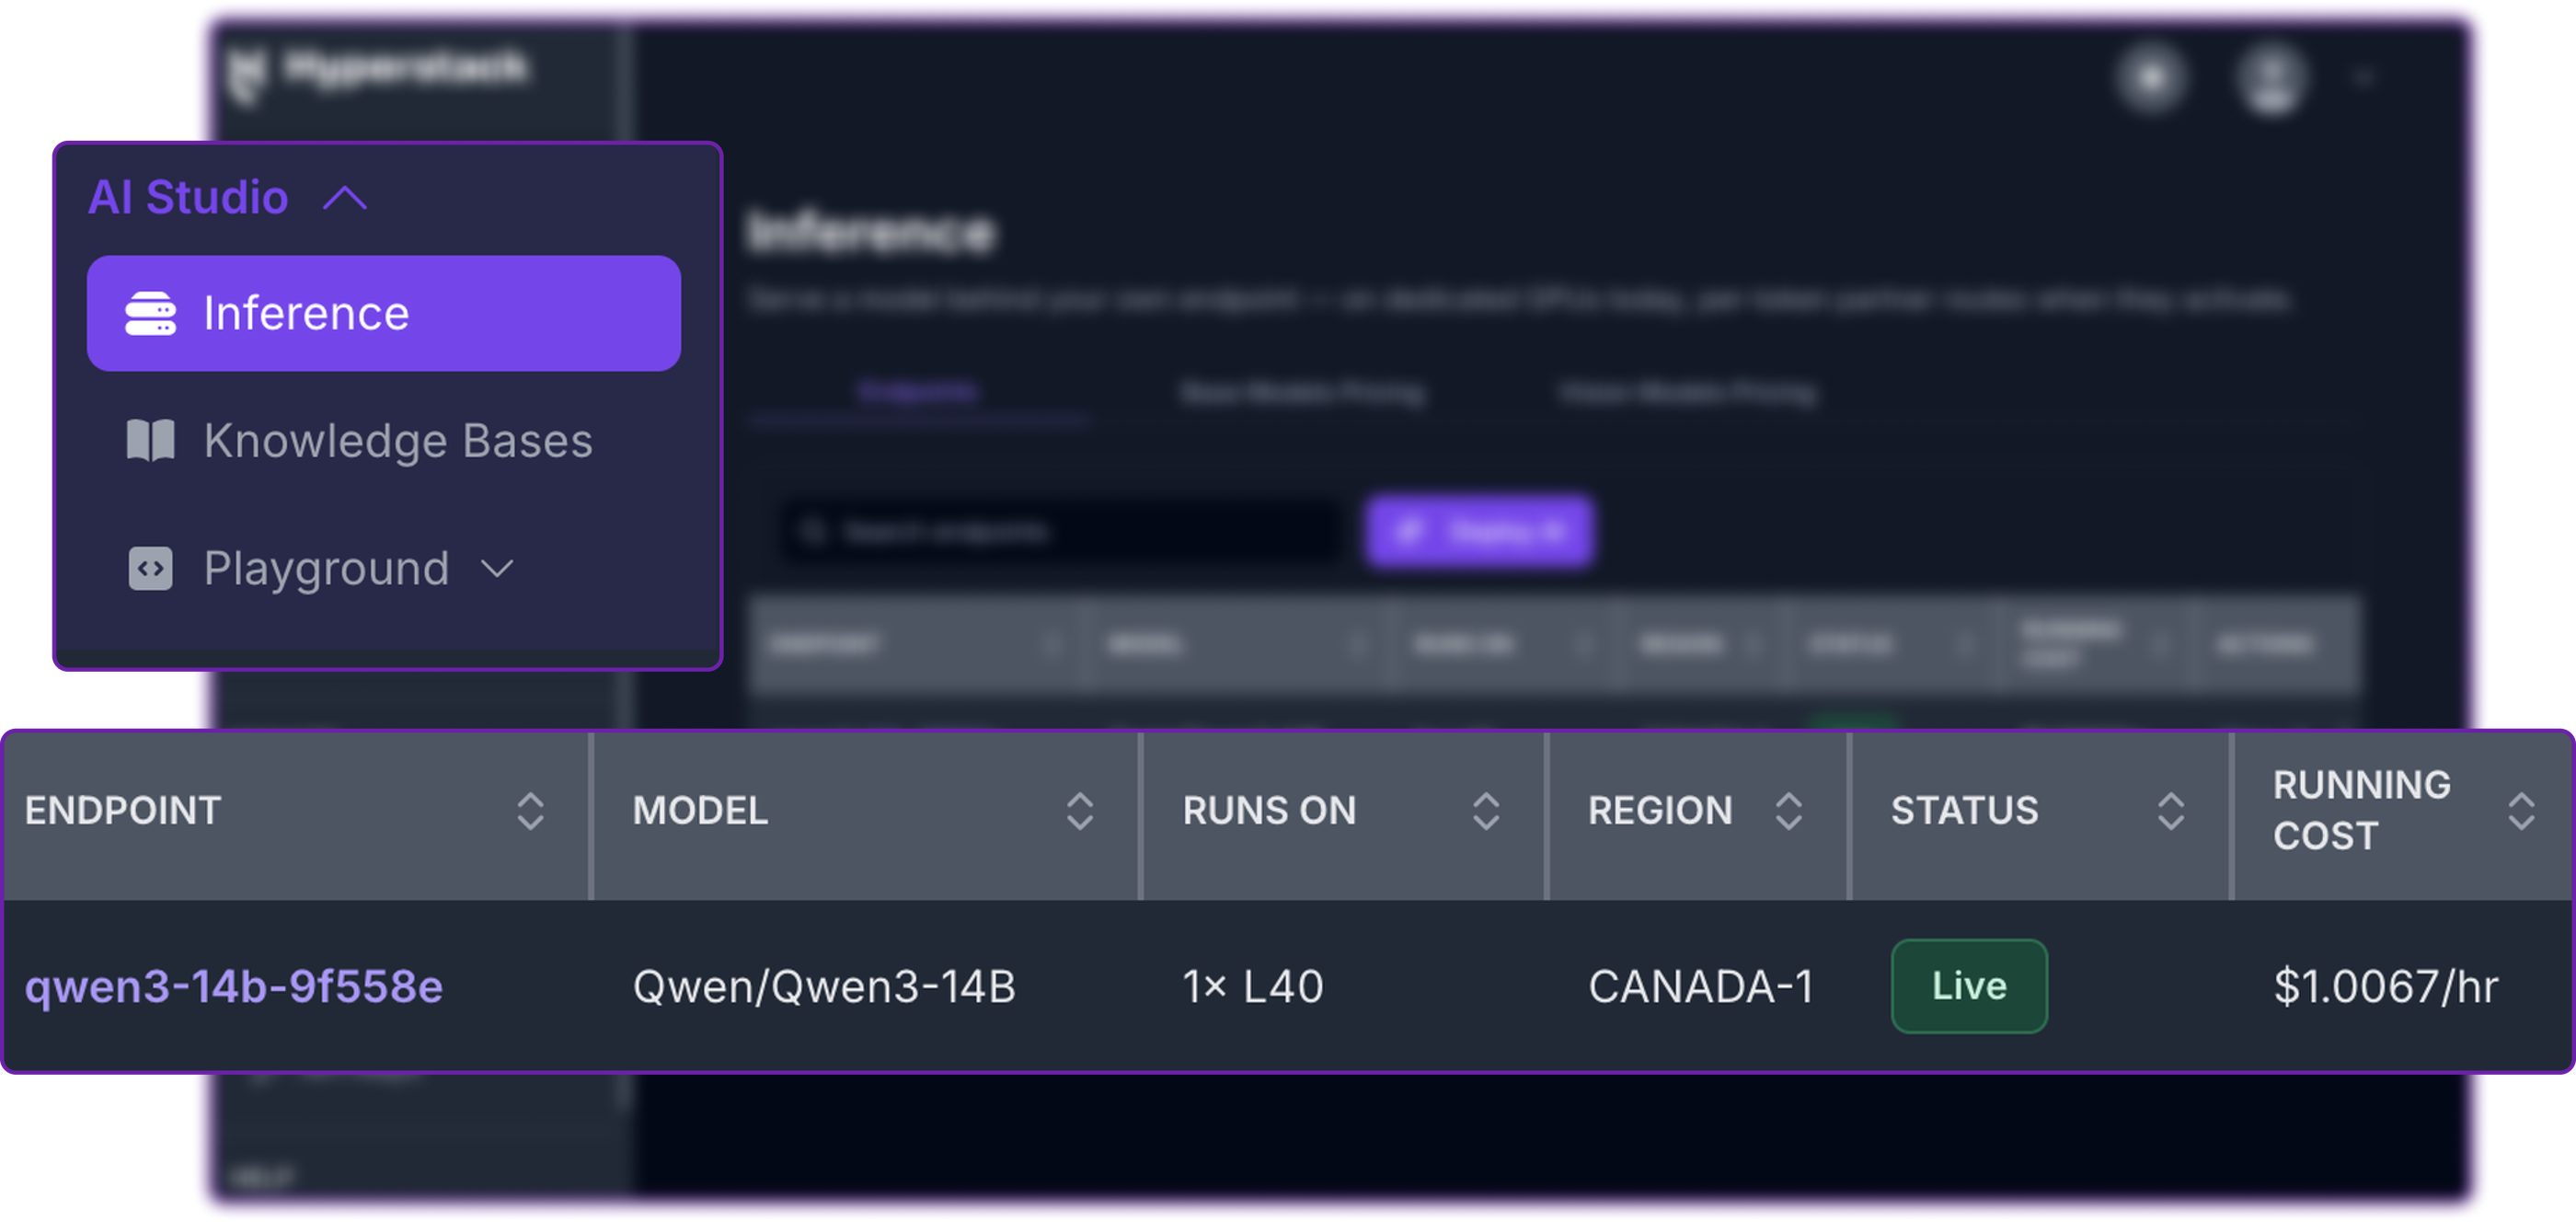
The Endpoints tab, with one dedicated endpoint running.
The Endpoint’s Own Page
Opening an endpoint shows a Connection section carrying:
- The endpoint URL, model id and API key, masked until an eye control is clicked, with a copy control beside each.
- The provisioned configuration and running cost.
- A Quick start request with the URL and model id already filled in.
Manage virtual machine opens the machine behind the endpoint.
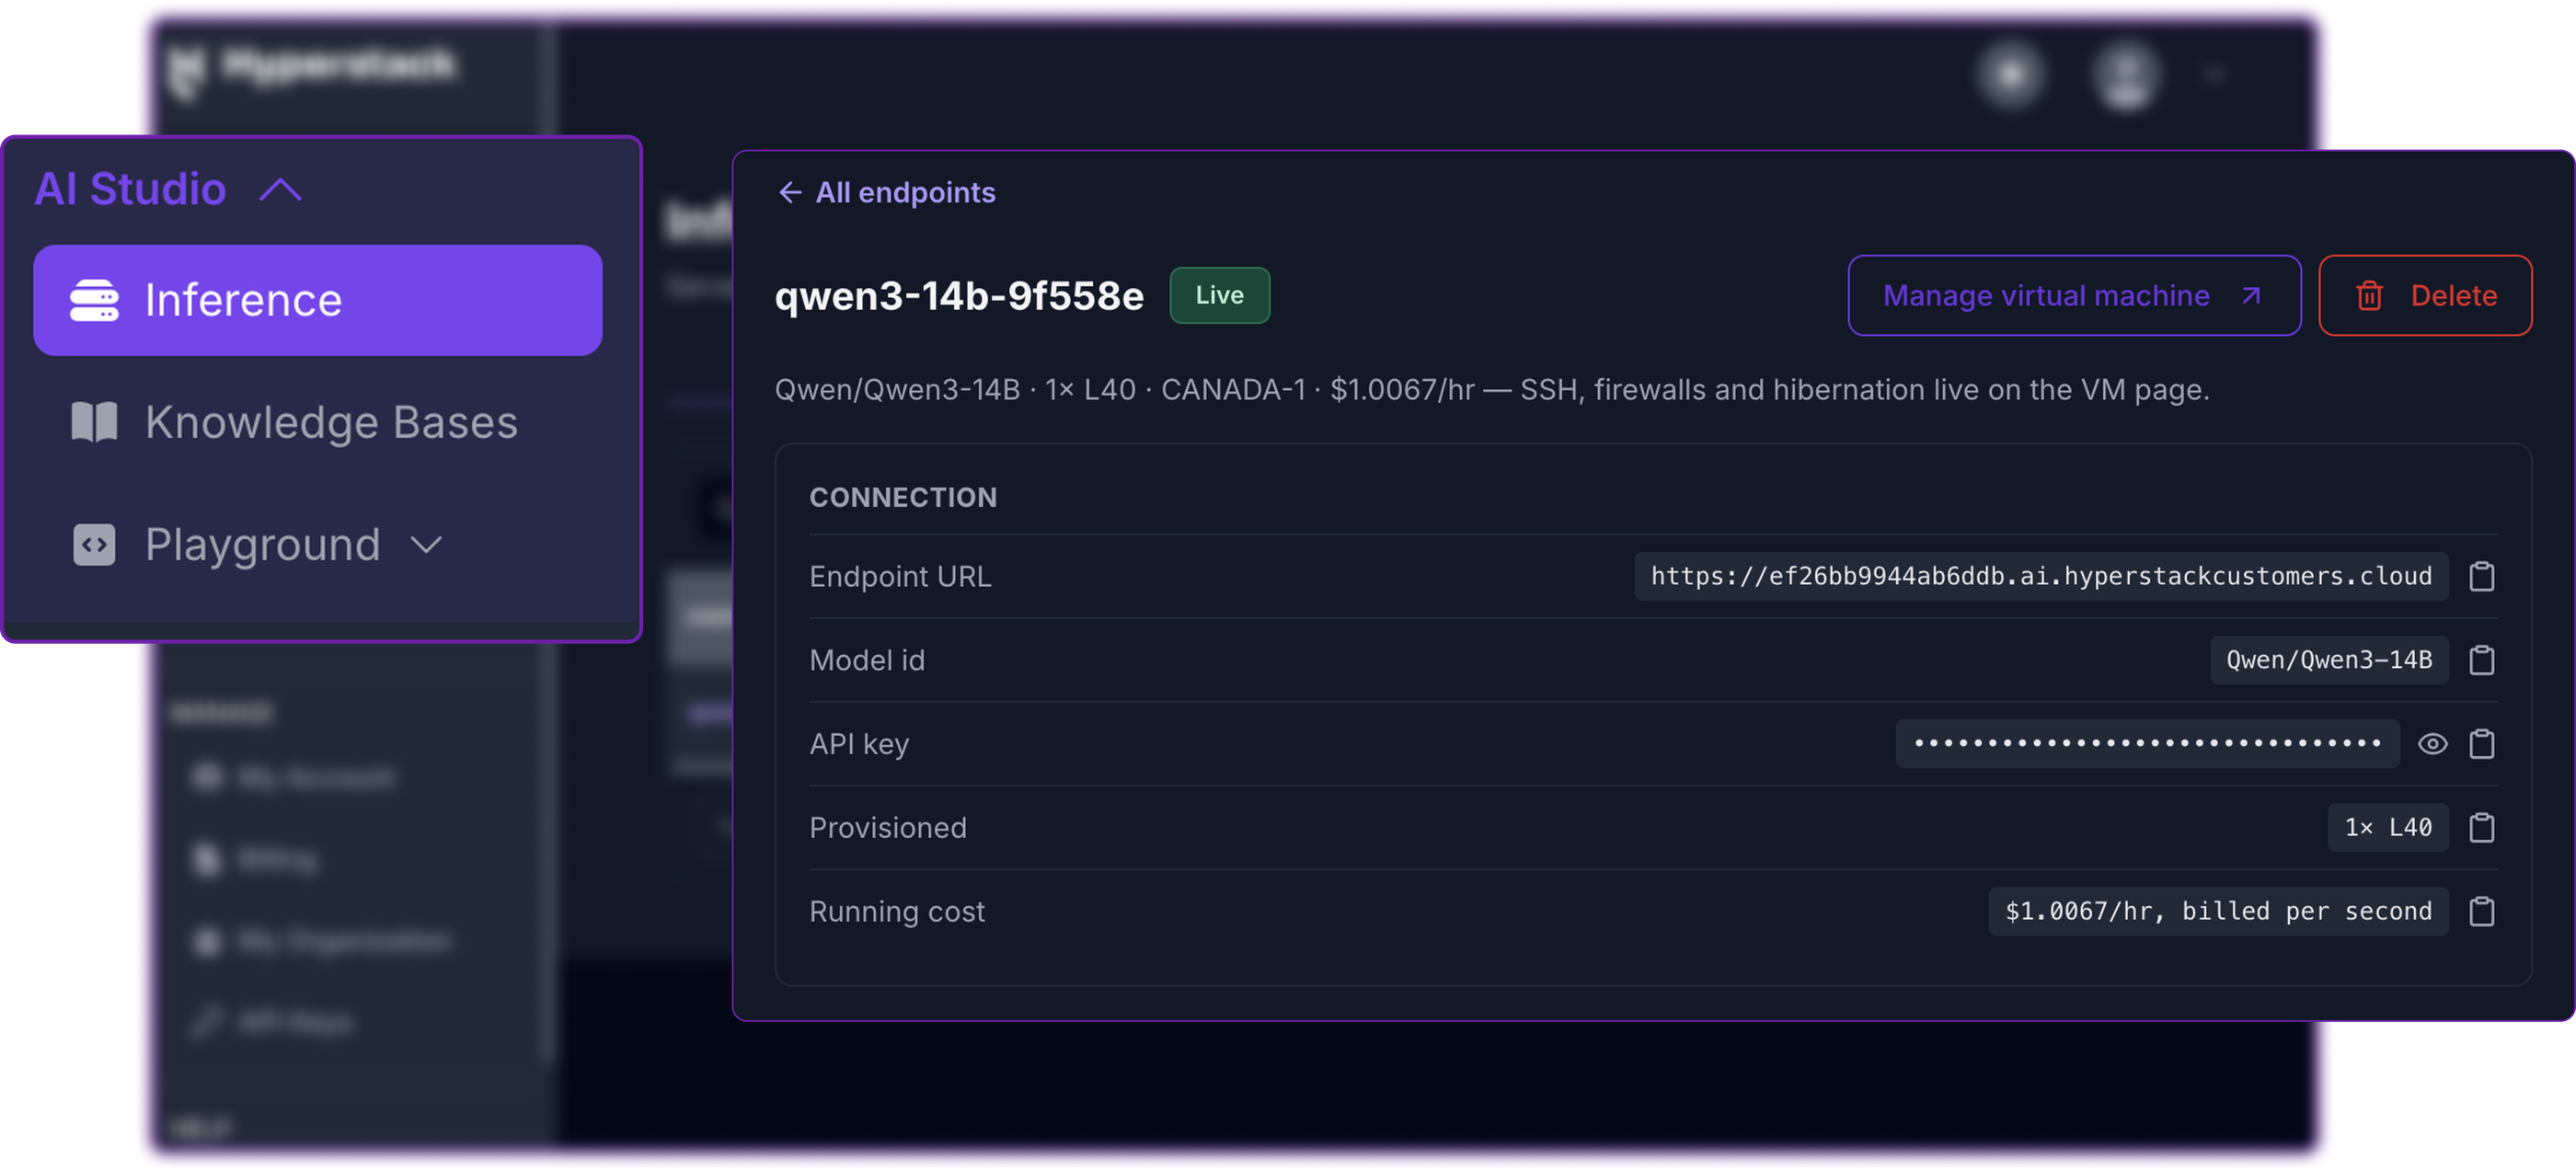
Connection details and the Quick start request, ready to copy.
An endpoint key is not an AI Studio API key. It is issued with that endpoint, covers only that endpoint, and is not one of your API keys.
The Endpoint and Its Virtual Machine Are One Resource
The endpoint and the machine behind it link to each other in both directions, and deleting either one deletes both: the machine, its public IP address and the endpoint record are released together, so nothing is left running or reserved.
One resource, two pages
What lives on the endpoint’s own page against what lives on its virtual machine’s page.
AI Studio, Inference, Endpoints
- Endpoint URL, model id and API key
- Provisioned configuration and running cost
- The Quick start request, ready to copy
- Delete, which takes the machine with it
Cloud, Virtual Machines
- SSH access and firewall rules
- Console access and console logs
- A Performance Metrics tab, and a link back to the endpoint
- Hibernation and snapshots, both unavailable
Manage virtual machine, on the endpoint page, and Go to inference endpoint, on the virtual machine’s Dedicated Inference tab, link the two views together.
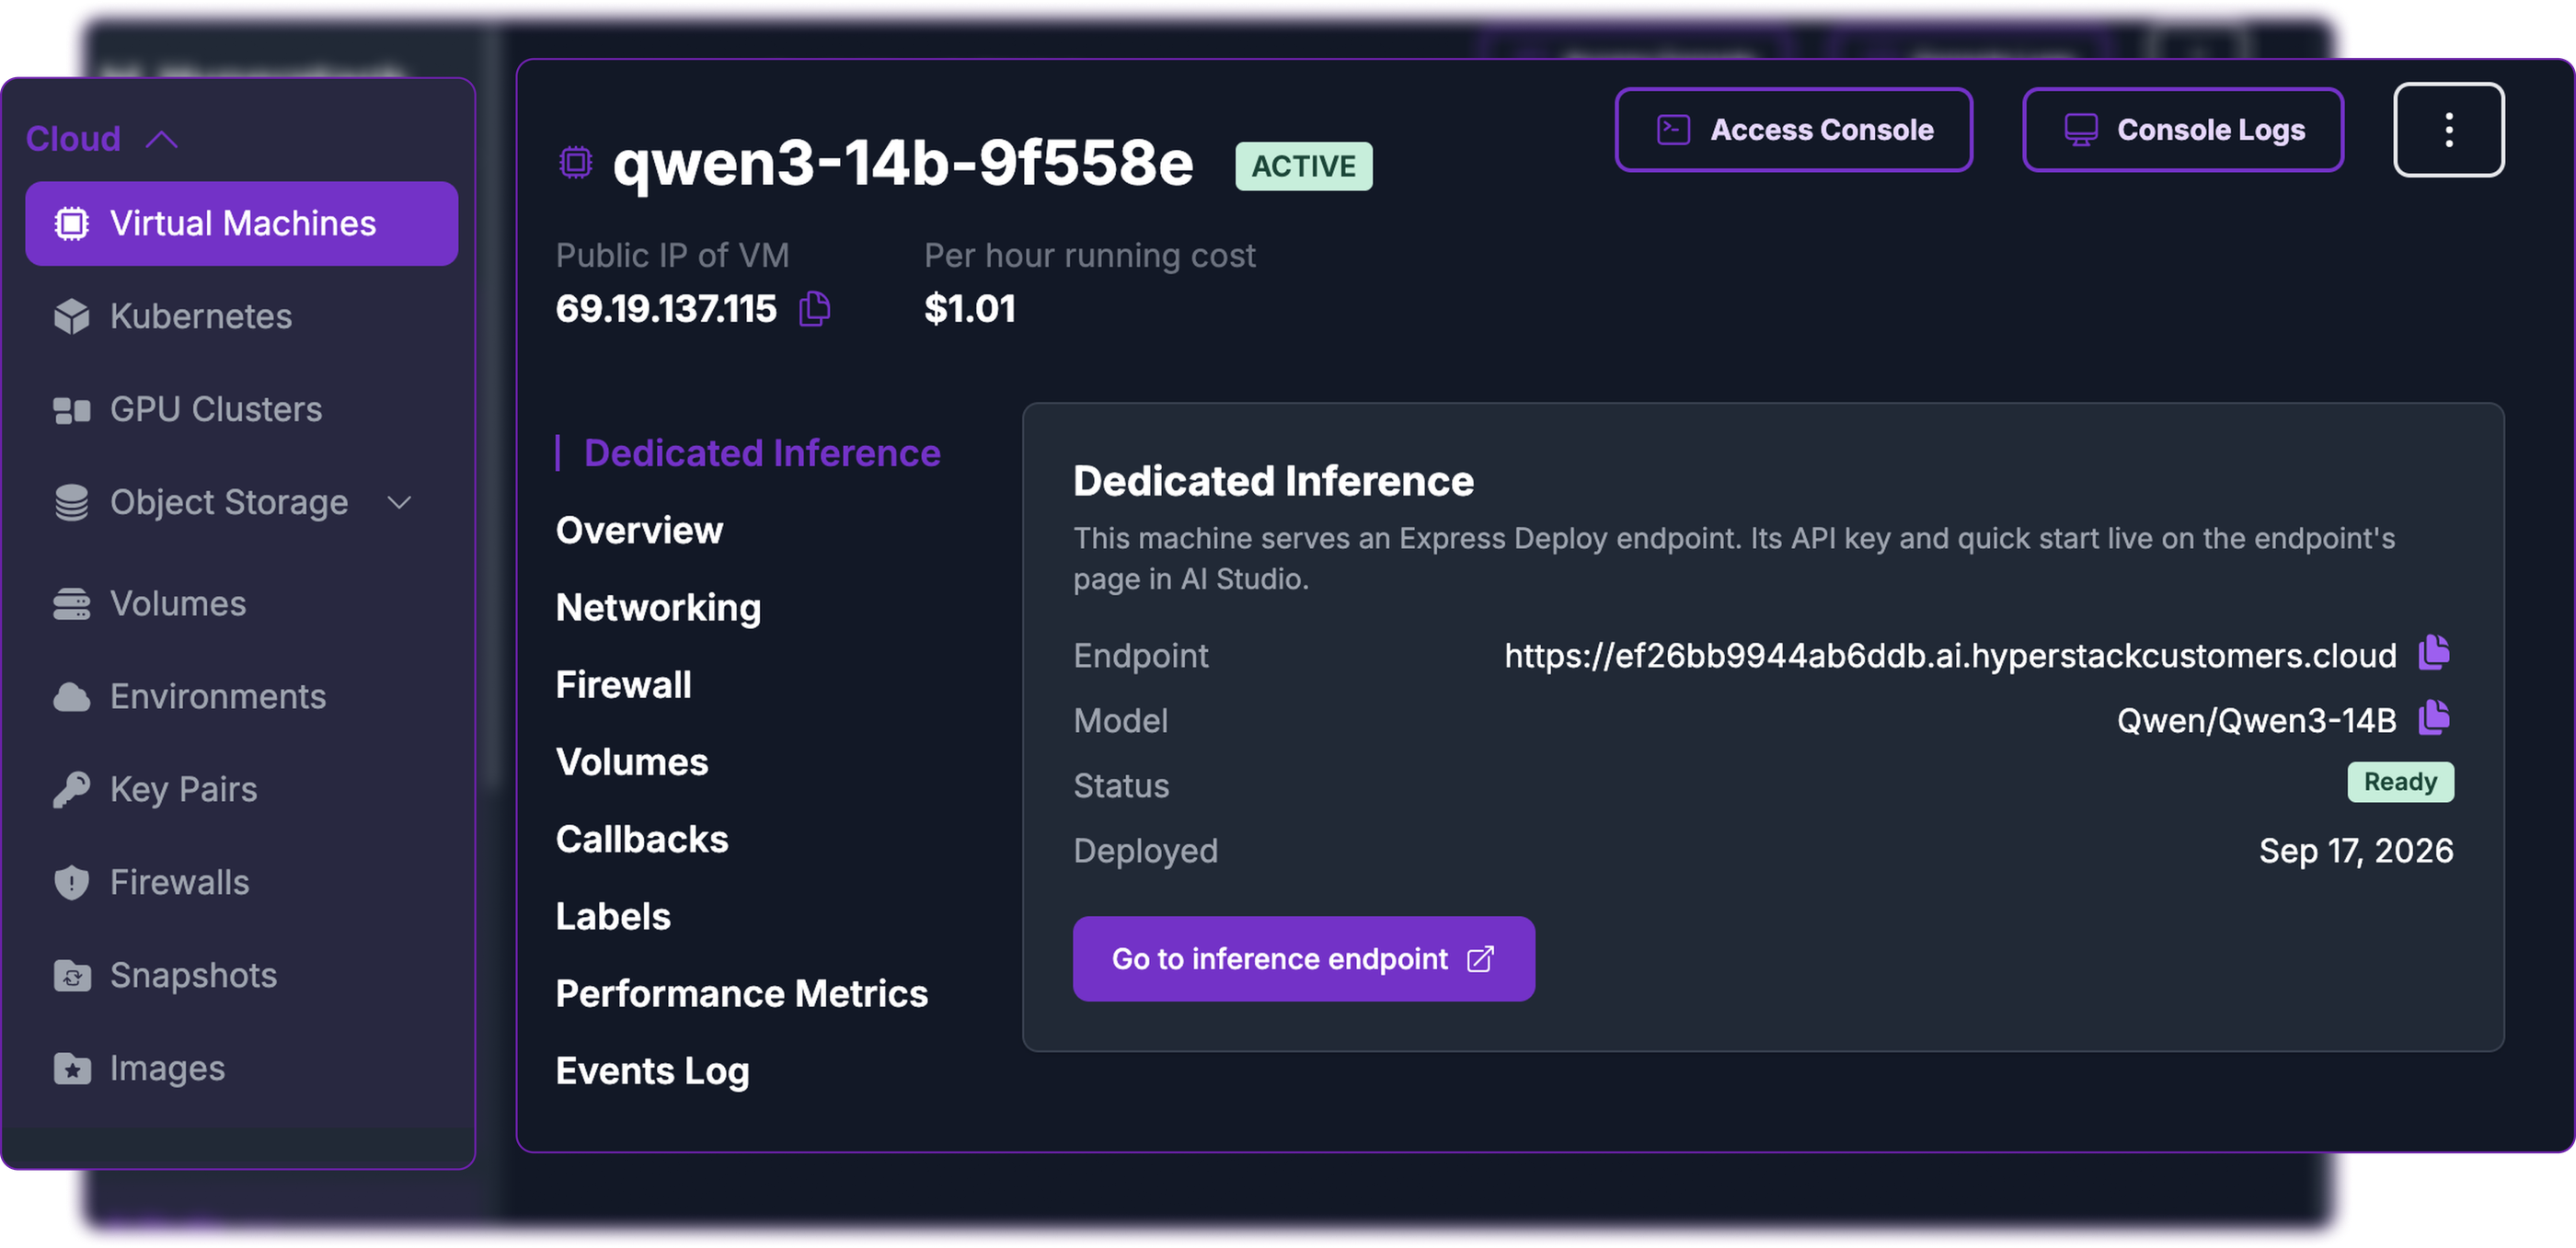
The virtual machine’s own Dedicated Inference tab, linking back to the endpoint. The console labels it an Express Deploy endpoint, an internal name for the same dedicated deployment this guide covers throughout.
What Changes on an Inference Machine
A machine that serves a dedicated endpoint is still an ordinary virtual machine in every way that matters day to day, with two operations refused because the machine exists to serve the endpoint rather than to be reshaped.
Enhanced Monitoring is already on for a machine serving a dedicated endpoint, so metrics are collected with nothing to install: the usual CPU, memory and network graphs every monitored machine carries, plus serving metrics read from the inference engine itself.
The machine’s Performance Metrics tab carries a separate Dedicated Inference sub-tab summarising six values: the model served, requests running, requests waiting, key-value cache usage, token throughput and error rate, alongside time-series charts for throughput, time to first token, queue depth and cache usage. The separate Dedicated Inference page in the left menu links back to the endpoint itself rather than its metrics.
Connecting to Your Endpoint
Every dedicated endpoint exposes an OpenAI-compatible chat completions API at its own hostname, protected by the API key generated for it. That compatibility is the point: nothing about calling it is specific to Hyperstack once the base URL and key are set, so any client library, framework or agent already built against the OpenAI schema works here unchanged.
The simplest call is a signed curl request, and the endpoint’s own page in the console carries this exact request with the URL and model id already filled in.
A signed request to your endpoint
Replace the host and the key with your own.
The key is sent as a bearer token, and the model id is the same repository id shown on the endpoint’s page, such as Qwen/Qwen3-14B.
Calling It from Python
The OpenAI Python SDK works against any OpenAI-compatible server, which is what vLLM exposes behind the endpoint. Pointing it at your dedicated endpoint is a matter of setting base_url and api_key, with no other code changed.
The response is an ordinary OpenAI-shaped chat completion object:
- An
id. - The
modelthat answered. - One or more
choices, each carrying amessage. - A
usageblock with prompt, completion and total token counts.
Nothing about parsing it differs from parsing a response from any other OpenAI-compatible provider.
Streaming works the same way as it does against any OpenAI-compatible server: set stream=True and read the response as a sequence of chunks rather than waiting for the whole completion.
Concurrency has a ceiling, and it is visible. The sizing panel reports how many requests a configuration serves, seven for the NVIDIA RTX A6000 example above. Requests beyond that queue rather than fail, visible as requests running against requests waiting in the machine’s own Enhanced Monitoring.
Using a Dedicated Endpoint for Agentic Workloads
Qwen3-14B is a strong fit for agentic use: its own model card states plainly that the Qwen3 family “excels in tool calling capabilities”, and that it supports switching between a thinking mode for complex reasoning and a plain dialogue mode for direct answers within the same model. The Qwen team’s own recommendation for building agents on top of it is Qwen-Agent.
Why the loop below asks for tools in the prompt, not the tools parameter. vLLM only enables that parameter with --enable-auto-tool-choice and a matching --tool-call-parser; without both, it returns a 400 error instead of a tool call. The prompt-based approach needs nothing but the chat completions endpoint every dedicated deployment guarantees.
A tool-calling round trip against a dedicated endpoint has the same shape whatever the tool does: your application sends the conversation, with the available tools described in the prompt, the model decides whether one is needed, your own code runs it if so, and the result is appended to the conversation before the next call.
The loop ends when the model answers with no tool call in its reply.
The tool-calling loop against a dedicated endpoint
Four stops, repeated until the model stops asking for a tool.
A prompt-driven loop against your endpoint, needing nothing but plain chat completions.
Defining a Tool
Rather than a JSON Schema passed to a tools parameter, the tool is described in plain language inside the system prompt, along with the exact JSON shape the model should reply with when it wants to call it. The model never executes anything directly; it only ever writes out that JSON, which your own code reads.
Running the Loop
The loop below sends a question, and on each turn checks whether the reply text contains that JSON shape. If it does, the requested function runs locally and its result is fed back as the next user turn; if it does not, the reply is the final answer.
The turn count is capped, since nothing stops a model from asking for the same tool indefinitely; a production loop would also log or retry a turn where the reply matches neither a final answer nor valid tool-call JSON.
The JSON the model is asked to reply with is deliberately small: a tool name and its arguments, nothing else. There is no call id to track, because this loop only ever asks for one tool at a time and waits for its result before continuing.
Extracting it with json.JSONDecoder().raw_decode() rather than a plain string search means any text the model adds after the JSON, or the nested braces inside arguments itself, cannot break the parse.
Qwen3’s thinking mode, mentioned above, can wrap a reasoning block around that JSON even when asked for nothing else; disabling thinking mode for tool-routing turns, or stripping a leading <think> block before searching, keeps the extraction reliable.
Frameworks work too, with the same caveat. LangChain, LlamaIndex and Qwen-Agent all accept a custom base_url and api_key. Their prompted agent modes (LangChain’s ReAct, Qwen-Agent’s default) work exactly like the loop above; a mode built around the OpenAI tools parameter needs the same server-side flags.
A retrieval tool is defined the same way as any other: the function takes a query, searches your own documents, and returns the matching passages as its result. AI Studio’s own Knowledge Bases already do the retrieval half of that inside the platform, so a dedicated endpoint and a knowledge base can sit either side of the same tool-calling loop, one holding the model and the other holding what it is allowed to look up.
Sizing and Cost in Practice
A dedicated endpoint bills per minute at the hourly rate of the flavour it runs on, for as long as the machine is running, regardless of how many requests it serves. The Deploy AI wizard provisions on demand only; Reserved and Spot are not options inside the wizard itself.
Rates follow the standard virtual machine rates in the Pricebook, the same rates that apply to any Hyperstack virtual machine.
What an always-on endpoint costs, on demand
Published on-demand hourly rates multiplied by 730 hours, the same monthly convention the wizard’s own “always-on” estimate uses.
Hourly rates from the Hyperstack GPU pricing page.
| GPU | VRAM | Memory bandwidth | On demand |
|---|---|---|---|
| NVIDIA RTX A6000 | 48 GB GDDR6 | 768 GB/s | $0.50/hr |
| NVIDIA L40 | 48 GB GDDR6 | 864 GB/s | $1.00/hr |
Both cards carry the same 48 GB of VRAM, so the choice between them for a model this size is about throughput rather than fit.
The NVIDIA L40’s higher memory bandwidth and newer Ada Lovelace core suit a busier endpoint, while the NVIDIA RTX A6000 on the Cost profile is the cheaper way to hold a model of this size on a private endpoint.
The sizing profile is the lever that matters most. Cost picks the cheapest fit, Fast the quickest GPU class, Experiment the fewest GPUs at a shorter context, all before any pricing decision is made.
From Deploy to Delete
A dedicated endpoint has exactly one line of travel: deploy it, watch it come up, leave it live and answering requests, and delete it when the work is done. Nothing about that path repeats on its own; once an endpoint is deleted, that deployment is gone for good, and starting again means running the wizard from the beginning.
The whole lifecycle, start to finish
Every stage above, in the order it happens.
Delete is the one irreversible step: it releases the machine, its public IP address and the endpoint record together.
Why Deploy Dedicated Inference on Hyperstack?
Hyperstack is a cloud platform built for AI and machine learning workloads. Here is what a private model endpoint needs from a provider, and how AI Studio delivers it:
The Deploy AI wizard sizes the GPU, checks stock and installs vLLM in one pass, so a private endpoint needs no manual server work.
From the NVIDIA RTX A6000 used here up to NVIDIA H100 and NVIDIA H200 for larger models, all sized by the same wizard.
Firewall rules open only SSH, HTTP and HTTPS on the machine the wizard creates, and can be tightened further after deployment.
The Deploy AI wizard provisions the endpoint on demand, metered by the minute for as long as it runs, so a short experiment is charged as a short experiment.
Enhanced Monitoring runs on every inference machine by default, from the moment the endpoint is live, with nothing to install.
The Playground sits alongside dedicated inference in AI Studio, so testing a model and putting it behind your own endpoint stay in the same place.

FAQs
What is Hyperstack Dedicated Inference?
One open-weight model on GPUs reserved for you, behind a private, API key-protected endpoint, billed by the GPU hour rather than per token.
How is a dedicated endpoint priced?
At an hourly rate, provisioned on demand and billed per minute regardless of traffic. A single NVIDIA RTX A6000 is $0.50/hour.
What happens to the endpoint if I delete its virtual machine?
The endpoint goes with it: the machine, its IP address and the endpoint record are released together, and the API key stops working immediately.
Can I pick a different GPU than the one the wizard recommends?
Yes. Change the configuration lists every option at your chosen context and concurrency, cheapest first, in-stock only.
Does a dedicated endpoint support streaming, tool calling and agent frameworks?
Yes to all three. Streaming just needs stream=True. Tool calling works through the prompt, not the OpenAI tools parameter, since vLLM does not enable that by default. LangChain, LlamaIndex and Qwen-Agent all accept a custom base_url and api_key.
Subscribe to Hyperstack!
Enter your email to get updates to your inbox every week