
.png)
TABLE OF CONTENTS
NVIDIA H100 SXM GPUs On-Demand
Key Takeaways
-
Qwen 3 TTS CustomVoice delivers production-grade speech synthesis only when paired with the right GPU infrastructure. Proper GPU selection, memory configuration, and precision settings are critical to achieving low latency, stable inference, and consistent audio quality in real-world deployments.
-
Hyperstack simplifies running advanced TTS models by removing infrastructure complexity. With pre-configured GPU images, fast provisioning, and on-demand access to NVIDIA H100 and NVIDIA RTX-class GPUs, teams can deploy Qwen 3 TTS quickly and focus on building voice applications.
-
GPU choice has a direct impact on performance and cost. NVIDIA H100 GPUs enable ultra-low-latency, real-time speech generation, while NVIDIA RTX A6000 GPUs provide a cost-efficient alternative for batch workloads and experimentation without sacrificing speech quality.
-
Using Miniconda with a dedicated Python 3.12 environment ensures stable dependencies and compatibility with Qwen 3 TTS. This approach minimises version conflicts, simplifies environment management, and supports reproducible setups across development and production systems.
-
Inference optimisations significantly improve performance. Running Qwen 3 TTS in BF16 precision and enabling Flash Attention reduces memory usage and latency, making large-scale and real-time speech synthesis faster, more reliable, and more cost-efficient on modern GPUs.
-
Qwen 3 TTS CustomVoice goes beyond basic text-to-speech by enabling fine-grained control over speaker identity, emotion, tone, and prosody. This flexibility is essential for branded voices, conversational AI, and content creation workflows requiring expressive, consistent output.
-
The model’s unified end-to-end architecture eliminates traditional multi-stage TTS pipelines. This reduces deployment complexity, improves reliability, and allows faster iteration when building scalable speech services that support both streaming and batch generation.
-
Hyperstack’s scalable, usage-based GPU infrastructure supports growth from experimentation to production. With seamless integration into PyTorch, Hugging Face, and Docker workflows, teams can scale Qwen 3 TTS workloads efficiently while keeping costs predictable and controlled.
If you are looking to run Qwen 3 TTS CustomVoice efficiently on cloud GPUs, this tutorial shows you exactly how to deploy it on Hyperstack. Qwen 3 TTS is designed for high-fidelity, low-latency speech synthesis, but real-world performance depends heavily on GPU configuration, memory setup, and deployment strategy. This guide walks through the full process so you can achieve production-ready text-to-speech performance quickly. With clear commands, configuration tips, and cost-aware choices, this tutorial removes the guesswork from running Qwen 3 TTS CustomVoice at scale.
What is Qwen 3 TTS CustomVoice?
Qwen 3 TTS CustomVoice is Qwen next-generation neural text-to-speech (TTS) model built specifically for high-fidelity, controllable speech generation. It is designed to synthesize natural speech, support multilingual output, and provide fine-grained control over voice characteristics such as timbre, emotion, and prosody. With a 1.7B parameter architecture and support for low-latency streaming generation, Qwen 3 TTS delivers production-ready speech synthesis for AI assistants, content creation, and real-time voice applications.
Qwen 3 TTS Custom Voice Features
The latest Qwen 3 TTS comes with new capabilities, including:
- Multilingual Speech Synthesis: Supports 10 major languages, including Chinese, English, Japanese, Korean, German, French, Russian, Portuguese, Spanish, and Italian, enabling global voice applications.
- Custom Voice and Style Control: Provides multiple premium timbres and allows users to control voice characteristics such as emotion, tone, rhythm, and speaking style through natural language instructions.
- Ultra-Low Latency Streaming: Uses a Dual-Track hybrid streaming architecture to generate speech in real time, with end-to-end synthesis latency as low as ~97 ms, making it suitable for interactive voice systems.
- Advanced Speech Representation: Powered by the Qwen3-TTS-Tokenizer-12Hz, which performs efficient acoustic compression and high-dimensional semantic modeling while preserving paralinguistic and environmental audio features.
- Universal End-to-End Architecture: Utilizes a discrete multi-codebook language model architecture to perform full-information speech modeling, avoiding traditional cascaded TTS pipeline bottlenecks and improving generation quality and efficiency.
How to Install Qwen3 TTS 1.7B CustomVoice on Hyperstack
Now, let's walk through the step-by-step process of deploying the necessary infrastructure.
Step 1: Accessing Hyperstack
First, you'll need an account on Hyperstack.
- Go to the Hyperstack website and log in.
- If you are new, create an account and set up your billing information. Our documentation can guide you through the initial setup.
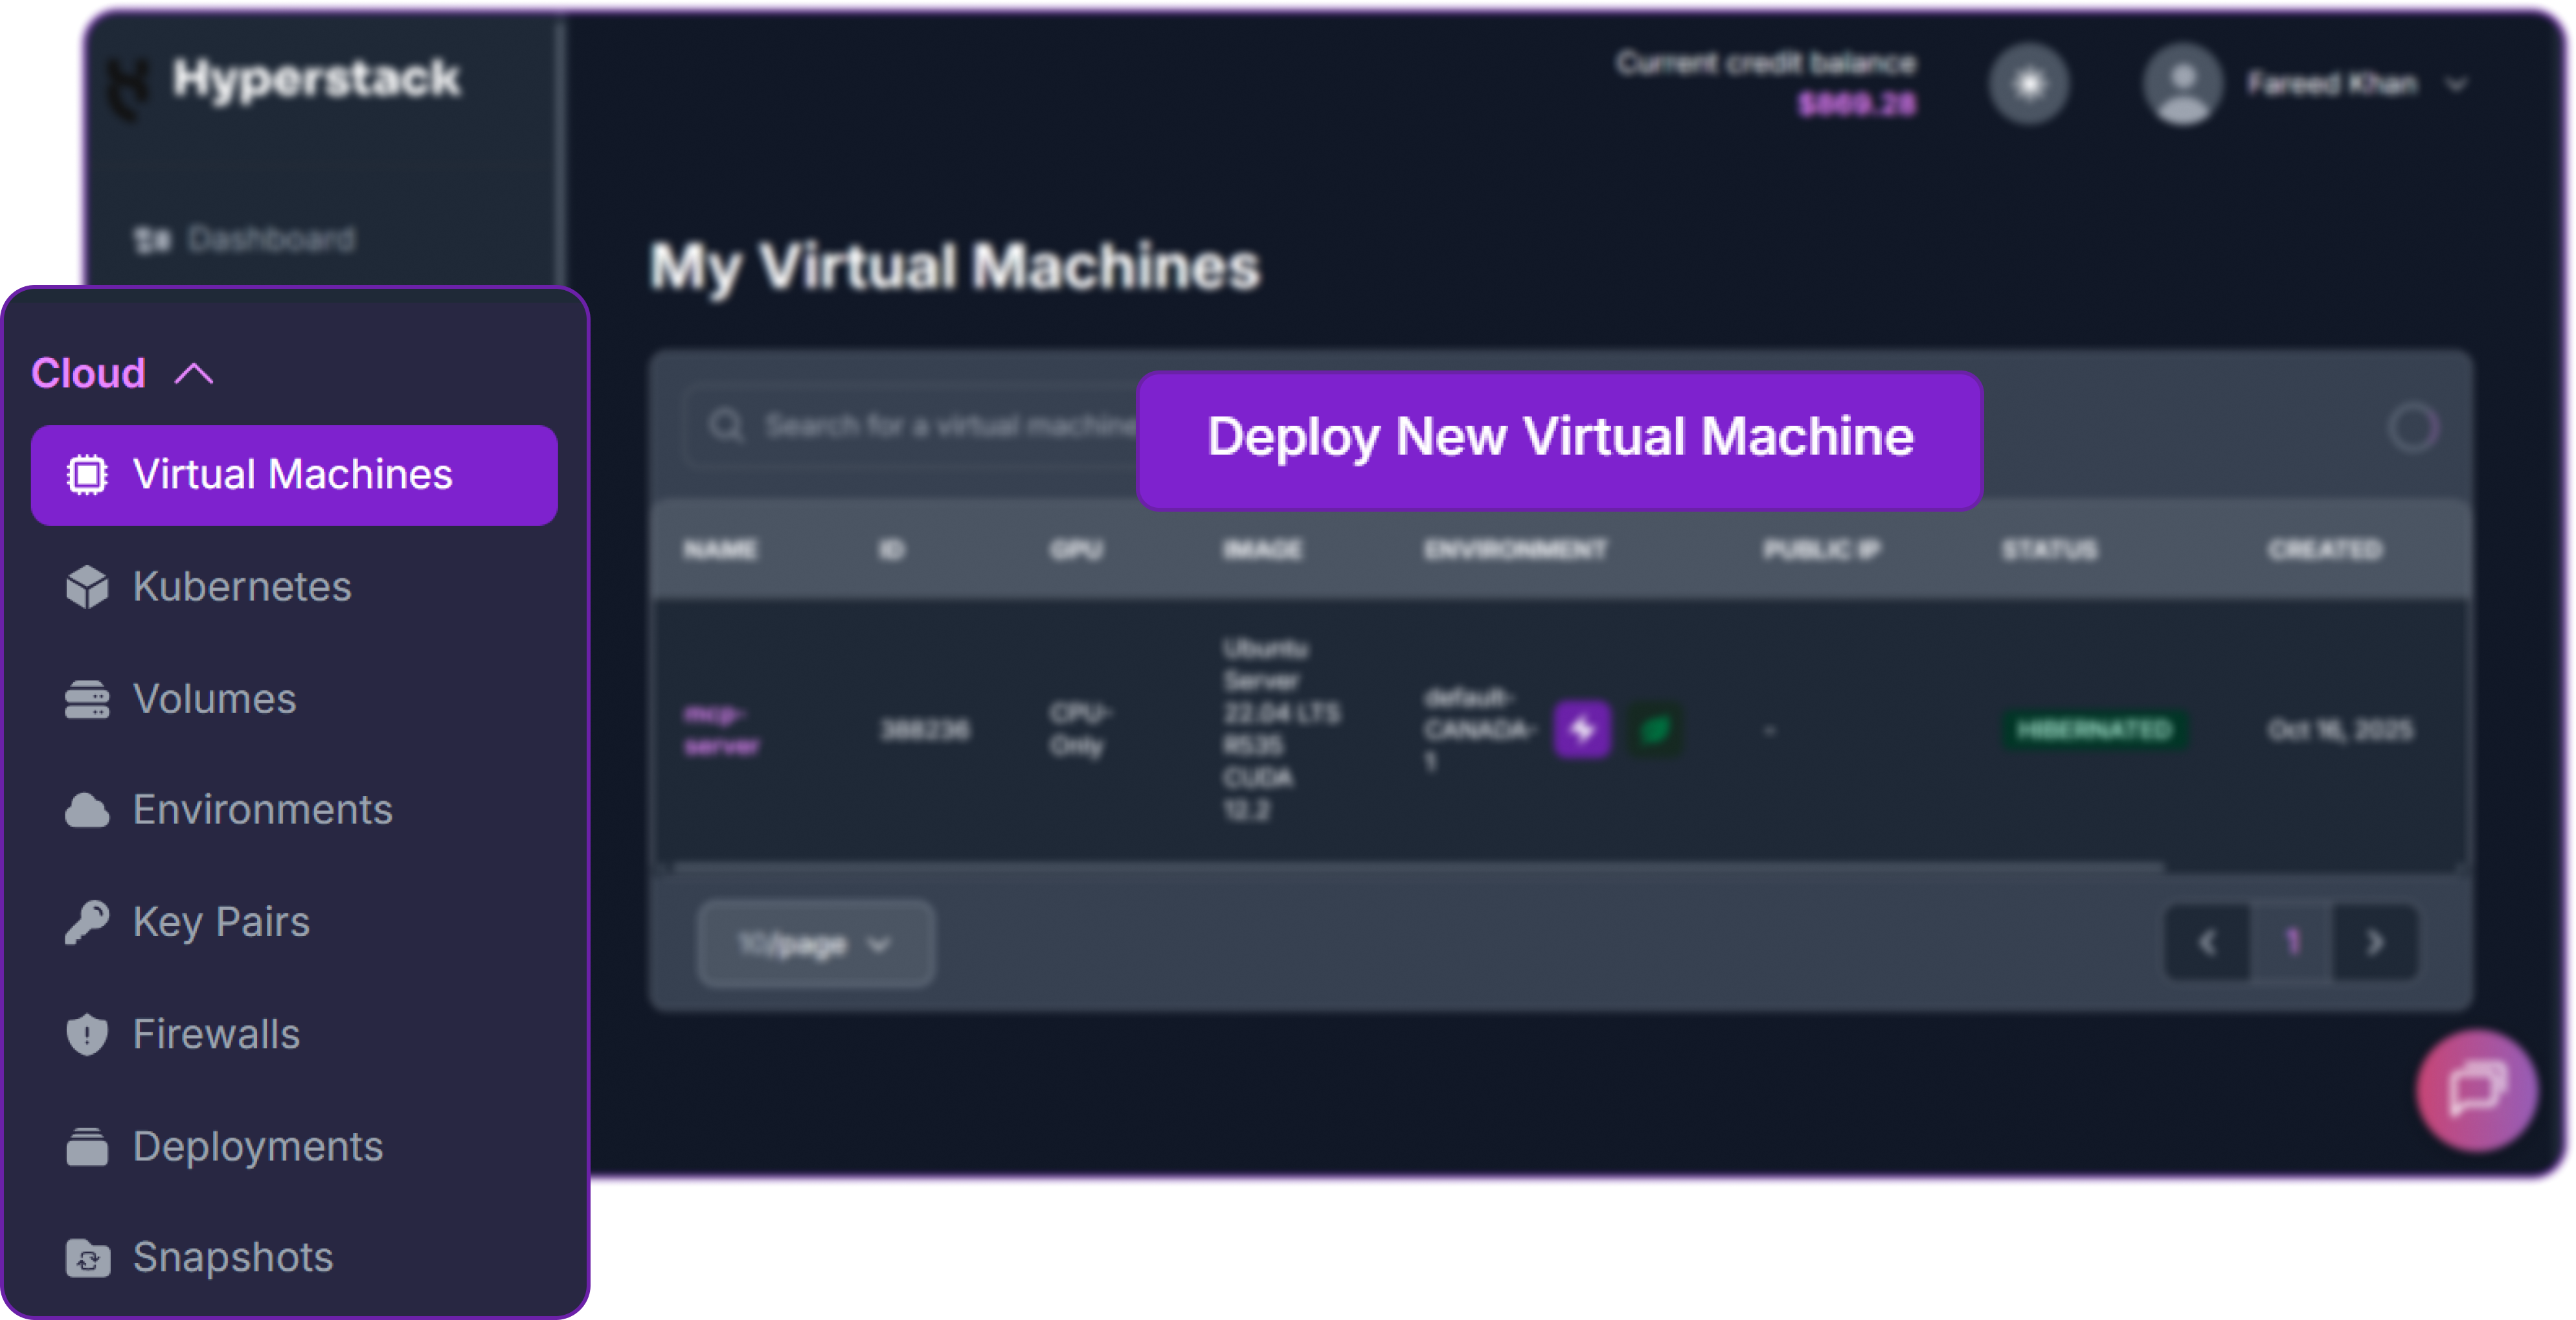
Step 2: Deploying a New Virtual Machine
From the Hyperstack dashboard, we will launch a new GPU-powered VM.
- Initiate Deployment: Look for the "Deploy New Virtual Machine" button on the dashboard and click it.
Qwen 3 TTS CustomVoice runs efficiently on multiple GPU configurations depending on latency and cost requirements:
-
RTX A6000: A cost-effective option suitable for batch speech generation and experimentation. Widely available, it is ideal for developers and teams optimizing for budget.
-
NVIDIA H100 PCIe: A high-end GPU designed for ultra-low latency and large-scale real-time inference. Recommended for production deployments requiring instant speech generation and high concurrency.
In this guide, we demonstrate deployment on an H100 80GB GPU for optimal performance. If time-to-speech is less critical, the RTX A6000 is a strong alternative offering excellent value for batch workloads.

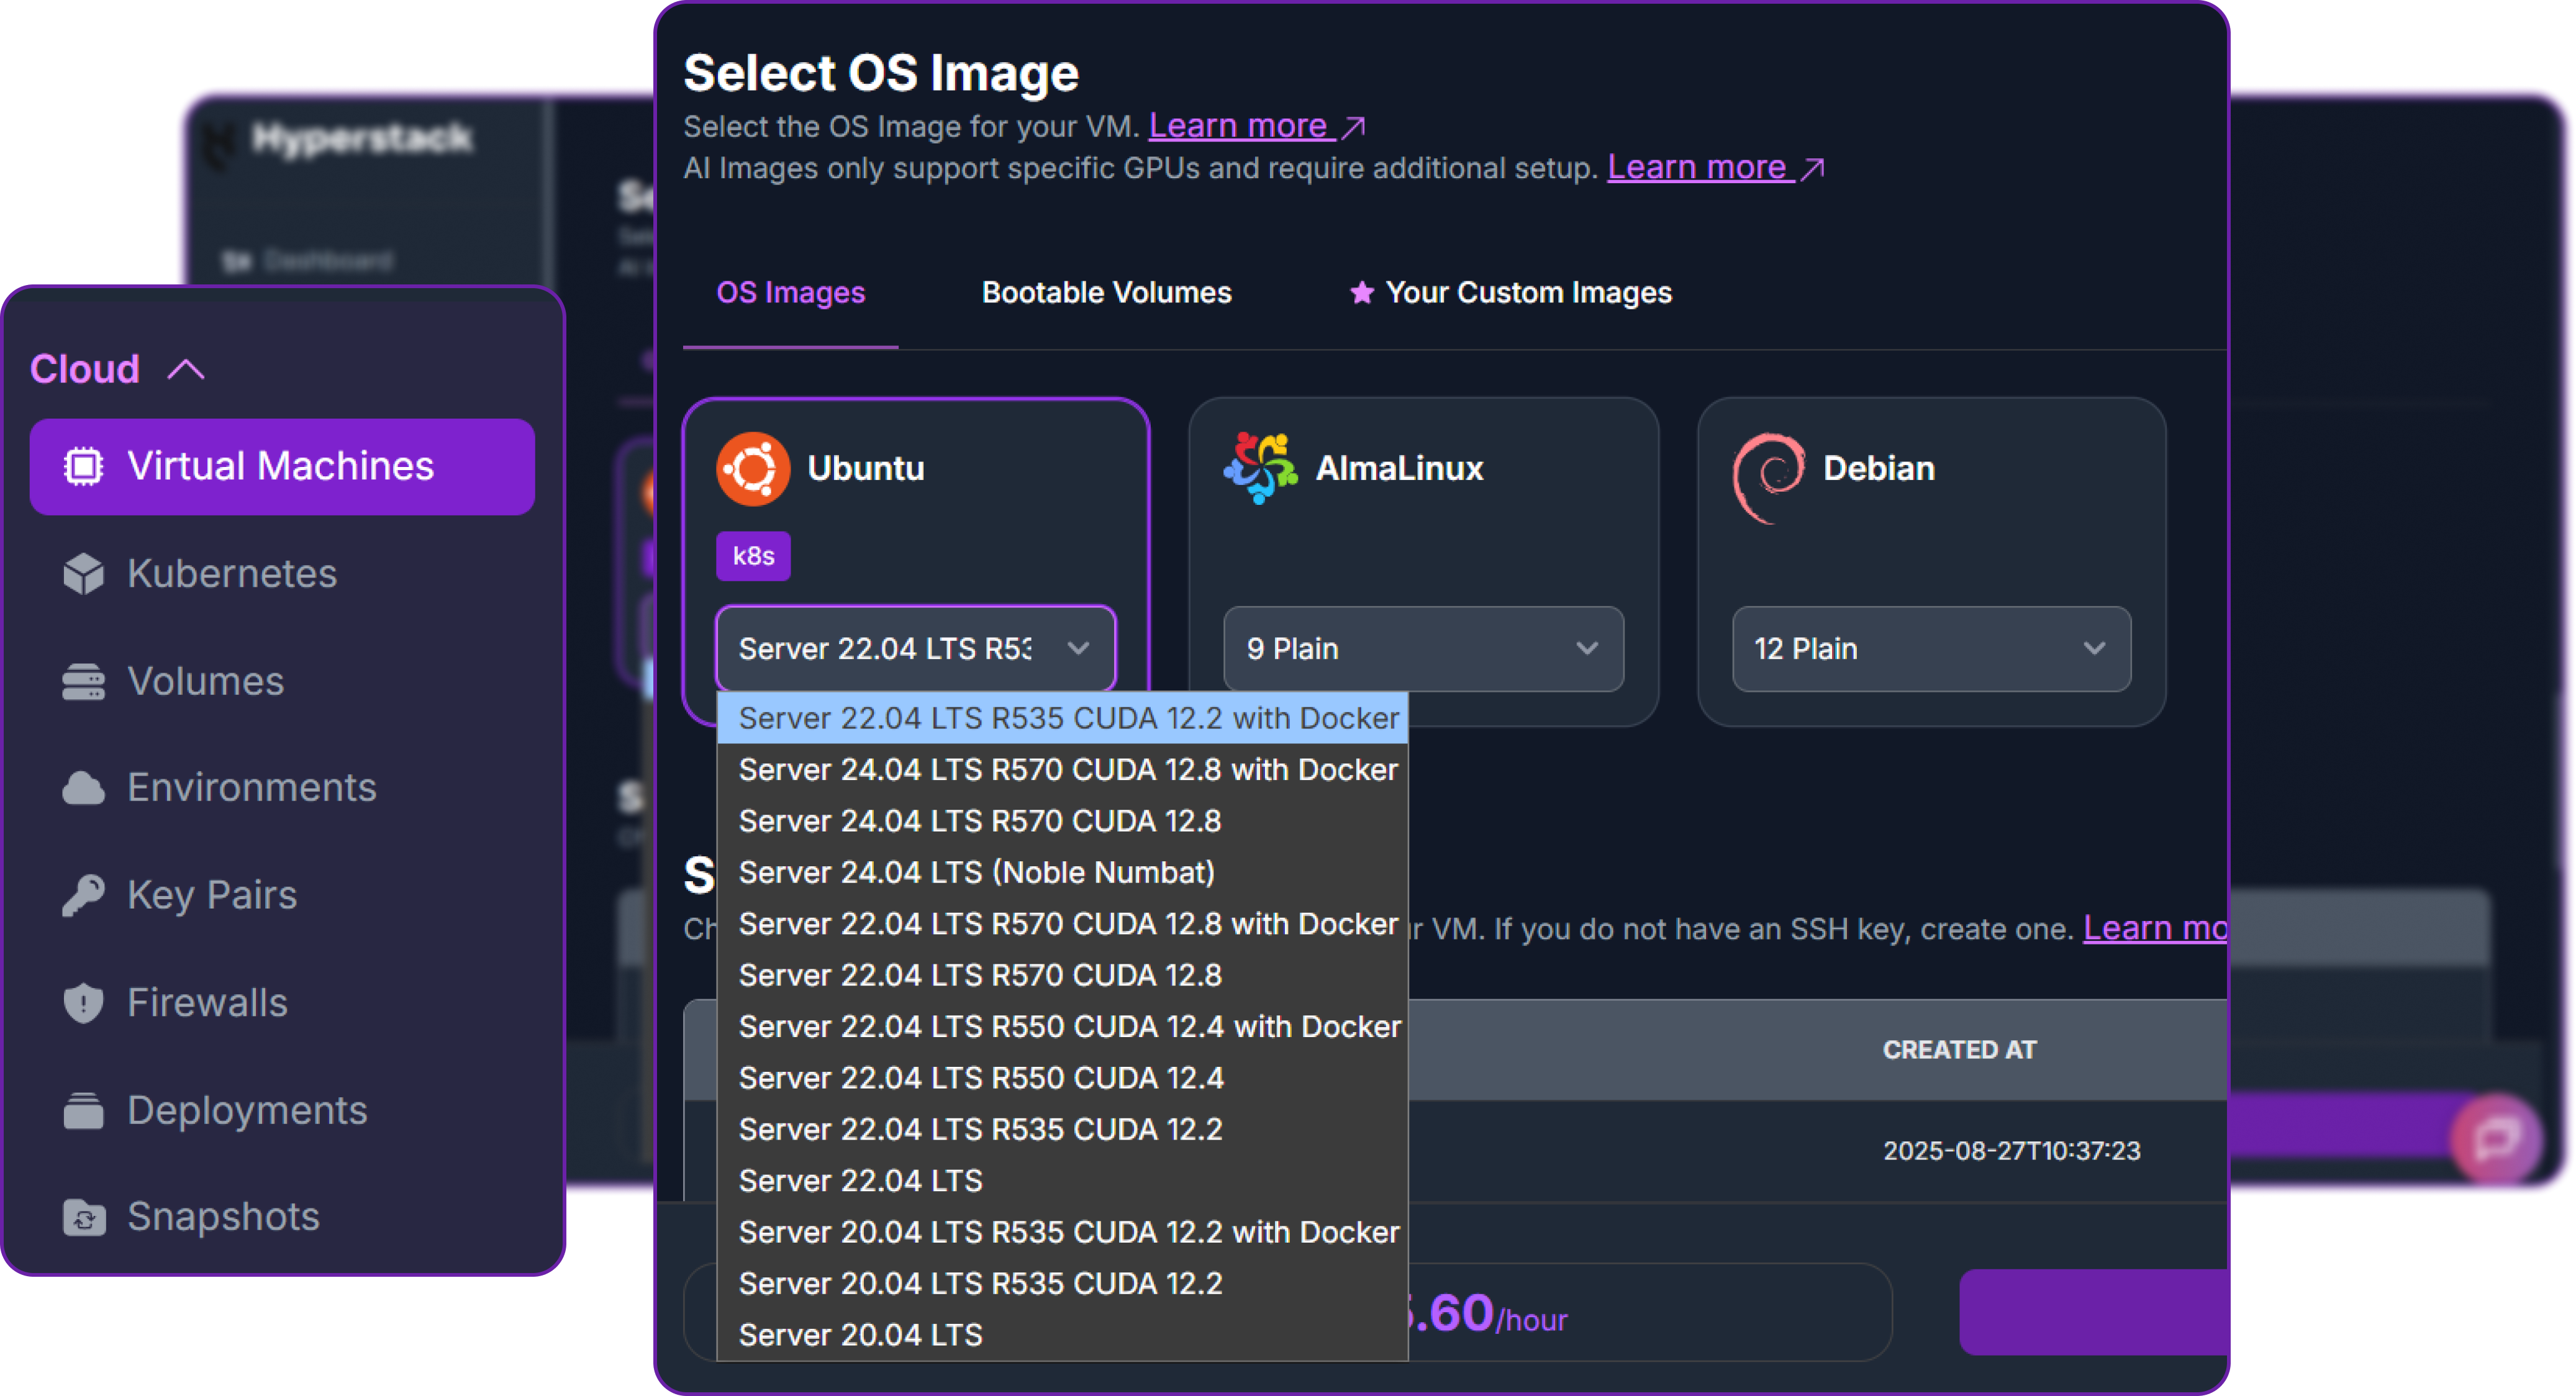
- Choose the Operating System: Select the "Ubuntu Server 22.04 LTS R535 CUDA 12.2 with Docker" image. This provides a ready-to-use environment with all necessary drivers.
- Select a Keypair: Choose an existing SSH keypair from your account to securely access the VM.
- Network Configuration: Ensure you assign a Public IP to your Virtual Machine. This is crucial for remote management and connecting your local development tools.
- Review and Deploy: Double-check your settings and click the "Deploy" button.
Step 3: Accessing Your VM
Once your VM is running, you can connect to it.
-
Locate SSH Details: In the Hyperstack dashboard, find your VM's details and copy its Public IP address.
-
Connect via SSH: Open a terminal on your local machine and use the following command, replacing the placeholders with your information.
# Connect to your VM using your private key and the VM's public IP
ssh -i [path_to_your_ssh_key] ubuntu@[your_vm_public_ip]
Here you will replace [path_to_your_ssh_key] with the path to your private SSH key file and [your_vm_public_ip] with the actual IP address of your VM.
Once connected, you should see a welcome message indicating you're logged into your Hyperstack VM.
Now that we are inside the VM, we will use Docker to launch the vLLM server.
Step 4: Acquire Miniconda
The standard approach to use qwen TTS custom voice model is through Miniconda. So let's get Miniconda set up on your system. We need to create a directory for Miniconda first:
mkdir -p ~/miniconda3
Then we can download the Miniconda installer script:
wget https://repo.anaconda.com/miniconda/Miniconda3-latest-Linux-x86_64.sh -O ~/miniconda3/miniconda.sh
Since the installer script may not have execute permissions by default, we need to modify its permissions:
bash ~/miniconda3/miniconda.sh -b -u -p ~/miniconda3
Here we are using the -b flag for a silent installation, the -u flag to update any existing installation, and the -p flag to specify the installation path.
You can now remove the installer script to clean up:
rm -rf ~/miniconda3/miniconda.sh
Now we need to initialize the shell to use conda:
# Initialize the shell
~/miniconda3/bin/conda init bash
This will modify your ~/.bashrc file to include the necessary configurations for conda. To apply these changes, run:
# Reload the shell to apply changes
source ~/.bashrc
We need to accept the Terms of Service for the conda channels to avoid any interruptions during package installations. Run the following commands:
# Accept Terms of Service for both Main and R channels (Required)
conda tos accept --override-channels --channel https://repo.anaconda.com/pkgs/main
conda tos accept --override-channels --channel https://repo.anaconda.com/pkgs/r
These two commands ensure that you have accepted the Terms of Service for both the main conda channel and the R channel, which may be required for some packages.
Step 5: Create a New Conda Environment and Install qwen TTS
You can now create a new conda environment specifically for qwen TTS with Python 3.12. This Python version is required to avoid any compatibility issues:
# Create the environment with Python 3.12
conda create -n qwen3-tts python=3.12 -y

# Activate it
conda activate qwen3-tts
Now that we are in the qwen3-tts environment, we can proceed to install the necessary dependencies for qwen TTS in the next step.
pip install -U qwen-tts
This will start downloading and installing qwen TTS along with all its dependencies.
Note that for optimal performance, especially on GPUs, it is highly recommended to install Flash Attention. You can do this by running the following command:
# Install Flash Attention (Highly recommended for speed)
pip install -U flash-attn --no-build-isolation
Once the installation is complete, we can now start using qwen TTS in our conda environment.
Generating Speech with Qwen3 TTS
Qwen TTS Custom voice model documentation supports many parameters you can look into their official documentation but for now let's generate some speech using the default settings.
Step 1: Import Required Libraries
We need to import the necessary libraries that is going to support our TTS generation.
# For tensor operations
import torch

# For audio file saving
import soundfile as sf

# Import the Qwen TTS model
from qwen_tts import Qwen3TTSModel
We are using torch to load the model in a compatible precision on GPU, soundfile to save the generated audio, and Qwen3TTSModel from qwen_tts to load the TTS model.
Step 2: Load the Pre-trained Qwen TTS Model
Now we are going to load the pre-trained Qwen TTS model with a custom voice. We will use the from_pretrained method to load the model from the Hugging Face repository.
# Load the pre-trained Qwen TTS model with custom voice
model = Qwen3TTSModel.from_pretrained(
    "Qwen/Qwen3-TTS-12Hz-1.7B-CustomVoice", # Model repository
    device_map="auto",                      # Automatically uses the NVIDIA GPU if available
    dtype=torch.bfloat16,                   # Uses BF16 for efficiency
)
We are using dtype=torch.bfloat16 to load the model in BF16 precision which is more efficient on modern GPUs.
Step 3: Define the Text Prompt
We need to define the text that we want to convert to speech. In this case, we will use an introduction text about Hyperstack.
# The Hyperstack introduction text
text_prompt = (
    "Hyperstack is a leading European GPU cloud platform, offering scalable, "
    "flexible and secure infrastructure. It provides a true cloud environment "
    "for building market-ready products faster with high-performance cloud GPU solutions."
)
This text will be used as the input for the TTS model to generate speech.
Step 4: Generate Speech from Text
Now we can use the model to generate speech from the defined text prompt. We will specify the language and the custom voice speaker.
# Generate speech using the custom voice model
wavs, sr = model.generate_custom_voice(
    text=text_prompt,                    # Text to be converted to speech
    language="English",                  # Language of the text
    speaker="Ryan" ,                     # Custom voice speaker
)
Here, we are generating speech in English using the custom voice named "Ryan". We are specifying wavs to hold the generated audio data and sr for the sample rate.
Step 5: Save the Generated Audio
After generating the speech, we can save the audio to a WAV file using the soundfile library.
# Save the generated audio to a WAV file
output_file = "hyperstack_intro.wav"

# Write the audio data to the file
sf.write(output_file, wavs[0], sr)
This will save the generated speech to a file named hyperstack_intro.wav in the current directory.
🎧 Listen to the Generated Result
Output: hyperstack_intro.wav (Speaker: Ryan)
As you can see our generated audio is now saved and ready to be played back!
Hyperstack is a cloud platform designed to accelerate AI and machine learning workloads. Here's why it's an excellent choice for deploying Qwen 3 TTS CustomVoice:
-
Availability: Hyperstack provides access to the latest and most powerful GPUs such as the NVIDIA H100 on-demand, which are well-suited for neural text-to-speech models and enable fast, high-quality speech synthesis with low latency.
-
Ease of Deployment: With pre-configured environments and one-click deployments, setting up Qwen 3 TTS becomes significantly simpler on the platform, allowing you to start generating speech without complex CUDA or driver configuration.
-
Scalability: You can easily scale your resources up or down based on your audio generation workload, whether you are synthesizing a few voice samples or running large-scale batch and real-time TTS services.
-
Cost-Effectiveness: You pay only for the resources you use with Hyperstack’s cost-effective cloud GPU pricing, making it ideal for experimenting with custom voices, content creation, and production speech pipelines.
-
Integration Capabilities: Hyperstack provides easy integration with popular AI frameworks and tools such as PyTorch, Hugging Face, and Docker, enabling seamless integration of Qwen 3 TTS into voice assistants, AI agents, and multimedia pipelines.
FAQs
What is Qwen 3 TTS CustomVoice?
Qwen 3 TTS CustomVoice is an advanced neural text-to-speech (TTS) model by Qwen, purpose-built for high-quality speech generation. It can generate natural-sounding audio, support custom voices, handle multilingual text, and power scalable voice applications.
What are the key features of Qwen 3 TTS CustomVoice?
Qwen 3 TTS CustomVoice offers high-fidelity speech synthesis, custom voice generation, multilingual support, low-latency inference, and scalable deployment for real-time and batch audio workloads.
What is the model size of Qwen 3 TTS CustomVoice?
Qwen 3 TTS CustomVoice provides a 1.7B parameter architecture, enabling efficient GPU inference while maintaining high speech quality for long-form and real-time audio generation.
How does Qwen 3 TTS CustomVoice perform in production?
Qwen 3 TTS CustomVoice is optimized for fast inference and high throughput on modern GPUs, delivering production-ready performance for large-scale speech synthesis pipelines when deployed on cloud infrastructure like Hyperstack.
What are the main use cases for Qwen 3 TTS CustomVoice?
Qwen 3 TTS CustomVoice is suited for AI voice assistants, audiobook generation, dubbing, conversational AI agents, content creation, accessibility tools, and enterprise speech synthesis services.
Subscribe to Hyperstack!
Enter your email to get updates to your inbox every week

