
.png)
TABLE OF CONTENTS
NVIDIA H100 SXM On-Demand
In our latest tutorial, we explore how to seamlessly connect Hyperstack AI Studio with OpenWebUI in just minutes. Learn how to set up OpenWebUI, retrieve your Hyperstack API credentials, and integrate models like meta-llama/Llama-3.1-8B-Instruct for real-time interaction. This guide helps you create a complete, secure, and customizable AI environment—combining Hyperstack’s powerful backend with OpenWebUI’s sleek, privacy-first interface for effortless LLM deployment and testing.
Large language models (LLMs) have reshaped the way we interact with software from chat assistants to autonomous coding tools. However, managing, testing, and integrating these models can still be complex. That’s where tools like OpenWebUI and Hyperstack AI Studio come into play.
These two platforms complement each other perfectly:
- OpenWebUI provides an intuitive, web-based chat interface for interacting with LLMs, whether hosted locally or via API.
- Hyperstack AI Studio acts as the backend infrastructure, letting us host, fine-tune, benchmark, and deploy our own LLMs all through an OpenAI-compatible API.
By merging these tools, we can create a full-stack AI environment that’s easy to use, flexible, and secure.
In this guide, we’ll explore what both tools are, why they matter, and how to connect them step by step, complete with theoretical explanations for each part of the process.
Understanding OpenWebUI
What is OpenWebUI?
OpenWebUI is an open-source web interface that allows developers to interact with large language models (LLMs) via a browser-based UI.
It’s designed for simplicity, privacy, and extensibility ideal for local testing or production-scale deployments.
Instead of sending your prompts to a public cloud API, you can host and run everything locally (or on your own server), ensuring data confidentiality and full control over your AI stack.

OpenWebUI can connect to:
- Local inference engines (like Ollama or llama.cpp)
- Cloud-based APIs that follow the OpenAI API schema (like Hyperstack AI Studio)
This means you can switch between open-source models or custom fine-tuned models simply by changing the API credentials no code rewrite required.
Why Use OpenWebUI?
Let's quickly go over why OpenWebUI is a great choice for developers and organizations:
- Self-hosted privacy: No external data sharing. Everything stays local.
- OpenAI API compatibility: Works seamlessly with any compatible endpoint, including Hyperstack.
- Multi-user roles: Supports admin and user accounts for collaborative setups.
- GPU-ready: Accelerate inference using Nvidia GPUs via Docker flags.
- Lightweight installation: Can be deployed via Docker or Python with minimal dependencies.
- Customizable interface: Modify UI themes, model settings, and connection preferences easily.
It transforms any compatible LLM backend (like Hyperstack) into a sleek, usable chat interface.
Why Use Hyperstack AI Studio
Hyperstack AI Studio is a generative AI platform that lets developers and teams host, fine-tune, evaluate, and deploy large language models without having to manage GPUs or infrastructure manually.
One of the standout features of Hyperstack is its quick evaluation framework, which allows you to benchmark different models and fine-tuned versions against standard datasets with just a few clicks.
Key Benefits
Some of the main advantages of using Hyperstack AI Studio with OpenWebUI include:
- OpenAI-Compatible API: Plug-and-play integration with OpenWebUI or other tools that use OpenAI’s schema.
- Fast Inference: Optimized GPU backend with low latency and scalable performance.
- Fine-Tuning: Train and customize models with domain-specific data, which you can then access via OpenWebUI.
- Evaluation Framework: Benchmark models and compare them quickly to find the best fit for your use case.
- Playground: Test your models interactively before production.
- Cost-Effective: Pay only for what you use.
In our setup, Hyperstack provides the intelligence (LLMs and APIs), while OpenWebUI provides the user experience (chat and visualization).
Together, they deliver an end-to-end AI workflow that’s flexible, scalable, and completely under your control.
Step-by-Step Integration Guide
Let’s walk through the entire setup from installing OpenWebUI to connecting it with Hyperstack AI Studio.
Step 1: Install OpenWebUI
OpenWebUI can be installed in two main ways:
- Using Docker (recommended) best for production or easy setup.
- Using Python (via pip) best for lightweight environments or developers who prefer direct control.
We’ll explore both methods in detail.
Option 1: Installing via Docker
Docker simplifies the setup by packaging everything inside a container, meaning you don’t have to manually manage dependencies.
Make sure Docker is installed in your local environment.
Step 1.1: Pull the Docker Image
# Pull the official OpenWebUI image from GitHub Container Registry
docker pull ghcr.io/open-webui/open-webui:main
We are basically downloading the latest pre-built Docker image containing the OpenWebUI environment, dependencies, and configurations.
If you have limited storage, you can use the slim variant, which downloads required models on first use:
docker pull ghcr.io/open-webui/open-webui:main-slim
This keeps the initial download size small, but may introduce a slight delay when loading models for the first time.
Step 1.2: Run the Container
Next, start the container with the following command:
# Run OpenWebUI container with default settings
docker run -d -p 3000:8080 -v open-webui:/app/backend/data --name open-webui ghcr.io/open-webui/open-webui:main
Let's understand the flags we used:
-d: Run container in detached mode (in the background)-p 3000:8080: Map port 8080 inside the container to port 3000 on your machine-v open-webui:/app/backend/data: Persist data (chats, settings, users) even after container restarts--name open-webui: Assign a readable name to your container
To make the GPU acceleration available for faster LLM inference, we can add the --gpus all flag (requires Nvidia Docker support).
docker run -d -p 3000:8080 --gpus all -v open-webui:/app/backend/data --name open-webui ghcr.io/open-webui/open-webui:cuda
But in our case, since we are connecting to Hyperstack’s API, GPU support is not strictly necessary.
Once running, open your browser and visit localhost:3000 to access the OpenWebUI interface.
Option 2: Installing via Python (Manual Method)
If you prefer a hands-on approach or don’t use Docker, you can install OpenWebUI directly via Python.
Make sure you have Python 3.11 or later installed as it is required for compatibility.
Step 2.1: Create a Virtual Environment
First, create a virtual environment to isolate your OpenWebUI installation:
# Create a virtual environment called "venv"
python3 -m venv venv
Since OpenWebUI depends on several packages, creating a virtual environment isolates your Python dependencies so they don’t conflict with system-wide packages. This ensures a clean and controlled development setup.
Step 2.2: Activate the Environment
Let's activate the virtual environment:
# On Linux/macOS
source venv/bin/activate


# On Windows
venv\Scripts\activate
Activating the environment changes your shell context, all Python commands (like pip install) will now affect only this environment.
Step 2.3: Install OpenWebUI
We can now install OpenWebUI using the Python package manager, pip:
# Install OpenWebUI from PyPI
pip install open-webui
It will take time as it fetches the latest version of OpenWebUI and installs its dependencies (Flask, FastAPI, etc.) inside the virtual environment.
Step 2.4: Start the Server
Once all dependencies are installed, you can start the OpenWebUI server with:
# Launch the OpenWebUI web server
open-webui serve
This spins up a lightweight HTTP server (typically on port 8080) that serves the web UI and API endpoints.
Visit ocalhost:3000 to access the app.
Step 2: Create an Account and Log In
Once OpenWebUI is up and running, this is what their interface looks like:

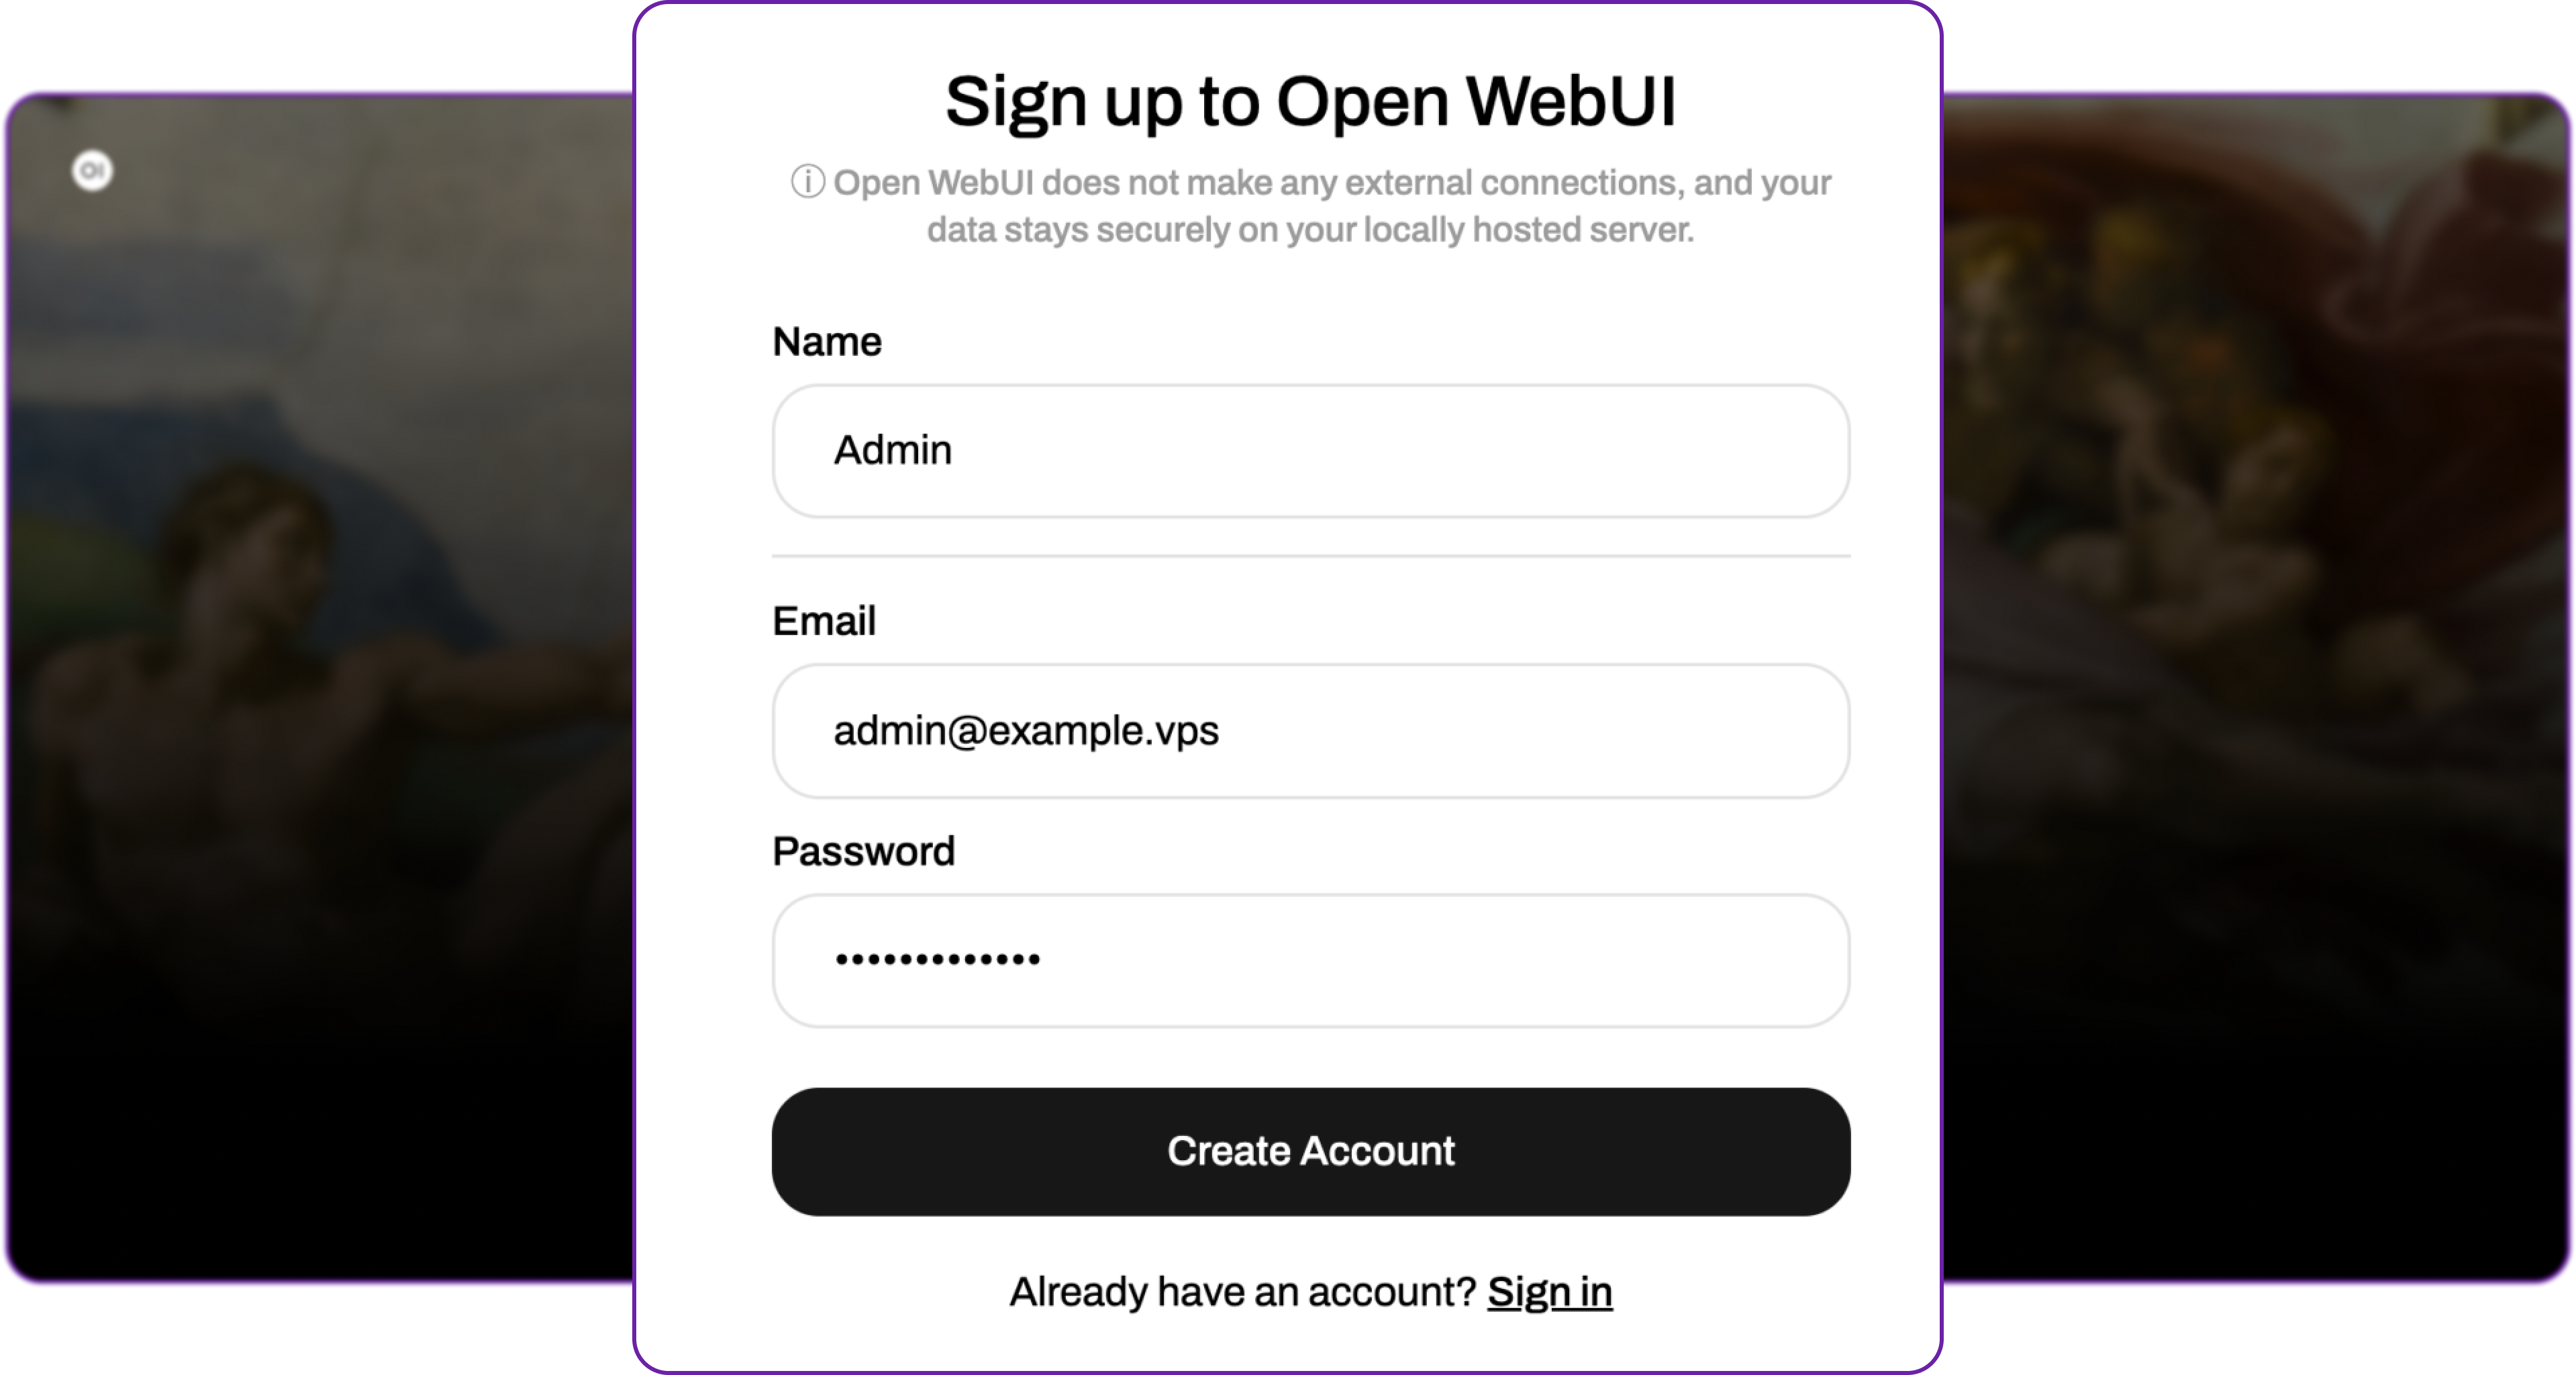
Click on get started and create your first user account.
🧩 Note: The first registered user automatically becomes the Administrator, who controls settings, model connections, and user permissions.
You can fill in your details to create the account:
After registering, you will be redirected to the home dashboard.
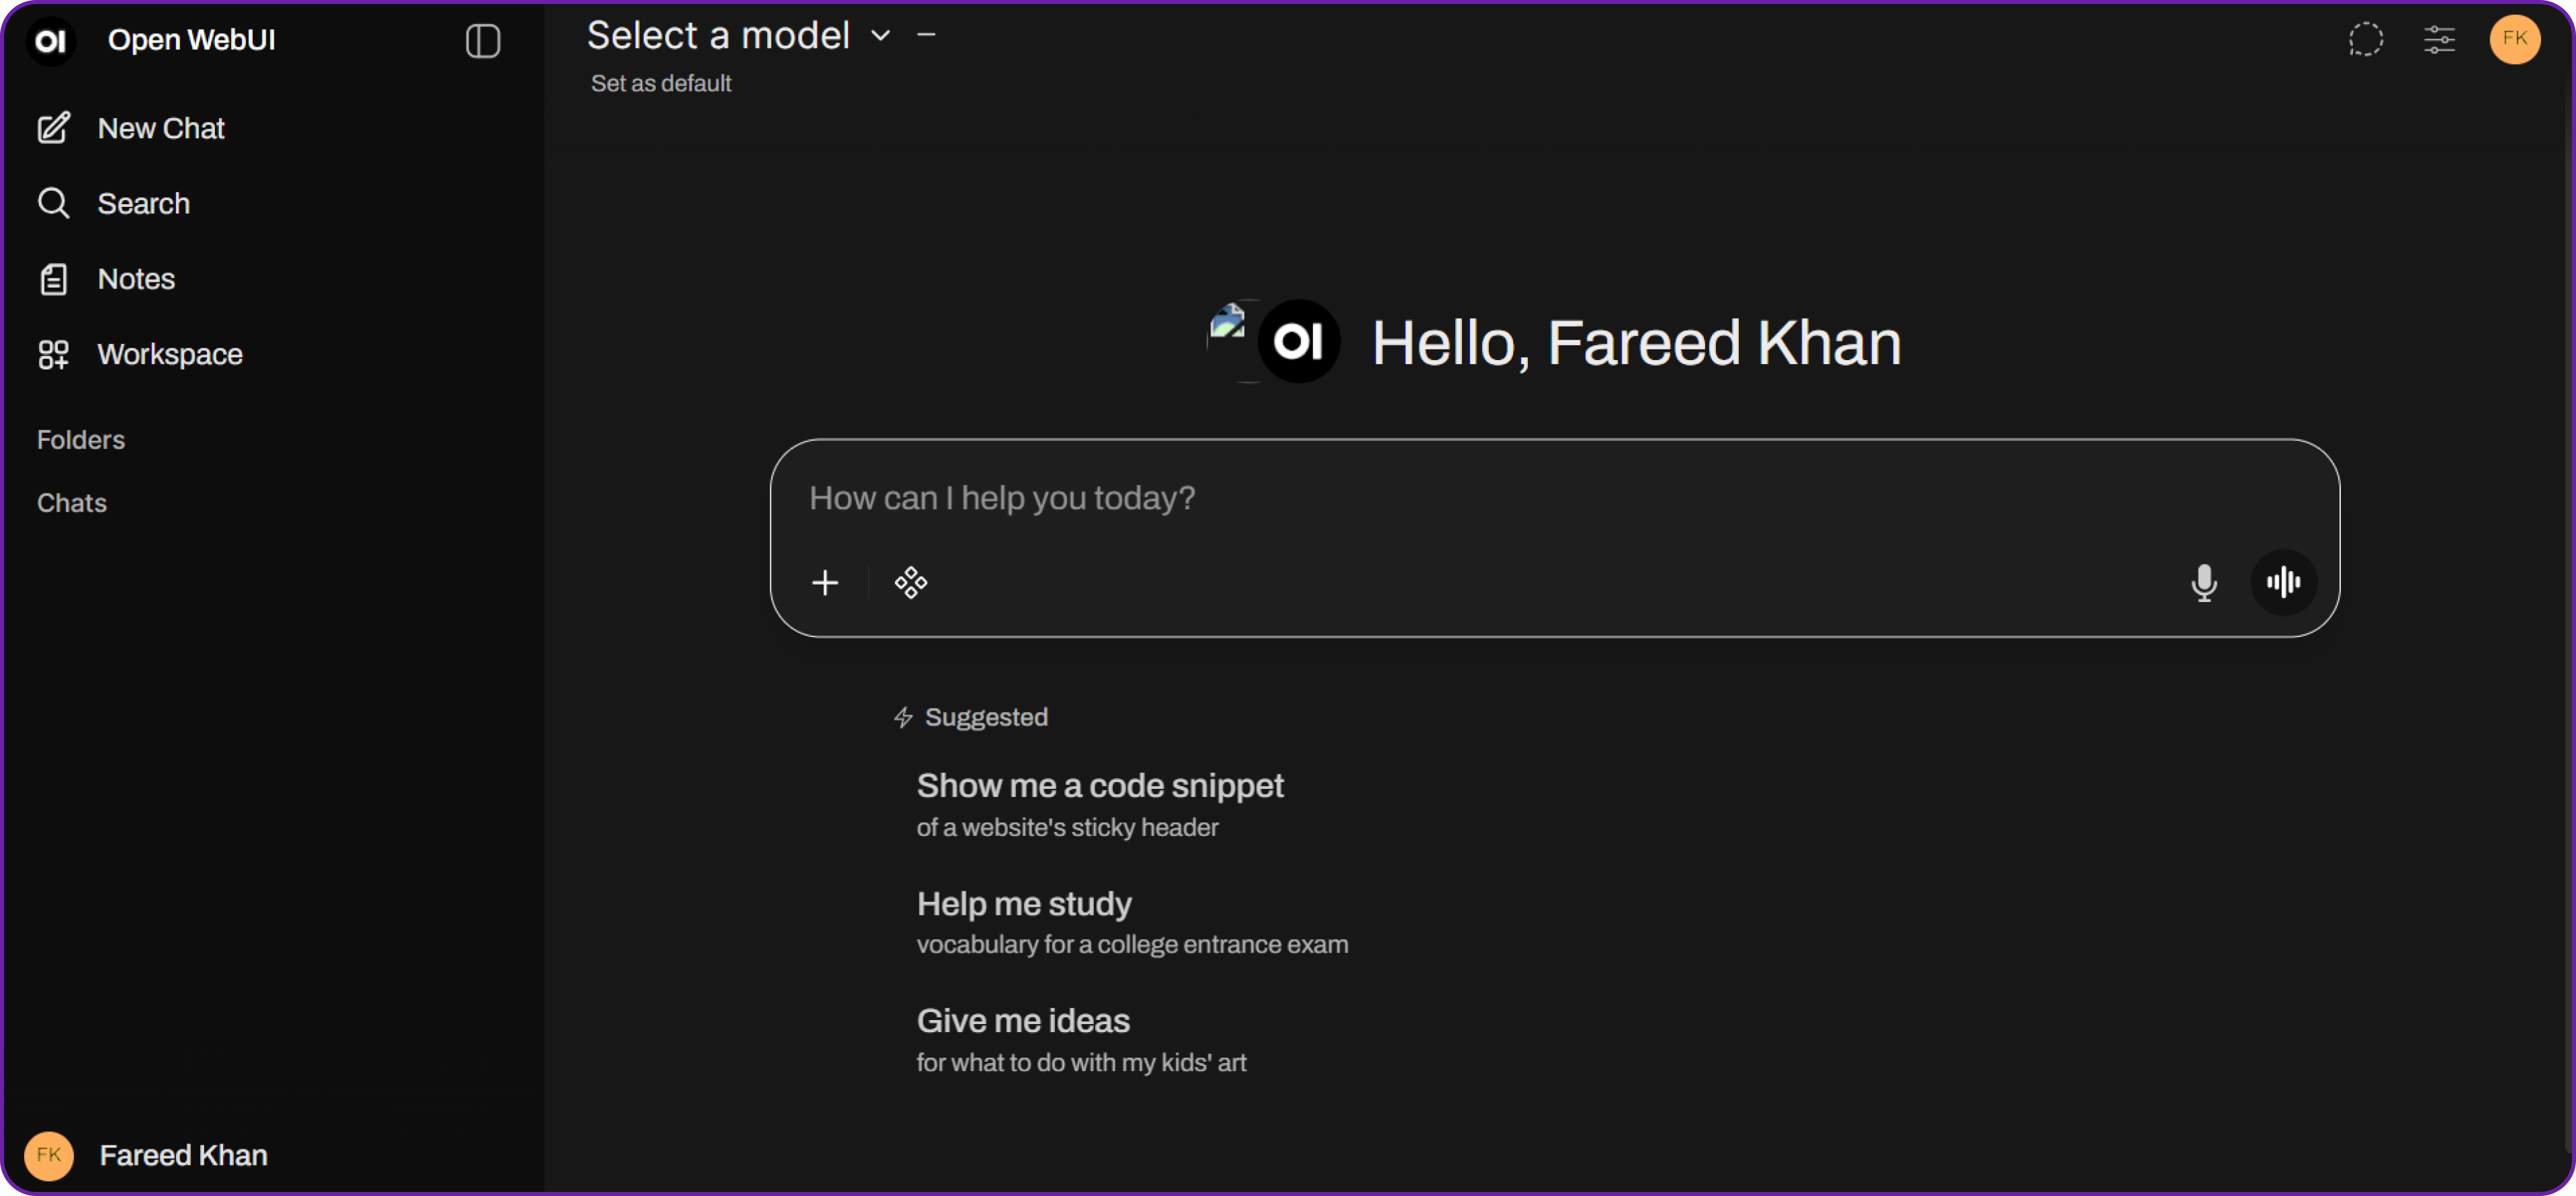
You can see that there is no model connected yet, so let’s fix that by connecting to Hyperstack AI Studio.
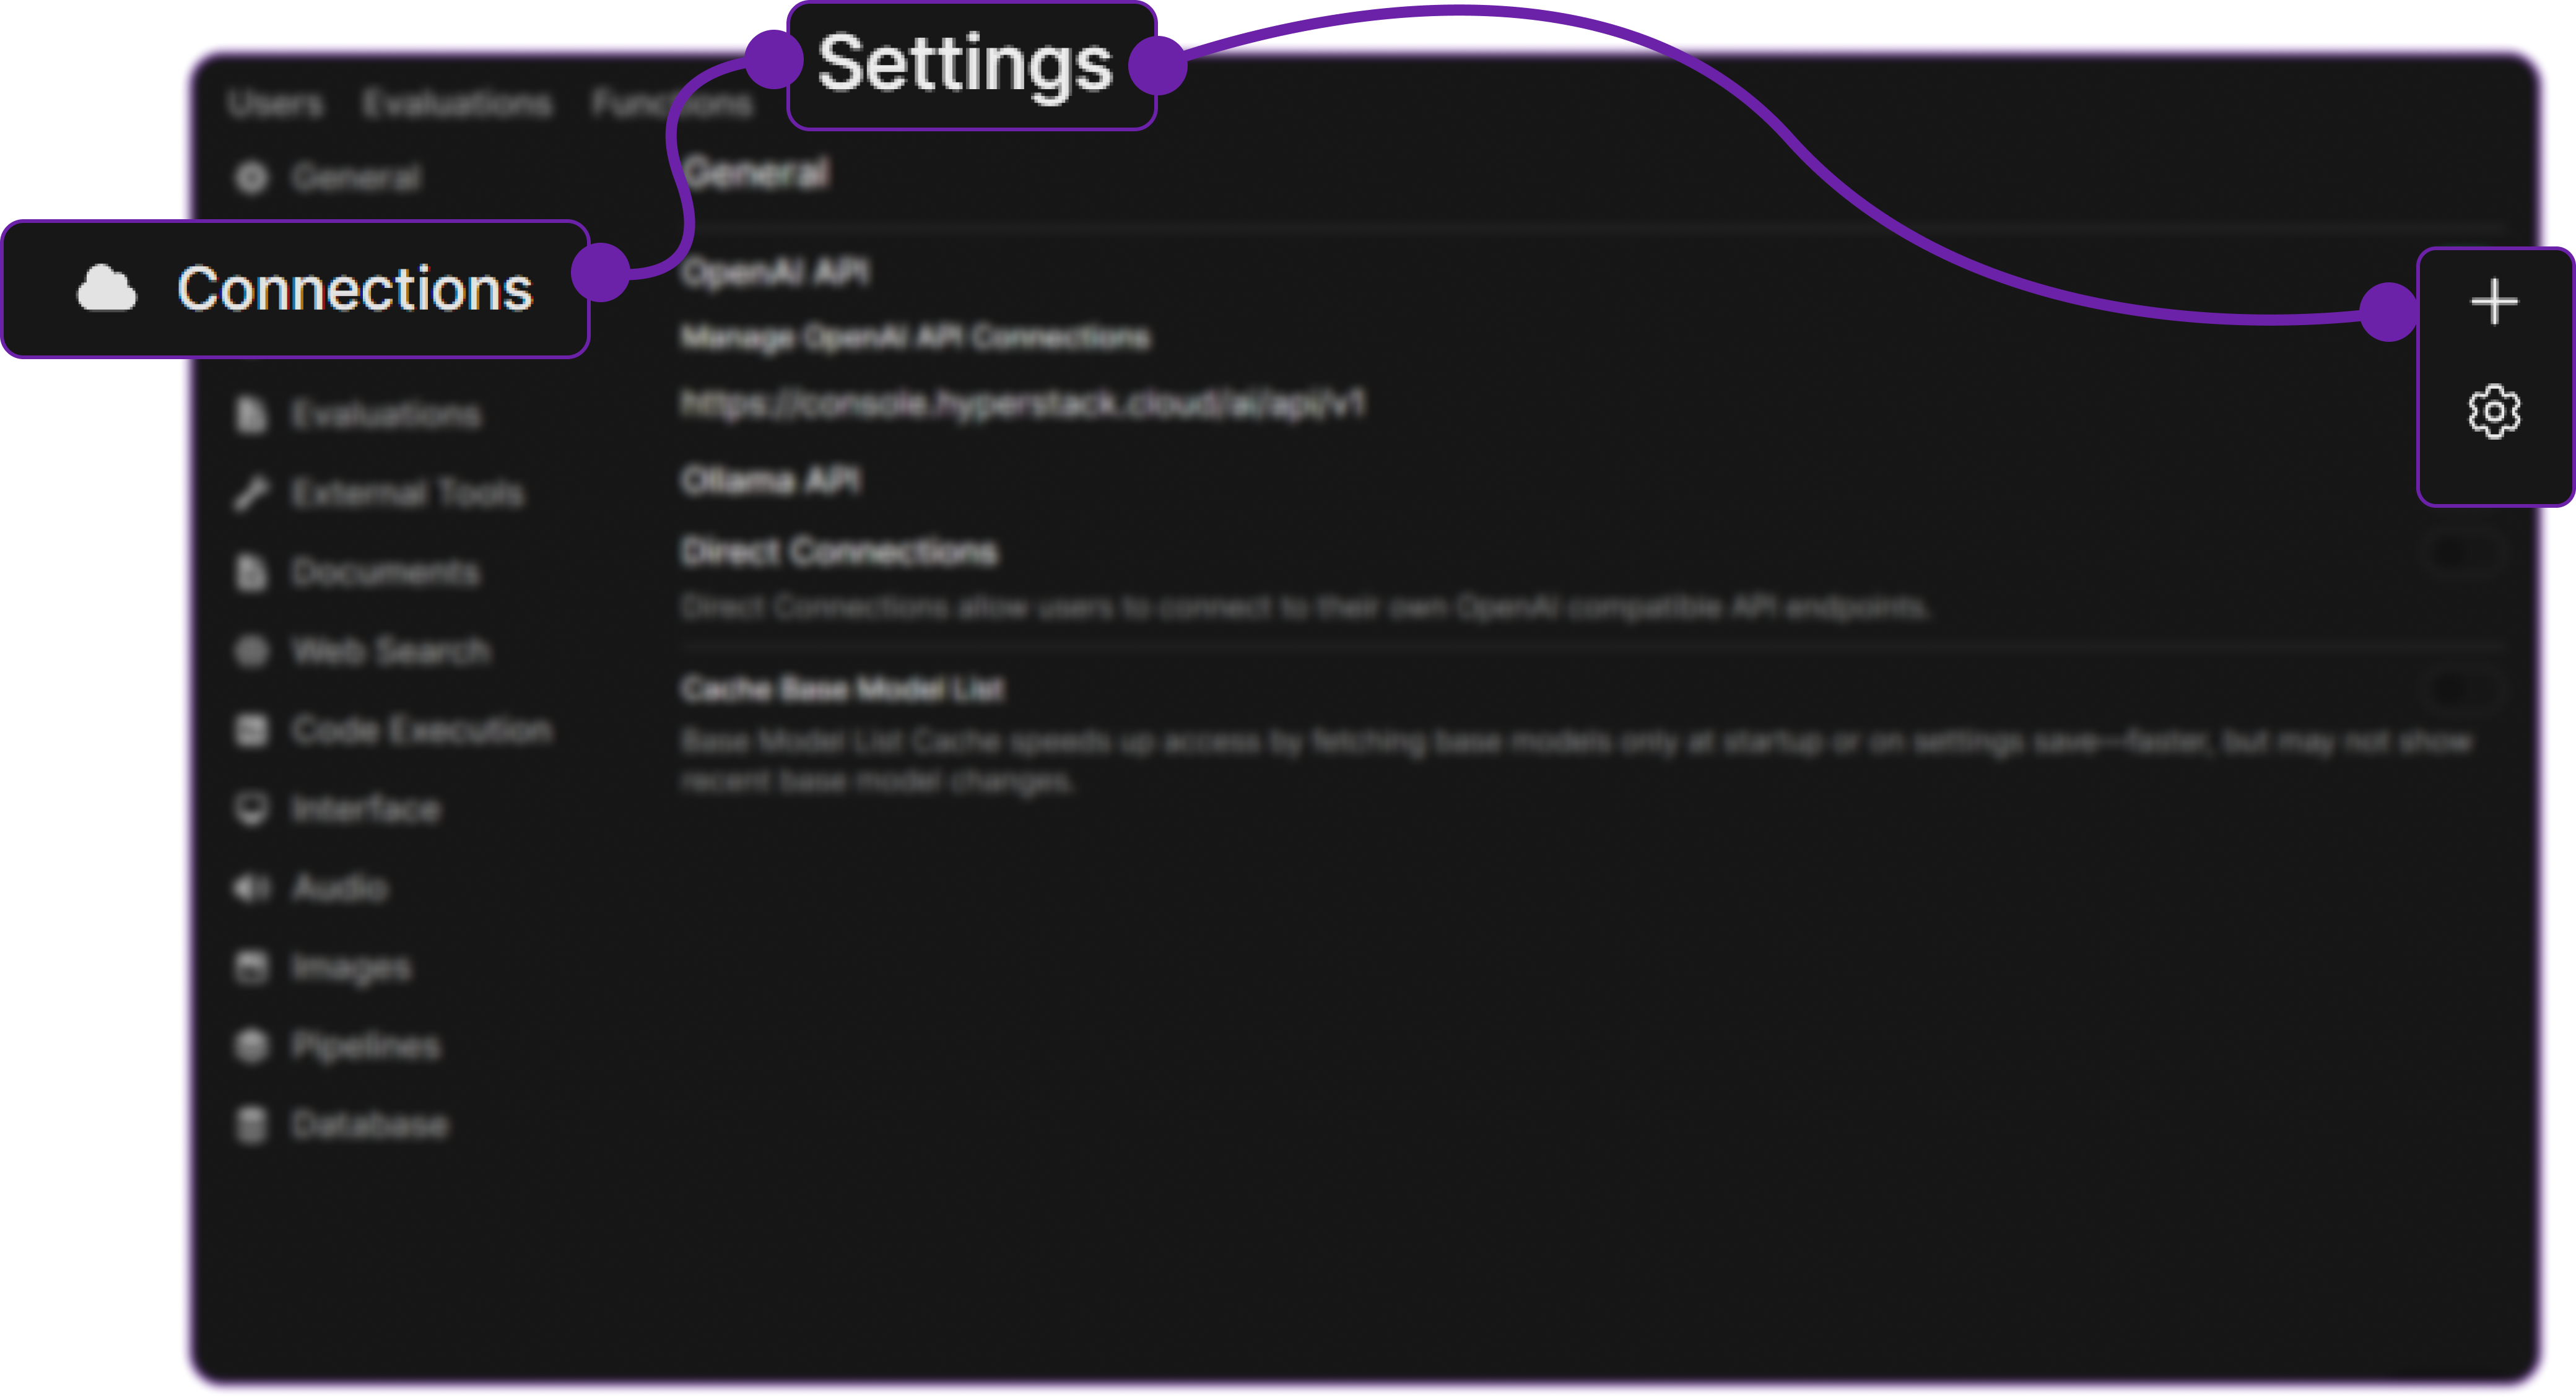
Step 3: Open Admin Panel and Go to Connections
- Click your Profile Icon (bottom-left corner of the interface).
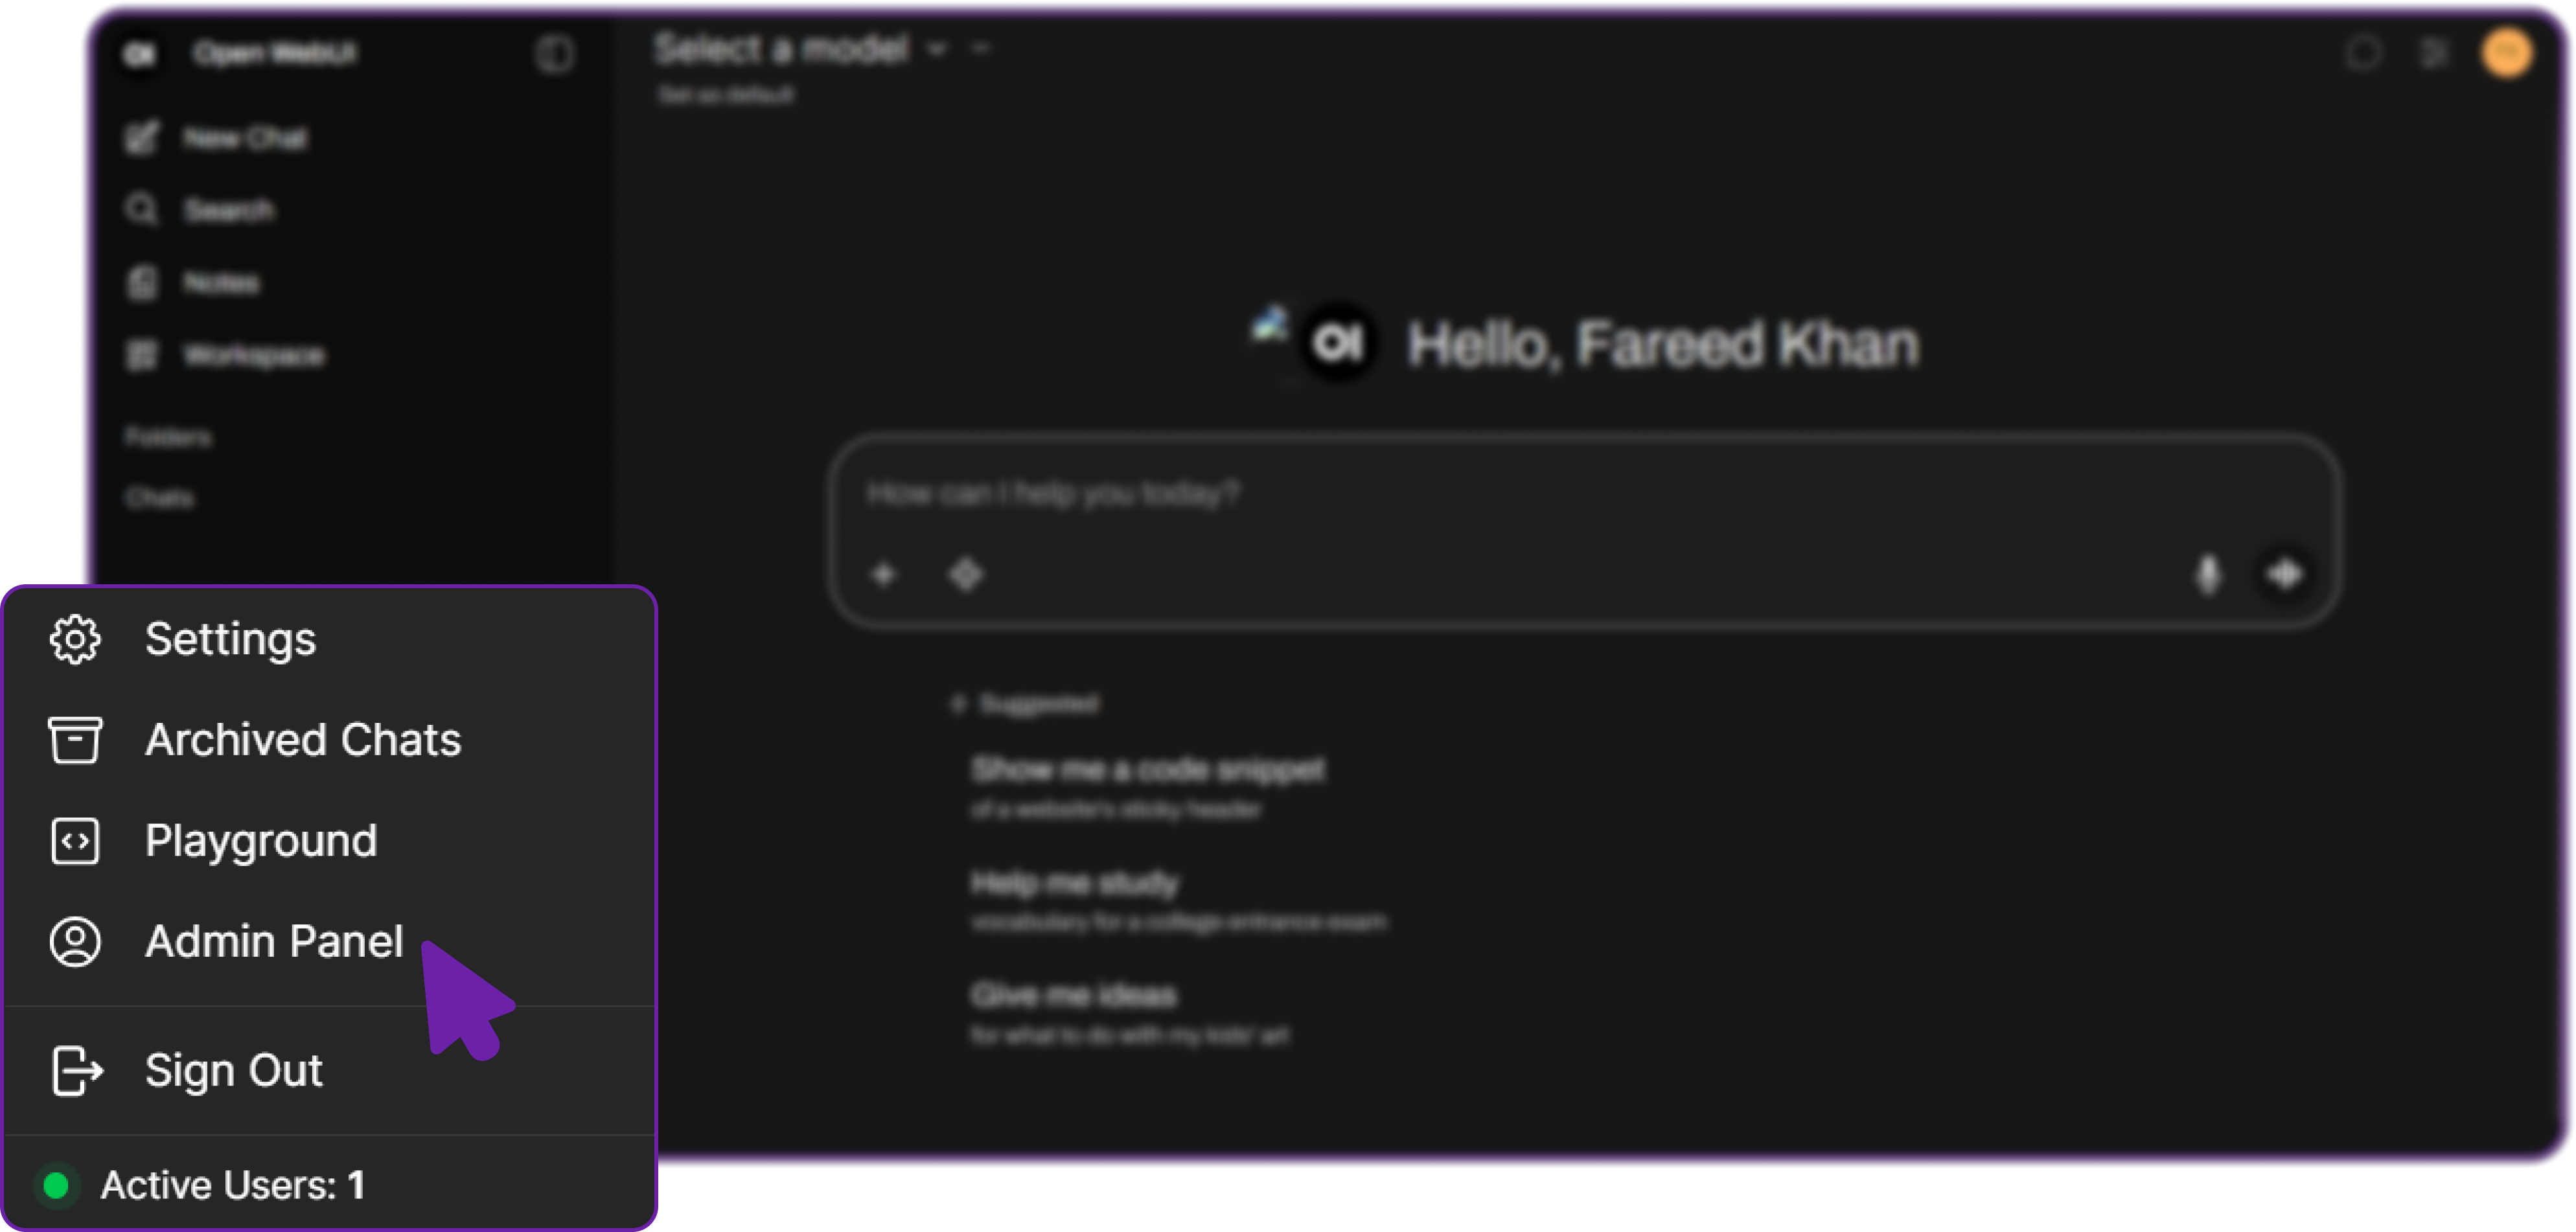
- Navigate to Settings → Connections.
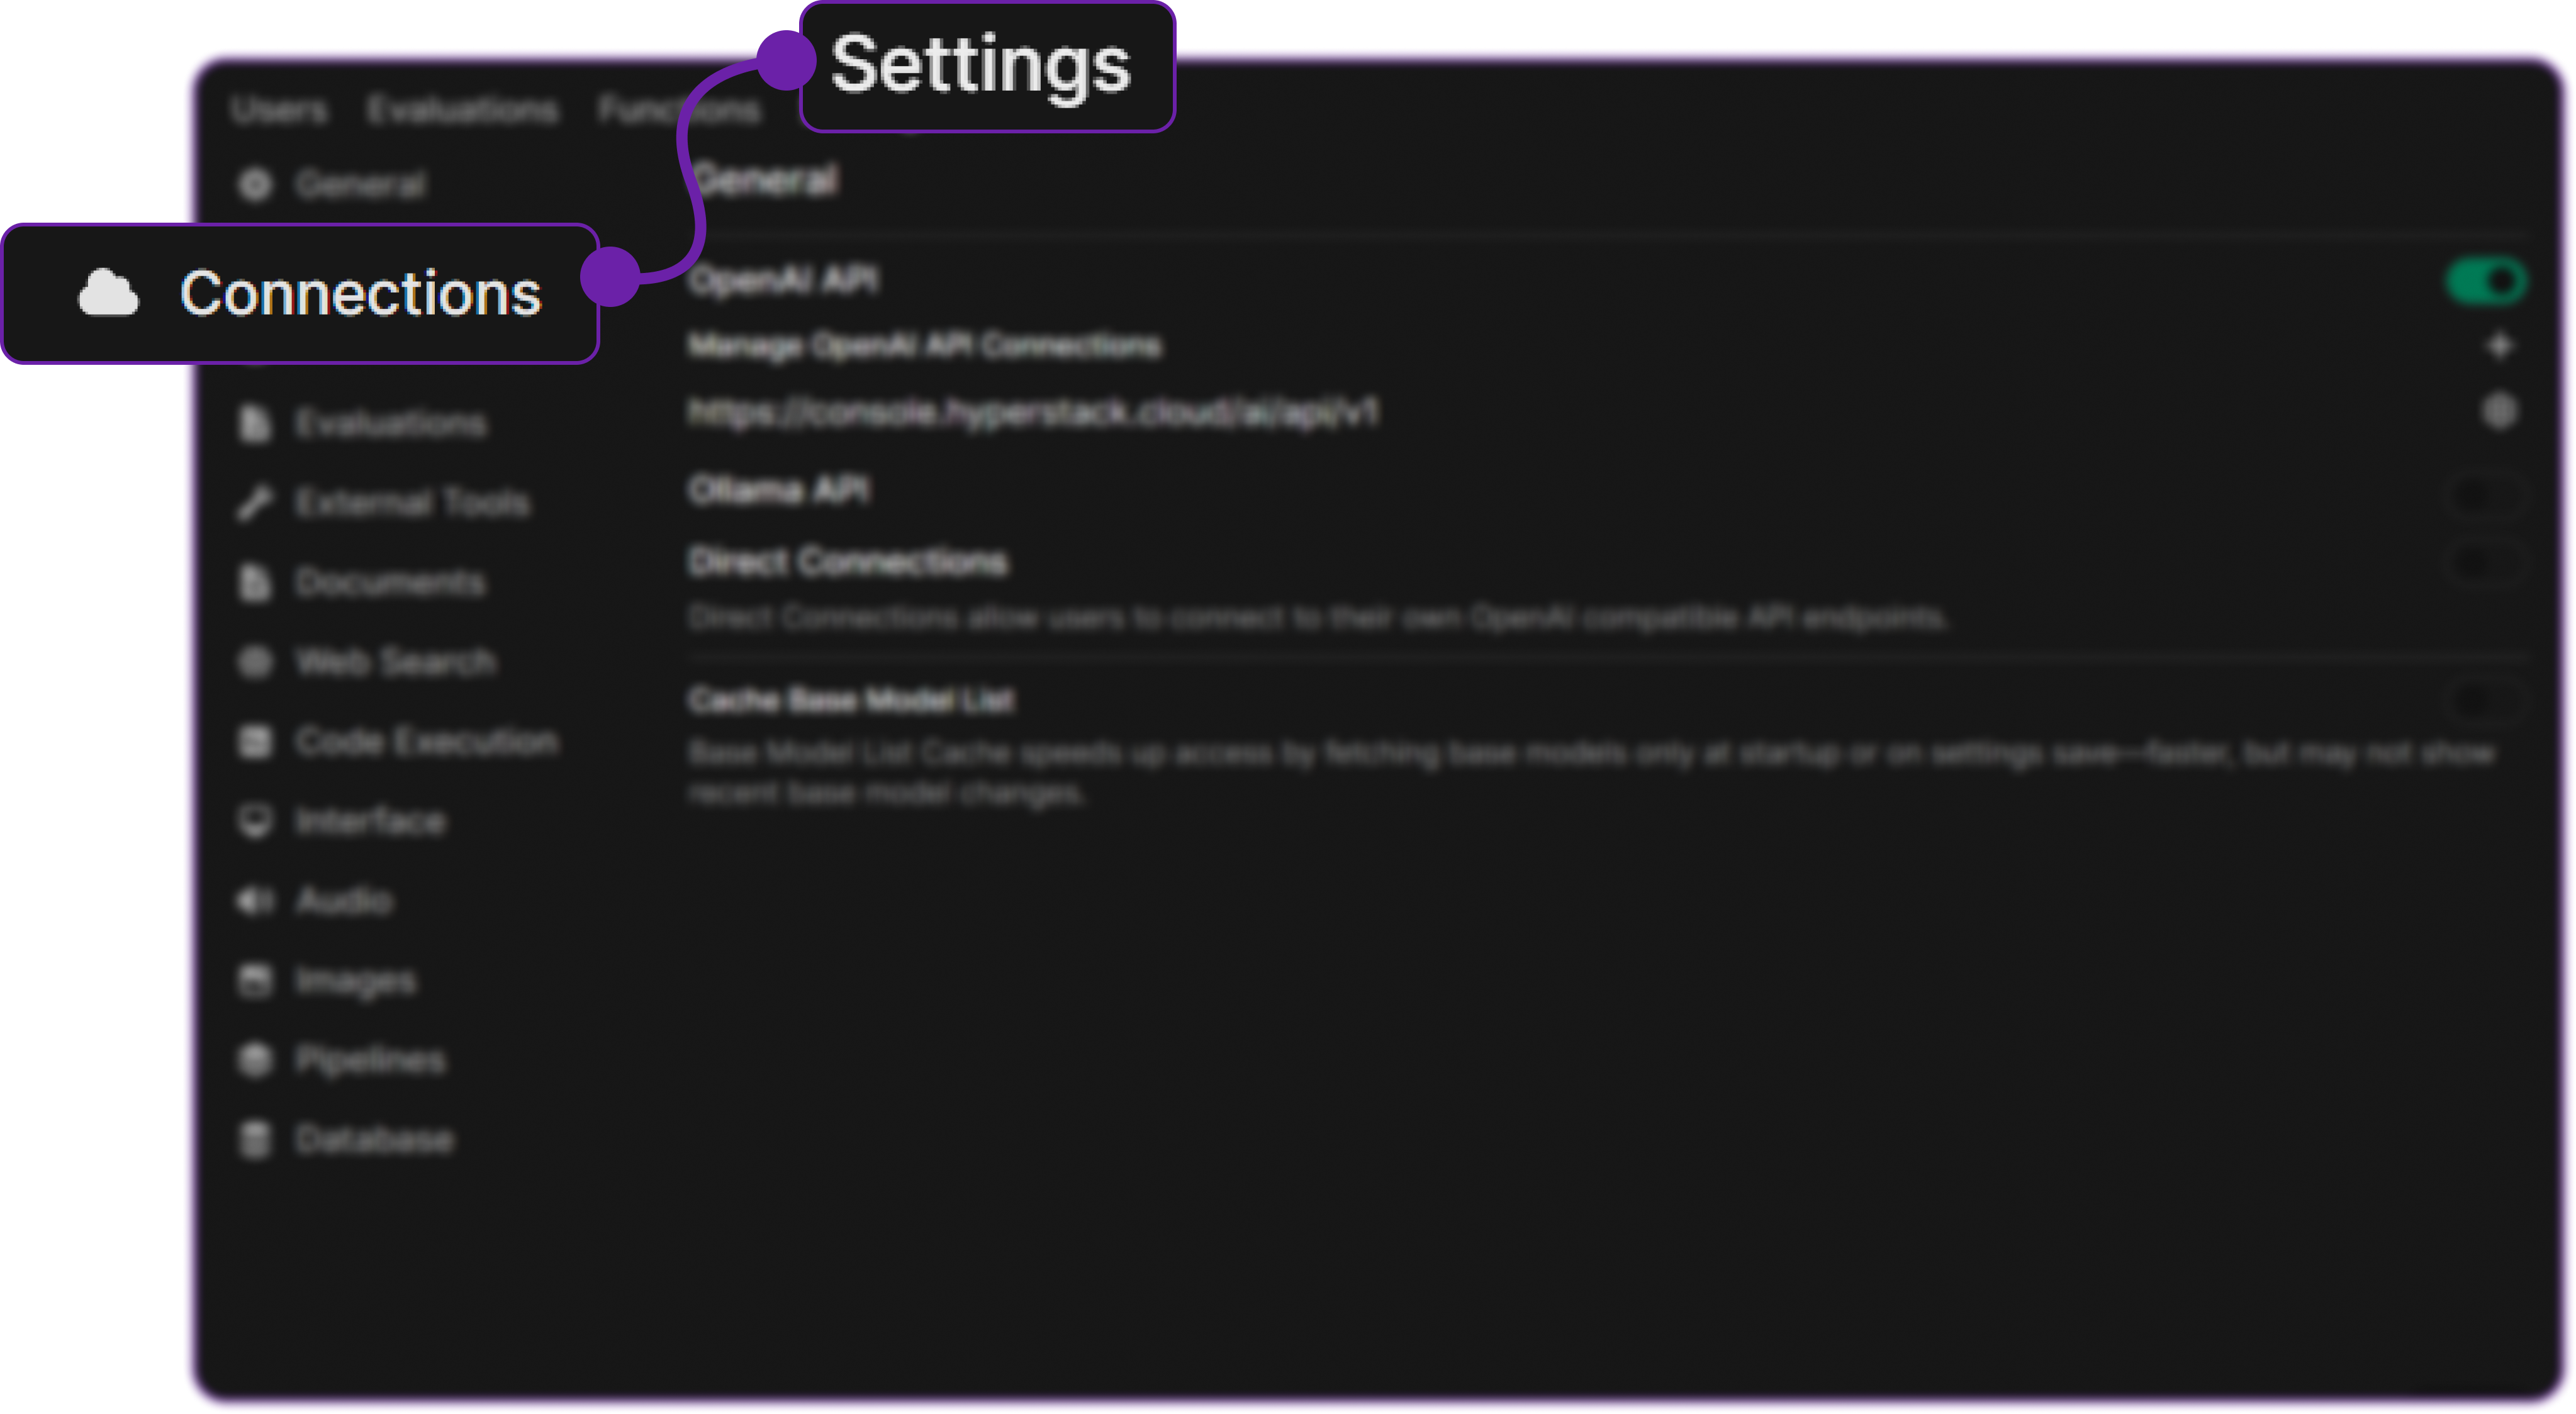
This is where you can add or configure LLM endpoints such as OpenAI, Ollama, or in our case Hyperstack AI Studio.
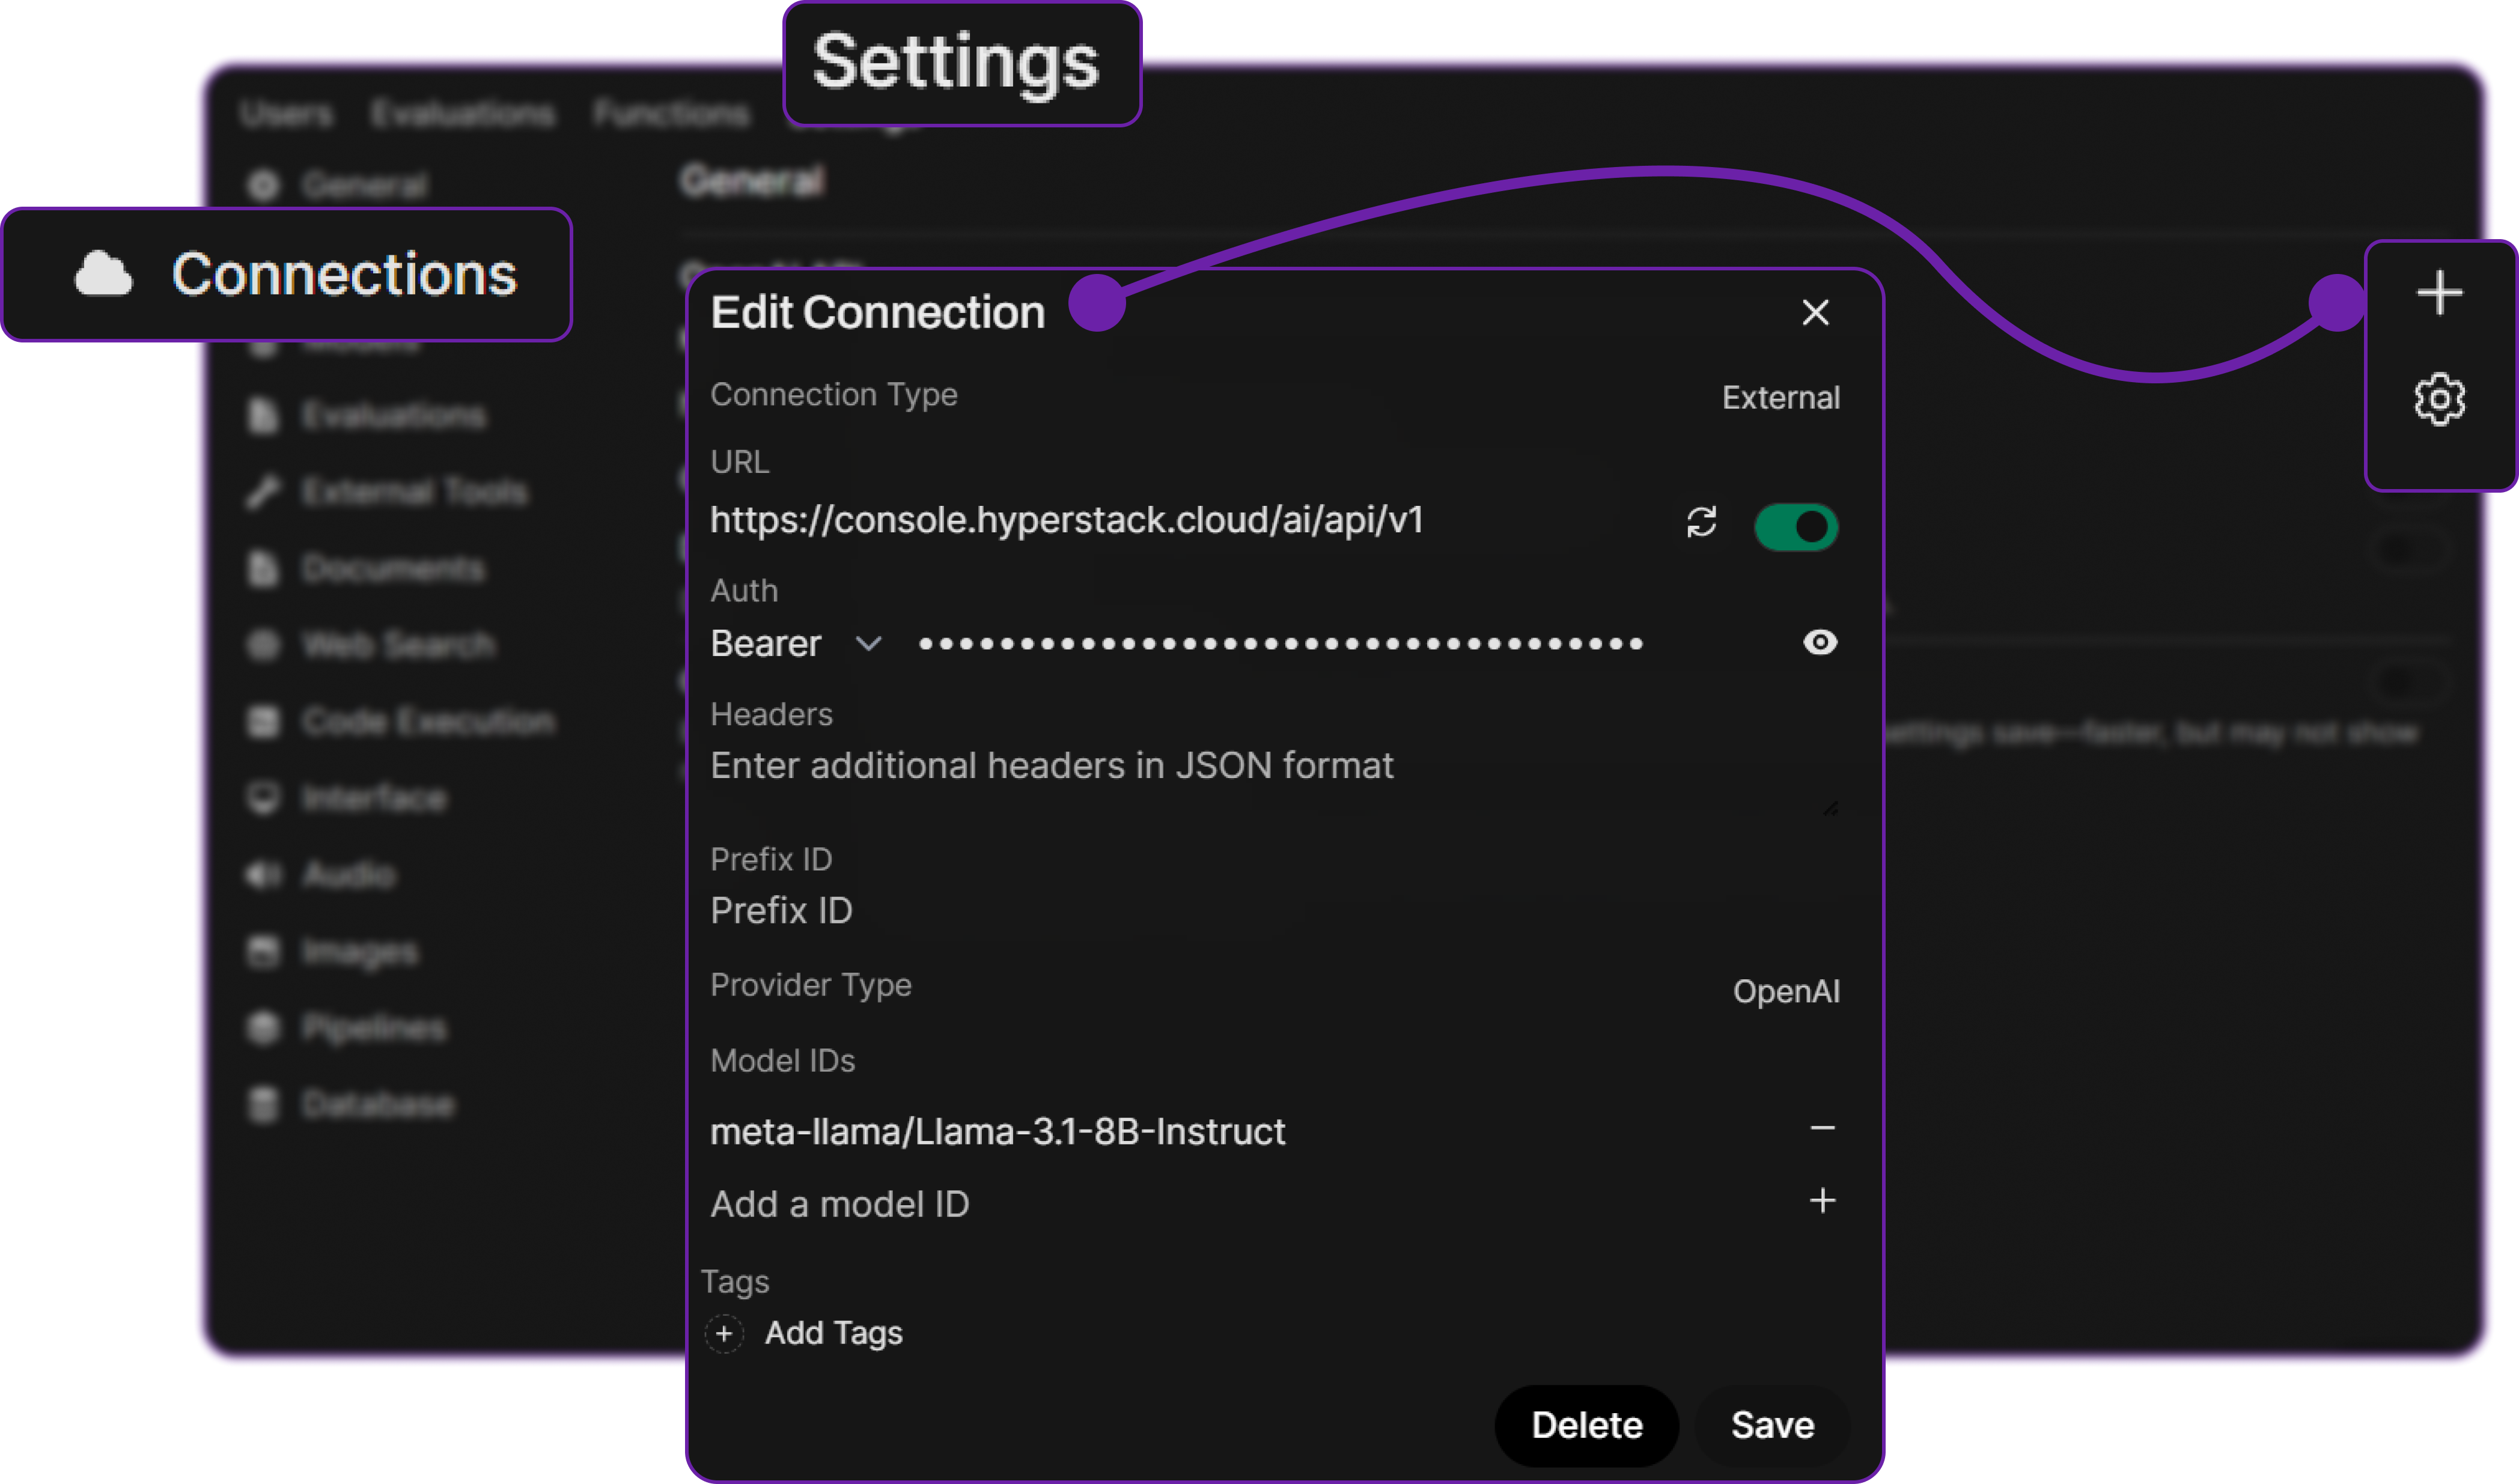
Step 4: Add a New Connection
-
Click Add New Connection → select OpenAI API.
-
You’ll be prompted to enter:
- Base URL: The API endpoint for Hyperstack (e.g., https://console.hyperstack.cloud/ai/api/v1)
- Model Name: The name of the model you want to use (e.g.,
openai/gpt-oss-120b) - API Key: Your Hyperstack API key
Step 5: Retrieve Hyperstack API Details
- Go to the Hyperstack Console and log in with your credentials.
- Navigate to the AI Studio Playground to explore available models before integration them with OpenWebUI.

In the playground, Select your desired model after quick testing it on the interface. We are going with meta-llama/Llama-3.1-8B-Instruct for this integration.
Then click on the API section to get the Base URL and Model ID.

You can check the available models on their base model documentation page. You can copy the model id and base url from here, we will need it in the next step.
Step 6: Generate an API Key
To authenticate, we will need a valid API key from Hyperstack AI Studio.
-
Go to the API Keys section in the Hyperstack console.
-
Click Generate New Key.
-
Give it a name (e.g.,
openwebui-integration-key). -
Copy the generated key, we will use it in OpenWebUI.

💡 Note: Hyperstack’s API is fully OpenAI-compatible, so these credentials will work exactly like OpenAI ones.
Step 7: Configure Hyperstack Model in OpenWebUI
Return to OpenWebUI’s connection form and fill in the details:
| Field | Value |
|---|---|
| Base URL | https://console.hyperstack.cloud/ai/api/v1 |
| Model Name | meta-llama/Llama-3.1-8B-Instruct |
| API Key | your-generated-key |
Hyperstack supports various models; you can explore all available ones here. You can add any model you like by specifying its exact name.
Click on Save, so that OpenWebUI can store this connection. Your Hyperstack-hosted model is now linked with OpenWebUI.
Step 8: Test the Integration
- Click New Chat from the dashboard.
- In the Model Selector, choose your Hyperstack model (
meta-llama/Llama-3.1-8B-Instruct).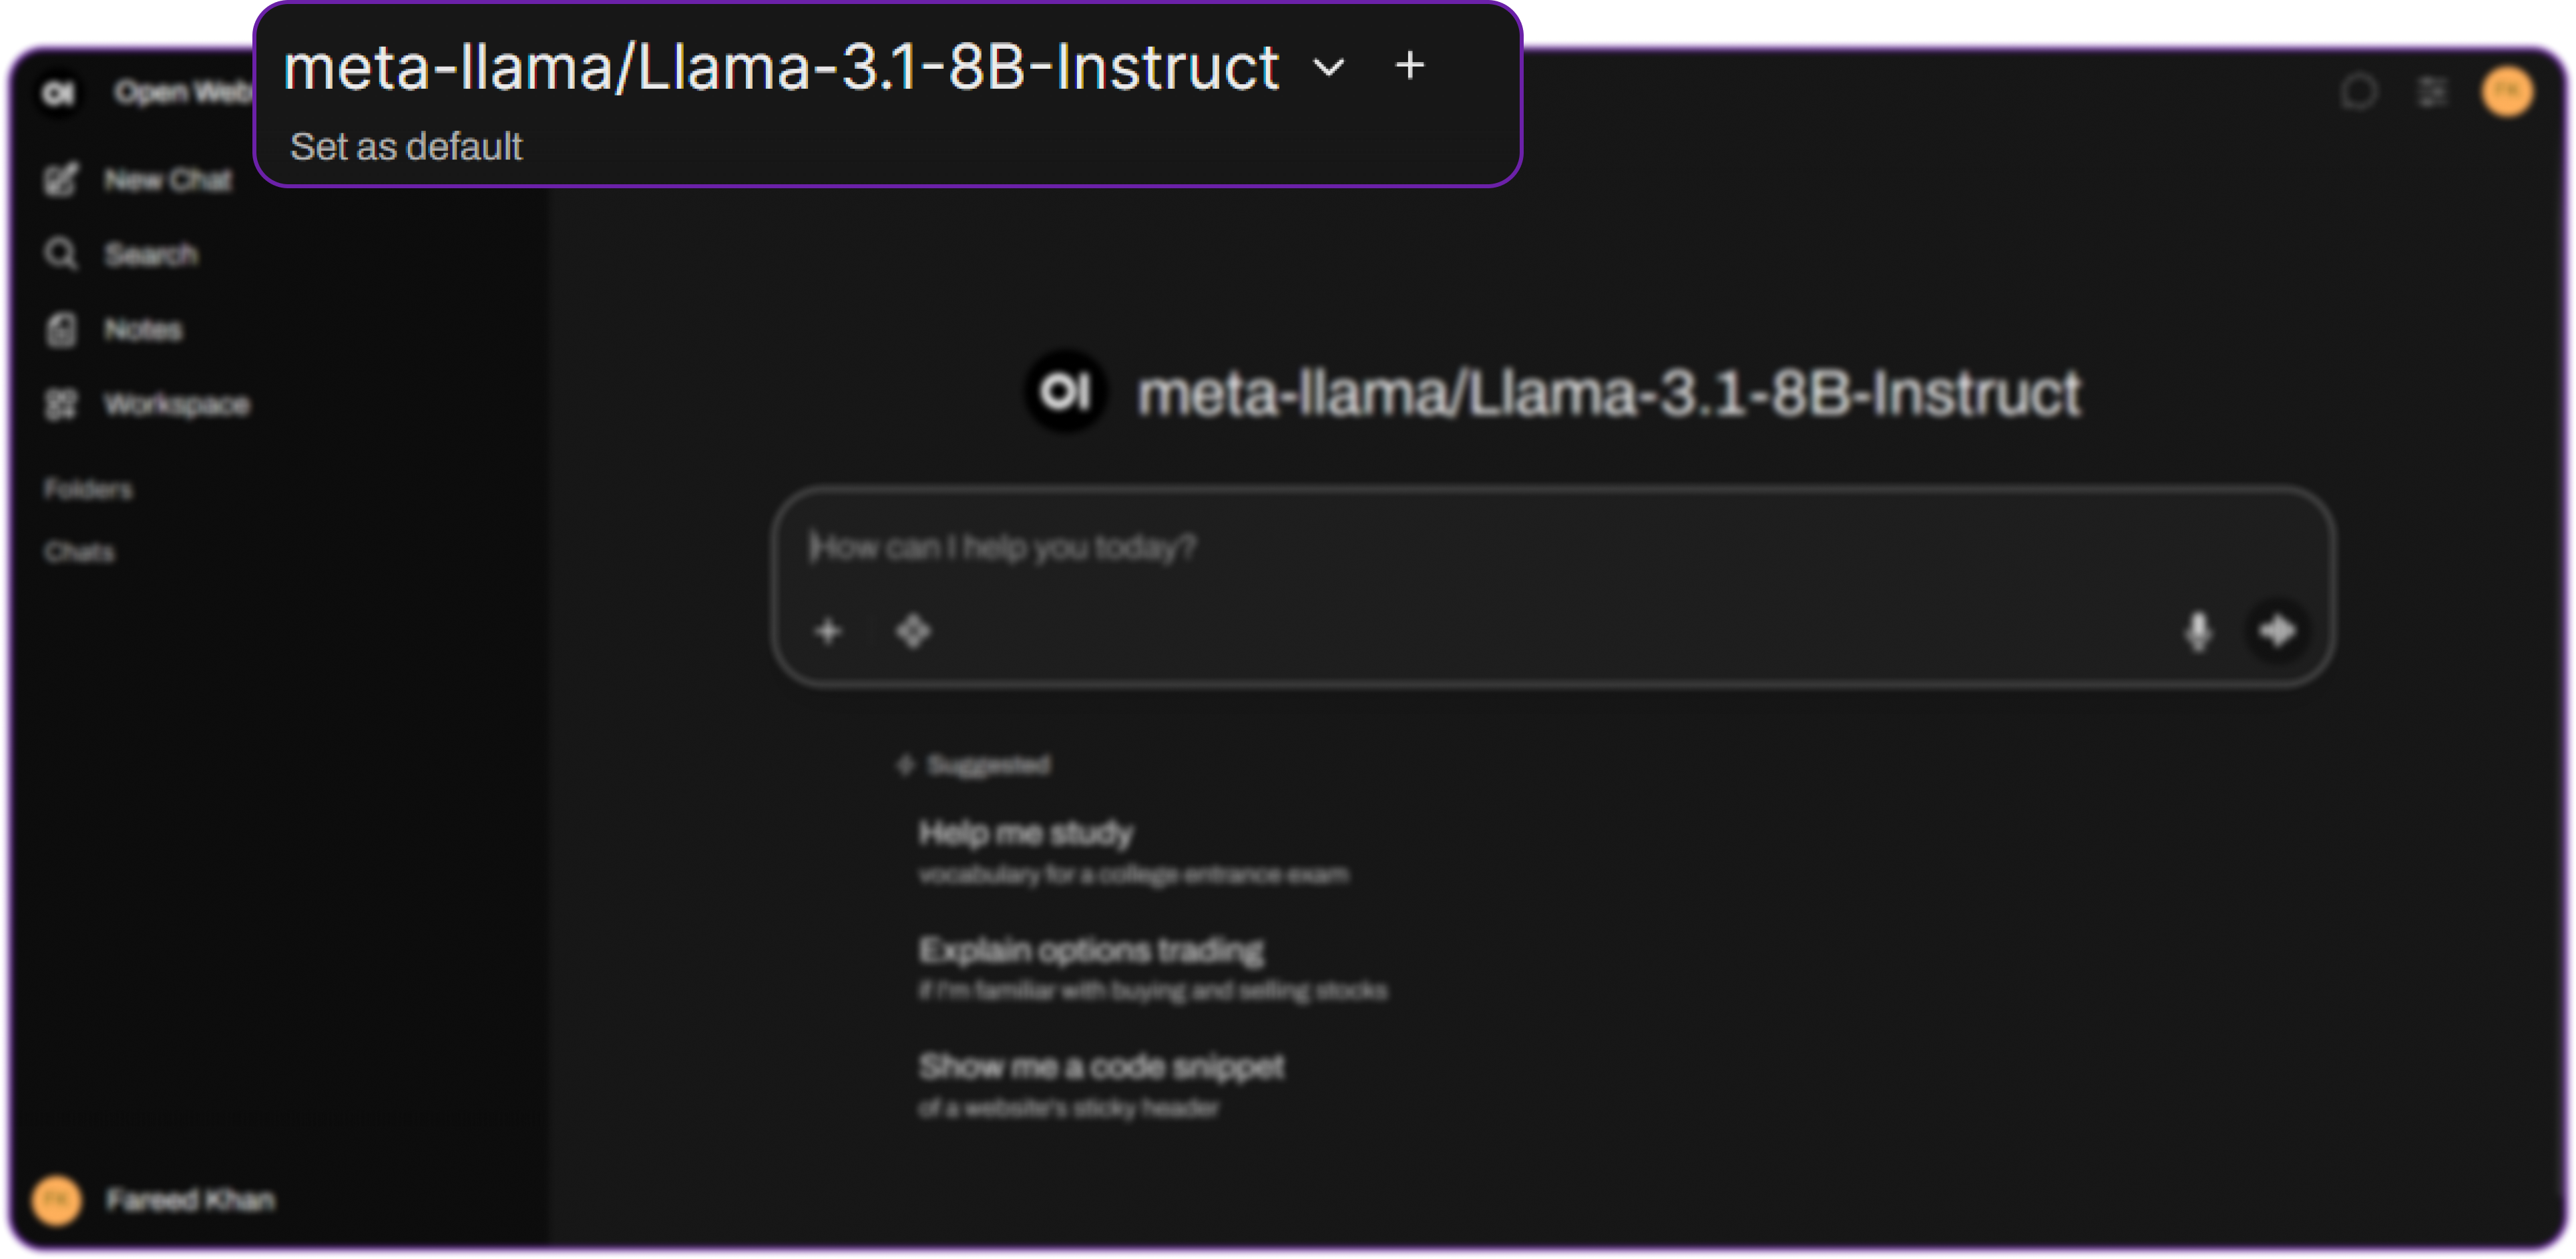
You can see that the model is now available in the dropdown. We can select it to start chatting. - Type a test message like:
Hello Hyperstack model! Can you write a Python function that returns "Hello, World!"?
If everything is set up correctly, the model will respond in real-time confirming your integration works perfectly.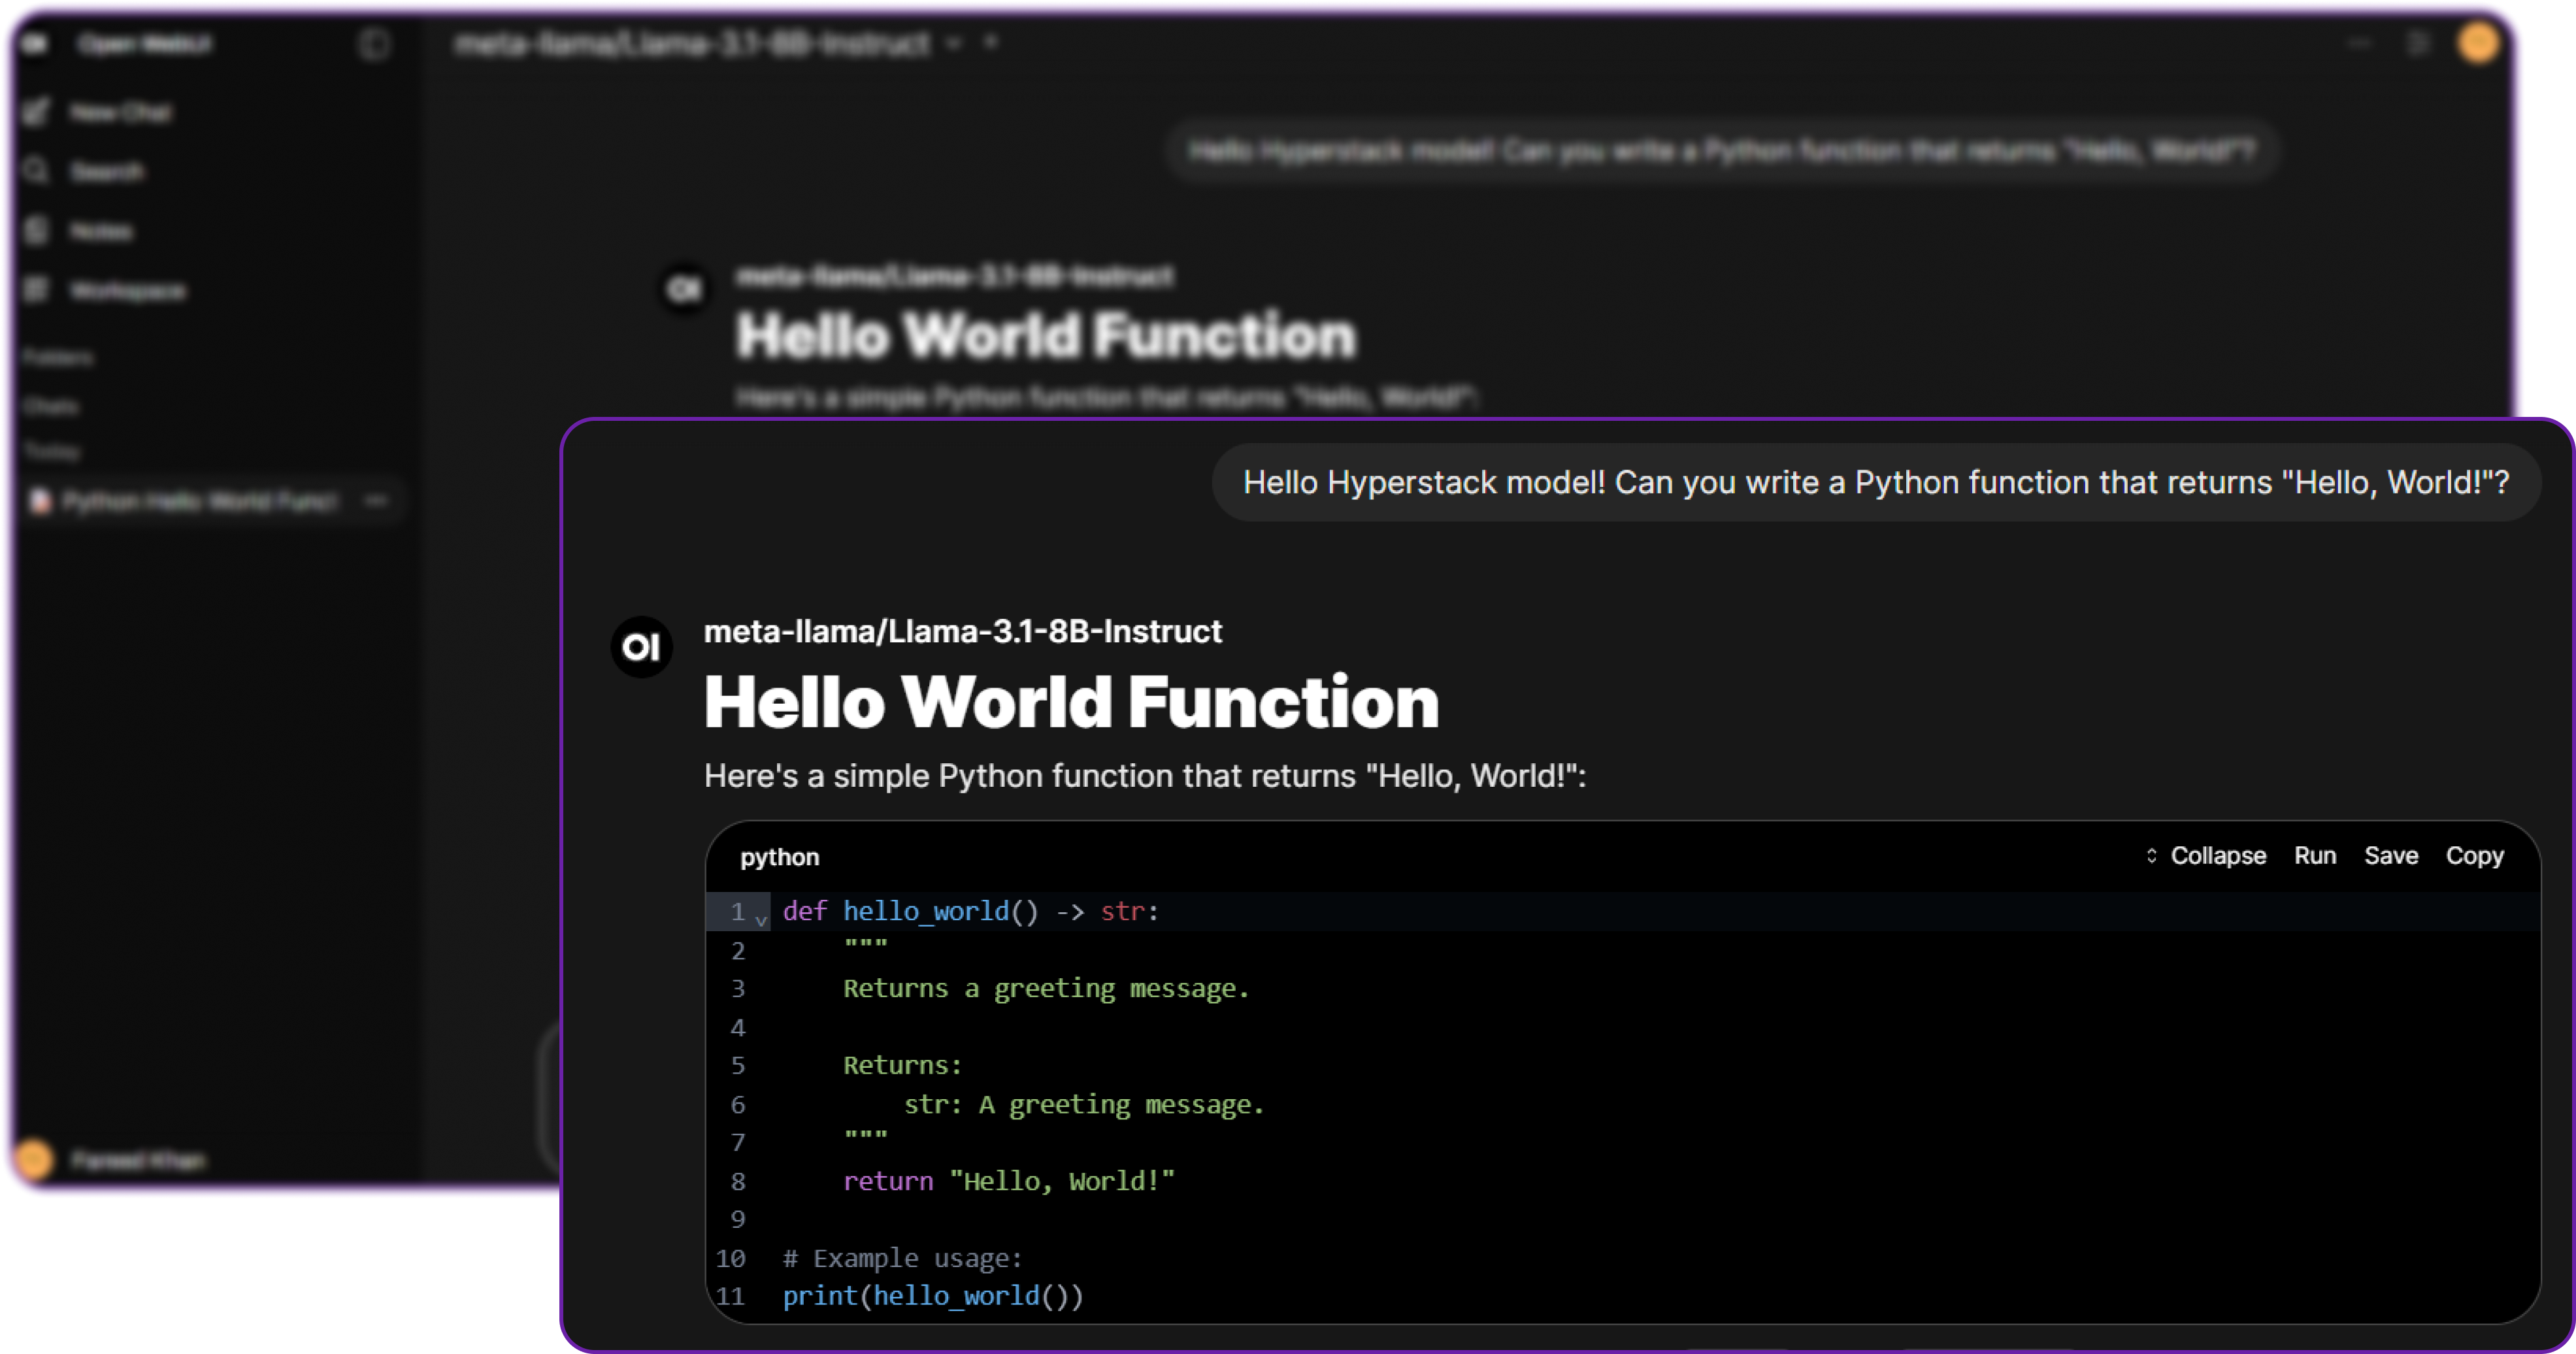
Monitoring and Next Steps
Hyperstack provides built-in monitoring tools to track usage, and costs of your API calls. Go to the Usage Dashboard in Hyperstack to see your consumption metrics.

Next Steps:
- Fine-tune models in Hyperstack and reconnect them to OpenWebUI for customized use cases.
- Experiment with different model sizes for balancing latency and cost.
- Deploy OpenWebUI in production using Docker + Tailscale for secure remote access.
Conclusion
By integrating Hyperstack AI Studio with OpenWebUI, you build a complete, flexible, and privacy-first AI environment:
- Hyperstack AI Studio serves as your AI backend hosting, fine-tuning, and evaluating models.
- OpenWebUI acts as your AI frontend a modern interface for testing and interacting with those models.
This setup empowers developers to:
- Train and deploy custom LLMs.
- Evaluate fine-tuned models through benchmarks.
- Interact with them instantly through a local web interface.
It’s cost-effective, secure, and developer-friendly the perfect match for any team building intelligent systems.
FAQ
1. Do I need admin access to integrate Hyperstack?
Yes, only an Administrator account in OpenWebUI can configure new API connections. You can create additional user accounts later for team members to use the chat interface without admin privileges.
Admin account can easily be created by registering the first user when setting up OpenWebUI.
2. Which Hyperstack model should I use?
Start with openai/gpt-oss-120b, which provides balanced speed and reasoning performance. You can explore all available models here.
3. Where do I get my API key and base URL?
From the Hyperstack Console.
Base URL: https://api.hyperstack.cloud/v1.
4. Can I use my fine-tuned models?
Absolutely! Once fine-tuned and deployed, copy its endpoint and model name from Hyperstack and add it as a new connection in OpenWebUI.
5. Is this setup secure?
Yes, it is designed with privacy in mind:
- OpenWebUI stores your chats and configurations locally.
- Hyperstack AI Studio provides a secure and managed inference API.
No third-party data exposure occurs unless explicitly configured.
Subscribe to Hyperstack!
Enter your email to get updates to your inbox every week

