
.png)
TABLE OF CONTENTS
NVIDIA H100 SXM GPUs On-Demand
Key Takeaways
-
Devstral 2 is an agentic large language model designed for advanced software engineering tasks
-
It is built to handle large codebases, multi-file edits, debugging, and complex reasoning workflows
-
Devstral 2 supports a very large context window, making it suitable for long prompts and repositories
-
Running Devstral 2 requires high-performance GPU infrastructure due to its model size
-
The tutorial walks through deploying Devstral 2 on Hyperstack using GPU-powered virtual machines
-
Docker is used to simplify setup and ensure consistent deployment
-
vLLM is used as the inference engine to serve Devstral 2 efficiently
-
Proper GPU allocation and memory configuration are important for stable performance
-
The setup includes caching models locally to reduce load times
-
A test API call confirms the model is running correctly after deployment
-
Once deployed, Devstral 2 can be integrated into developer tools and workflows
-
Hyperstack makes it easier to run large, compute-heavy models without managing physical infrastructure
If you’re looking to run Devstral 2 efficiently on cloud GPUs, this tutorial shows you exactly how to do it on Hyperstack. Devstral 2 is designed for high-performance inference, but real-world results depend heavily on GPU configuration and deployment setup. This guide walks through the full process, o you can get production-ready performance quickly. With clear commands, configuration tips and cost-aware choices, this tutorial removes the guesswork from running Devstral 2 at scale.
What is Devstral 2?
Devstral 2 is Mistral AI’s next-generation agentic large language model (LLM) built specifically for software engineering tasks. It’s designed to navigate large codebases, integrate with developer tools, perform multi-file edits, and act as the core engine for software engineering agents. With a massive 123B parameter architecture and a 256k context window, Devstral 2 delivers competent instruction-following behaviour for coding assistance, debugging, refactoring and agile workflows.
Devstral 2 Features
The latest Devstral 2 comes with new capabilities, including:
- Agentic Coding: Designed to autonomously explore codebases, call tools, and perform complex multi-step software engineering tasks.
- Advanced Tool Integration: Seamlessly works with scaffolding frameworks like Mistral Vibe, Cline, SWE Agent, Claude Code, and Kilo Code for deep code understanding.
- Massive 256k Context Window: Processes extremely large repositories, long files, and multi-file edits without losing context.
- High Benchmark Performance: Achieves top-tier scores on SWE-Bench Verified (72.2%) and Multilingual, outperforming or matching much larger models.
- Improved Generalisation & Robustness: Fine-tuned to follow instructions with higher accuracy, giving better results across diverse coding environments and prompt styles.
How to Deploy Devstral 2 on Hyperstack
Now, let's walk through the step-by-step process of deploying the necessary infrastructure.
Step 1: Accessing Hyperstack
First, you'll need an account on Hyperstack.
- Go to the Hyperstack website and log in.
- If you are new, create an account and set up your billing information. Our documentation can guide you through the initial setup.
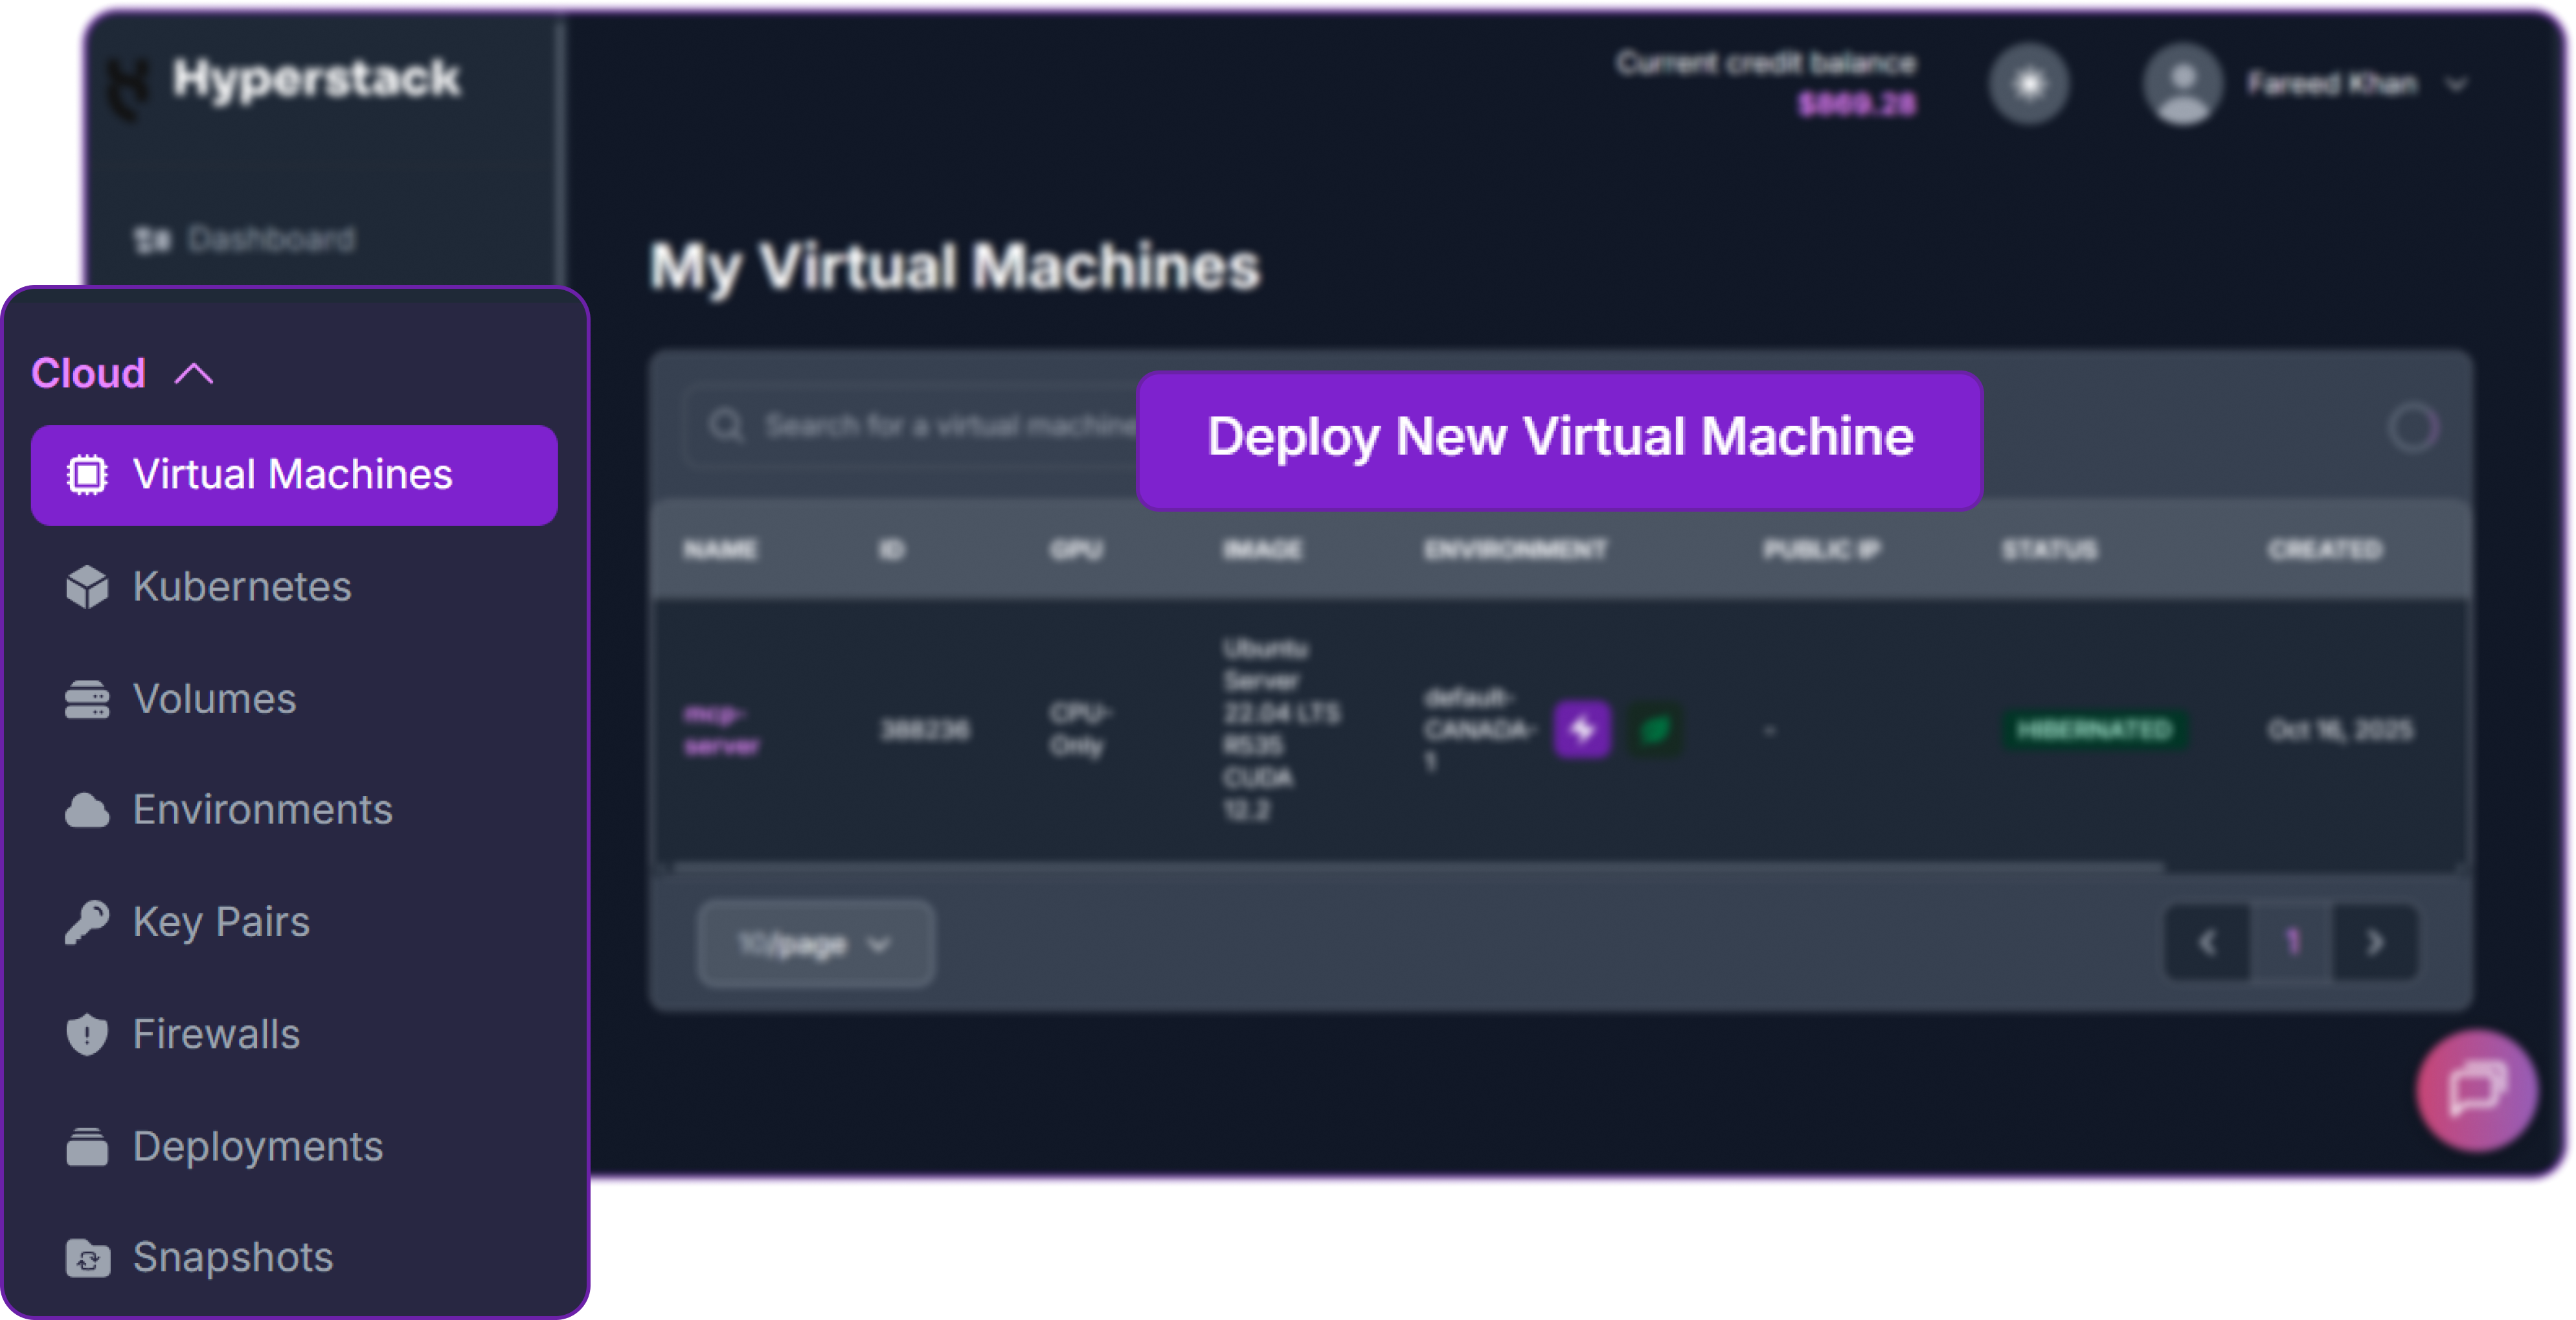
Step 2: Deploying a New Virtual Machine
From the Hyperstack dashboard, we will launch a new GPU-powered VM.
- Initiate Deployment: Look for the "Deploy New Virtual Machine" button on the dashboard and click it.
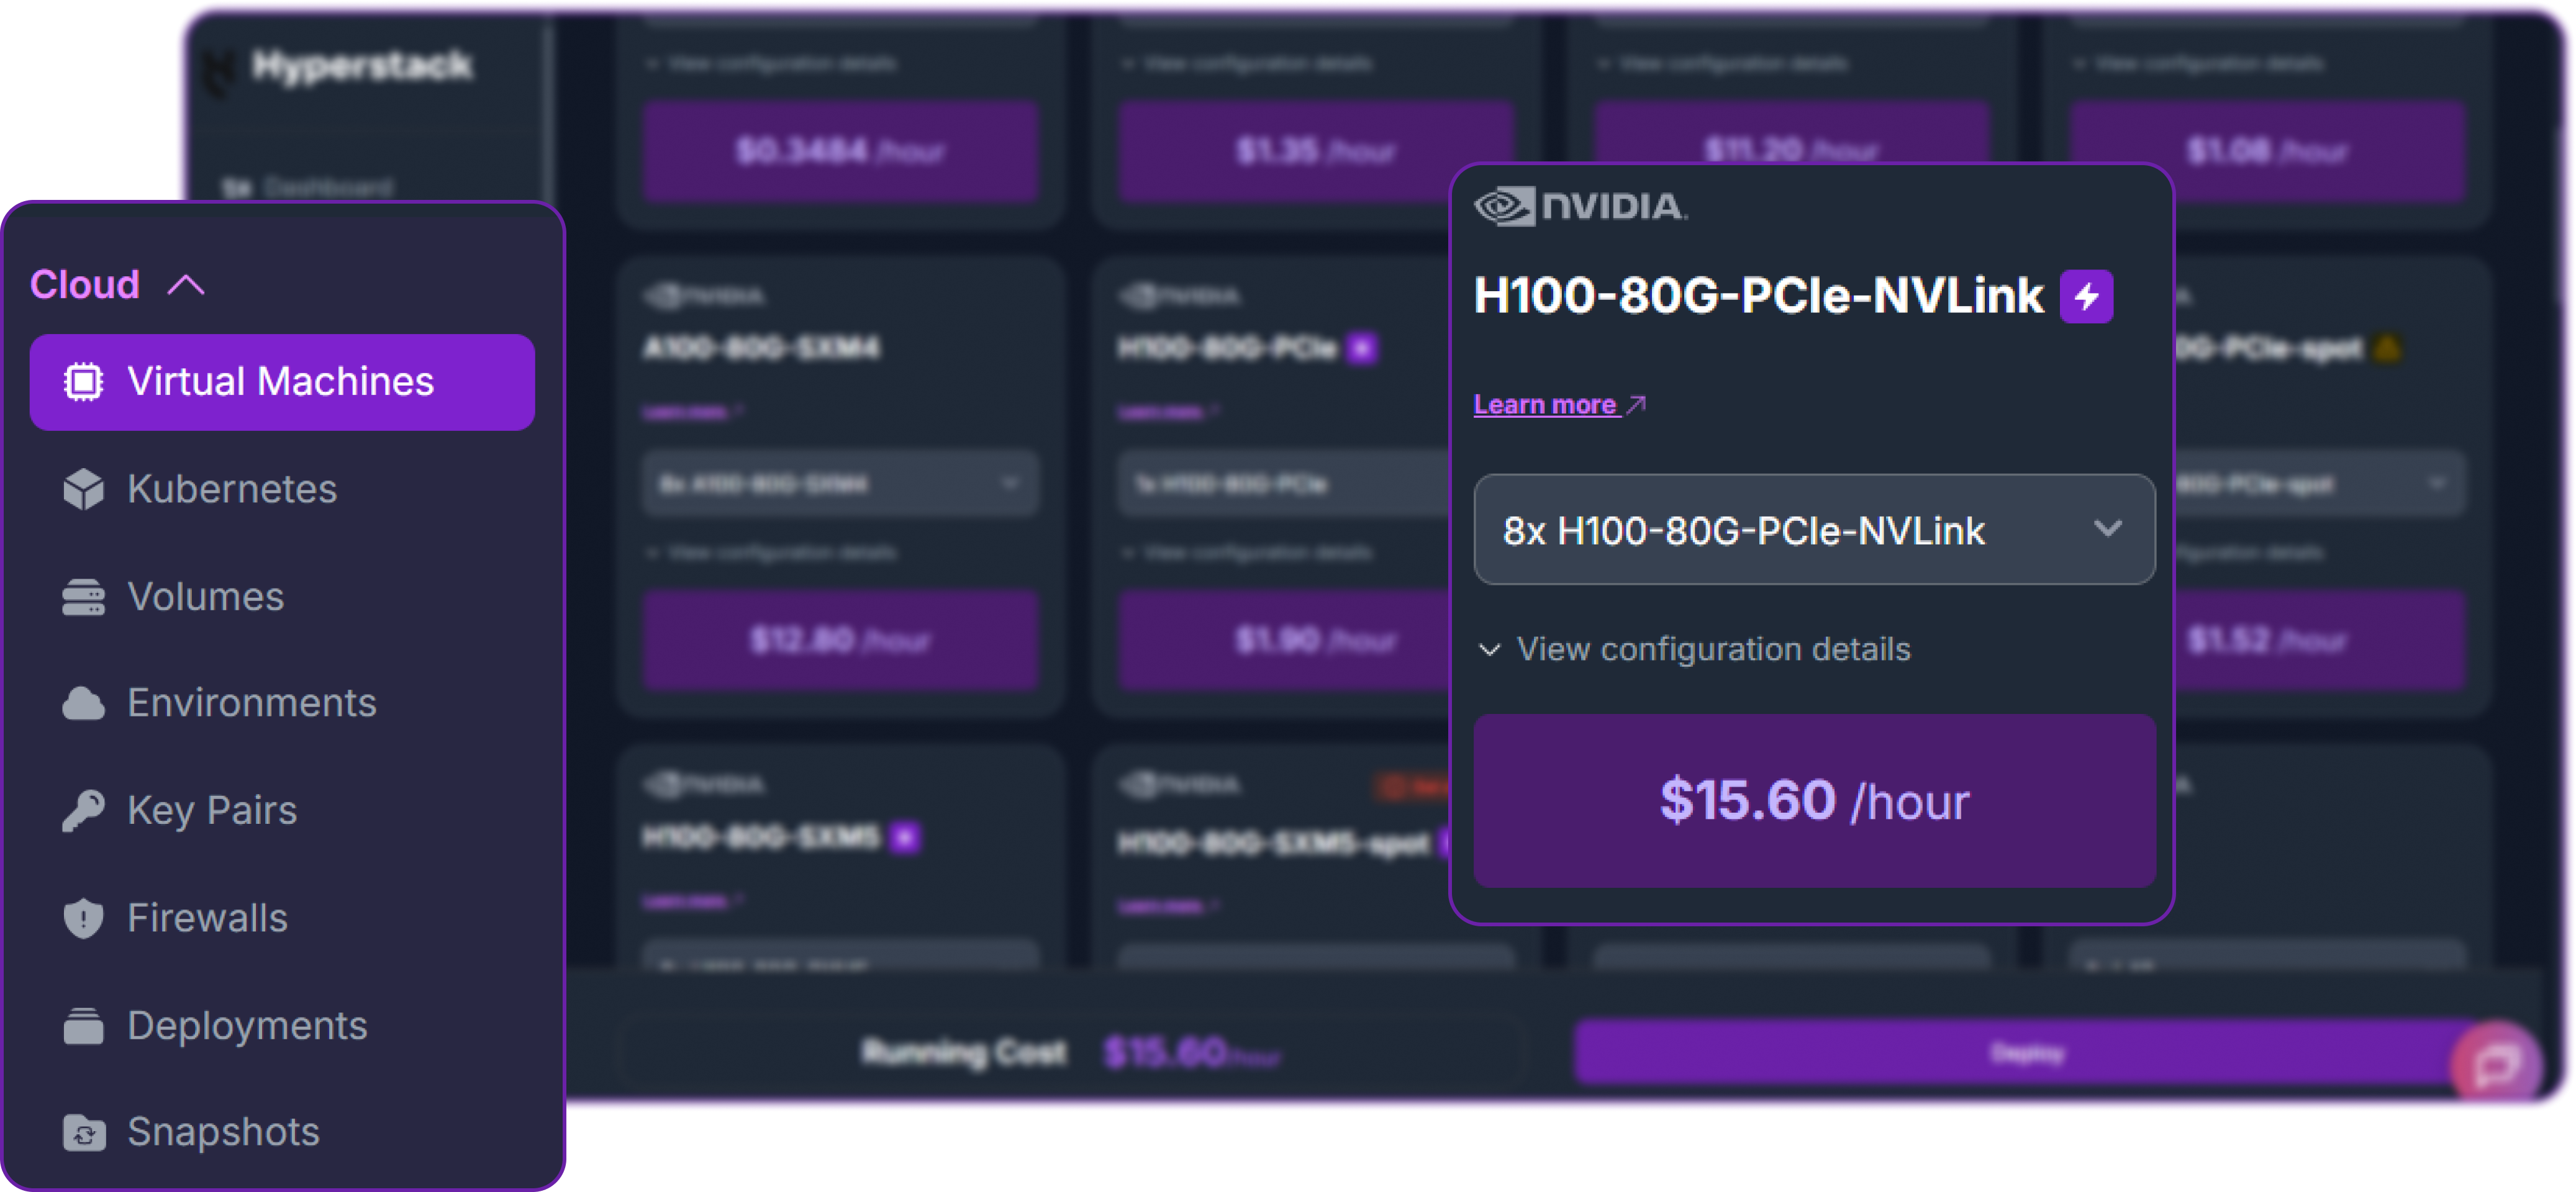
- Select Hardware Configuration: A model of this size requires significant GPU memory. For optimal performance with
tensor-parallel-size=8, choose the "8xH100-80G-PCIe-NVLink" flavour.
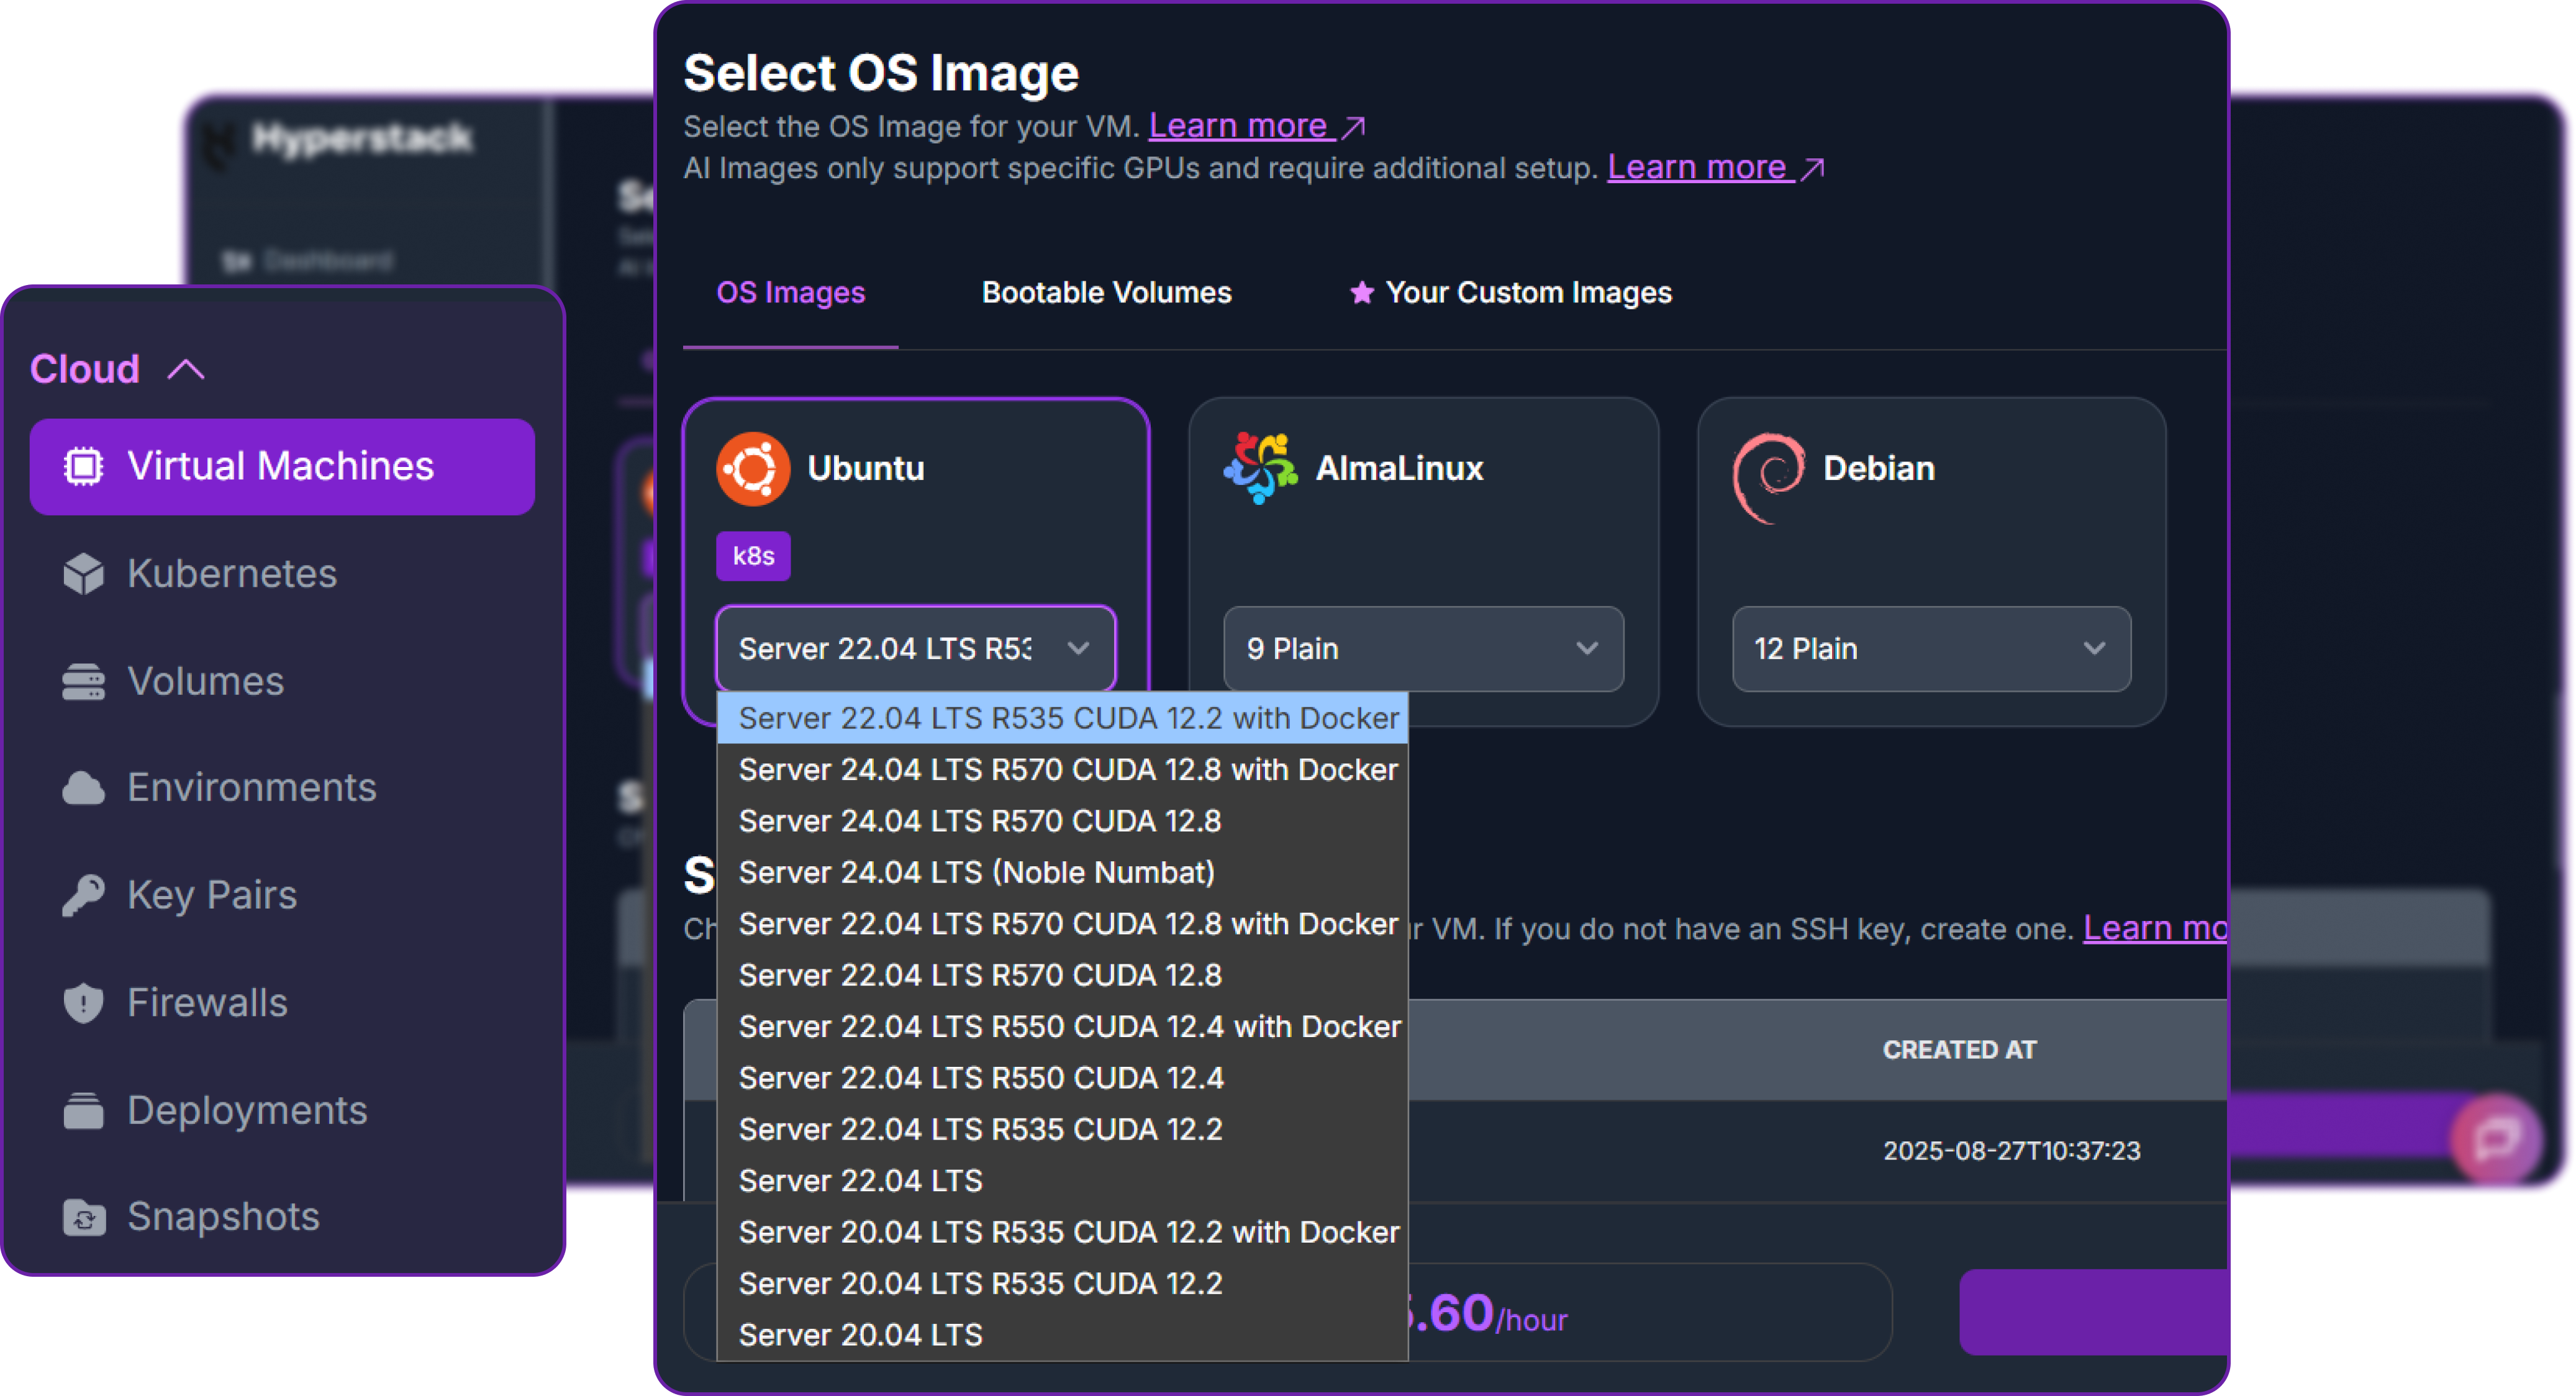
- Choose the Operating System: Select the "Ubuntu Server 22.04 LTS R535 CUDA 12.2 with Docker" image. This provides a ready-to-use environment with all necessary drivers.
- Select a Keypair: Choose an existing SSH keypair from your account to securely access the VM.
- Network Configuration: Ensure you assign a Public IP to your Virtual Machine. This is crucial for remote management and connecting your local development tools.
- Review and Deploy: Double-check your settings and click the "Deploy" button.
Step 3: Accessing Your VM
Once your VM is running, you can connect to it.
-
Locate SSH Details: In the Hyperstack dashboard, find your VM's details and copy its Public IP address.
-
Connect via SSH: Open a terminal on your local machine and use the following command, replacing the placeholders with your information.
# Connect to your VM using your private key and the VM's public IP
ssh -i [path_to_your_ssh_key] ubuntu@[your_vm_public_ip]
Here you will replace [path_to_your_ssh_key] with the path to your private SSH key file and [your_vm_public_ip] with the actual IP address of your VM.
Once connected, you should see a welcome message indicating you're logged into your Hyperstack VM.
Now that we are inside the VM, we will use Docker to launch the vLLM server.
Step 4: Create a Model Cache Directory
We'll create a directory on the VM's high-speed ephemeral disk. Storing the model here ensures faster loading times on startup.
# Create a directory for the Hugging Face model cache
sudo mkdir -p /ephemeral/hug

# Grant full read/write permissions to the directory
sudo chmod 0777 /ephemeral/hug
This command creates a folder named hug inside the /ephemeral disk and sets its permissions so that the Docker container can read and write the model files.
Step 5: Launch the vLLM Server
We will use the custom Docker image recommended by Mistral, which includes the correct patches for Devstral 2 advanced tool-calling features.
# Launch the vLLM container for Devstral 2
sudo docker run -d \
  --gpus all \
  --ipc=host \
  --network host \
  --name vllm_devstral \
  --restart always \
  -v /ephemeral/hug:/root/.cache/huggingface \
  mistralllm/vllm_devstral:latest \
  --model mistralai/Devstral-2-123B-Instruct-2512 \
  --tool-call-parser mistral \
  --gpu-memory-utilization 0.75 \
  --enable-auto-tool-choice \
  --tensor-parallel-size 8 \
  --host 0.0.0.0 \
  --port 8000
This command instructs Docker to:
--gpus all: Use all available NVIDIA GPUs.--network host: Expose the container's ports directly on the VM's network for simpler access.-v /ephemeral/hug:/root/.cache/huggingface: Mount our cache directory to persist the downloaded model.mistralllm/vllm_devstral:latest: Use the special Docker image required for Devstral.--model ...: Specify the model to serve.--tensor-parallel-size 8: Split the model across all 8 GPUs for maximum performance.--host 0.0.0.0 --port 8000: Listen for API requests on port 8000 from any IP address.--gpu-memory-utilization 0.75: Prevents 100% GPU usage and keeps enough free VRAM for full context-length operation.
Step 6: Verify the Deployment
First, check the container logs to monitor the model loading process. This may take several minutes.
sudo docker logs -f vllm_devstral
The process is complete when you see the line: INFO: Uvicorn running on http://0.0.0.0:8000.
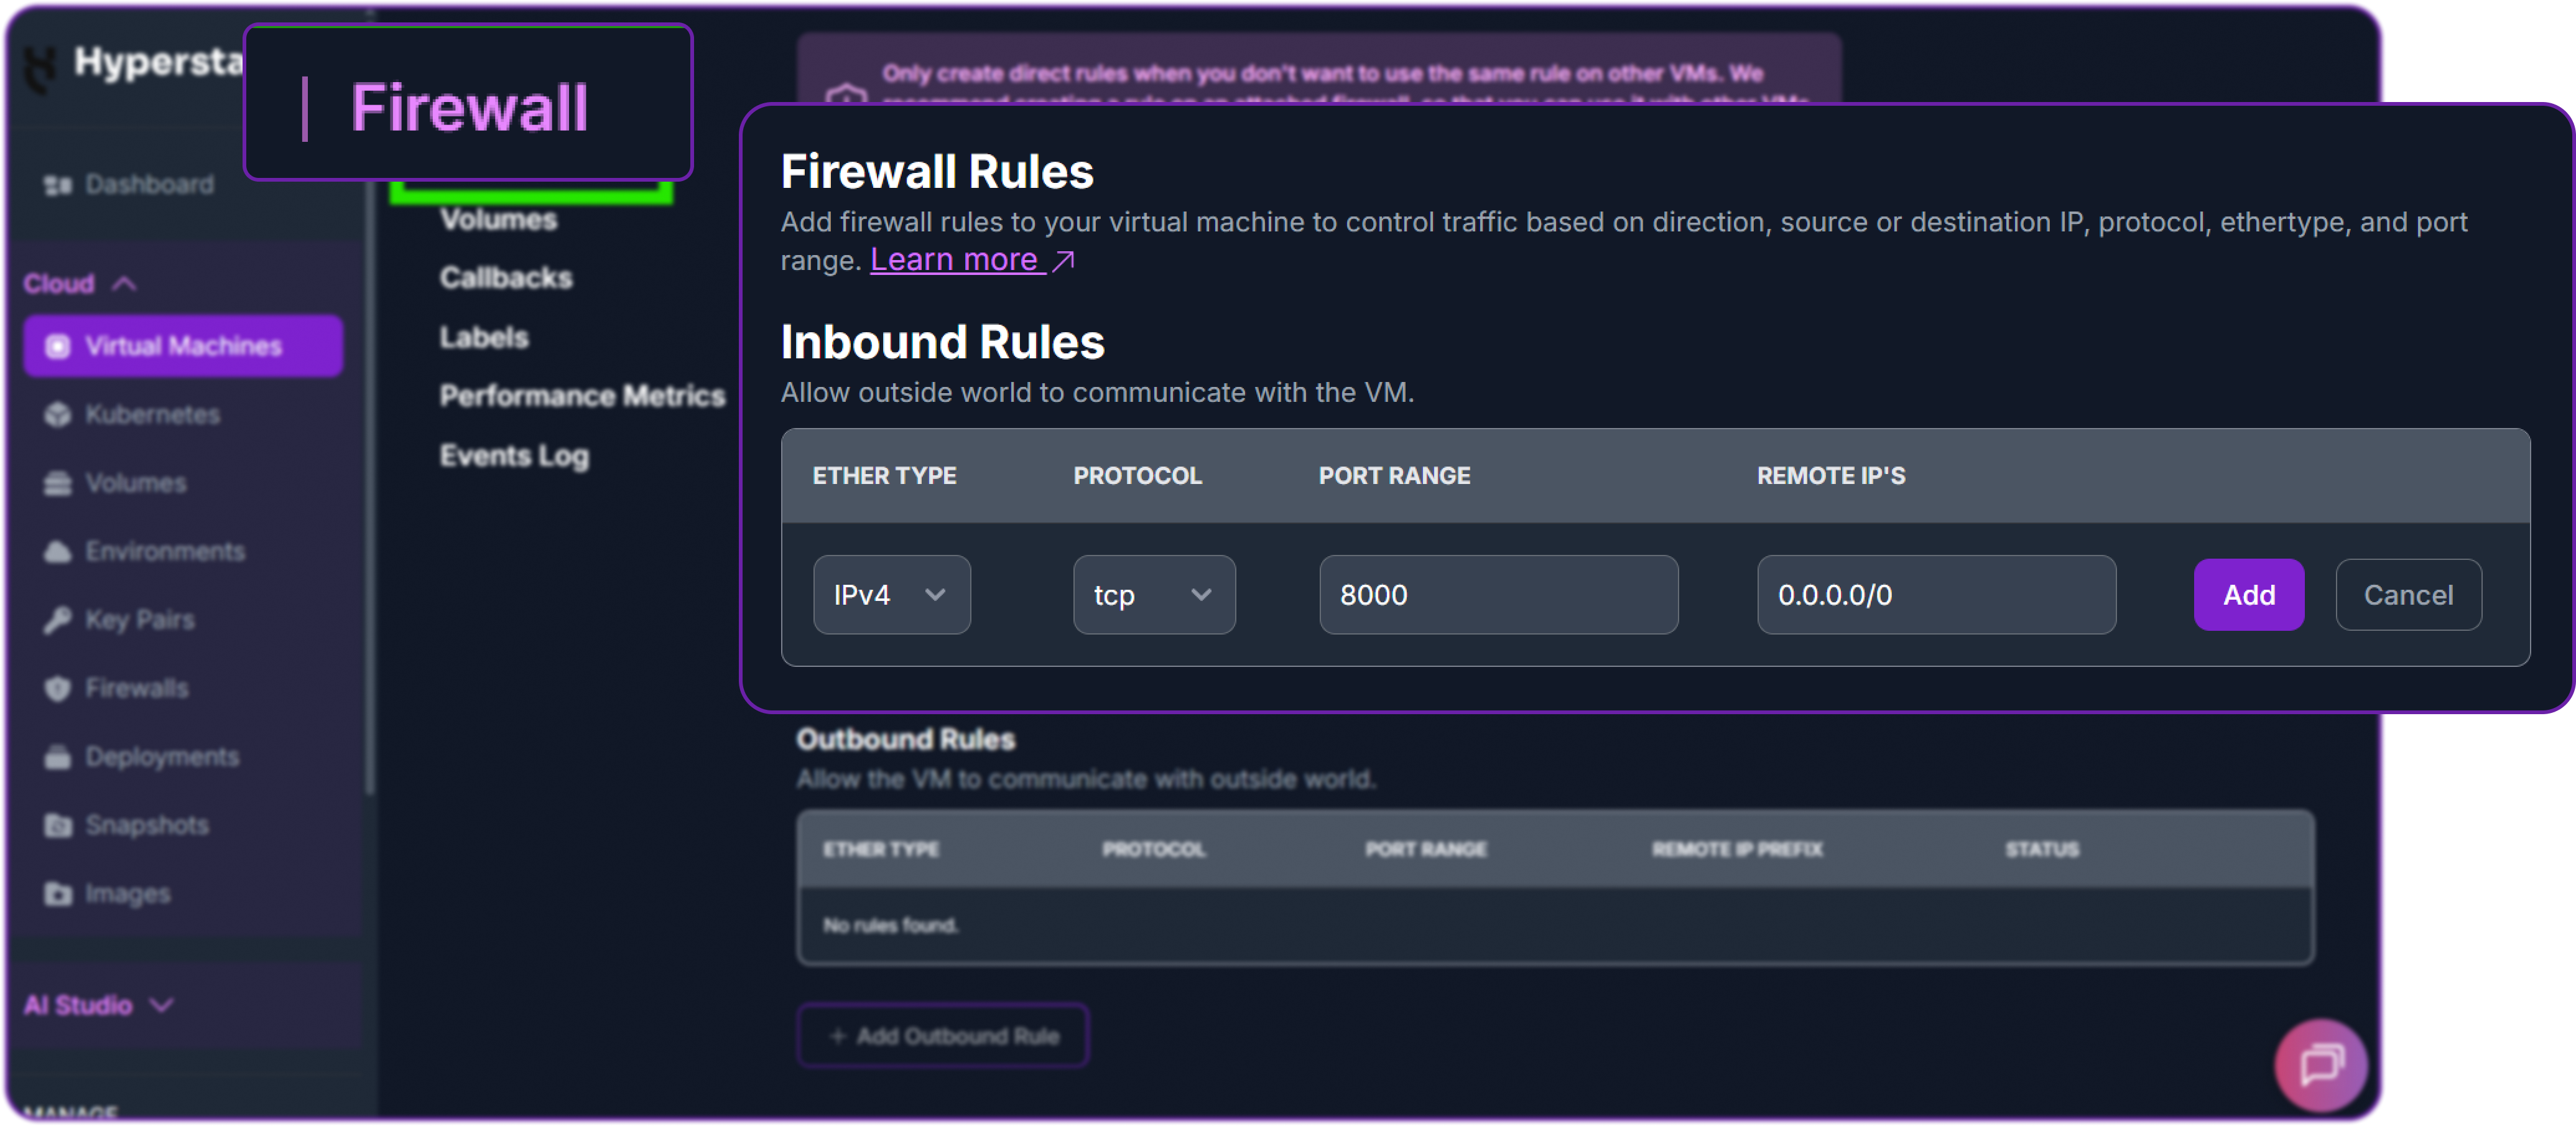
Next, add a firewall rule in your Hyperstack dashboard to allow inbound TCP traffic on port 8000. This is essential for external access.
Finally, test the API from your local machine (not the VM) by replacing <YOUR_VM_PUBLIC_IP> with your VM's IP address.
# Test the API endpoint from your local terminal
curl http://<YOUR_VM_PUBLIC_IP>:8000/v1/chat/completions \
  -H "Content-Type: application/json" \
  -H "Authorization: Bearer EMPTY" \
  -d '{
    "model": "mistralai/Devstral-2-123B-Instruct-2512",
    "messages": [
      {"role": "user", "content": "Hello! What is your name?"}
    ]
  }'
You can see that we have a successful response as a JSON object containing the model reply. Here’s a truncated version of it:
{
  "id": "chatcmpl-...",
  "object": "chat.completion",
  "model": "mistralai/Devstral-2-123B-Instruct-2512",
  "choices": [
    {
      "message": {
        "role": "assistant",
        "content": "Hello! I am Devstral, a large language model from Mistral AI..."
      },
      "finish_reason": "stop"
    }
  ],
  ...
}
This confirms that our API is live and ready for integration with external cli/coding tools!
Step 7: Hibernating Your VM (OPTIONAL)
When you are finished with your current workload, you can hibernate your VM to avoid incurring unnecessary costs:
- In the Hyperstack dashboard, locate your Virtual machine.
- Look for a "Hibernate" option.
- Click to hibernate the VM, which will stop billing for compute resources while preserving your setup.
Integrating Self-Hosted Devstral 2 with Kilo Code
Now that we have hosted Devstral 2, let's connect it to KiloCode, a powerful VS Code extension for agentic coding.
Step 1: Download and Install VS Code
First, we will need to install Visual Studio Code if we haven’t already.
- Visit their official website to download the installer.
- Click on Download for your OS.

- Once downloaded, run the installer and follow the setup instructions.
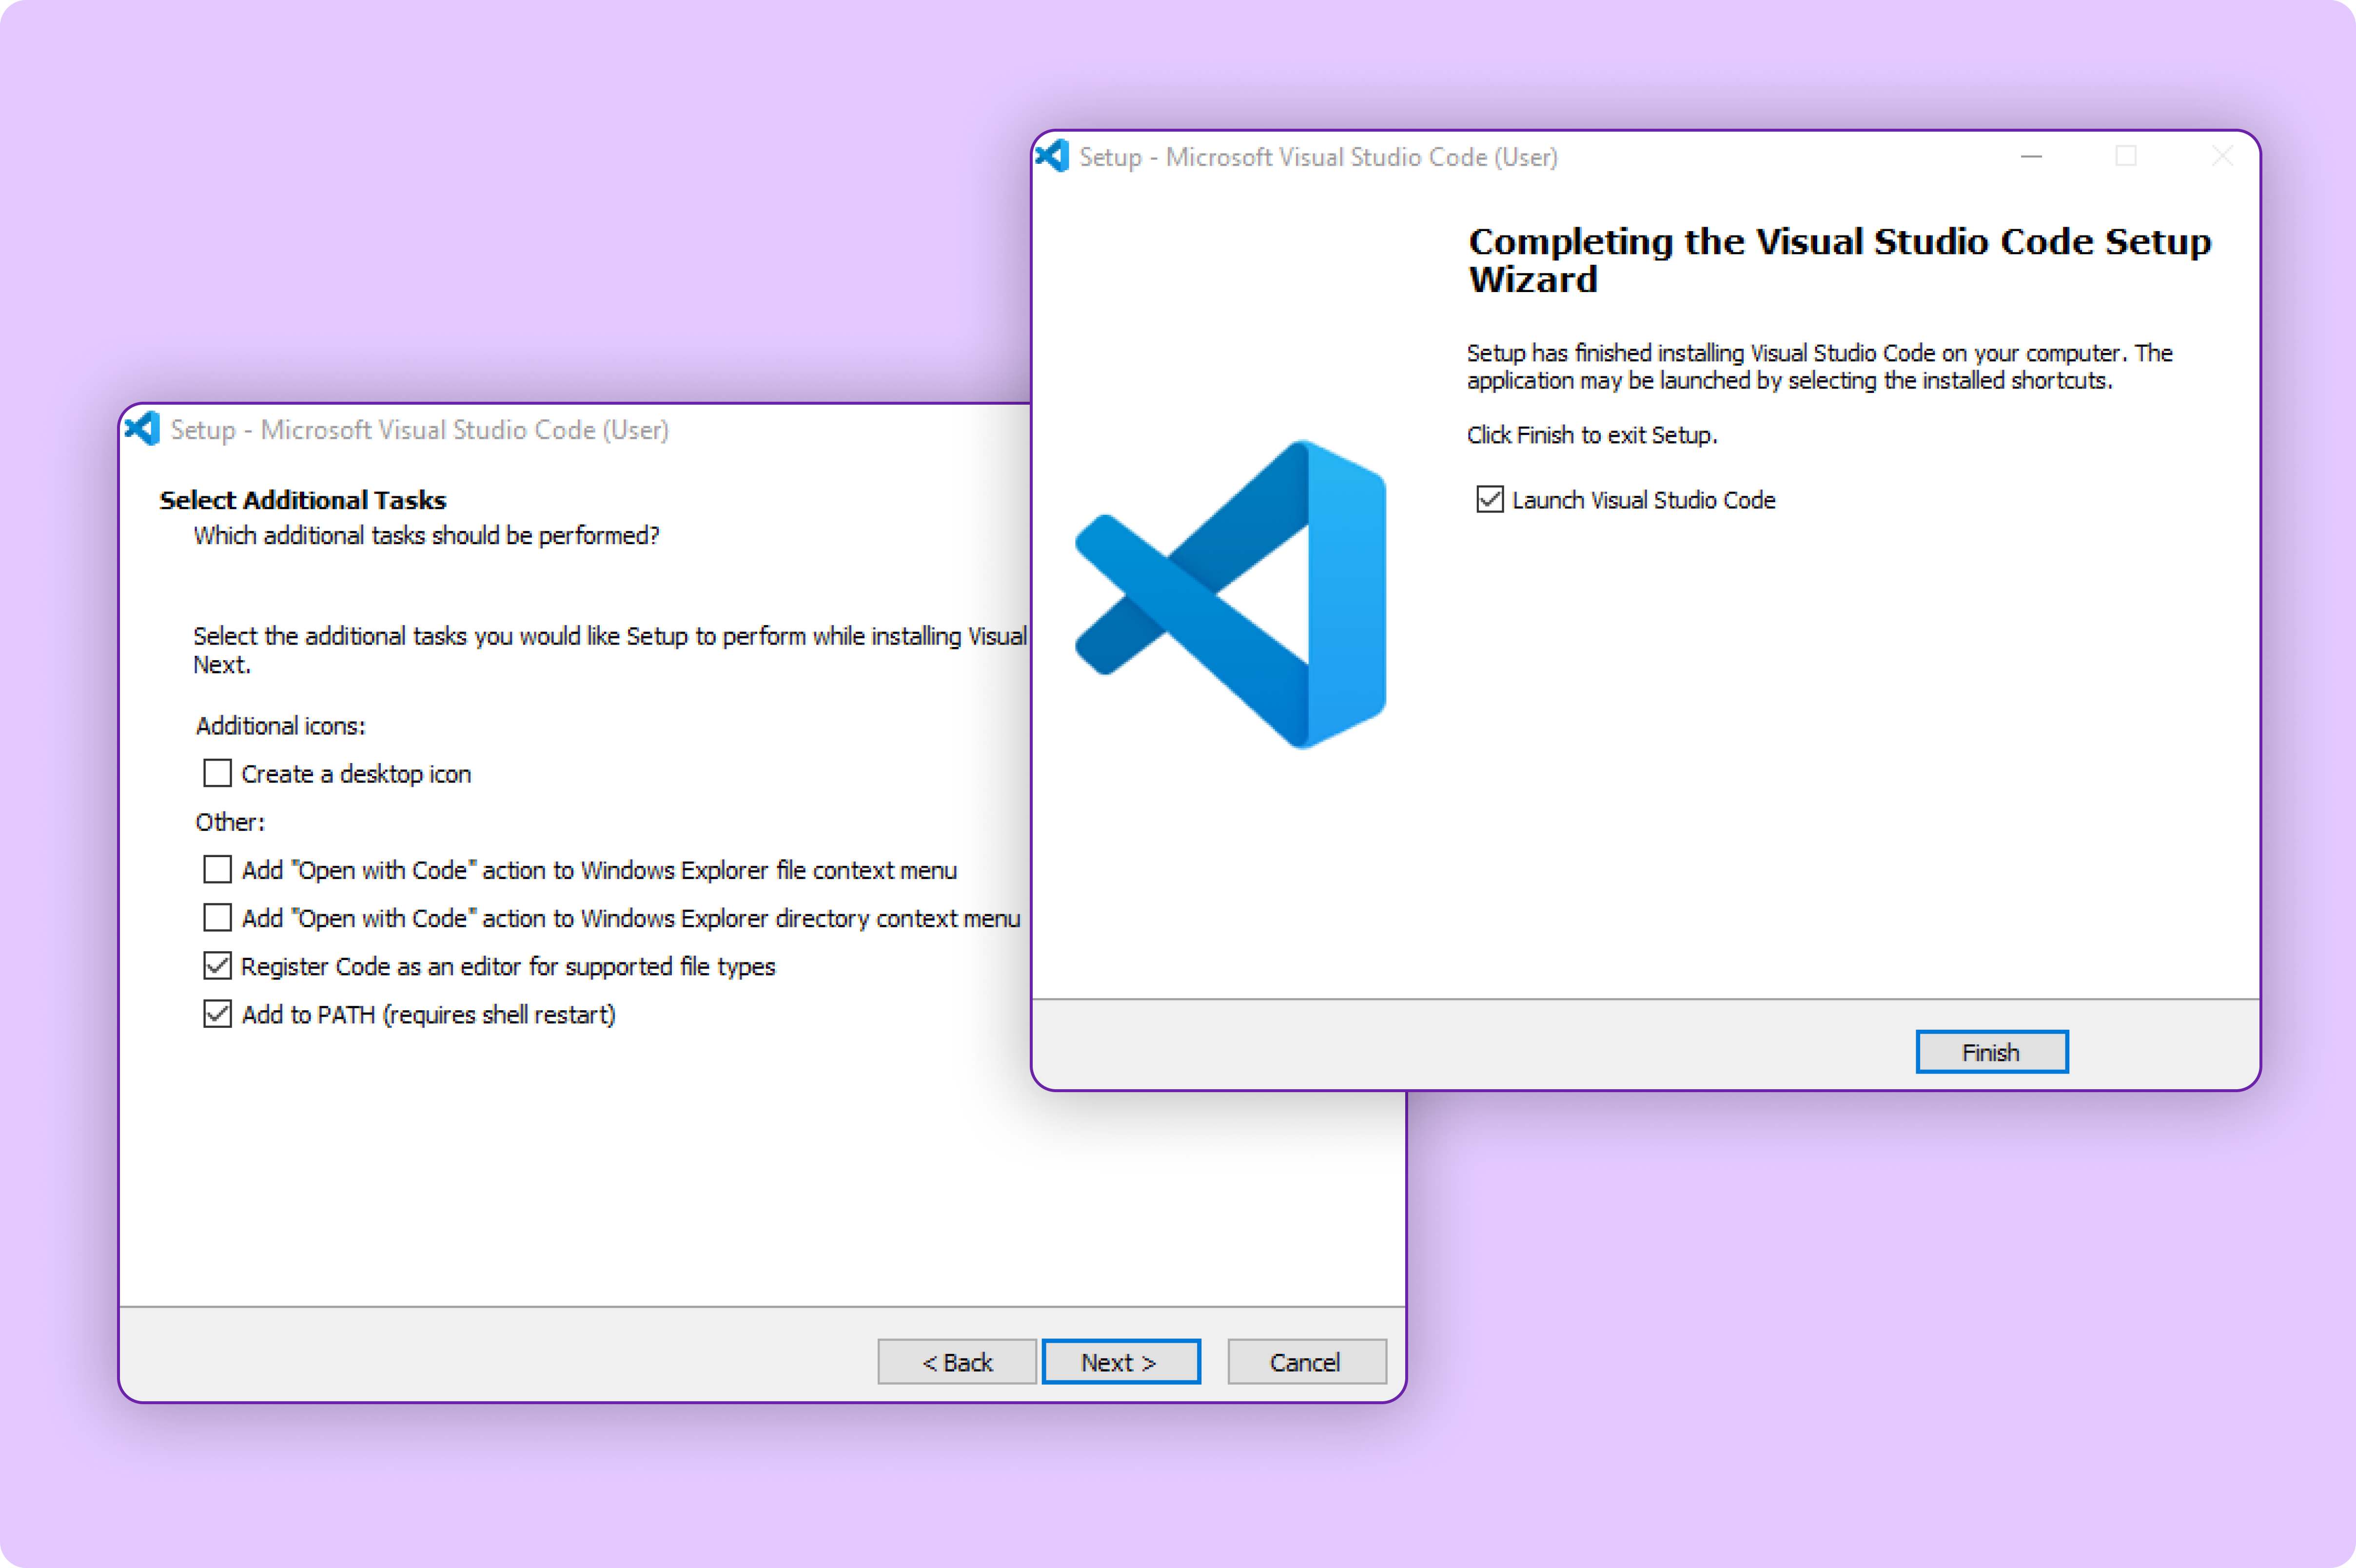
Once the installation completes, open VS Code from your desktop or applications menu.
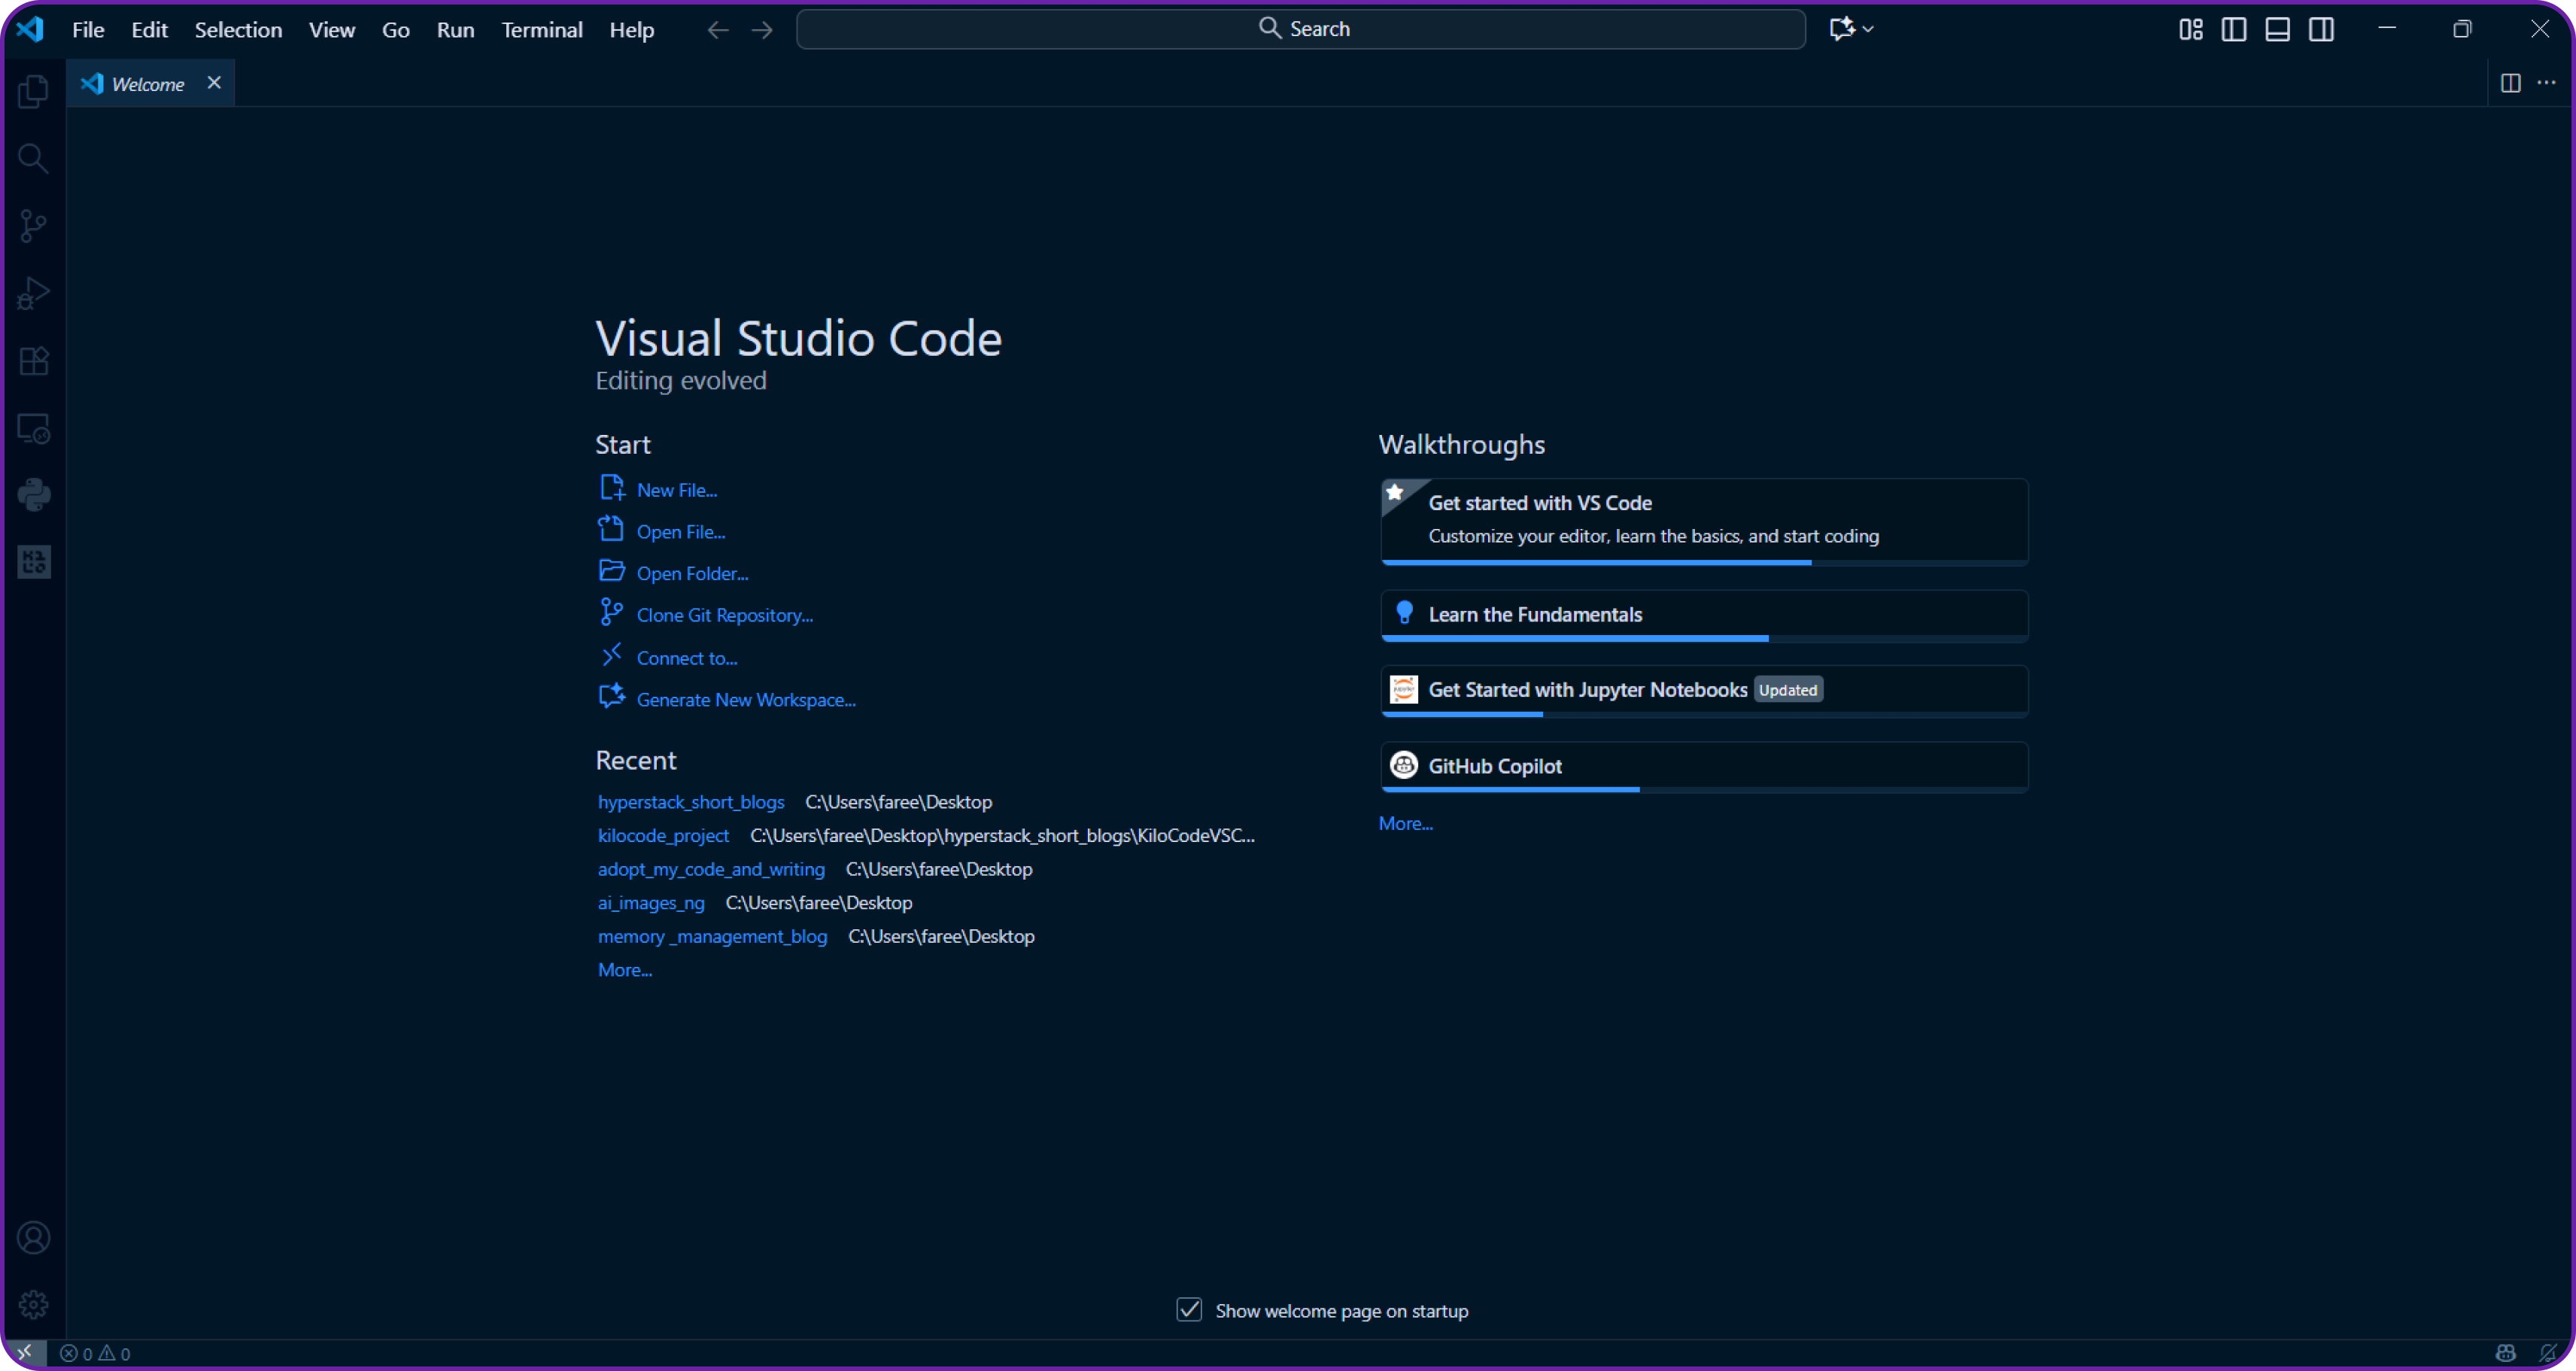
Great, so now we have VS Code installed, we can move on to adding the Kilo Code extension.
Step 2: Install the Kilo Code Extension
Now that we have VS Code ready, let’s add the Kilo Code extension that will allow us to interact with AI agents directly inside our editor.
- Open VS Code.
- Click on the Extensions icon on the left sidebar or press
Ctrl + Shift + X(Windows/Linux) orCmd + Shift + X(macOS). - Search for “Kilo Code” in the marketplace search bar.
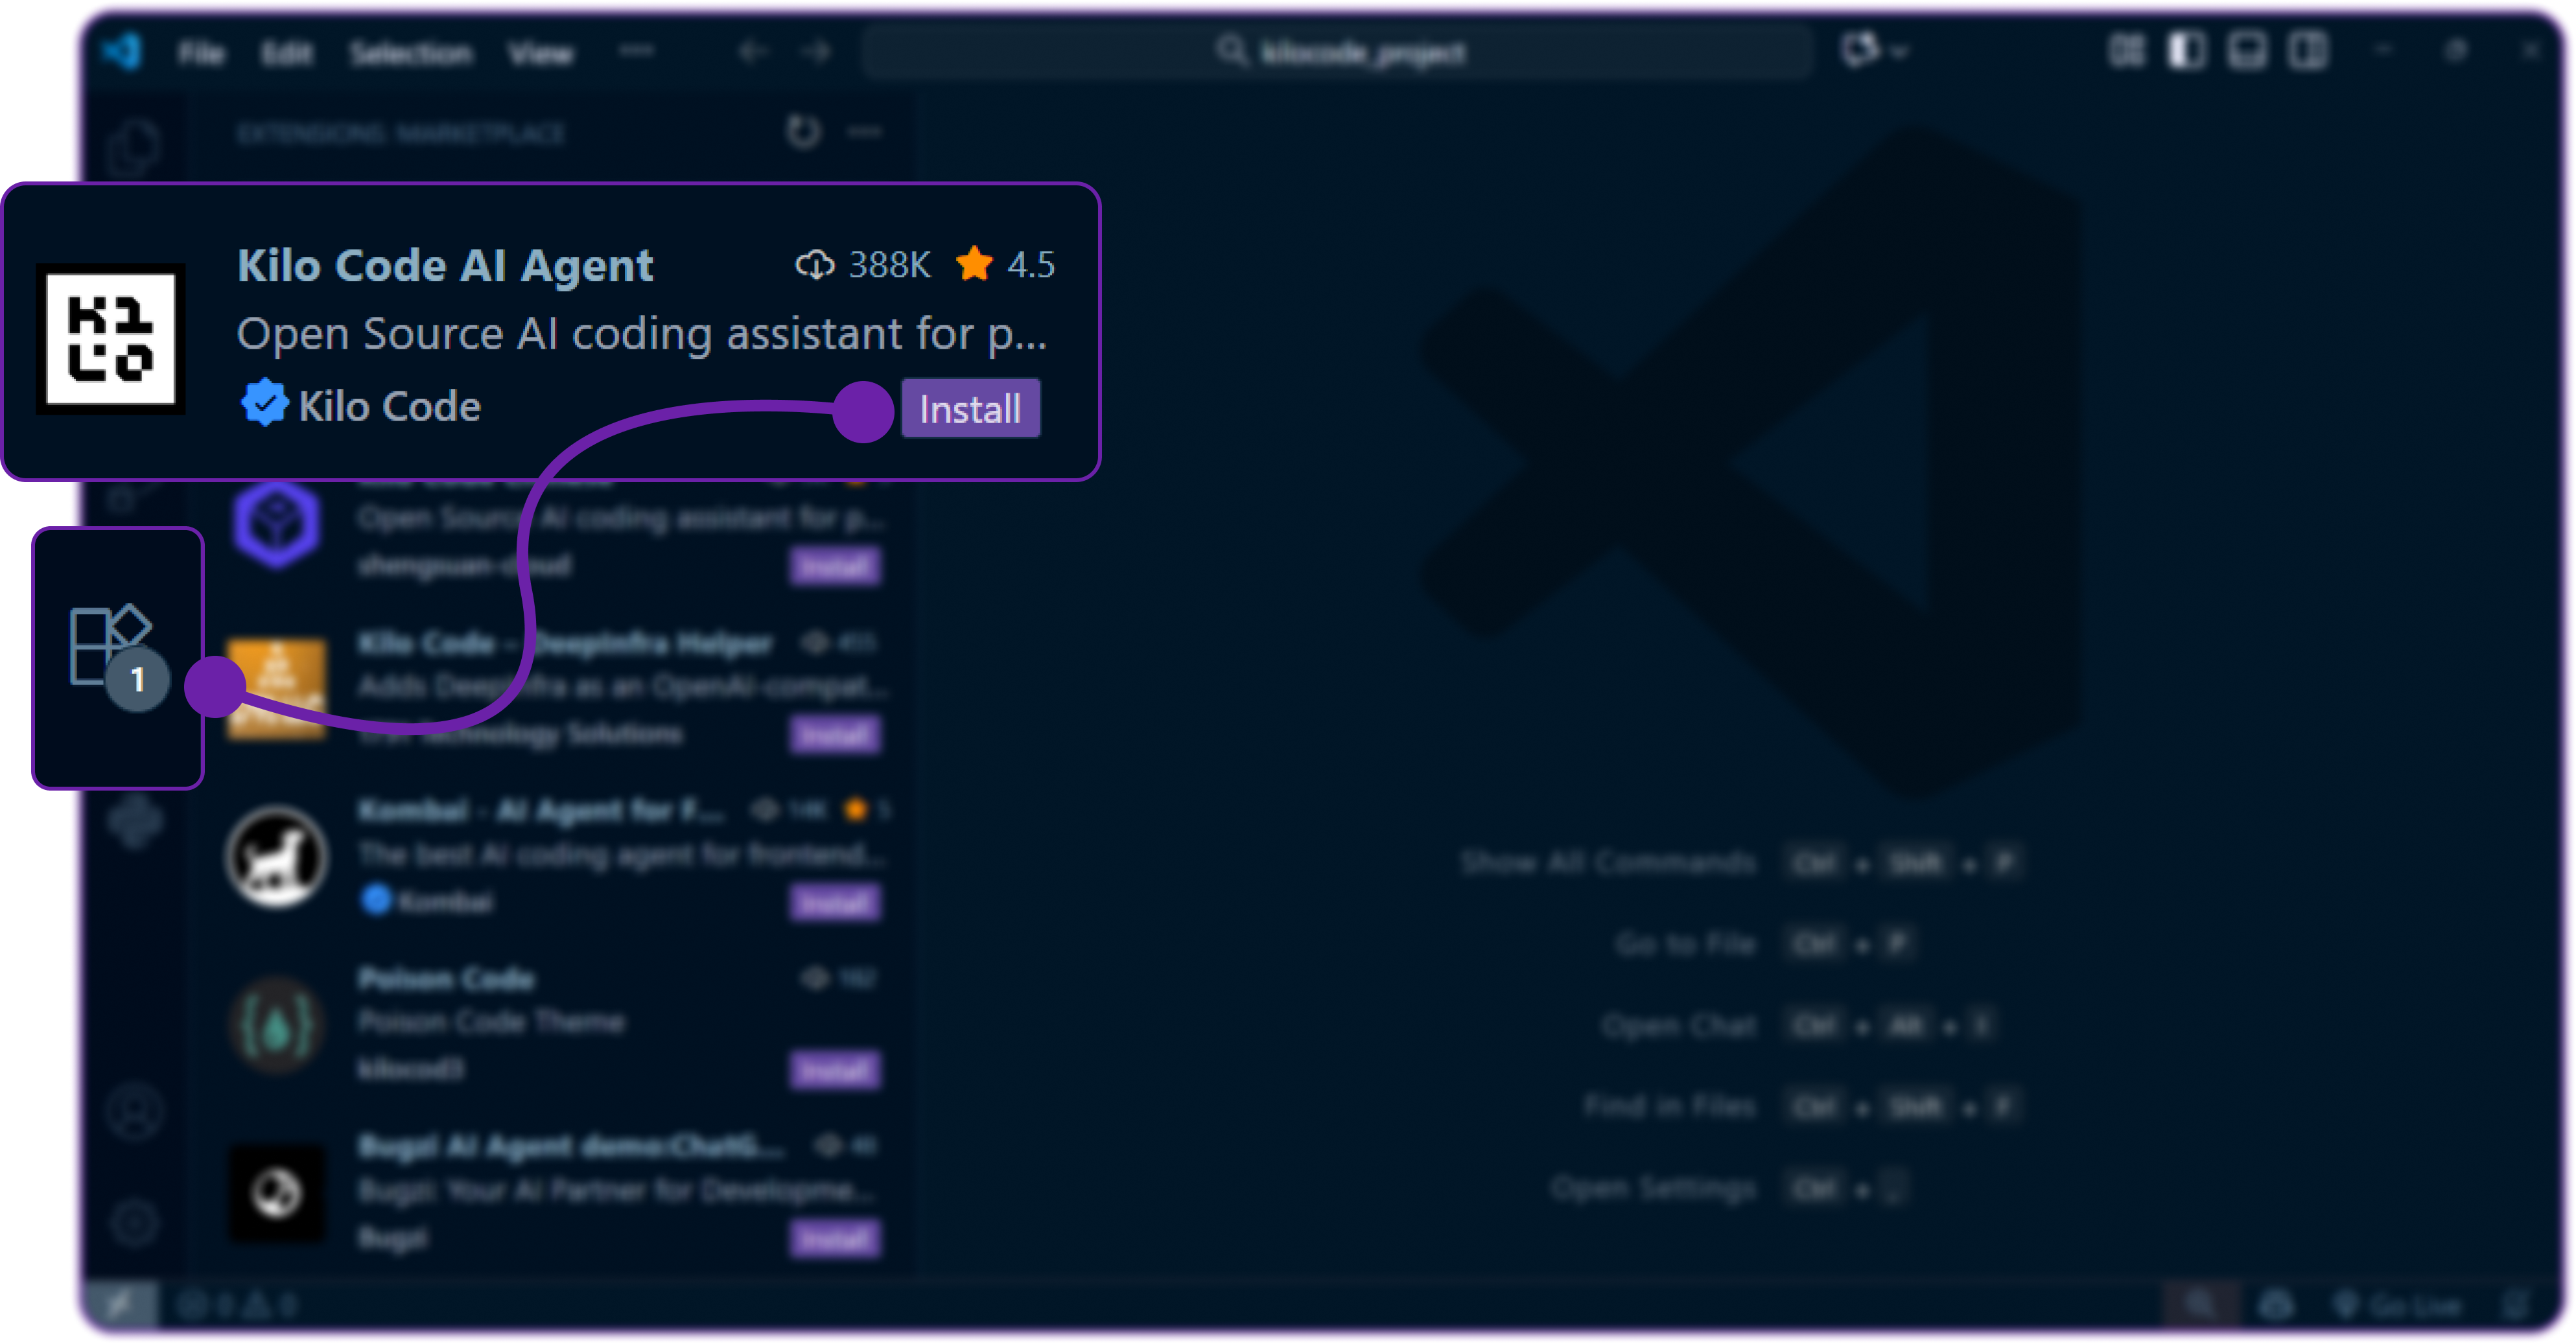
- Click Install and it will start downloading the extension and add it to your VS Code environment.
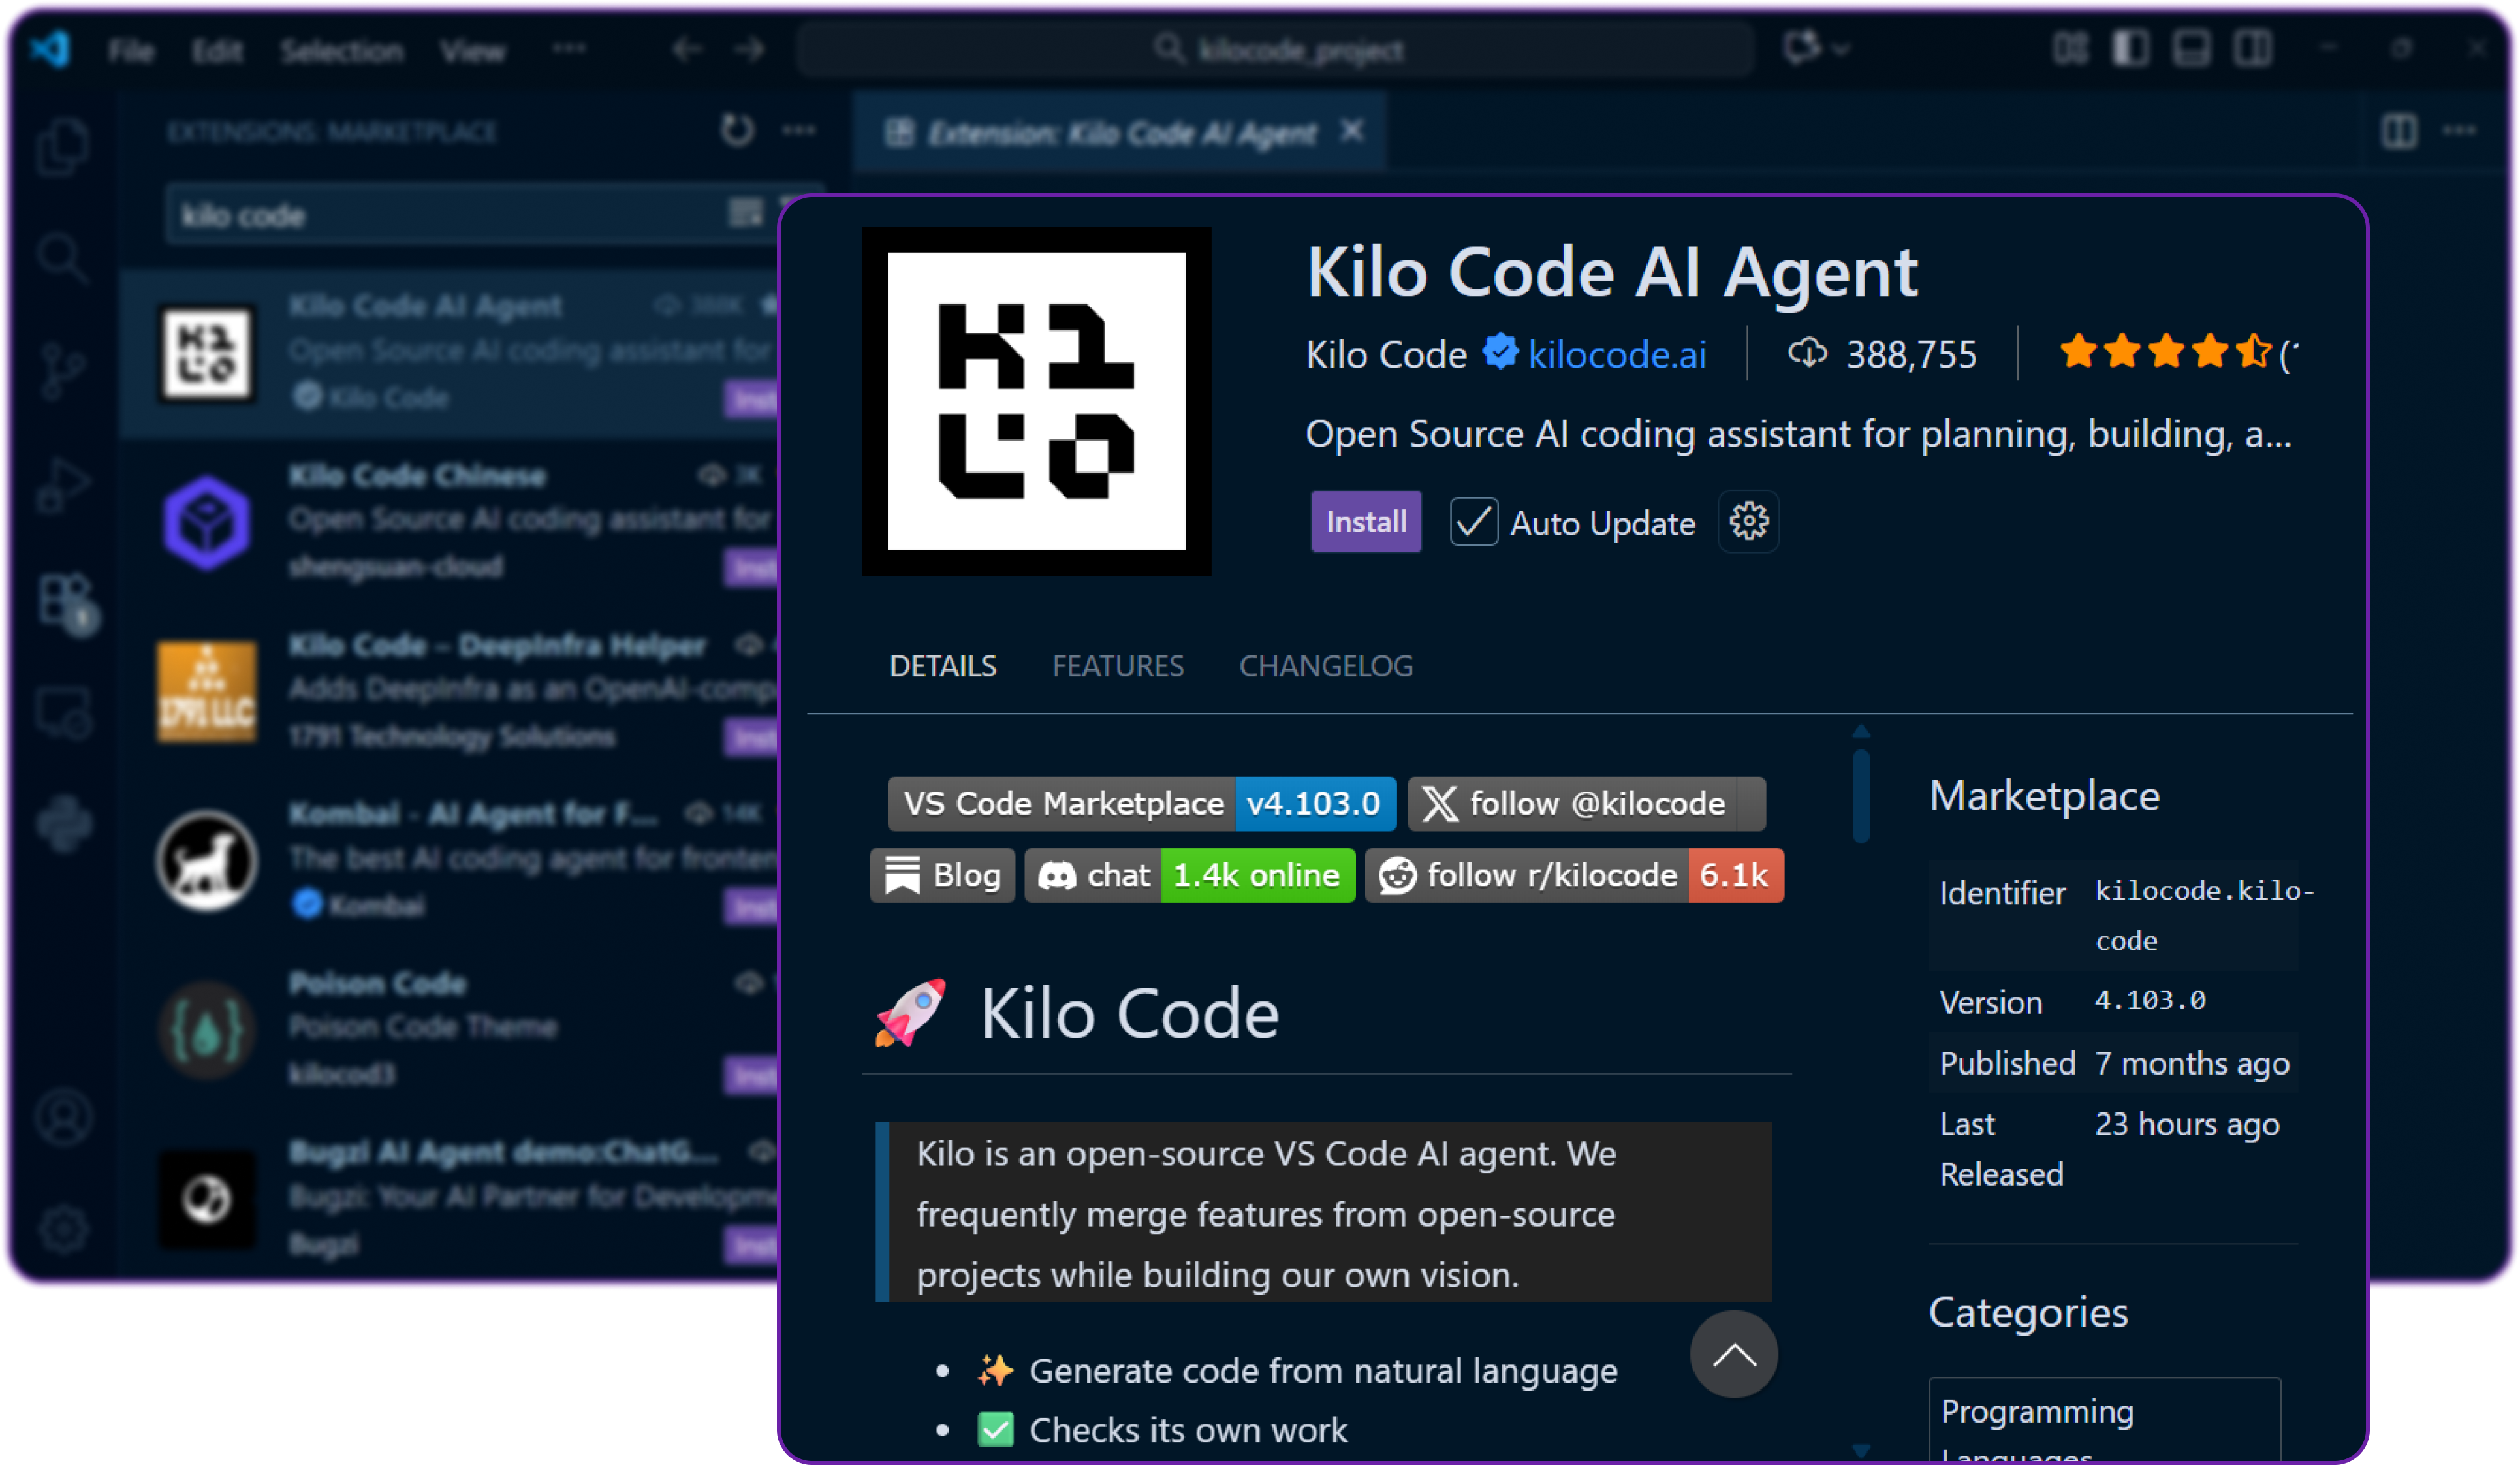
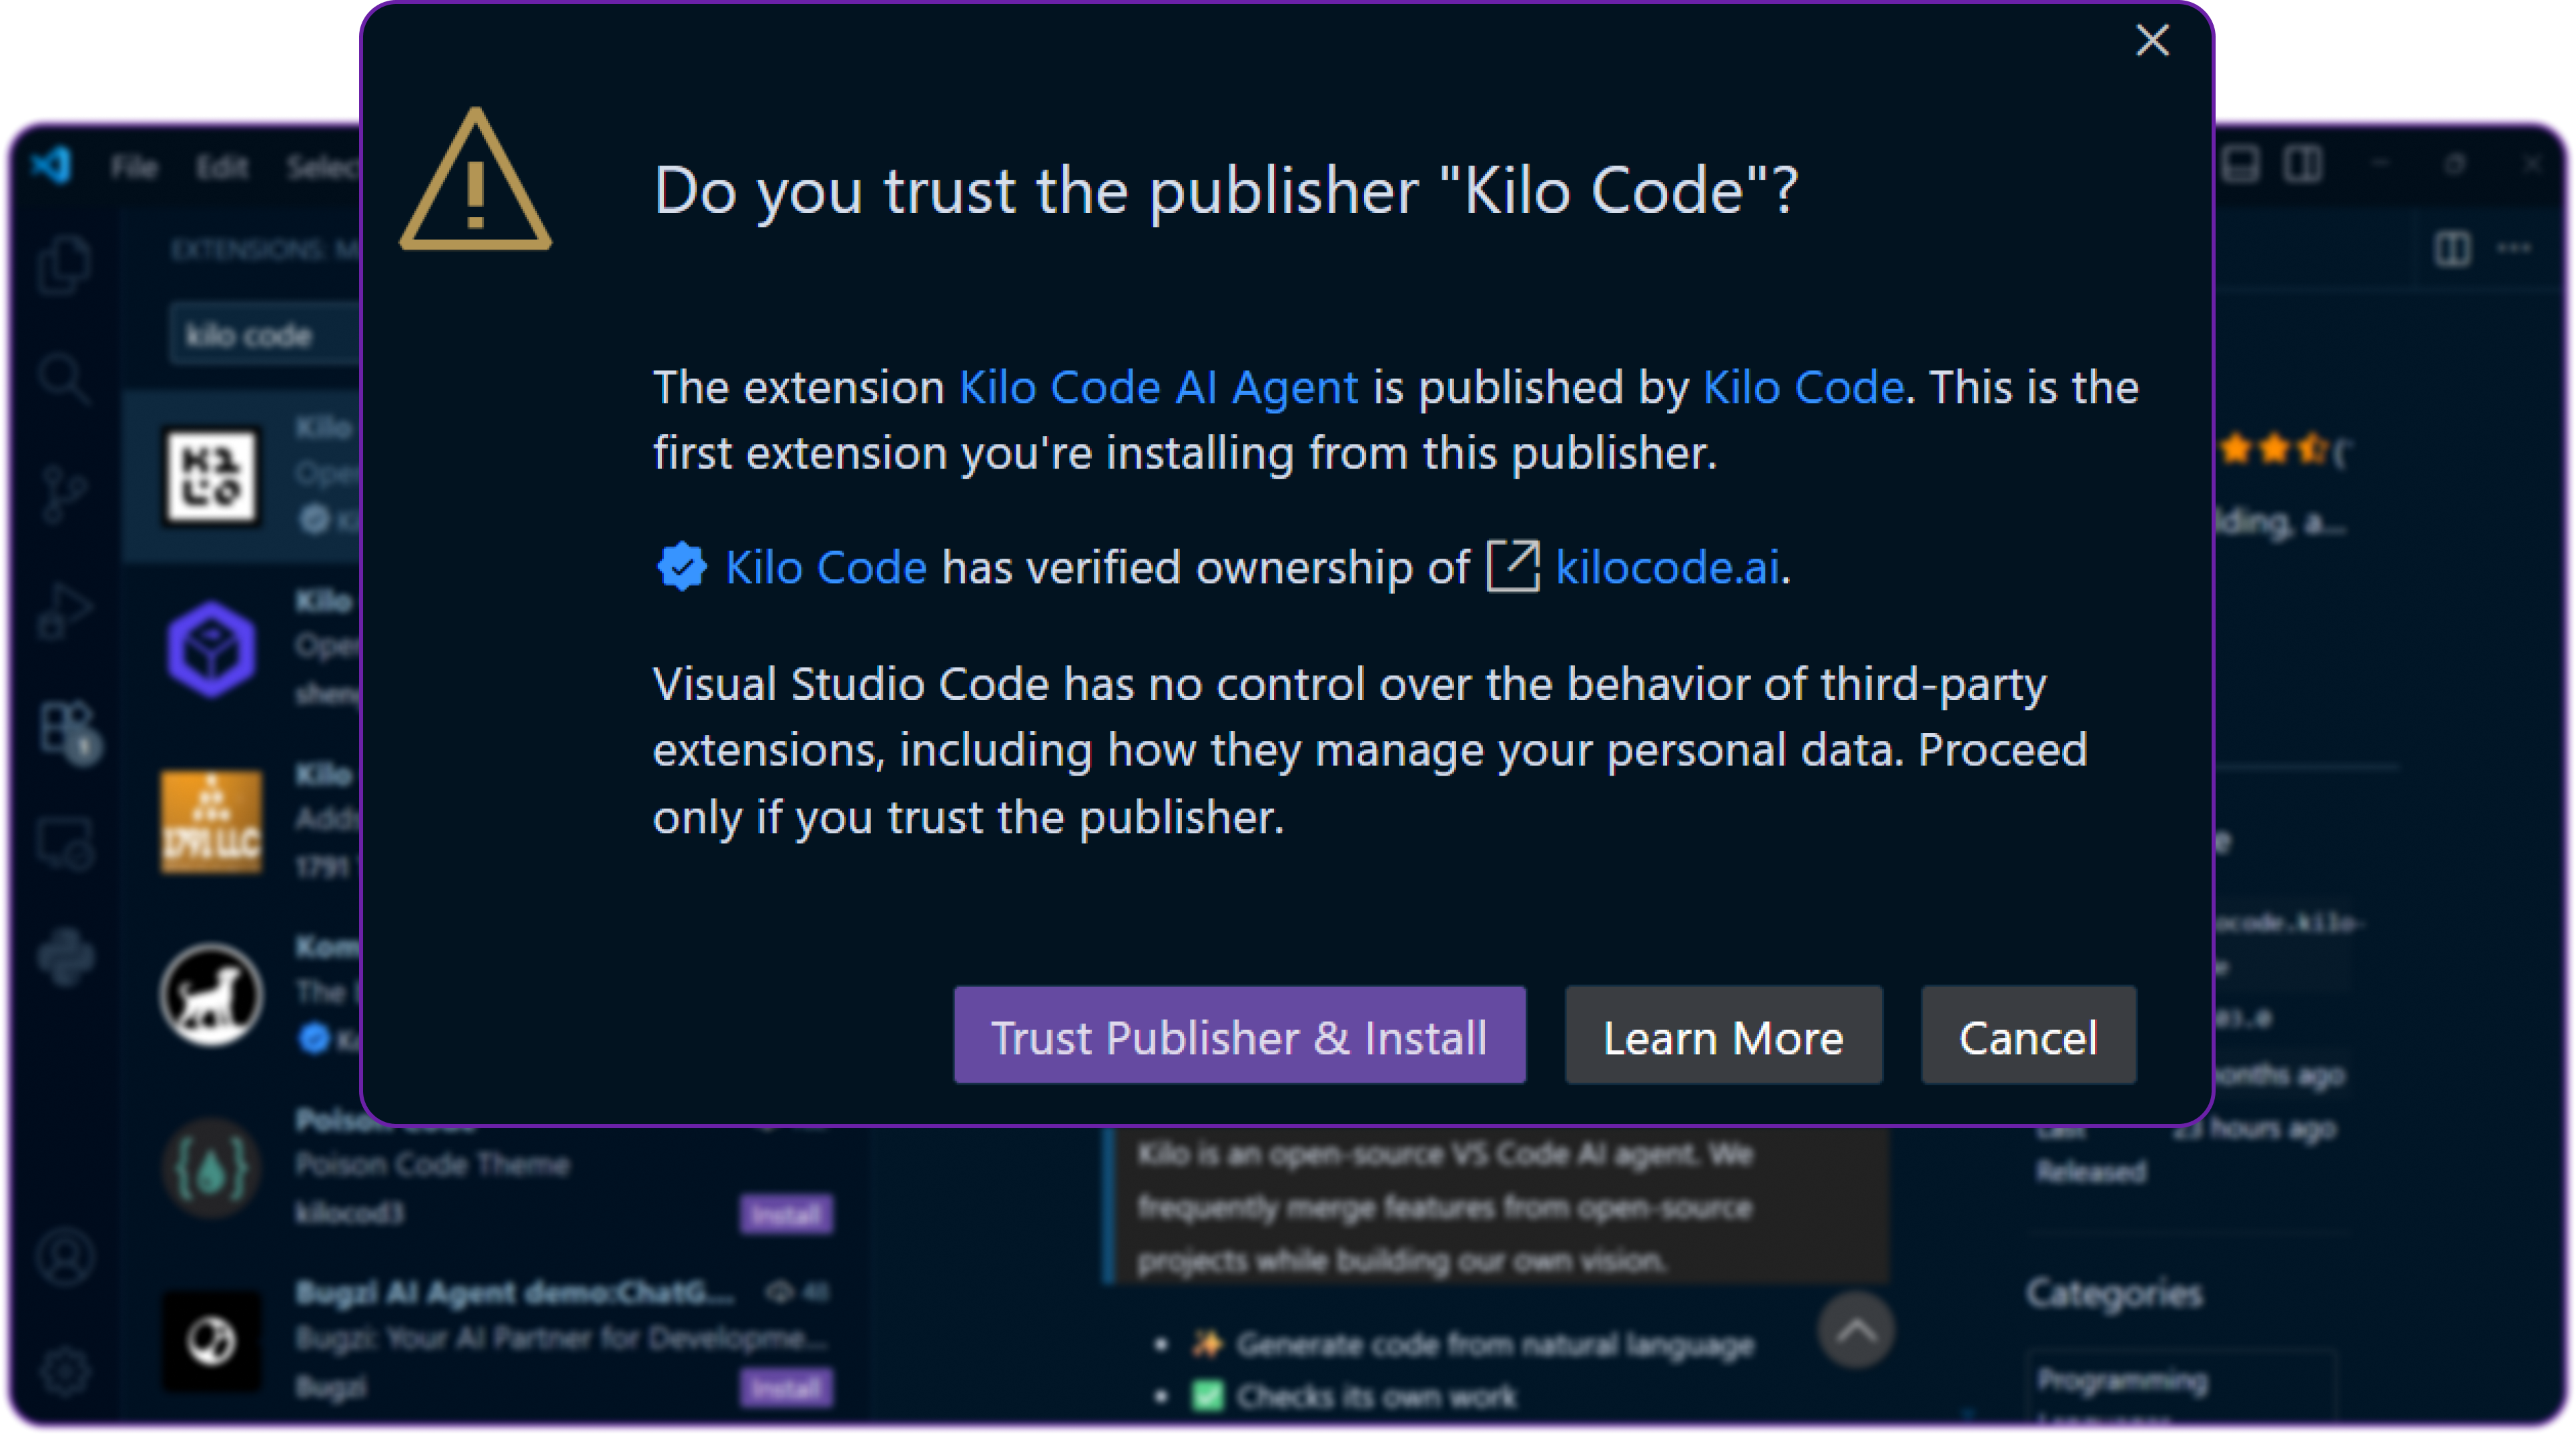
You might be ask to accept the publisher of kilo code extension, just click Accept. Since it's an AI agent, it will need permissions to read and write files in your workspace.
After installation, you’ll see Kilo Code appear in your VS Code sidebar. We can now open the Kilo Code panel to start configuring it.
Step 3: Setting Up Kilo Code
There are two ways we can use Kilo Code:
-
Using Kilo’s default API key (hosted service)
We can sign up at their website, generate an API key, and use Kilo’s built-in models directly.
There are many other LLM provider that kilo code supports like OpenAI, Anthropic, etc.
-
Using our own LLM provider (custom integration)
This is what we’ll do, we’ll connect Kilo Code to our own LLM hosted on Hyperstack.Since Hyperstack follows the OpenAI-compatible schema, Kilo Code can easily connect to it without any custom adapters.
Now head over to the Kilo Code settings in VS Code by clicking the gear icon in the Kilo sidebar and selecting Settings.
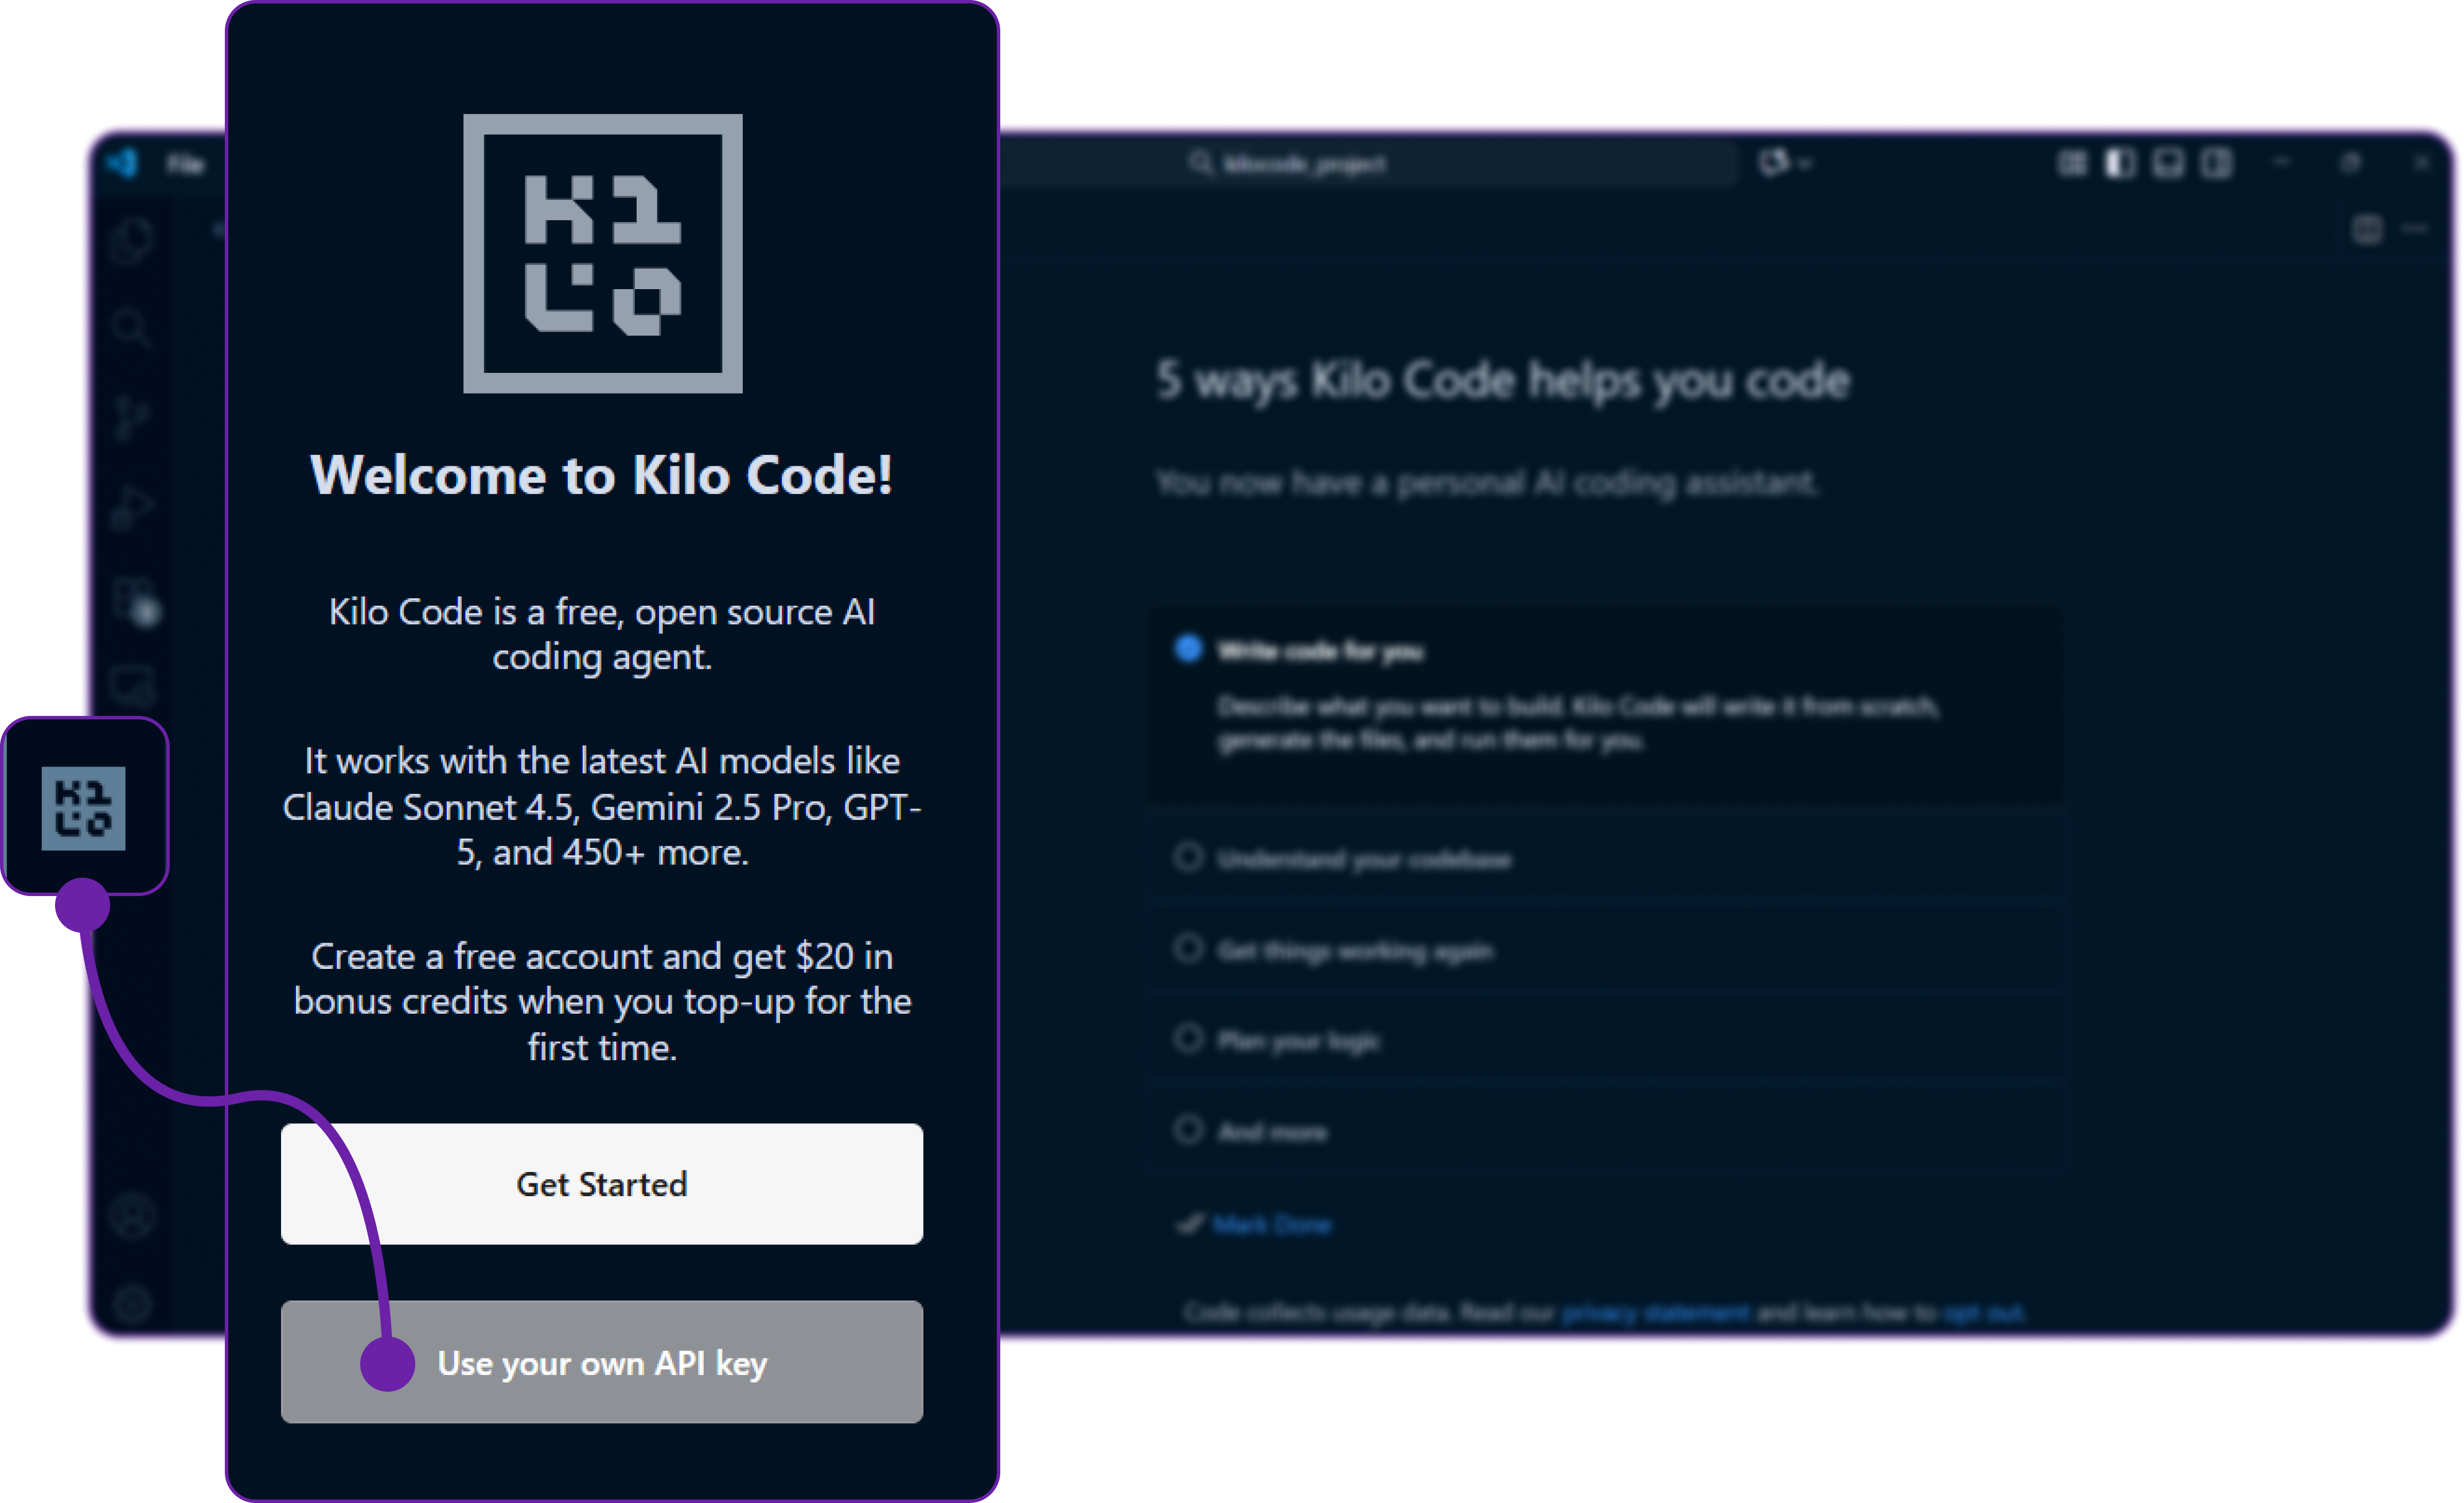
Here, we are clicking on use your own api key to configure our own LLM provider.
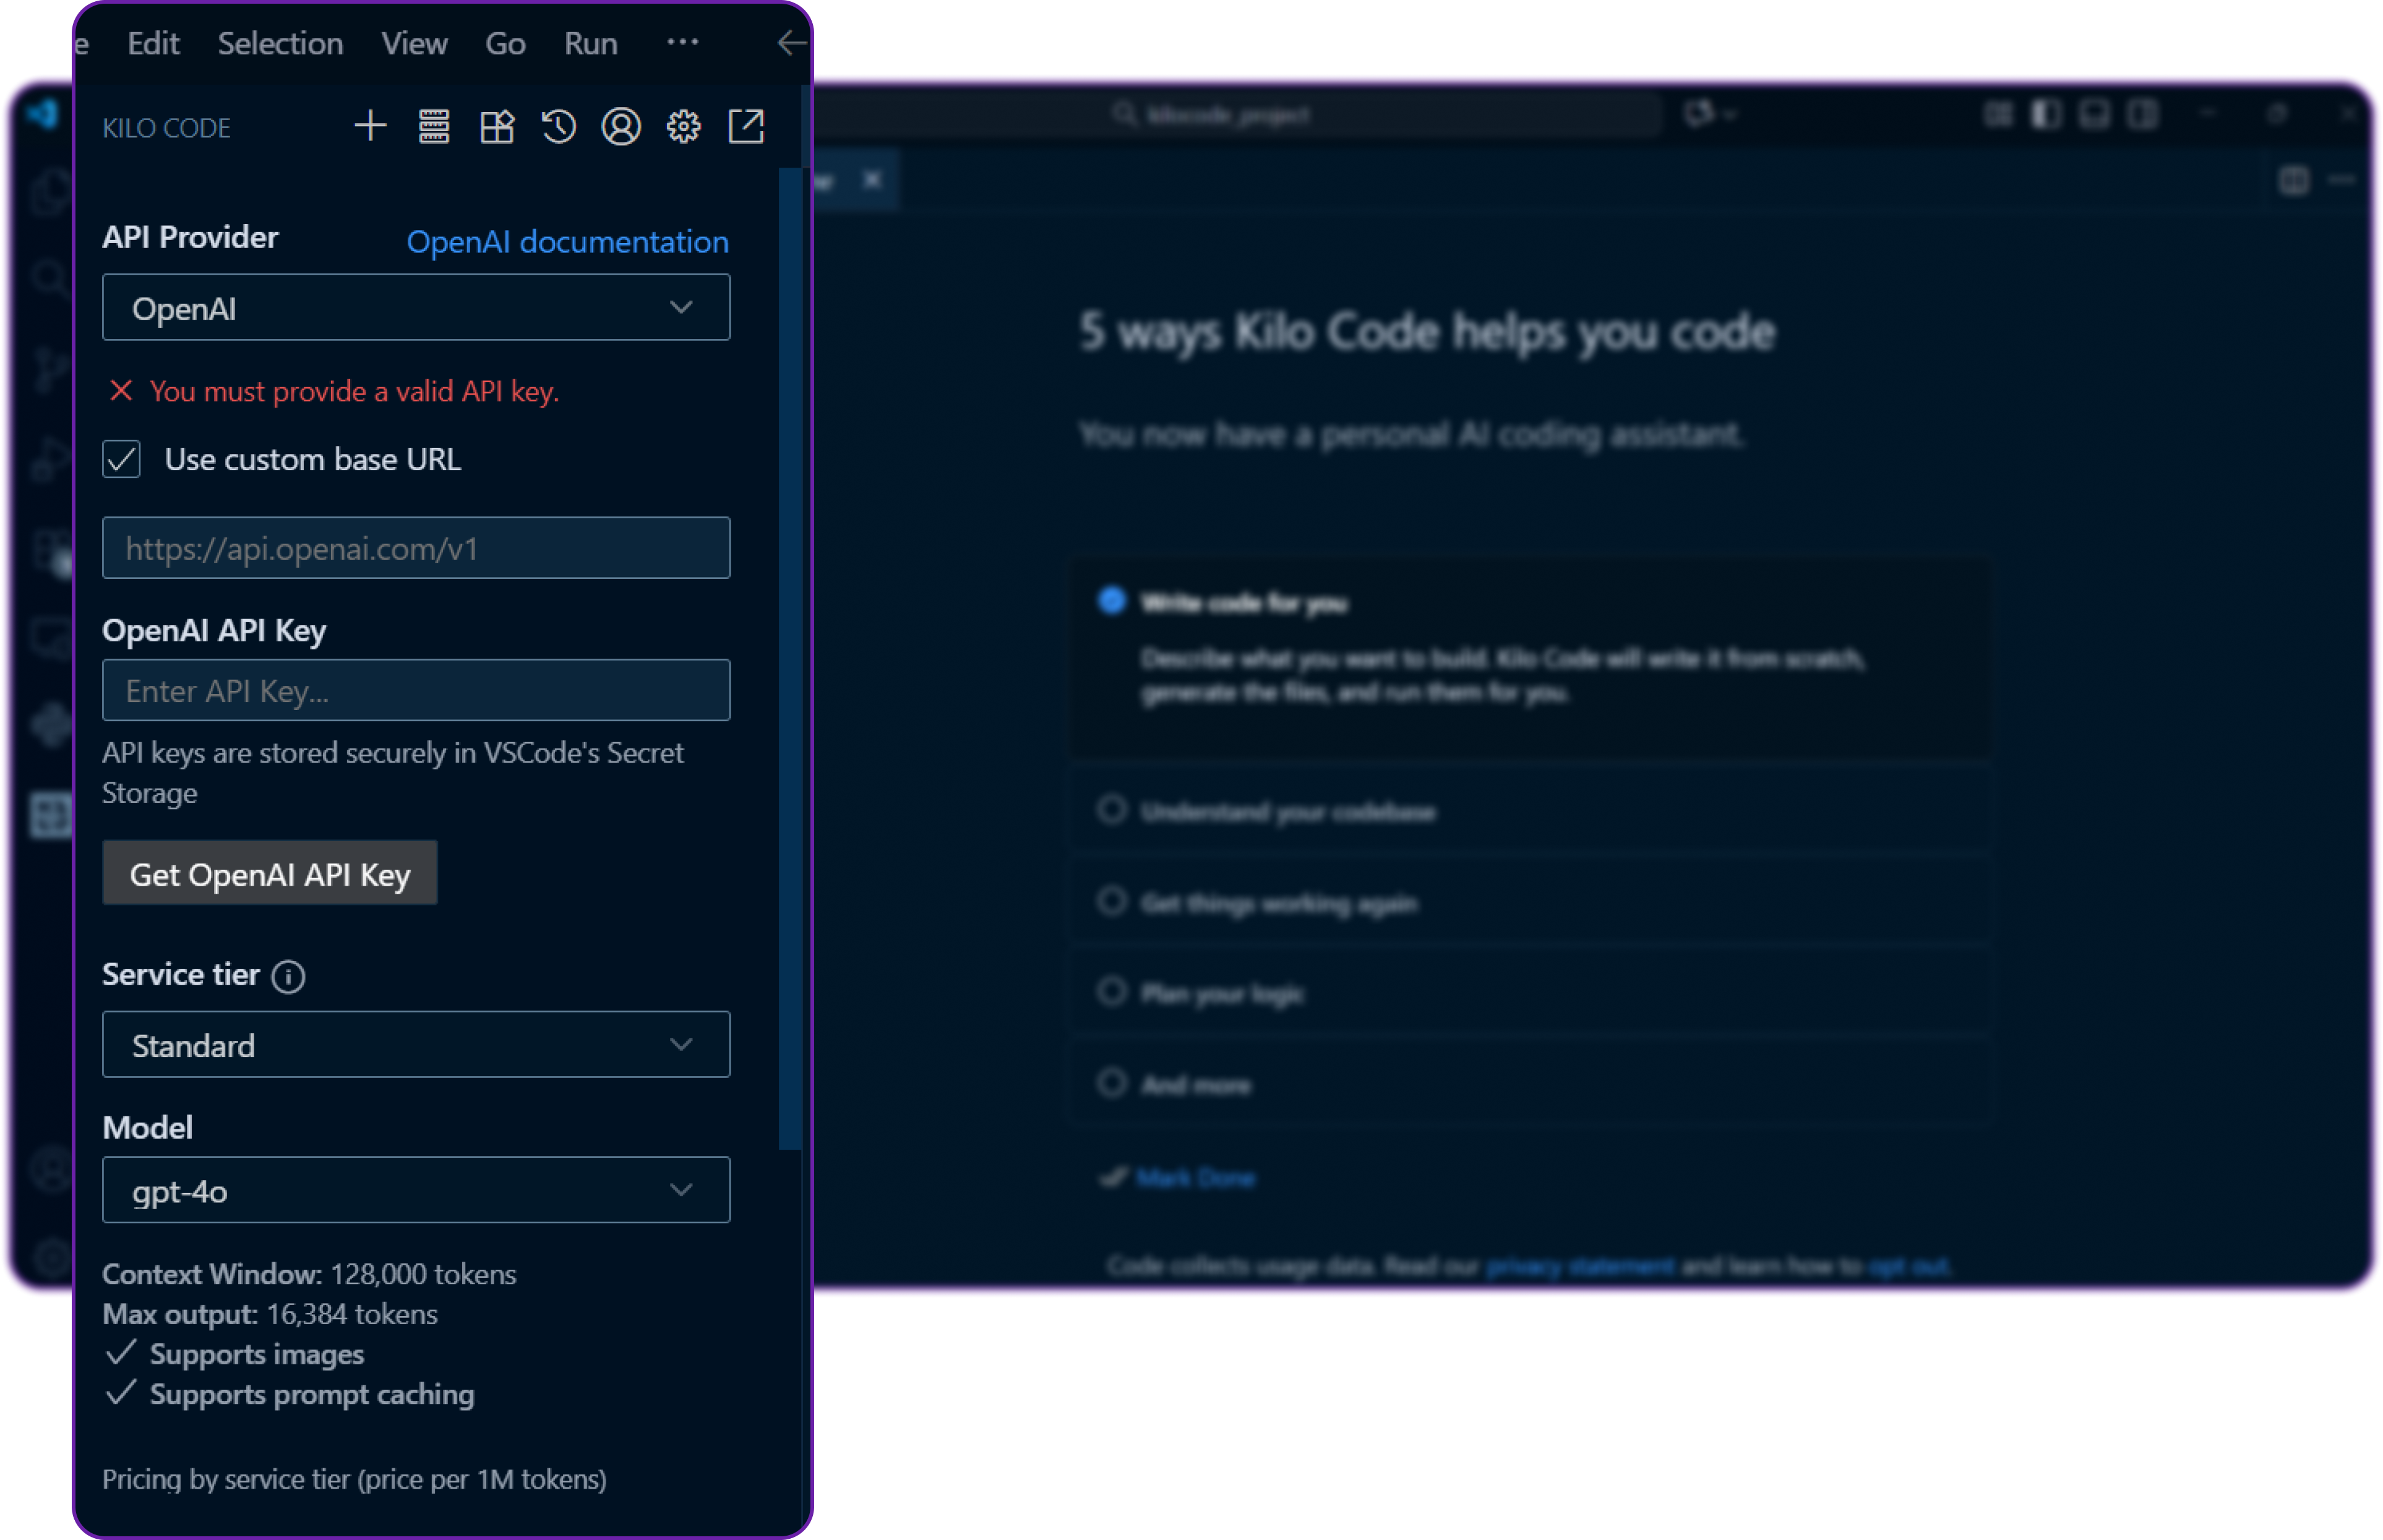
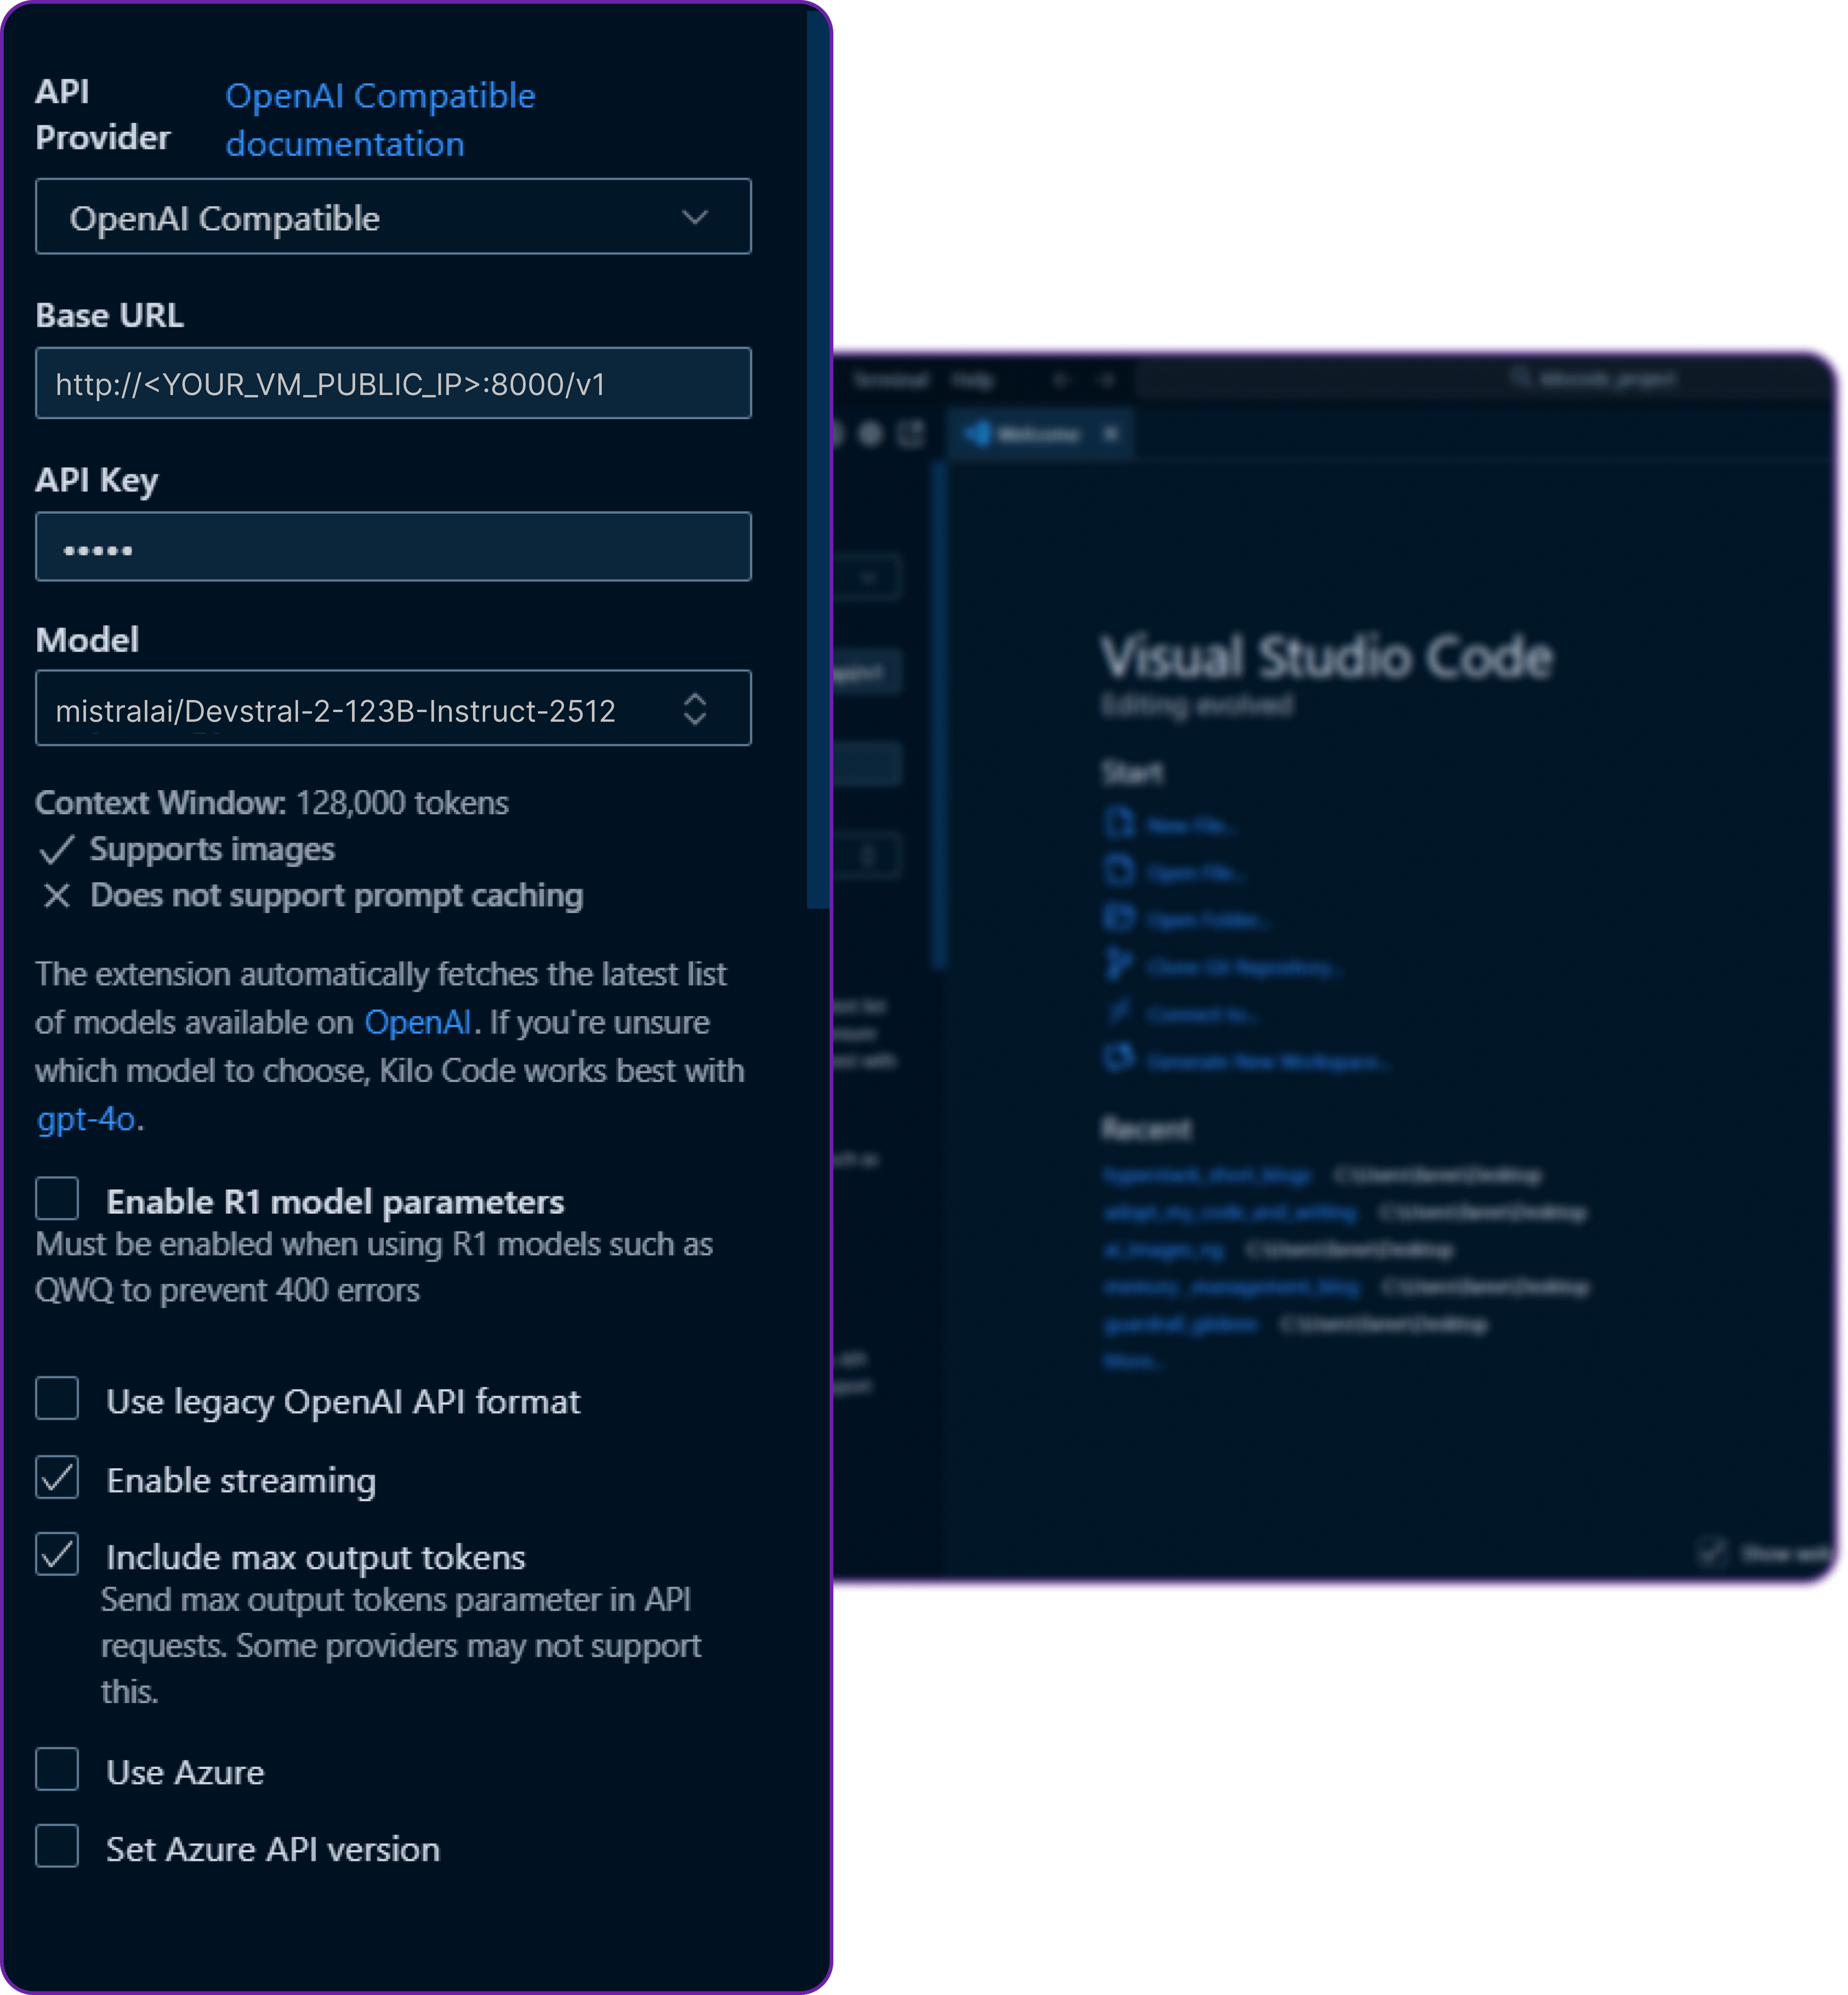
You can see it requires couple of things like BASE URL, MODEL NAME and API KEY to connect to our custom LLM provider.
Let's move on to the next step to get these details from Hyperstack.
Step 4: Add Your Hyperstack vLLM Details
Now we need to get our self-hosted model connection details that we used earlier while inferencing the model using the curl command.
- Base URL →
http://<YOUR_VM_PUBLIC_IP>:8000/v1 - Model Name →
mistralai/Devstral-2-123B-Instruct-2512 - API Key →
EMPTY
Let’s plug them into Kilo Code.
First we have to select the correct API provider which is OpenAI Compatible since Hyperstack follows the OpenAI schema.

Then we fill in the details we copied:
Once we save the configuration, Kilo Code will treat vllm as a valid model provider exactly like OpenAI.
We have named this configuration to Hyperstack profile, which is totally an optional step but better for organisation if we have multiple profiles.
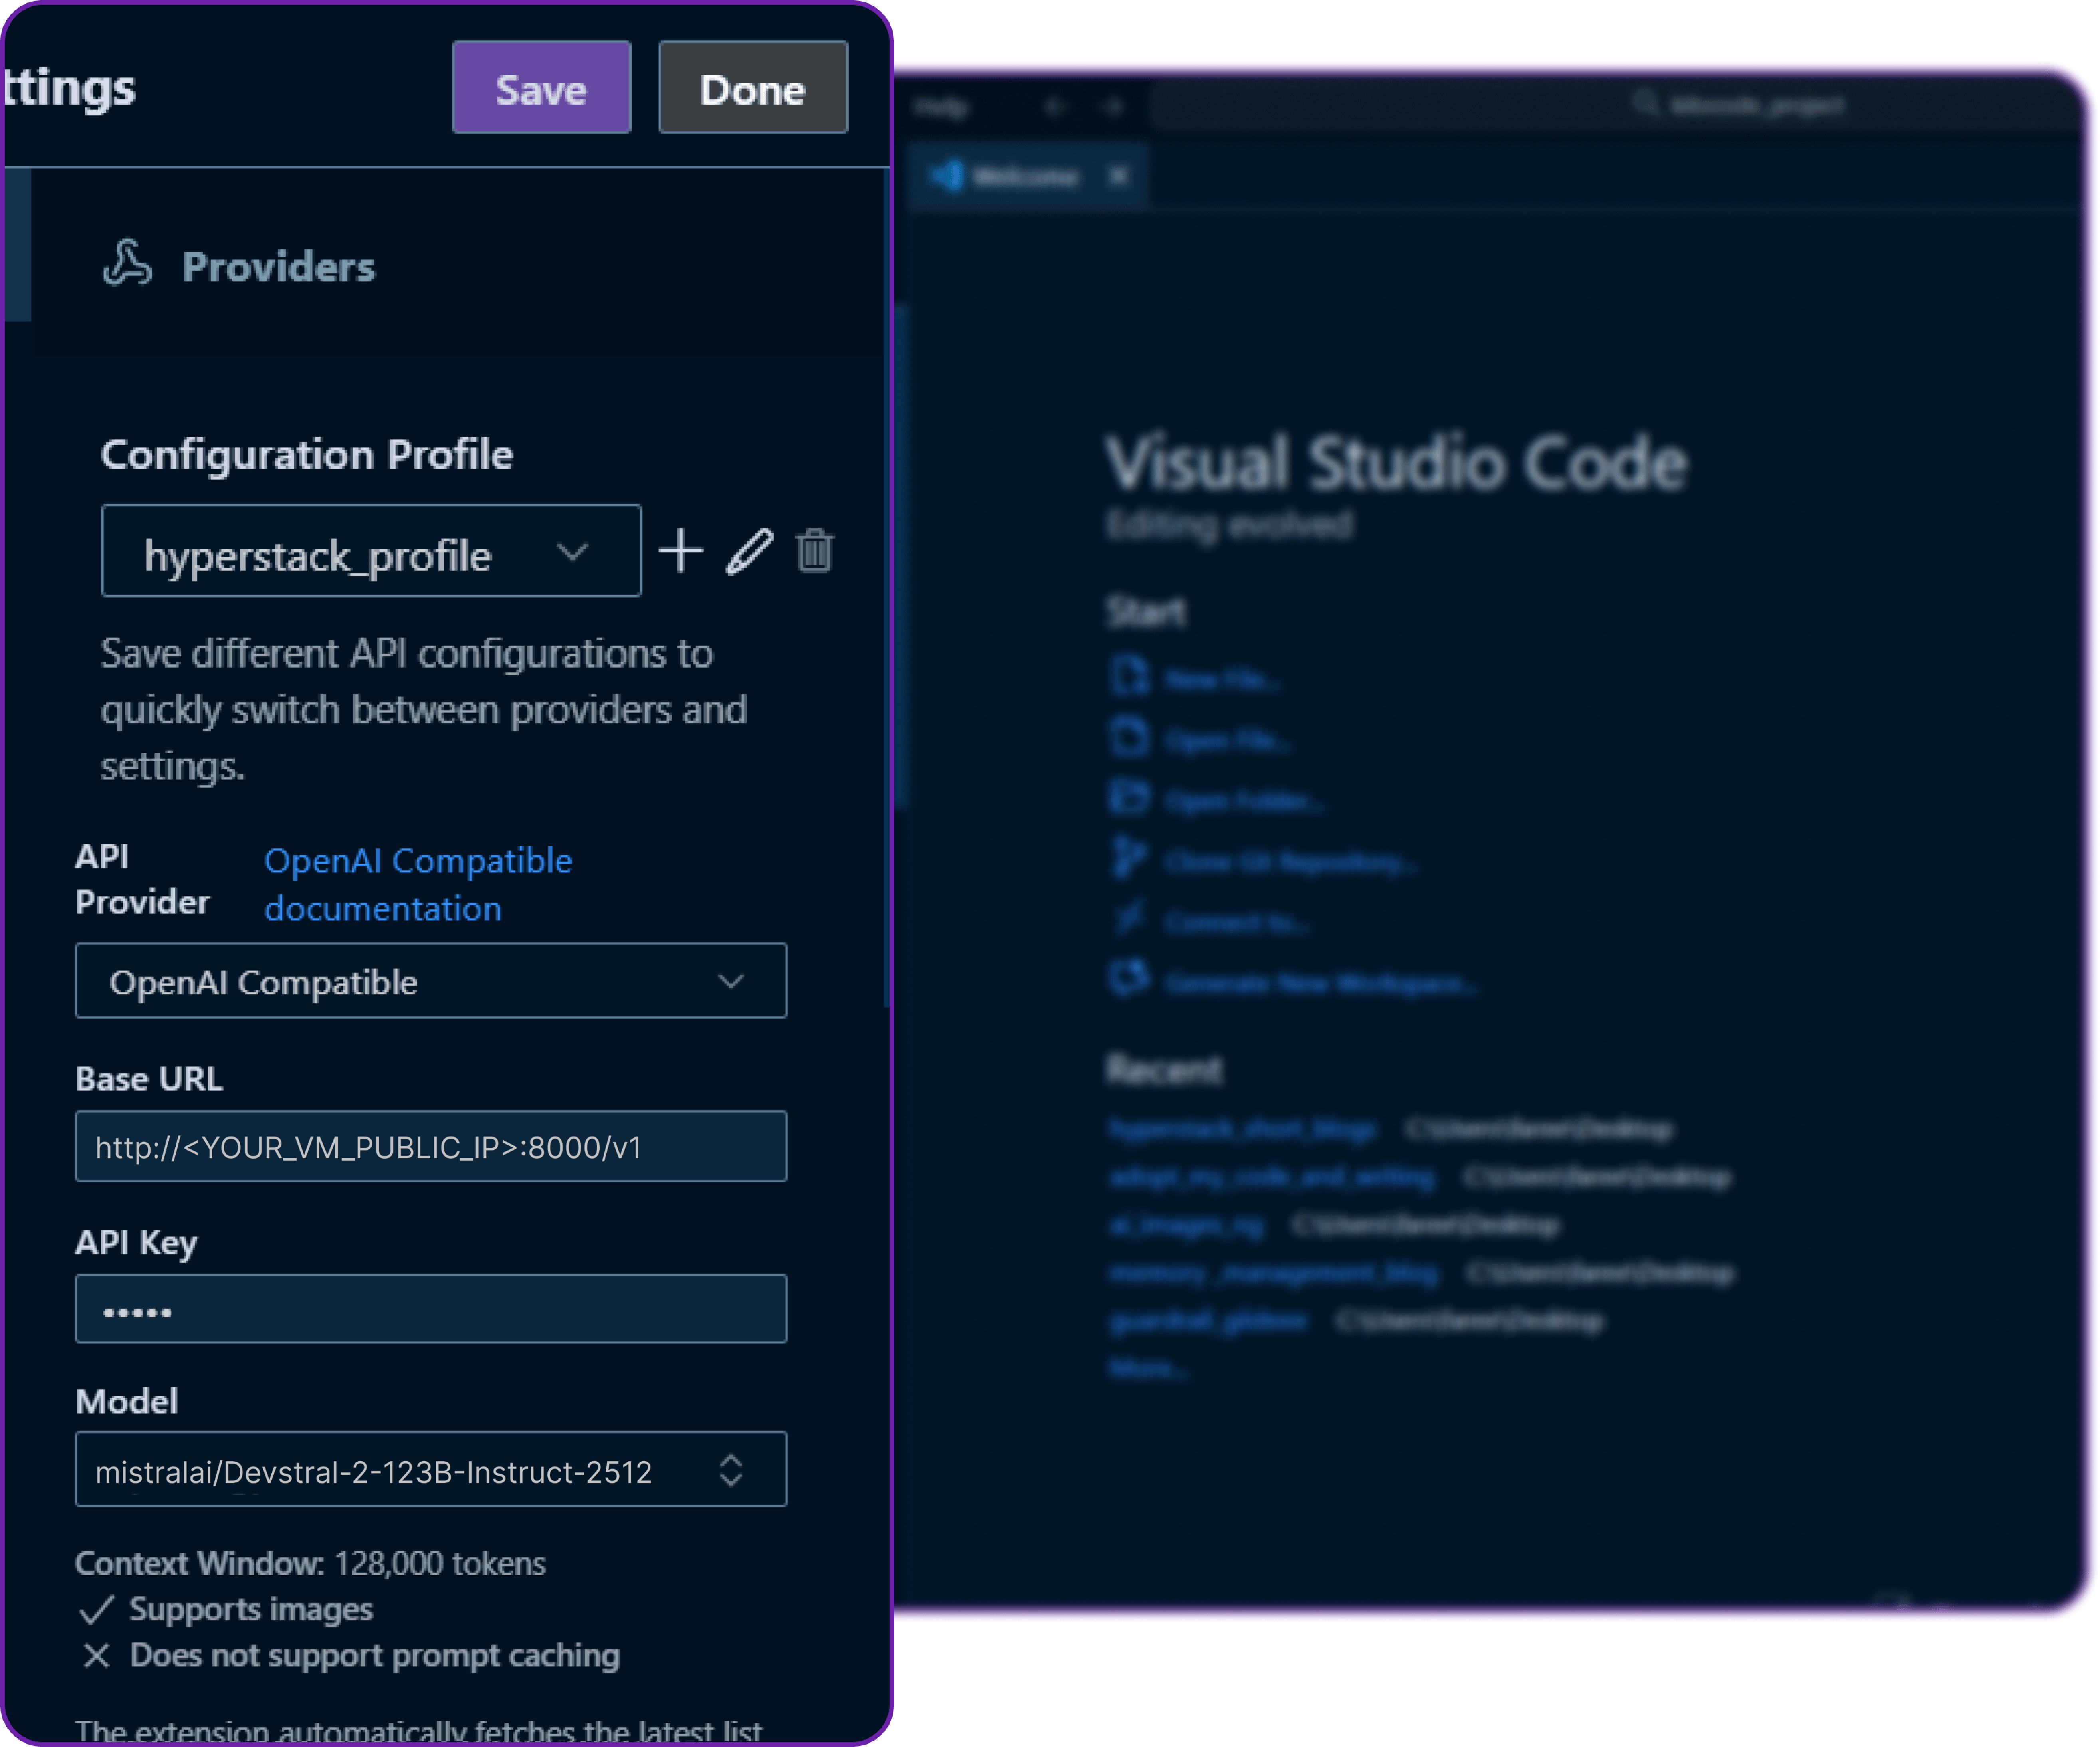
Click on save and then done, and we are all set our Kilo Code is now connected to our Hyperstack-hosted model!
Step 5: Test the Connection
Alright, now we need to test that if our integration is working or not.
- In VS Code, open the Kilo Code Ask panel.
- Make sure the selected model is
mistralai/Devstral-2-123B-Instruct-2512. - Let’s pass a simple prompt like
"Hi"to see how our Kilo Code Ask feature is handling the request.
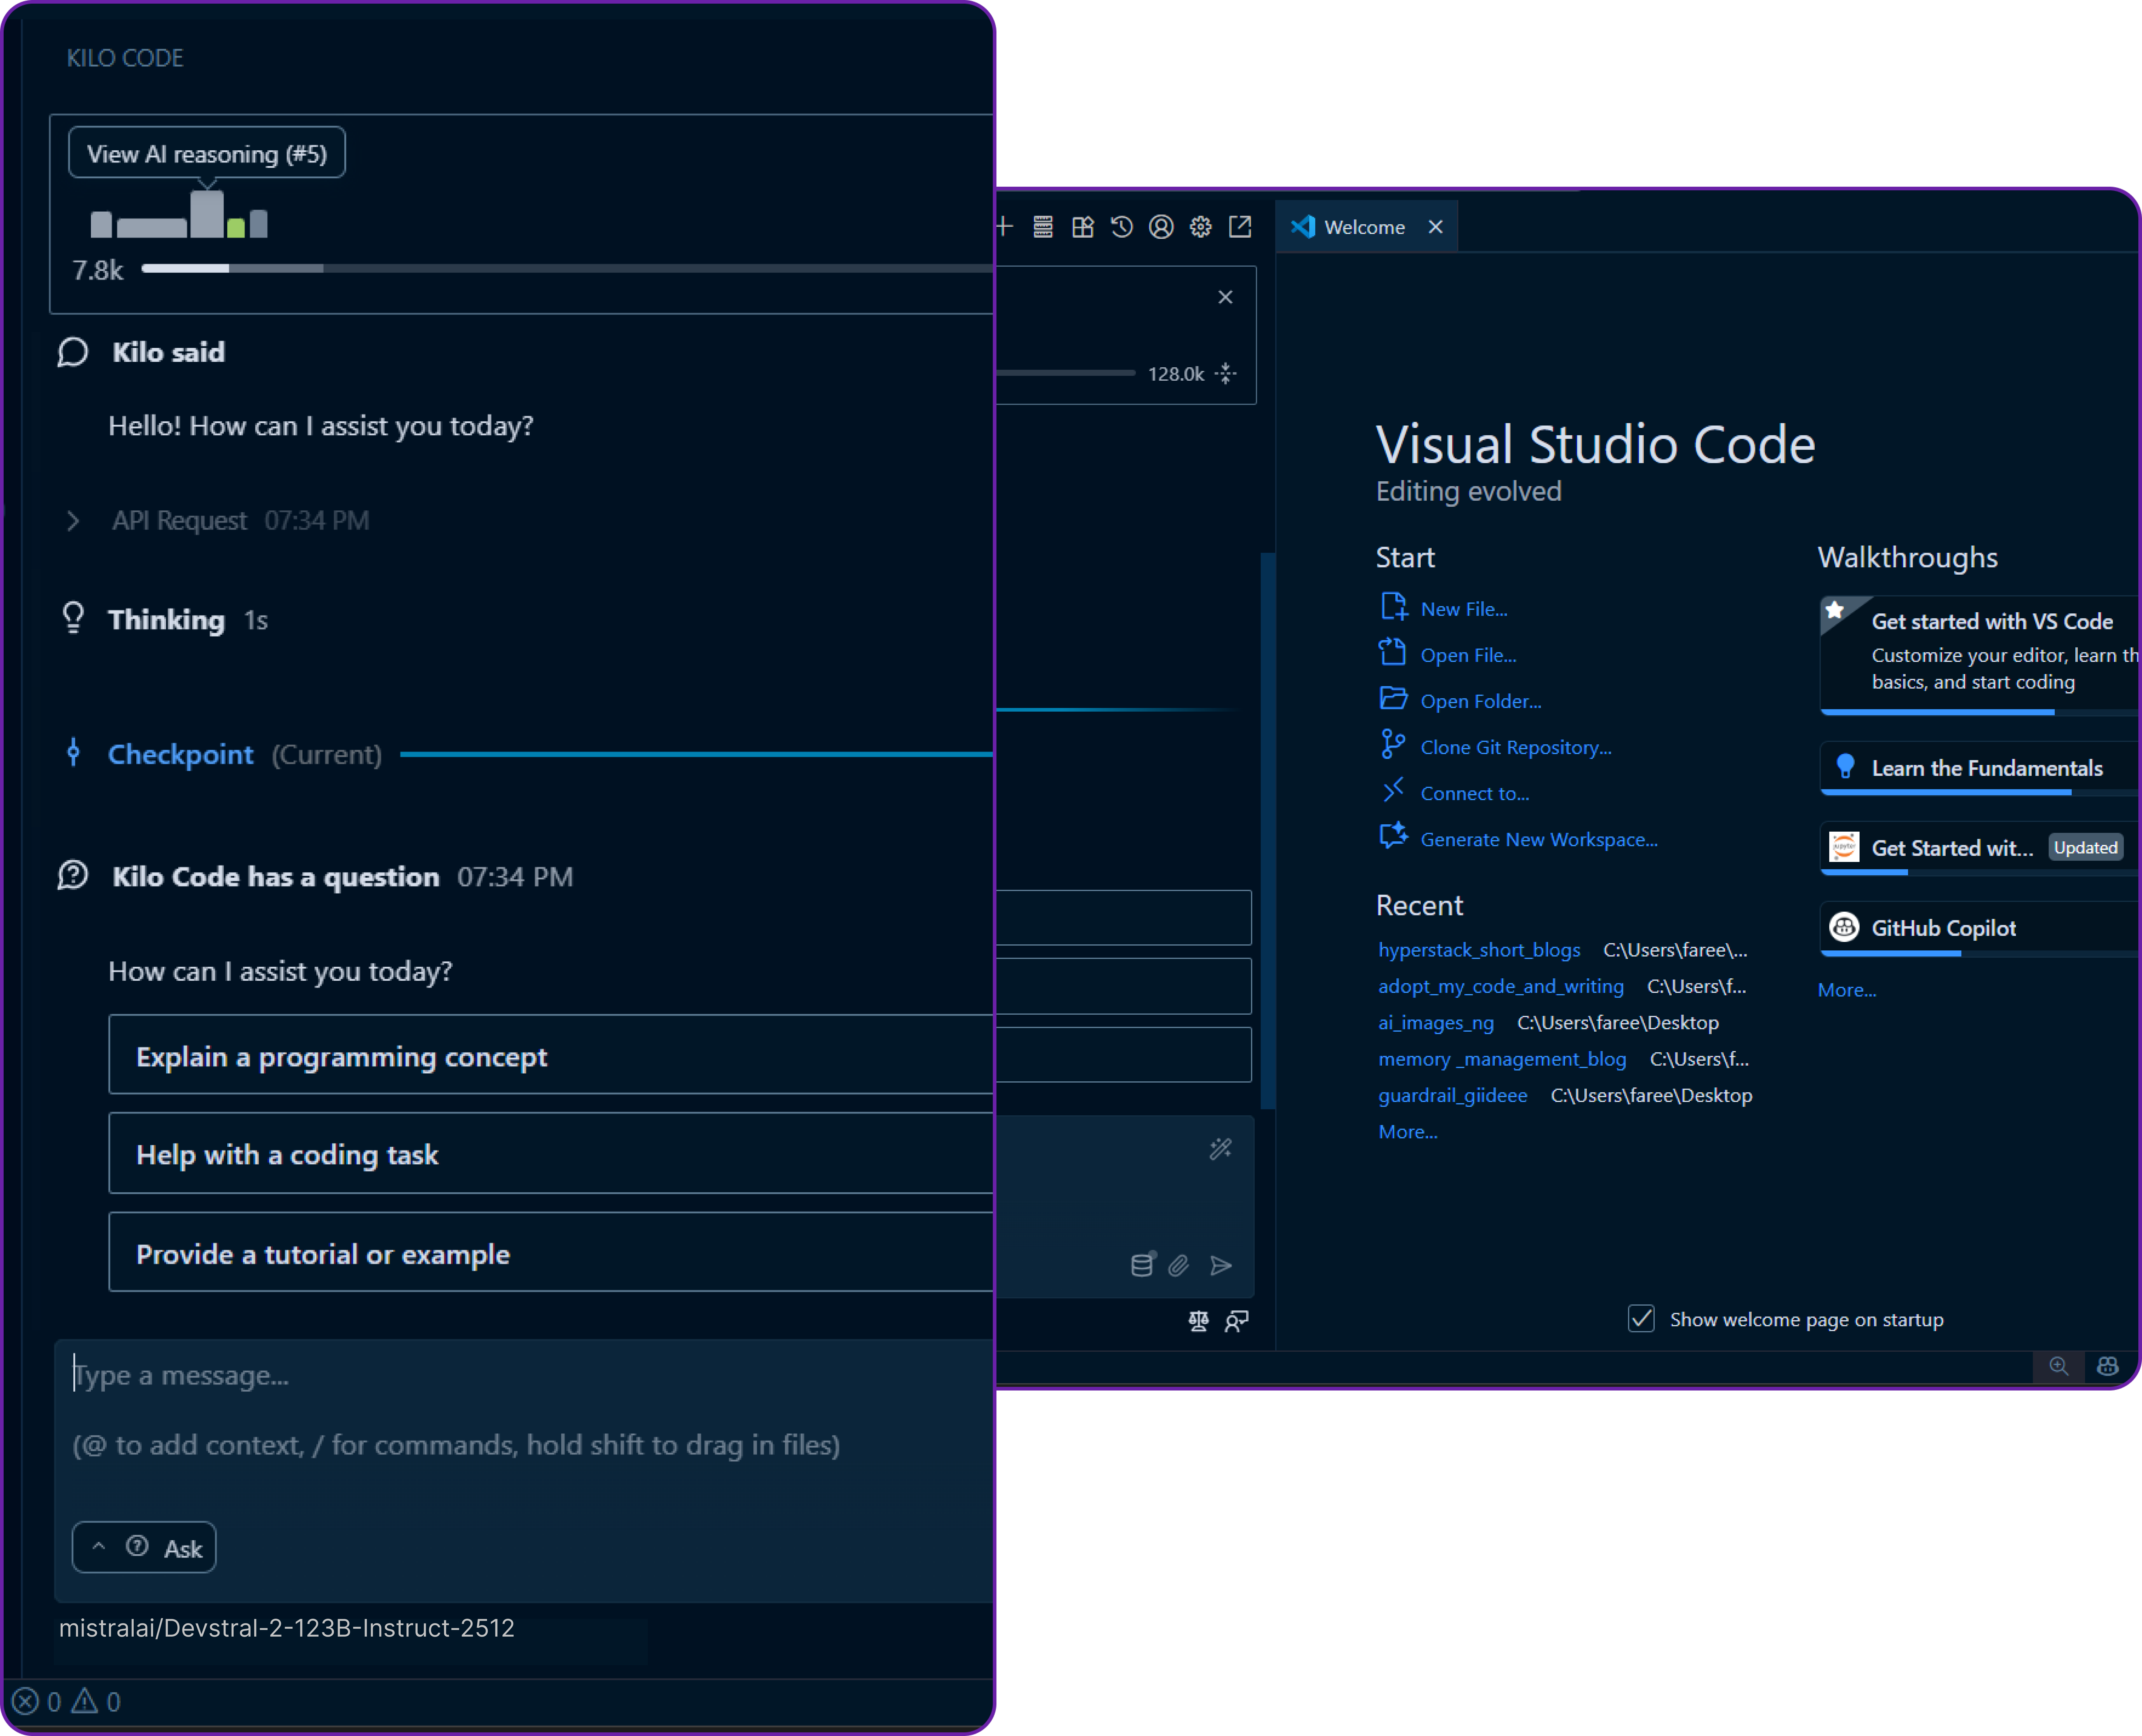
We get a response of ...
“Hello! How can I assist you today?”
then our integration is working perfectly! That means Kilo Code is successfully talking to our Hyperstack-hosted model.
You can also see that since it's a code editor tool it has print out several other important things like the next expected query, checkpoint to avoid data loss, and the latency of the request.
There is a serious potential here, we can now use Kilo Code’s powerful agentic workflow powered by our own custom model in Hyperstack!
Step 6: Test Agent Mode (Code Generation)
Now that we know our setup works, let’s try something more practical. Similar to how we would use Kilo Code in a real development scenario.
Open the Code or Agent panel in Kilo Code and this time, let’s ask it to create a simple Python file that prints "Hello, World!".
create a python file "hello_world.py"
that contains a simple function that prints "Hello, World!"
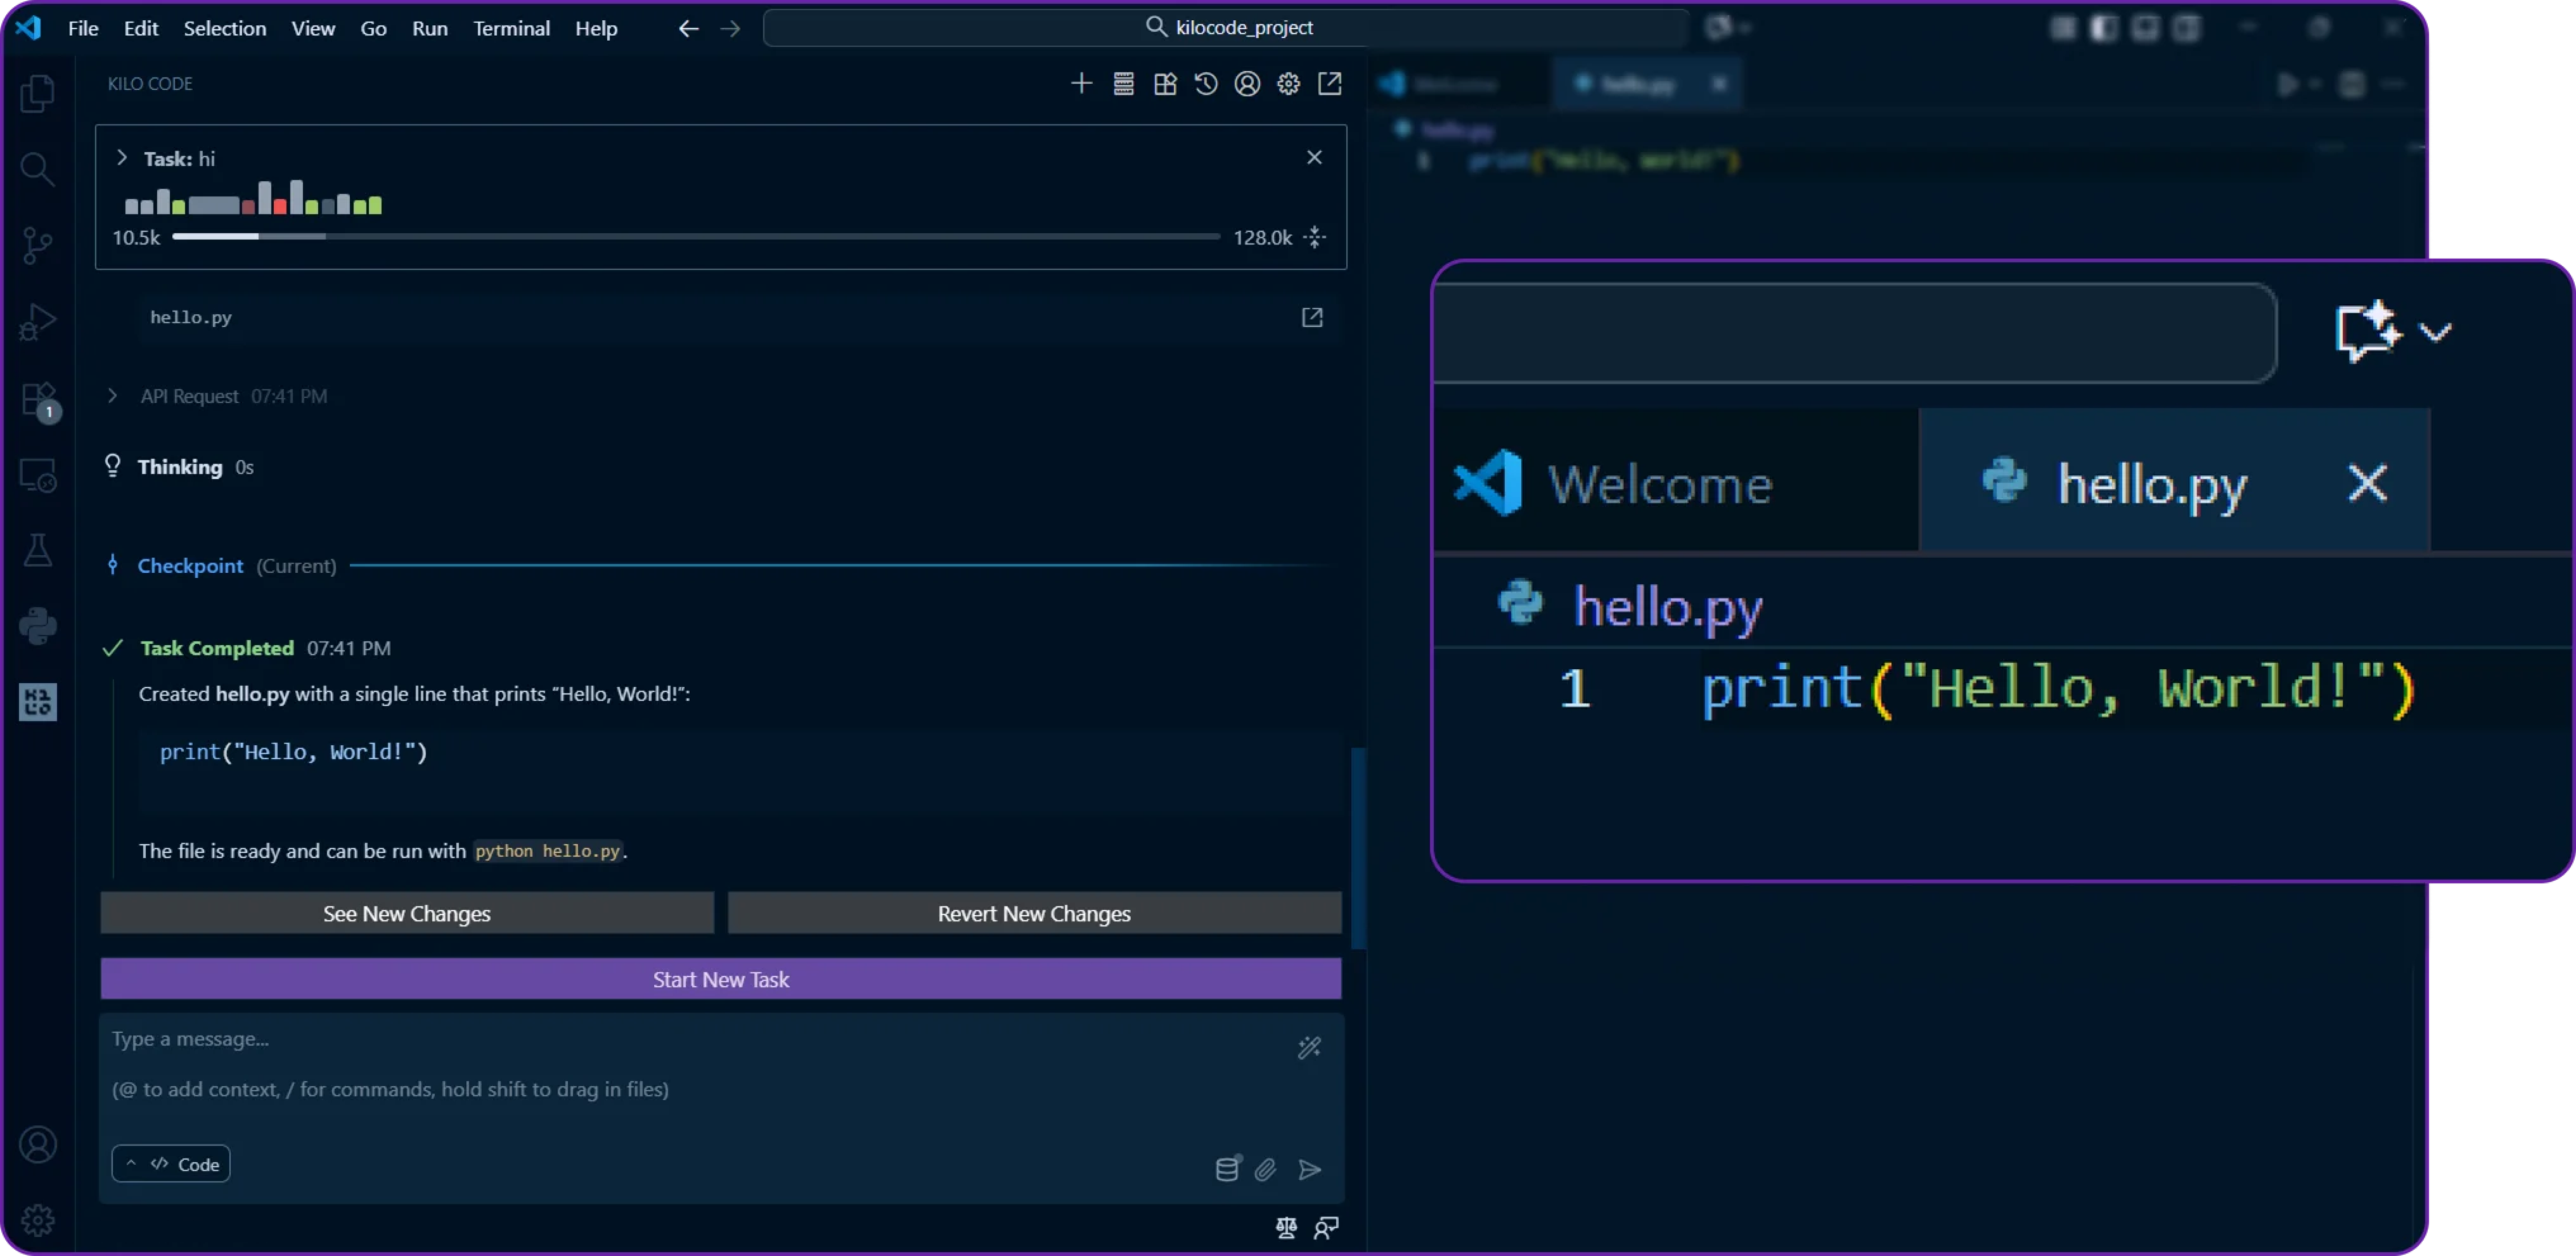
Within a few seconds, Kilo Code will generate the Python file and insert it into your workspace.
We can open hello_world.py and verify that it contains our function.
Perfect our Hyperstack-powered model is now generating code inside VS Code using Kilo Code!
We can also monitor the changes our AI Agent makes to the file by clicking on the Changes tab in Kilo Code.

This tells us exactly what modifications were made, which is great for transparency and review and audit purposes.
Integrating Self-Hosted Devstral 2 with Mistral Vibe
Mistral vibe is another powerful tool that allows you to interact with LLMs from the command line. It provides an agentic interface where you can give complex instructions, and the model can create files, run terminal commands, and edit code directly.
Let's set it up to use our self-hosted Devstral 2 model.
Step 1: Install Mistral Vibe on Your Local Machine
The official documentation recommends using the curl installer, which handles setting up dependencies like uv.
# This command downloads and runs the official installation script
curl -LsSf https://mistral.ai/vibe/install.sh | bash
This command will start the installation process.
After installation, you may need to restart your terminal or run source ~/.bashrc (on Linux) to ensure the vibe command is available in your PATH.
Step 2: Create a Project-Specific Configuration
It's best practice to configure Vibe on a per-project basis. In your local project directory, create a .vibe folder and a config.toml file inside it.
# Navigate to your local project directory
cd /path/to/your/project

# Create the configuration directory and file
mkdir .vibe
nano .vibe/config.toml
This file will hold the settings to connect Vibe to your self-hosted Devstral model.
Step 3: Configure the Self-Hosted Model (Piece by Piece)
Open .vibe/config.toml and add the following sections. This tells Vibe about your Hyperstack server and sets it as the default for this project.
First, set your self-hosted model as the default for this project.
# This line overrides the default model and tells Vibe to use our
# self-hosted instance whenever it's run from this directory.
active_model = "devstral-self-hosted"
This tells Vibe to use the model we will define later in this configuration file.
Next, define the Hyperstack vLLM server as a new "provider".
# This block defines the connection details for our vLLM server.
[[providers]]
name = "hyperstack-vllm"
api_base = "http://<YOUR_VM_PUBLIC_IP>:8000/v1" # Your VM's IP address
api_key_env_var = "VLLM_API_KEY" # The environment variable Vibe will look for
backend = "generic" # Use the standard OpenAI-compatible adapter
The backend = "generic" setting is important as it tells Vibe to communicate using the standard OpenAI API format, which vLLM provides.
Finally, define the Devstral model and link it to the provider we just created.
# This block defines the model and links it to our provider via its name.
[[models]]
name = "mistralai/Devstral-2-123B-Instruct-2512" # Must match vLLM model name exactly
provider = "hyperstack-vllm" # Links this model to the provider above
alias = "devstral-self-hosted" # The friendly name we use to refer to this setup
input_price = 0.0 # Not applicable for self-hosting
output_price = 0.0 # Not applicable for self-hosting
The alias is the friendly name we set as our active_model. The provider field links this model definition back to the [[providers]] block.
Step 4: Launch Vibe
Once everything is configured, you can start Vibe from your project directory.
# Set the placeholder API key for the current terminal session
export VLLM_API_KEY="EMPTY"

# Launch Vibe. No extra flags are needed thanks to our config!
vibe
The Vibe interface will start, and the initialization logs should indicate you to configure the UI settings.
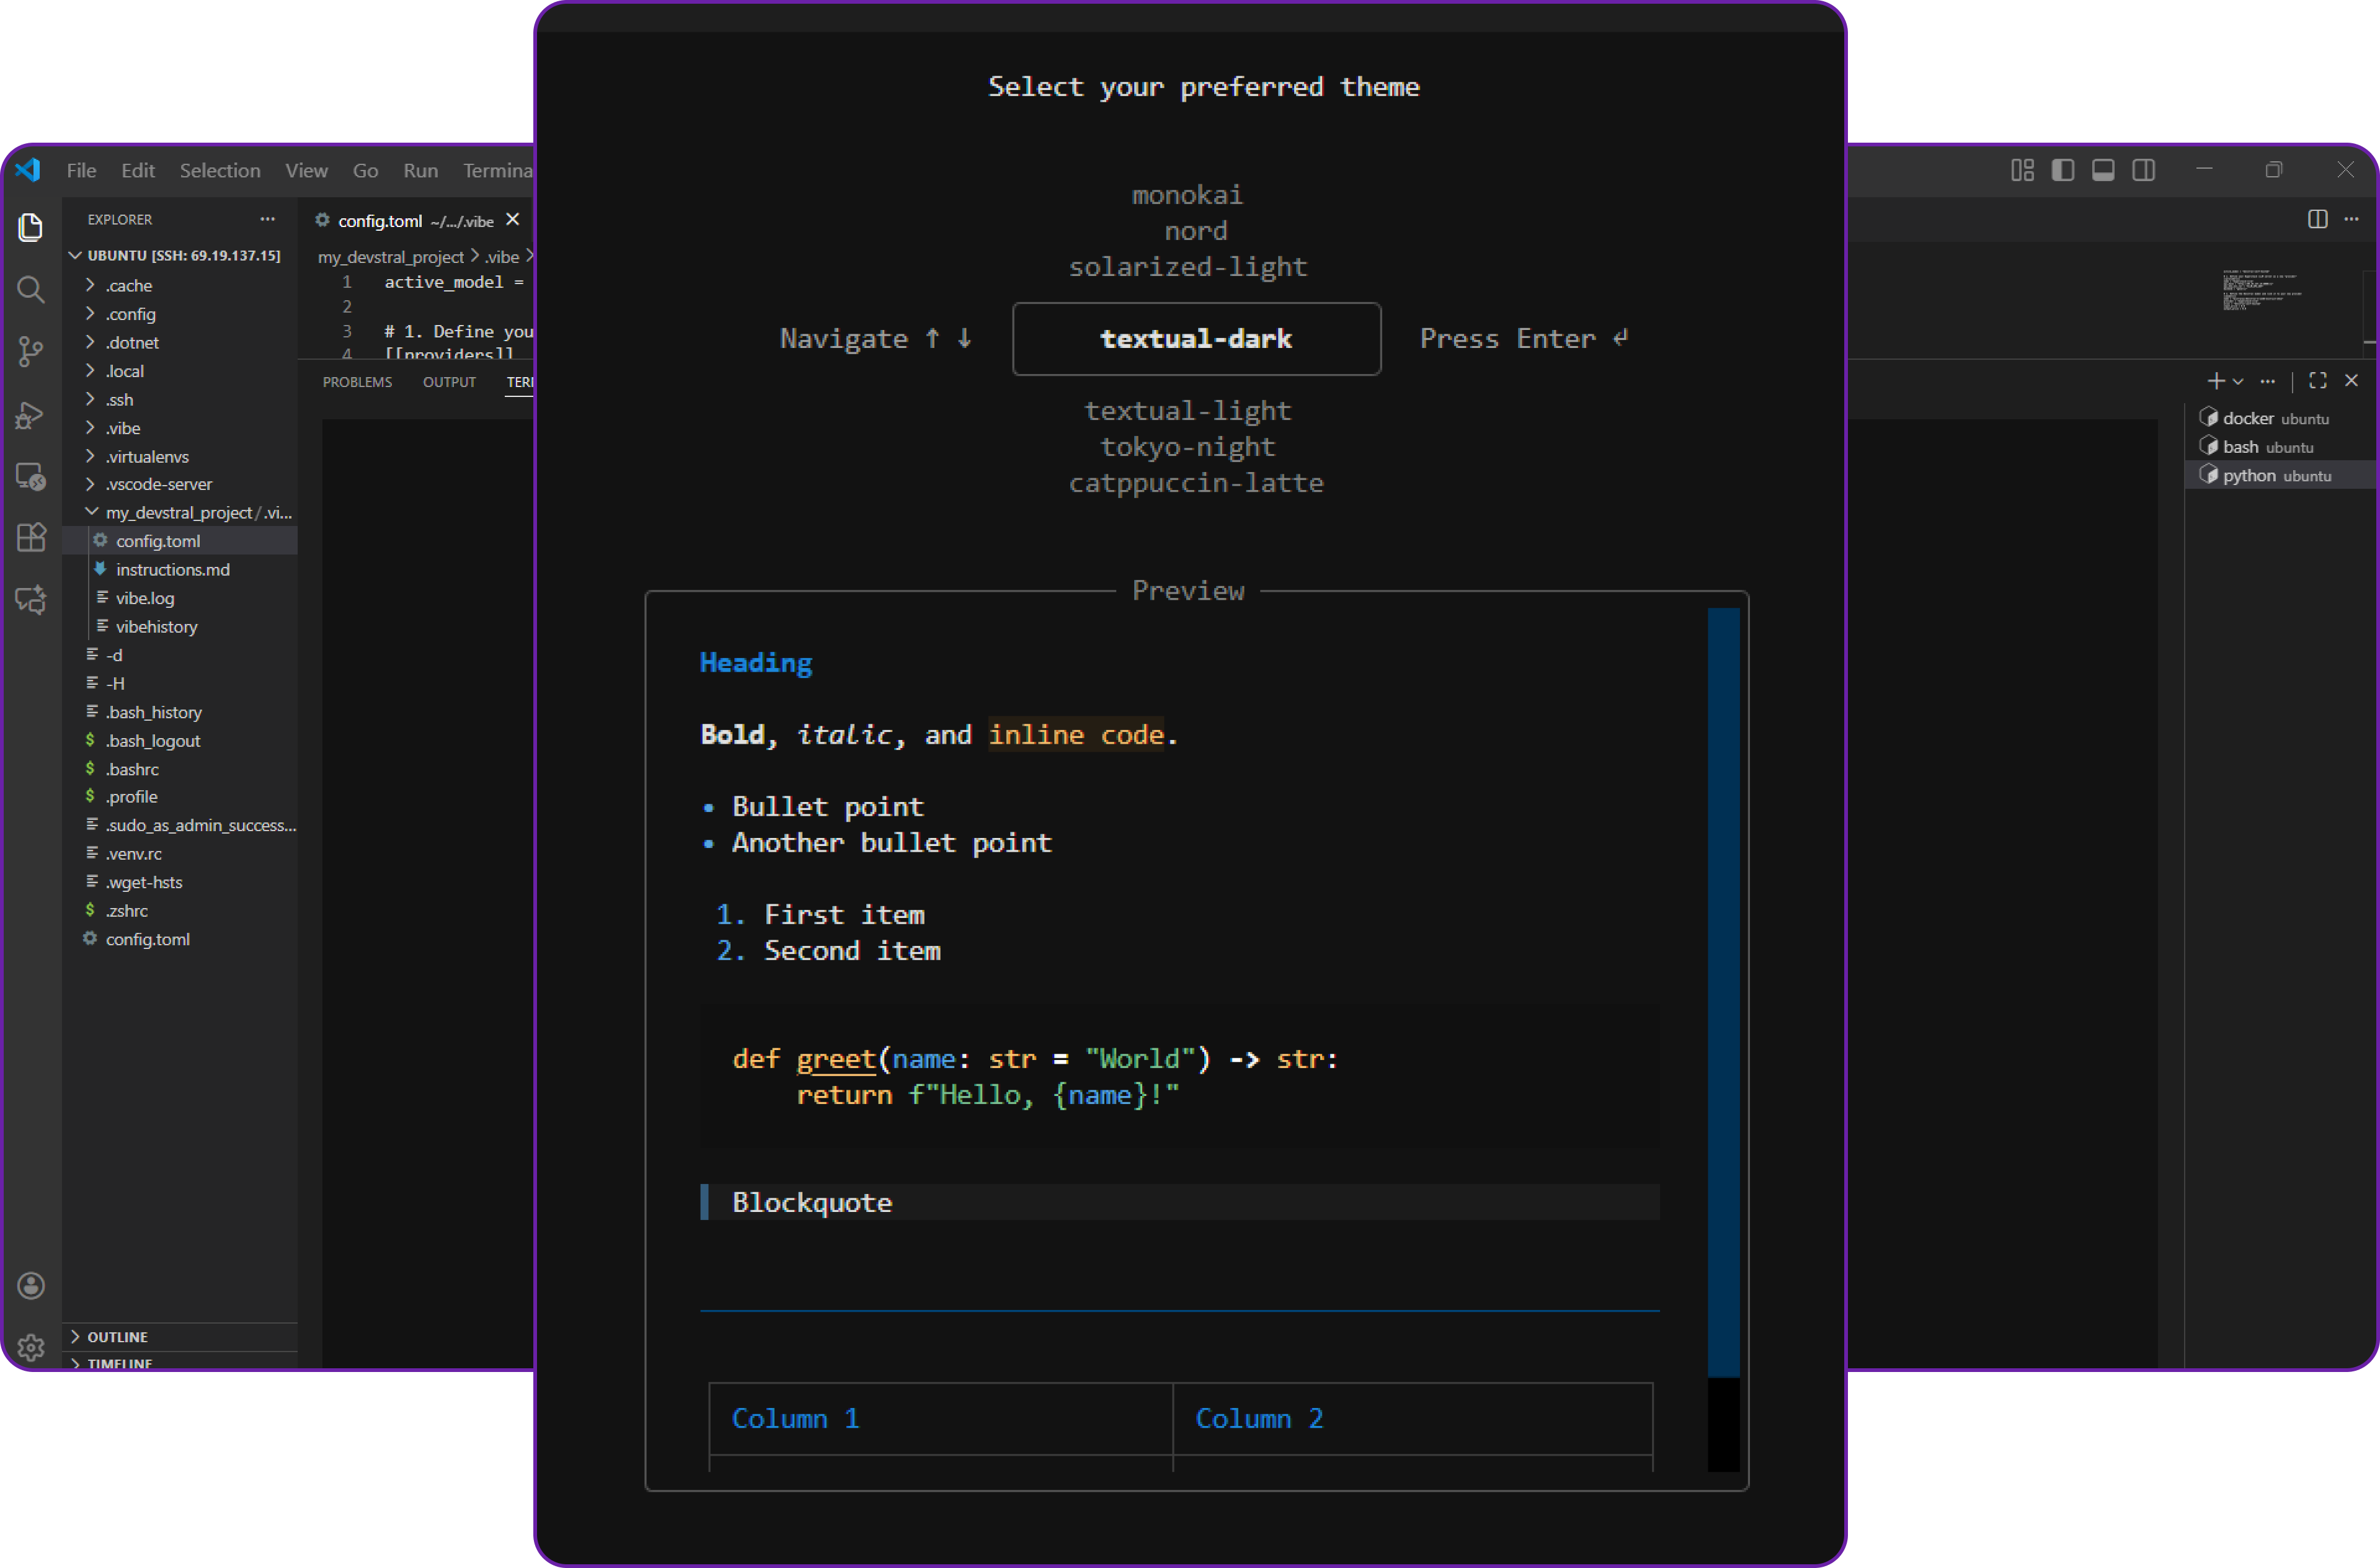
Once you done that you can start using Vibe as your AI coding assistant, powered by your self-hosted Devstral 2 model!
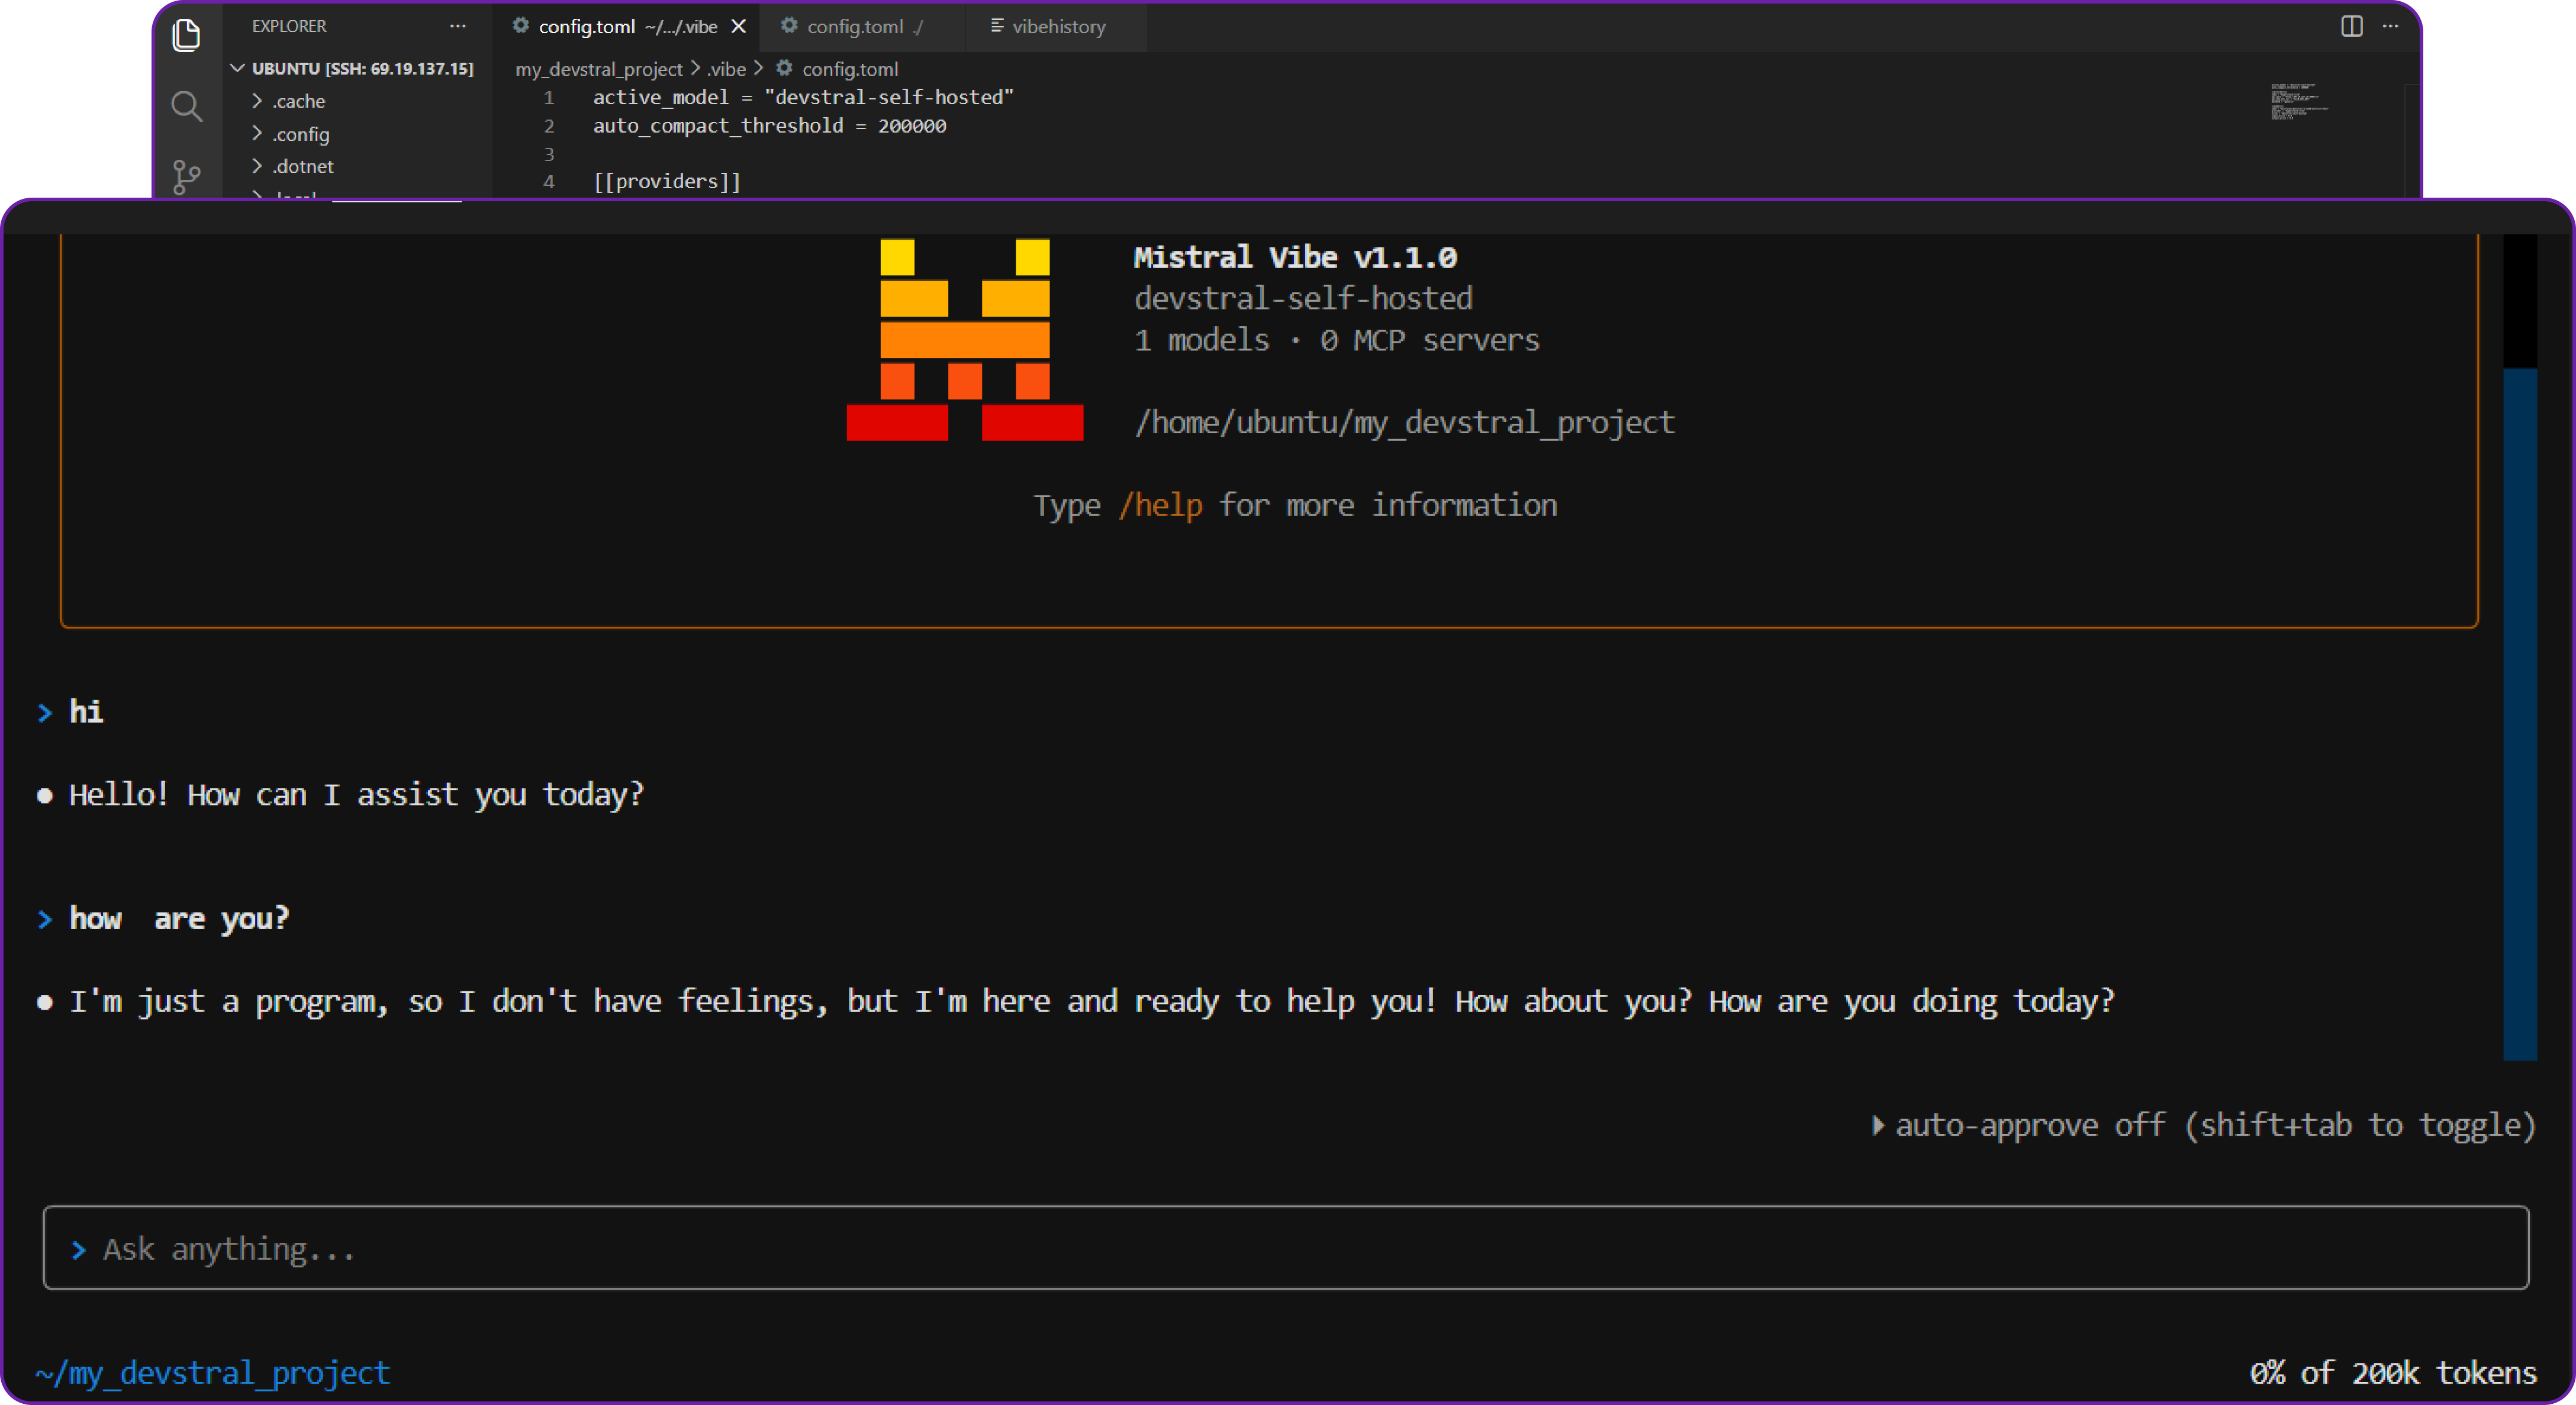
We can do agentic tasks like creating new files, running terminal commands, and editing code directly from the terminal interface. There is a lot to explore, go check out the official documentation.
Why Deploy Devstral 2 on Hyperstack?
Hyperstack is a cloud platform designed to accelerate AI and machine learning workloads. Here's why it's an excellent choice for deploying Devstral 2:
- Availability: Hyperstack provides access to the latest and most powerful GPUs such as the NVIDIA H100 on-demand, specifically designed to handle large language models.
- Ease of Deployment: With pre-configured environments and one-click deployments, setting up complex AI models becomes significantly simpler on our platform.
- Scalability: You can easily scale your resources up or down based on your computational needs.
- Cost-Effectiveness: You pay only for the resources you use with our cost-effective cloud GPU pricing.
- Integration Capabilities: Hyperstack provides easy integration with popular AI frameworks and tools.
FAQs
What is Devstral 2?
Devstral 2 is an advanced agentic large language model (LLM) by Mistral AI, purpose-built for software engineering tasks. It can explore large codebases, perform multi-file edits, integrate with tools and power autonomous coding agents.
What are the key features of Devstral 2?
Devstral 2 offers agentic coding capabilities, deep tool integration, a large 256k context window, improved generalisation across coding environments and strong performance on SWE-Bench and other engineering benchmarks.
What is the context window of Devstral 2?
Devstral 2 provides a 256k token context window, enabling it to handle entire repositories, long files, extensive diffs and multi-step tool call traces without losing context.
How does Devstral 2 perform on benchmarks?
Devstral 2 delivers 72.2% on SWE-Bench Verified and 61.3% on SWE-Bench Multilingual, placing it among the top-performing engineering-focused models in its class.
What are the main use cases for Devstral 2?
Devstral 2 is suited for AI code assistants, debugging, refactoring, repository exploration, multi-file editing and powering autonomous software engineering agents.
Subscribe to Hyperstack!
Enter your email to get updates to your inbox every week

