
.png)
TABLE OF CONTENTS
NVIDIA H100 SXM GPUs On-Demand
Key Takeaways
-
NemoClaw is NVIDIA's open source security stack that wraps OpenClaw with kernel-level sandboxing, network policy controls, and audit trails using the OpenShell runtime
-
The tutorial deploys NemoClaw on a Hyperstack GPU VM with a local Ollama instance running the Nemotron 3 Nano 30B model for fully private, on-device inference
-
A built-in Telegram bridge connects the sandboxed OpenClaw agent to a Telegram bot, enabling you to chat with your AI agent from your phone
-
All outbound network traffic is blocked by default and must be approved by the operator through the OpenShell TUI, preventing unauthorized data exfiltration or prompt injection exploits
-
Hyperstack's ephemeral storage and GPU availability make it ideal for hosting NemoClaw, as the 18 GB model weights are stored separately from the root disk
What is NemoClaw?
NemoClaw is NVIDIA's open source security stack for OpenClaw, the viral open-source personal AI agent platform with over 300K GitHub stars. Announced at GTC on March 16, 2026, NemoClaw wraps OpenClaw with the NVIDIA OpenShell runtime to provide kernel-level sandboxing, network policy controls, and audit trails for AI agents.
In simple terms, OpenClaw is a self-hosted AI agent that can actually do things on your machine, send emails, manage files, run shell commands, and interact with messaging platforms like Telegram and WhatsApp. The problem is that giving an AI agent this much power introduces serious security risks. NemoClaw solves this by running OpenClaw inside an isolated sandbox where every network request, file access, and inference call is governed by policy.
In this tutorial, we will deploy NemoClaw on a Hyperstack GPU VM using a local Ollama instance running NVIDIA's Nemotron model, then connect it to a Telegram bot so you can chat with your AI agent from your phone.

NemoClaw Features
NemoClaw provides several key capabilities that make running AI agents safer and more practical:
- Kernel-Level Sandboxing: NemoClaw uses Landlock, seccomp, and network namespaces to isolate the OpenClaw agent. The agent cannot access host files or network resources outside the sandbox without explicit approval.
- Network Policy Controls: All outbound network traffic is blocked by default. When the agent tries to reach an external host, OpenShell surfaces the request in a monitoring TUI where you can approve or deny it. Approved domains are permanently whitelisted.
- Local Inference with Open Models: NemoClaw supports running inference entirely on your own hardware using Ollama and open models like NVIDIA Nemotron. This means your data never leaves your machine.
- Telegram Integration: A built-in Telegram bridge forwards messages between your Telegram bot and the OpenClaw agent inside the sandbox. You can chat with your agent from anywhere.
- Single-Command Installation: The entire stack, OpenShell gateway, sandbox, inference provider, and network policy, installs with a single
curlcommand.
How to Deploy NemoClaw on Hyperstack
Now, let's walk through the step-by-step process of deploying the necessary infrastructure.
If you’re specifically interested in deploying the base OpenClaw stack, check out our secure OpenClaw deployment guide here: How to Securely Deploy OpenClaw AI Agents on Hyperstack
Step 1: Accessing Hyperstack
First, you will need an account on Hyperstack.
- Go to the Hyperstack website and log in.
- If you are new, create an account and set up your billing information. Our documentation can guide you through the initial setup.
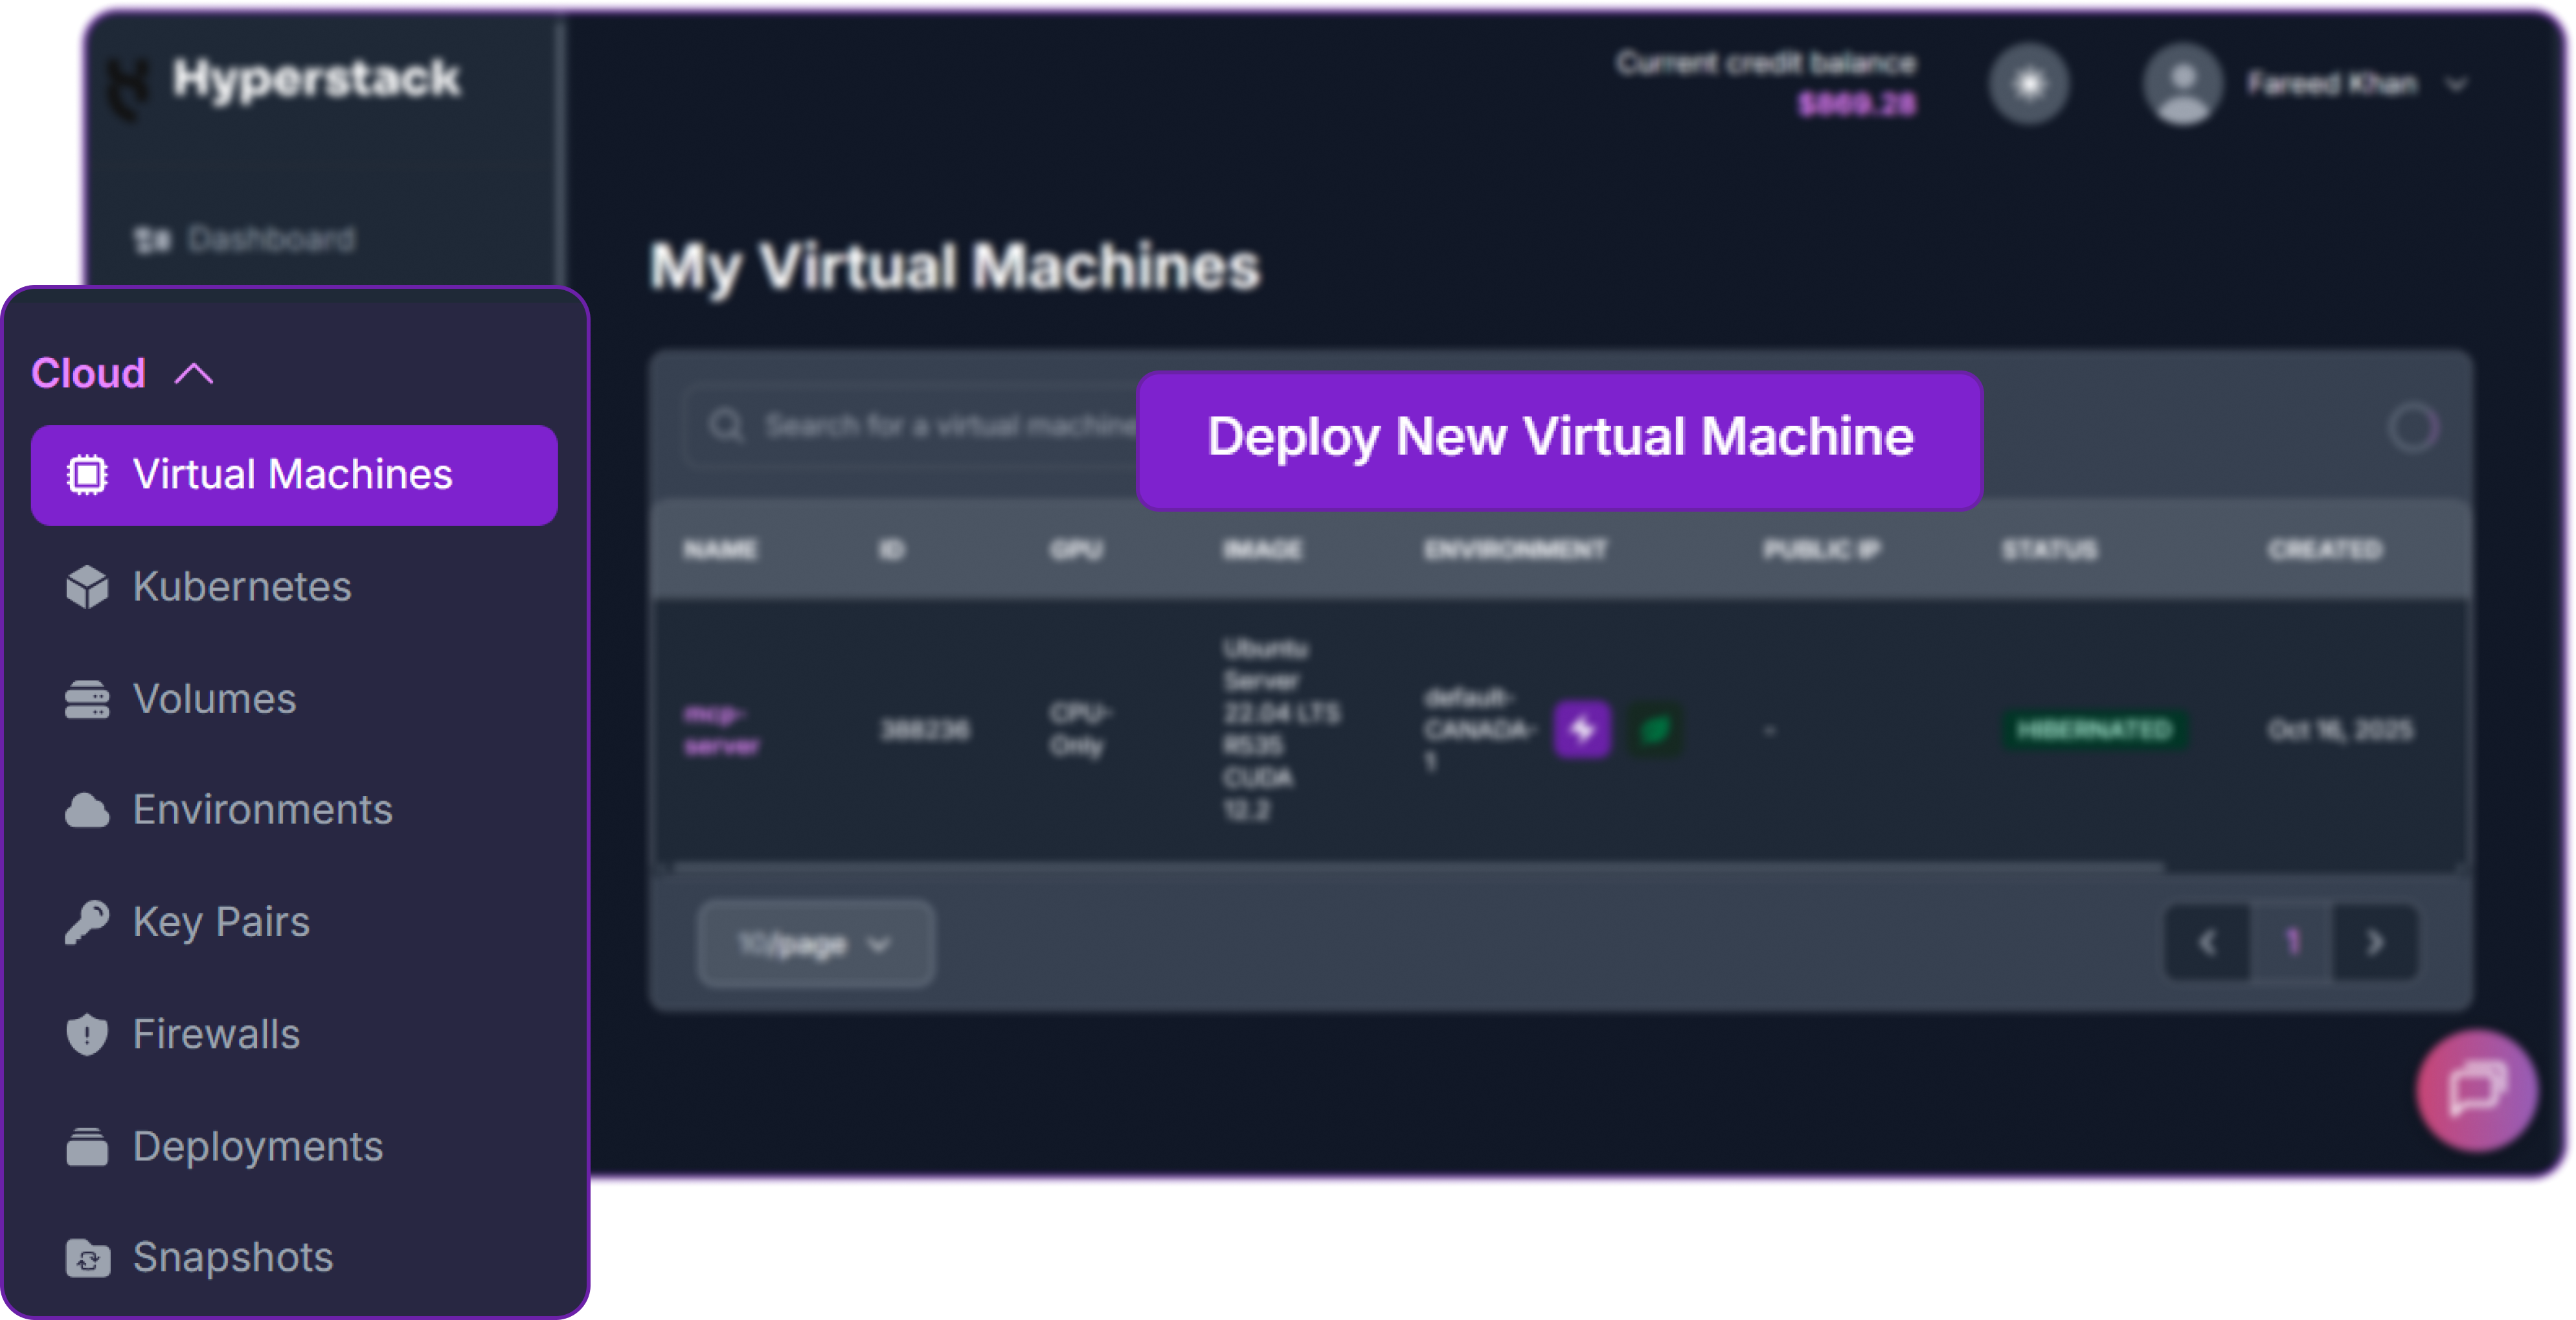
Step 2: Deploying a New Virtual Machine
From the Hyperstack dashboard, we will launch a new GPU-powered VM.
- Initiate Deployment: Look for the "Deploy New Virtual Machine" button on the dashboard and click it.
- Select Hardware Configuration: Choose a GPU with at least 24 GB of VRAM. The "L40" or "RTX-A6000" flavors work well for running the Nemotron 30B model locally.

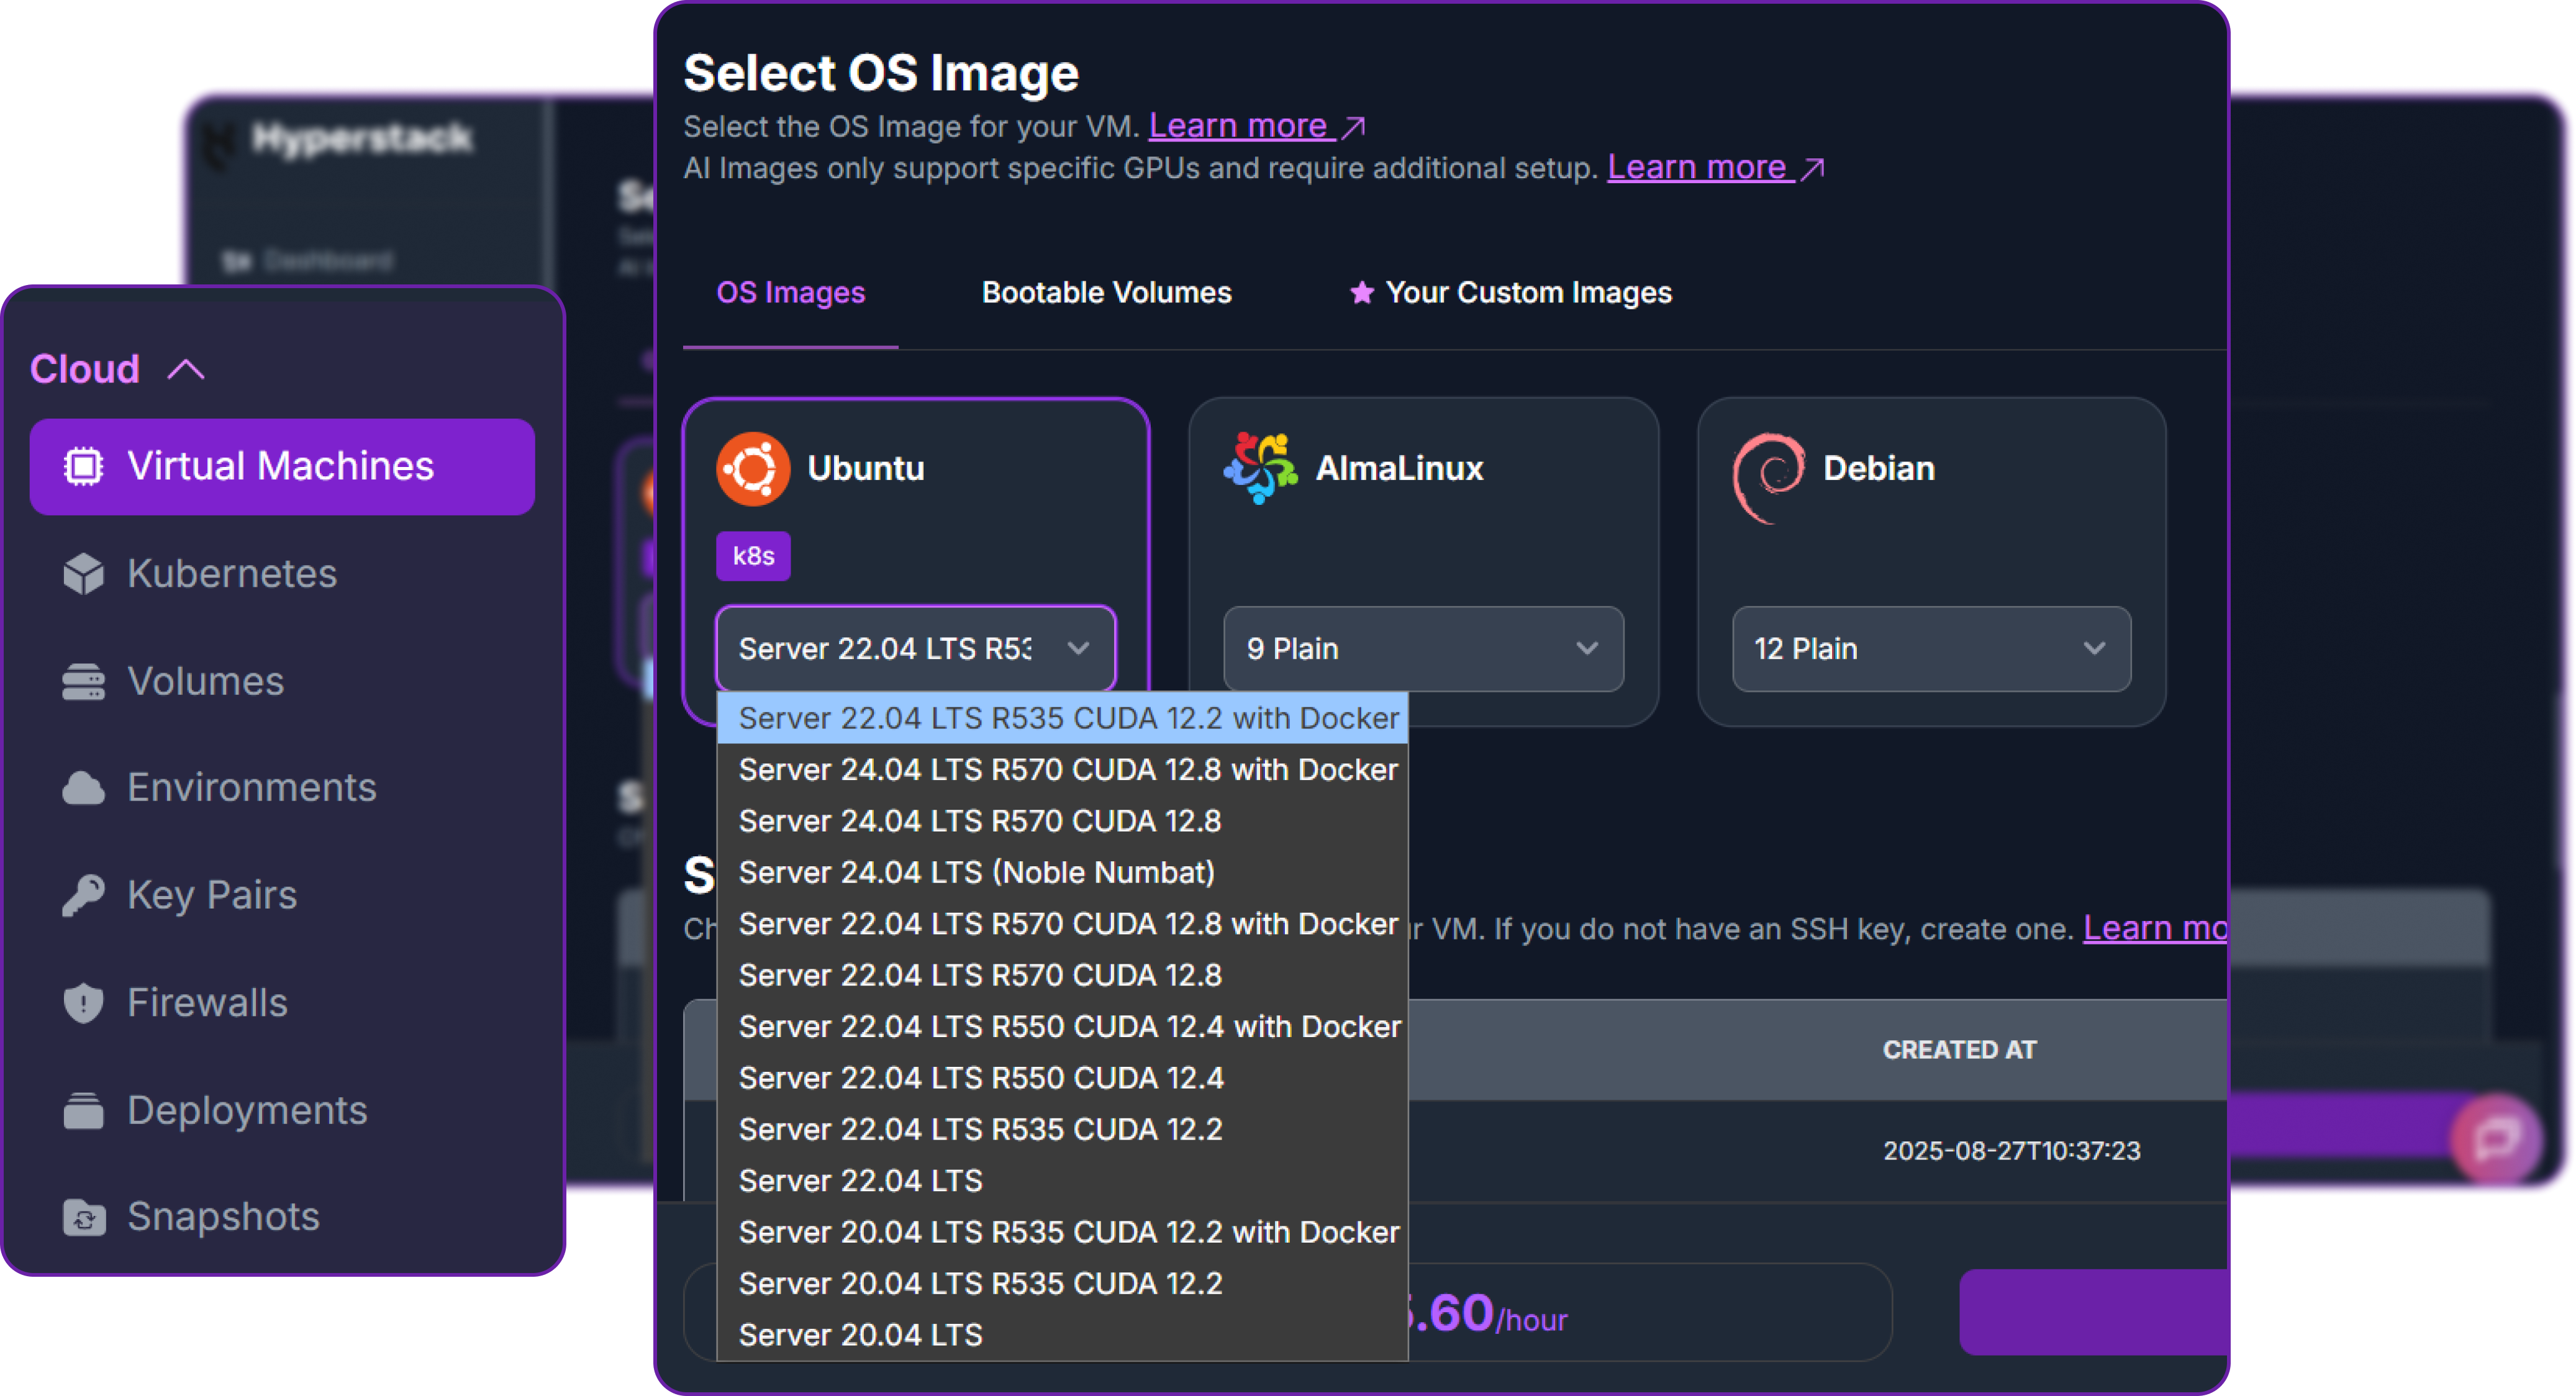
- Choose the Operating System: Select the "Ubuntu Server 22.04 LTS R535 CUDA 12.2 with Docker" image. This provides a ready-to-use environment with all necessary drivers.
- Select a Keypair: Choose an existing SSH keypair from your account to securely access the VM.
- Network Configuration: Ensure you assign a Public IP to your Virtual Machine. This is crucial for remote management and connecting your local development tools.
- Review and Deploy: Double-check your settings and click the "Deploy" button.
Step 3: Accessing Your VM
Once your VM is running, you can connect to it.
-
Locate SSH Details: In the Hyperstack dashboard, find your VM's details and copy its Public IP address.
-
Connect via SSH: Open a terminal on your local machine and use the following command, replacing the placeholders with your information.
# Connect to your VM using your private key and the VM's public IP
ssh -i [path_to_your_ssh_key] ubuntu@[your_vm_public_ip]
Here you will replace [path_to_your_ssh_key] with the path to your private SSH key file and [your_vm_public_ip] with the actual IP address of your VM.
Once connected, you should see a welcome message indicating you're logged into your Hyperstack VM. You can verify that the GPU and ephemeral disk are available:
# Check the GPU is detected
nvidia-smi

# Verify Docker is running
docker info > /dev/null 2>&1 && echo "Docker OK" || echo "Docker NOT running"

# Check the ephemeral disk is mounted
df -h /ephemeral
You should see your GPU listed, Docker running, and /ephemeral mounted with your allocated disk space. Here is our output:
Filesystem      Size  Used Avail Use% Mounted on
/dev/vdb        713G   0G  654G   1% /ephemeral
This confirms we have a 713 GB ephemeral disk with plenty of space for model weights.
Step 4: Install Ollama and Store Models on the Ephemeral Disk
Ollama is the tool we use to run the LLM locally on the GPU. We need to install it and configure it to store models on the ephemeral disk instead of the root disk.
So, first, we install Ollama with the official installation script:
# Install Ollama
curl -fsSL https://ollama.com/install.sh | sh
This will install the Ollama binary and set up the service. You can verify the installation with:
# Verify Ollama is installed
ollama --version

### OUTPUT
ollama version is 0.18.2
So we have Ollama installed, but we need to configure it before we can use it. We need to stop the service and configure it to use our ephemeral disk for model storage and listen on all network interfaces (required for the sandbox to reach it).
Let's stop the Ollama service first, so we can make our configuration changes:
# Stop the Ollama service so we can configure it
sudo systemctl stop ollama
We need to create a directory on the ephemeral disk for Ollama to store its models, give Ollama ownership of that directory, and then create a systemd override to point Ollama at that directory and make it listen on all interfaces.
# Create a directory on the ephemeral disk for storing models
sudo mkdir -p /ephemeral/ollama
In order to allow the Ollama service to read and write model files to this new directory, we need to run the following command:
# Give the Ollama service user ownership of this directory
sudo chown -R ollama:ollama /ephemeral/ollama
After that, we create a systemd override to set the OLLAMA_MODELS environment variable to point to our new directory and OLLAMA_HOST to listen on all interfaces:
# Create a systemd override to point Ollama at the ephemeral disk
# and make it listen on all interfaces (0.0.0.0)
sudo mkdir -p /etc/systemd/system/ollama.service.d
cat << 'EOF' | sudo tee /etc/systemd/system/ollama.service.d/override.conf
[Service]
Environment="OLLAMA_MODELS=/ephemeral/ollama"
Environment="OLLAMA_HOST=0.0.0.0:11434"
EOF
Since we changed the systemd configuration, we need to reload the daemon and start Ollama again for the changes to take effect:
# Reload systemd and start Ollama with the new configuration
sudo systemctl daemon-reload
sudo systemctl start ollama
Here is what each configuration does:
OLLAMA_MODELS=/ephemeral/ollamatells Ollama to store all downloaded model weights on the ephemeral disk instead of the default location on the root disk. This is crucial because the Nemotron 30B model is approximately 18 GB and would consume a large portion of the 100 GB root disk.OLLAMA_HOST=0.0.0.0:11434makes Ollama listen on all network interfaces. This is required because the NemoClaw sandbox runs inside a Docker container and needs to reach Ollama on the host.
Step 5: Download the Nemotron Model
Once Ollama is running with the new configuration, we can pull the Nemotron 3 Nano model. This model is a smaller variant of the Nemotron family, optimised for local inference on GPUs with 24-48 GB of VRAM.
# Pull the Nemotron 3 Nano model (recommended for 24-48 GB VRAM GPUs)
ollama pull nemotron-3-nano:30b
This takes a few minutes depending on your network speed. Once complete, verify everything works:
# Quick test — this should return a response from the model
curl -s http://localhost:11434/api/generate \
  -d '{"model":"nemotron-3-nano:30b","prompt":"Say hello","stream":false}' | head -c 200
Here is our output from the quick test and disk check:
{
    "model": "nemotron-3-nano:30b",
    "created_at": "2026-03-26T07:05:38.958621105Z",
    "response": "Hello! How can I assist you today? ..."
}
You can also check the ephemeral disk usage with df -h to confirm that the model weights are stored there and we have plenty of free space remaining:
# Confirm the disk usage
df -h /ephemeral
This is what we are getting:
Filesystem      Size  Used Avail Use% Mounted on
/dev/vdb        713G   23G  654G   4% /ephemeral
The model responded correctly and we can see that 23 GB is used on the ephemeral disk (the model weights plus some overhead). Ollama is ready.
Step 6: Install NemoClaw
With Ollama running and the model downloaded, we can install NemoClaw. The installer takes three environment variables to skip the interactive wizard:
# Run the non-interactive NemoClaw installer
# This installs NemoClaw, creates the sandbox, and configures inference
curl -fsSL https://www.nvidia.com/nemoclaw.sh | \
  NEMOCLAW_NON_INTERACTIVE=1 \
  NEMOCLAW_PROVIDER=ollama \
  NEMOCLAW_MODEL=nemotron-3-nano:30b \
  bash
You can see we are setting the following environment variables for the installer:
NEMOCLAW_NON_INTERACTIVE=1skips the interactive wizard and uses the provided values instead.NEMOCLAW_PROVIDER=ollamatells NemoClaw to route inference through the local Ollama instance.NEMOCLAW_MODEL=nemotron-3-nano:30bspecifies which Ollama model to use.
After the installer finishes, reload your shell and verify the CLI tools are available:
# Reload shell to pick up new PATH entries
source ~/.bashrc

# Verify NemoClaw is installed
nemoclaw --help

# Verify OpenShell is installed
openshell --version
If nemoclaw or openshell is not found, they are likely installed at ~/.local/bin/ which is not in your PATH. Fix this by running:
# Add the local bin directory to your PATH
export PATH="$HOME/.local/bin:$PATH"
echo 'export PATH="$HOME/.local/bin:$PATH"' >> ~/.bashrc
source ~/.bashrc
You can now verify the installation again with nemoclaw --help and openshell --version. You should see output confirming tools are installed correctly.
# Verify NemoClaw is installed
openshell --version
It gives us:
openshell 0.0.16Test the Sandbox and Agent
Before setting up Telegram, we need to confirm that the core stack (sandbox + agent + inference) is working.
Connect to the sandbox:
# Connect to the NemoClaw sandbox
nemoclaw my-assistant connect
You should see a prompt like sandbox@my-assistant:~$. This means you are now inside the isolated OpenShell sandbox.
Test the agent with a simple message:
# Send a test message to the agent
openclaw agent --agent main --local -m "hello" --session-id test1
When you pass this prompt in a separate terminal, you need to approve the network request for the agent to reach Ollama. This is expected behaviour and confirms that the network policy controls are working. We will cover how to approve this request in the next step.
openshell termGo to sandbox -> Press R for rules -> Approve all the pending requests.

Once you done that go back to the first terminal and you should see the agent's response to "hello" in the sandbox terminal:
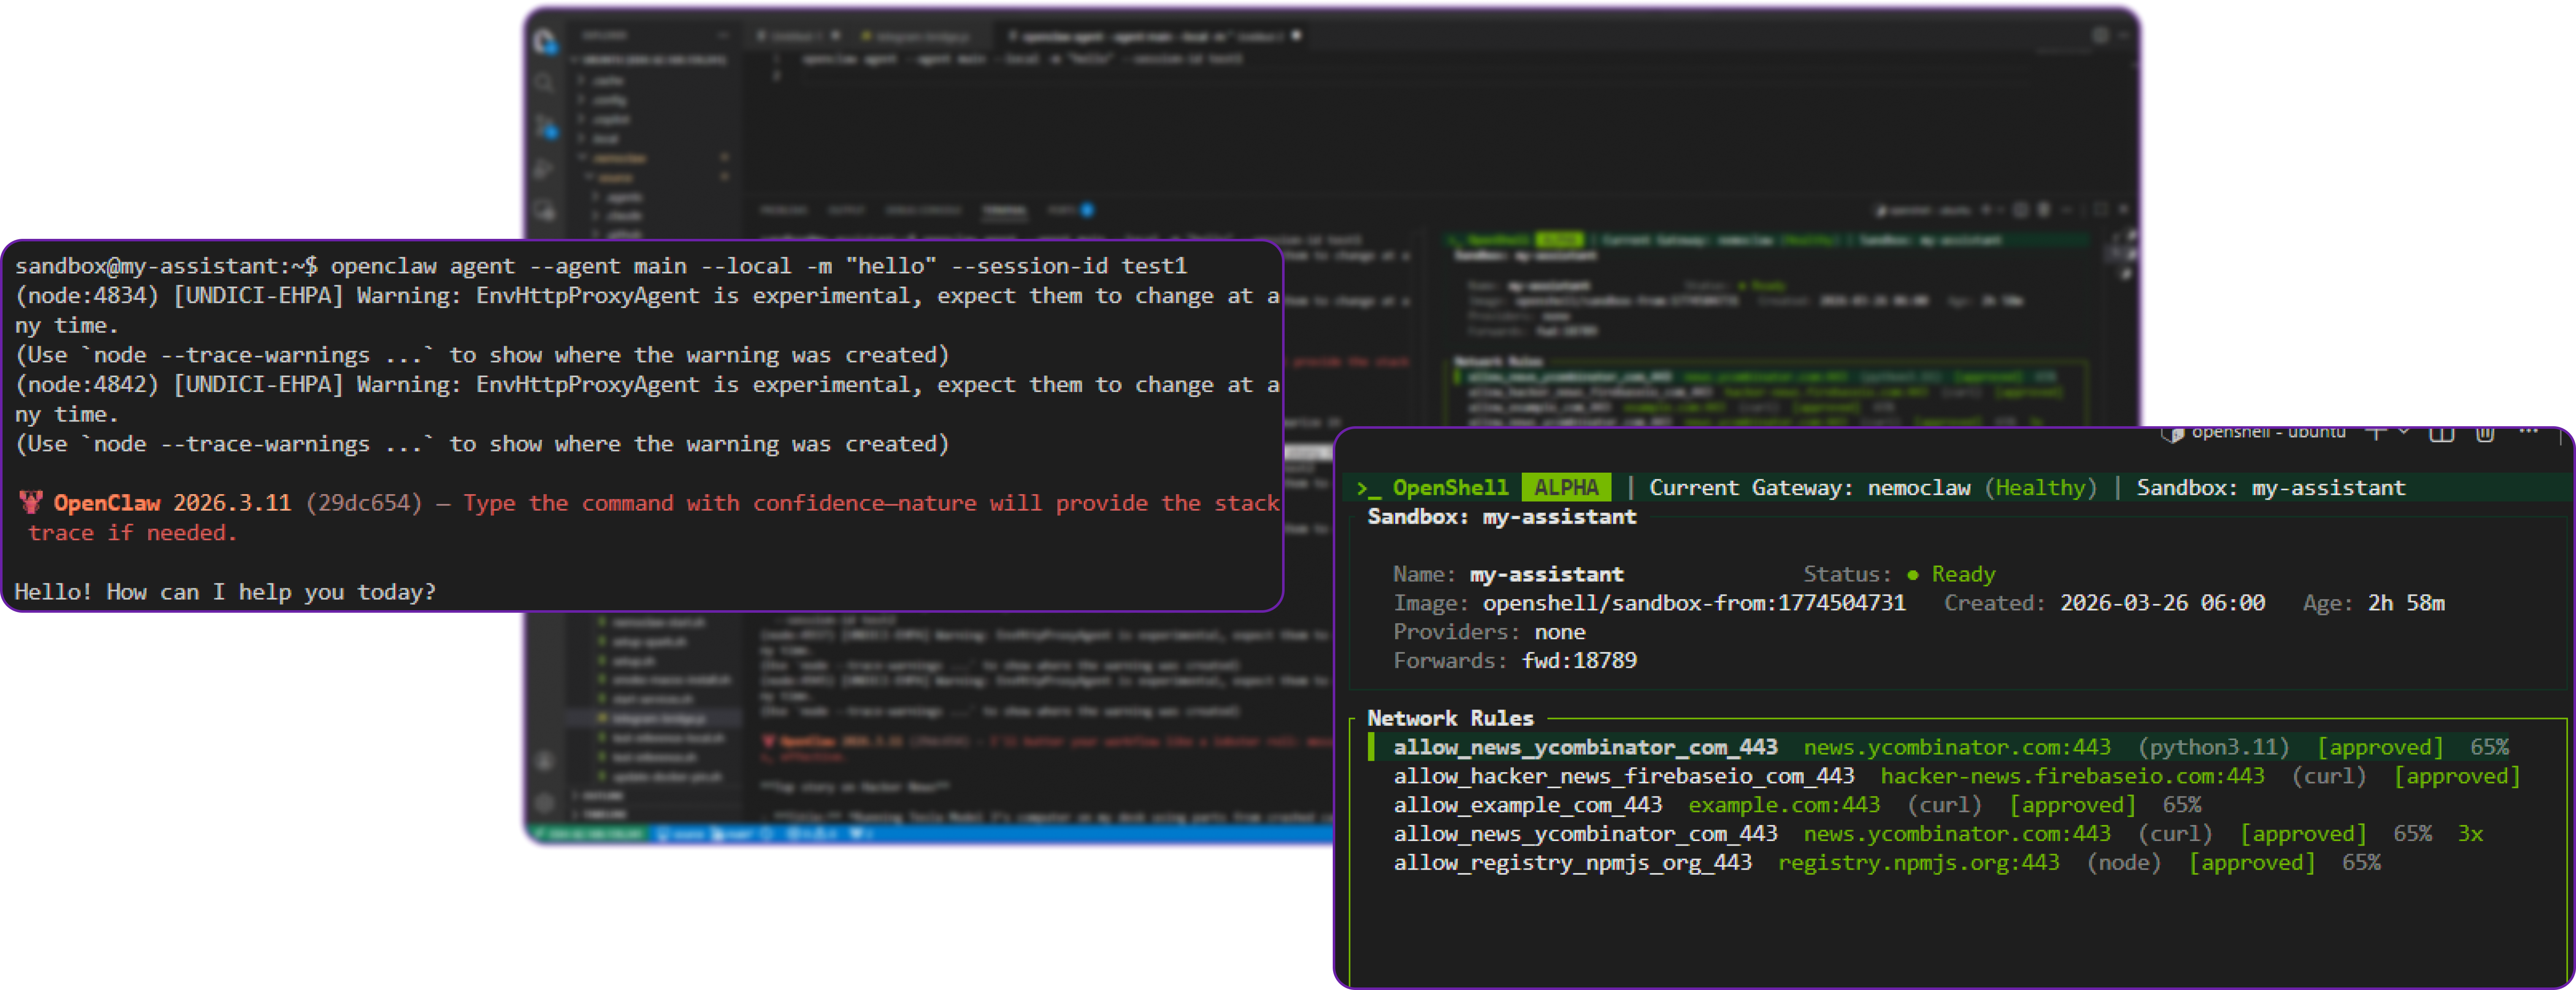
You can see that the agent successfully responded to our message, which confirms that the sandbox is working and can route inference requests to Ollama.
Test the agent with a fetch command:
In a similar way we can test a more complex command that requires a multi step process. Still inside the sandbox, run:
# Ask the agent to fetch the OpenAI homepage
openclaw agent --agent main --local \
  -m "Fetch the top story from news.ycombinator.com and summarize it." \
  --session-id test2
In our query, we are asking the agent to fetch the top story from Hacker News and summarize it. The agent will need to run network commands to fetch the page, parse the HTML to extract the top story, and then generate a summary using the Nemotron model.
This will also trigger a network request that you need to approve in the OpenShell TUI. Once you approve it, the agent will reach Ollama, run the Nemotron model, and return a summary of the Hacker News front page.
This is what we get:
**Top story on Hacker News**

- **Title:** *Running Tesla Model 3’s computer on my desk using parts from crashed cars*
- **URL:** https://bugs.xdavidhu.me/tesla/2026/03/23/running-tesla-model-3s-computer-on-my-desk-using-parts-from-crashed-cars/
- **Score:** 532 points
- **Comments:** 150 comments

**Summary:**
The article documents a hob ... hardware, electric‑vehicle recycling, and the future of low‑cost computing platforms.
You can see that it has successfully perform the agentic task of fetching and summarizing the Hacker News front page, which confirms that the sandbox, network policy controls, and inference routing are all working together correctly.
Fix the Model's Network Assumptions:
If you encounter an error where the agent refuses to run network commands like curl or ping, it is likely because the Nemotron 3 Nano model has a built-in assumption that it does not have network access. We fix this by updating the agent's personality file inside the sandbox:
# Append a note about network access to the agent's personality file
cat >> /sandbox/.openclaw/workspace/SOUL.md << 'EOF'

## Environment

You have network access through the OpenShell sandbox. Approved domains are reachable via curl and other tools. Always attempt commands before assuming they will fail — do not preemptively refuse based on assumptions about network restrictions.
EOF
Here, we are telling the model, "Hey, you actually do have network access, so try running those commands instead of refusing them outright." This should unblock any issues with the model refusing to run network commands.
Create a Telegram Bot
Now that we have confirmed the agent is working and can access the network, we will set up a Telegram bot so you can interact with it from your phone.
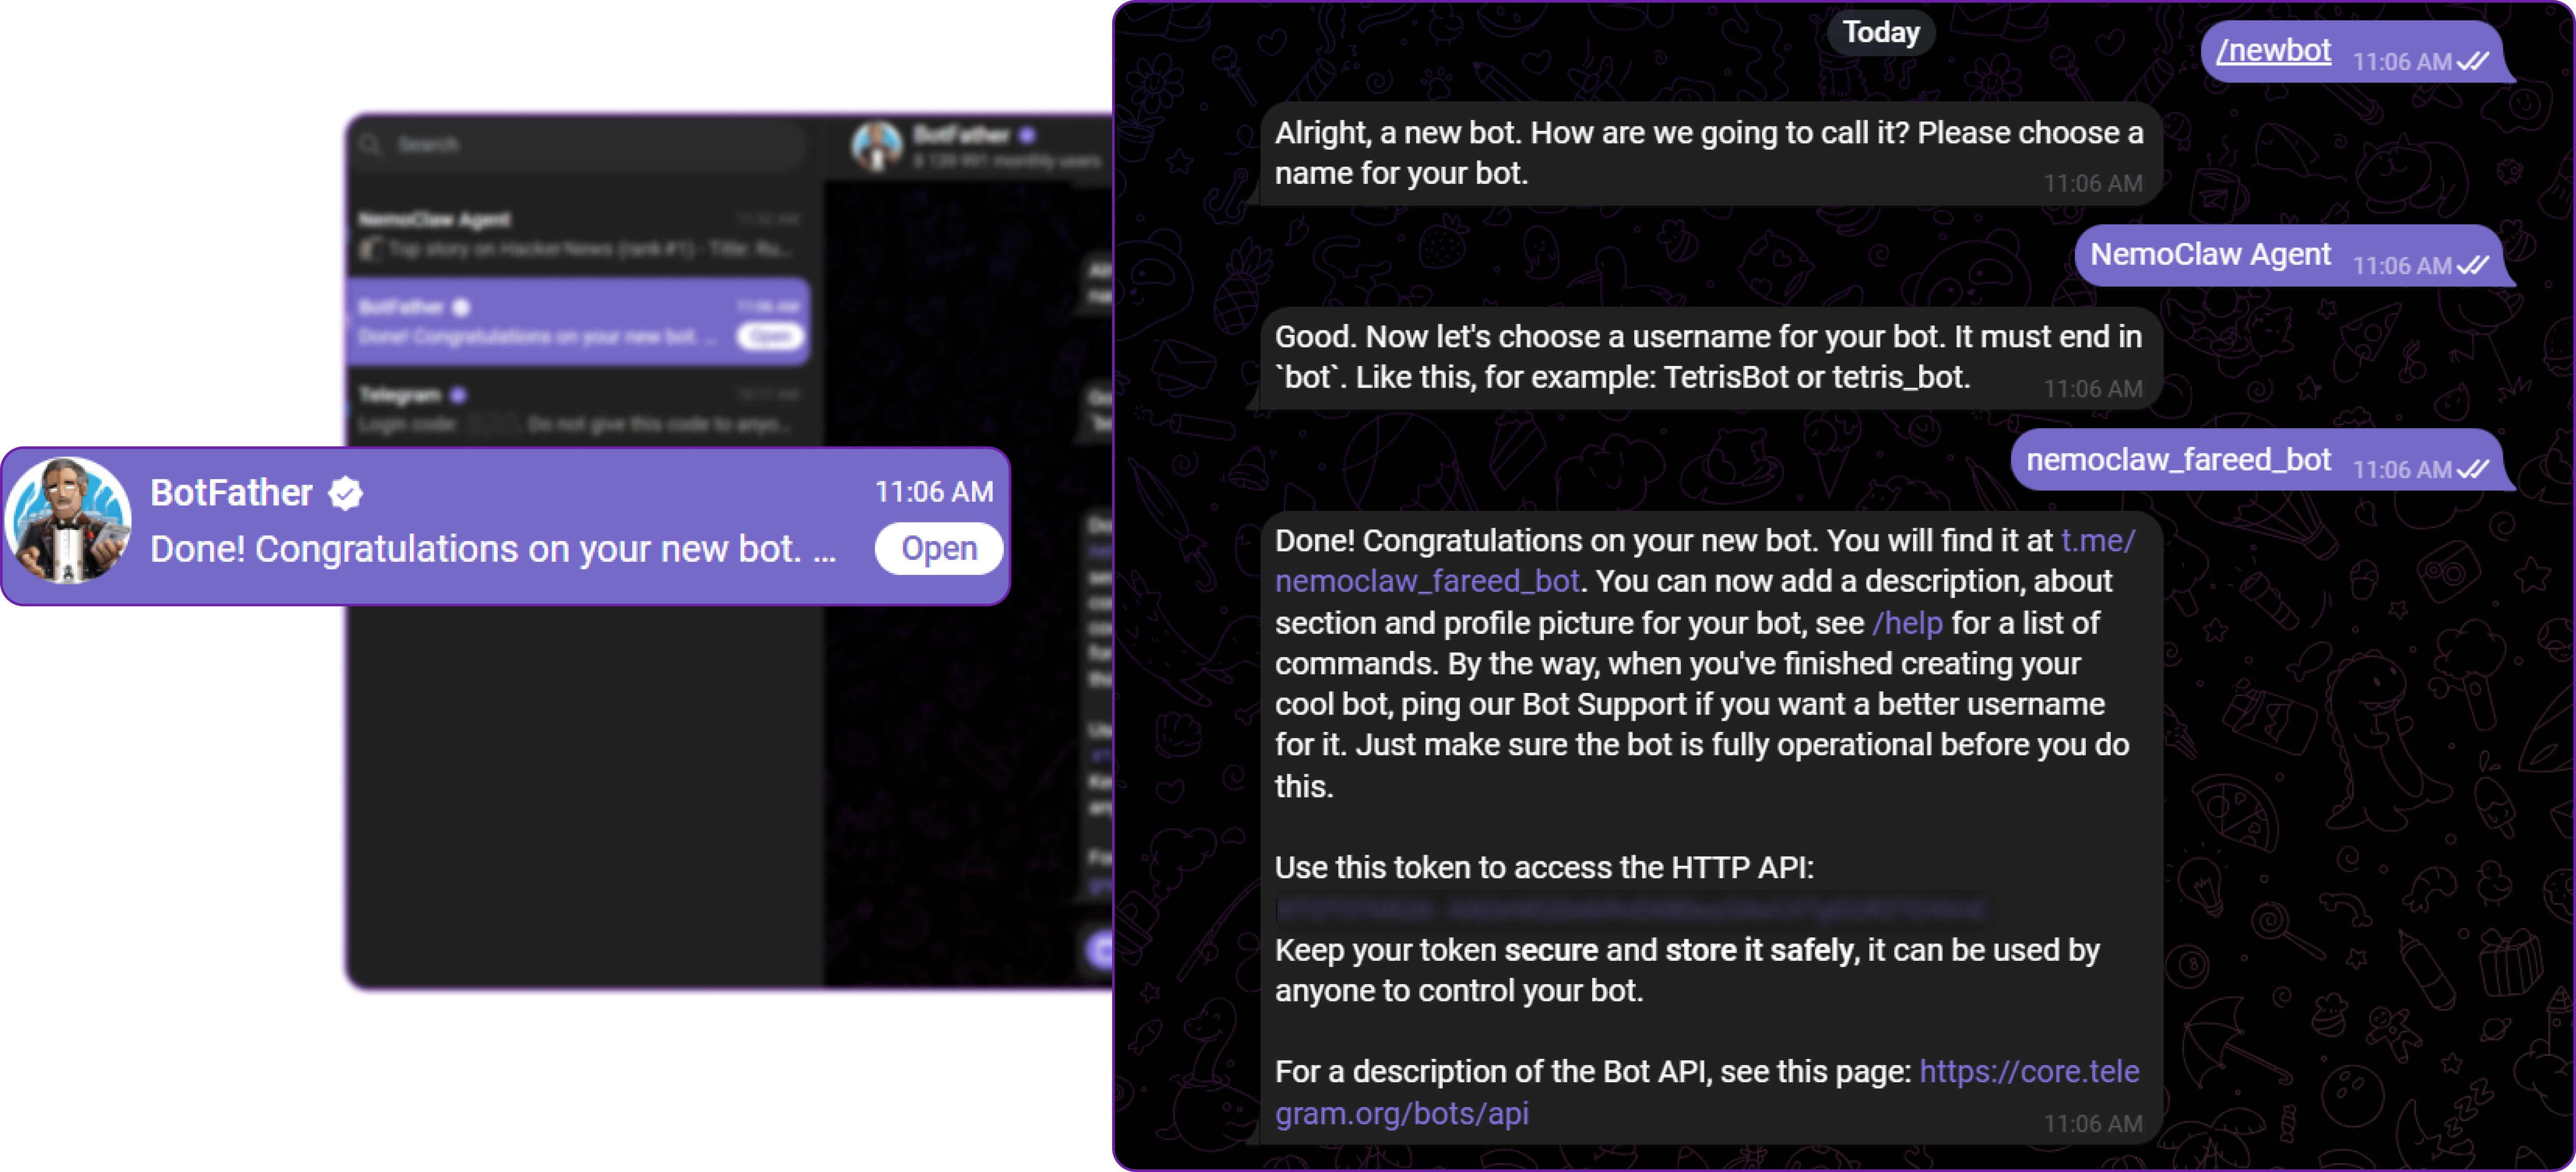
Step 1: Creating the Telegram Bot
Open Telegram on your phone and follow these steps:
- Search for @BotFather and open the conversation
- Send
/newbot - Enter a display name for your bot (for example,
NemoClaw Agent) - Enter a username ending in
bot(for example,my_nemoclaw_bot) - BotFather replies with your bot token, which looks like
71232521389:AAH13Kx_example_token - Copy this token
Step 2: Testing the Telegram Bot
Now that we have set up the Telegram bot and have the token, we can test it by starting the Telegram bridge in NemoClaw.
But before that we need to export the required environment variables for the Telegram bridge. The most important one is TELEGRAM_BOT_TOKEN, which is how the bridge authenticates with Telegram. We also need to set NVIDIA_API_KEY to "skip" since we are not using any NVIDIA cloud services for this local setup.
# Set your Telegram bot token (paste the real token from BotFather)
export TELEGRAM_BOT_TOKEN="YOUR_TOKEN_HERE"

# Required for the bridge startup but can be skipped for local Ollama setups
export NVIDIA_API_KEY="skip"
Let's start the Telegram bridge now:
# Start the Telegram bridge and auxiliary services
nemoclaw start
Now go to Telegram and send a message to your bot (@my_nemoclaw_bot) to test if it responds. You should see a response from the bot:
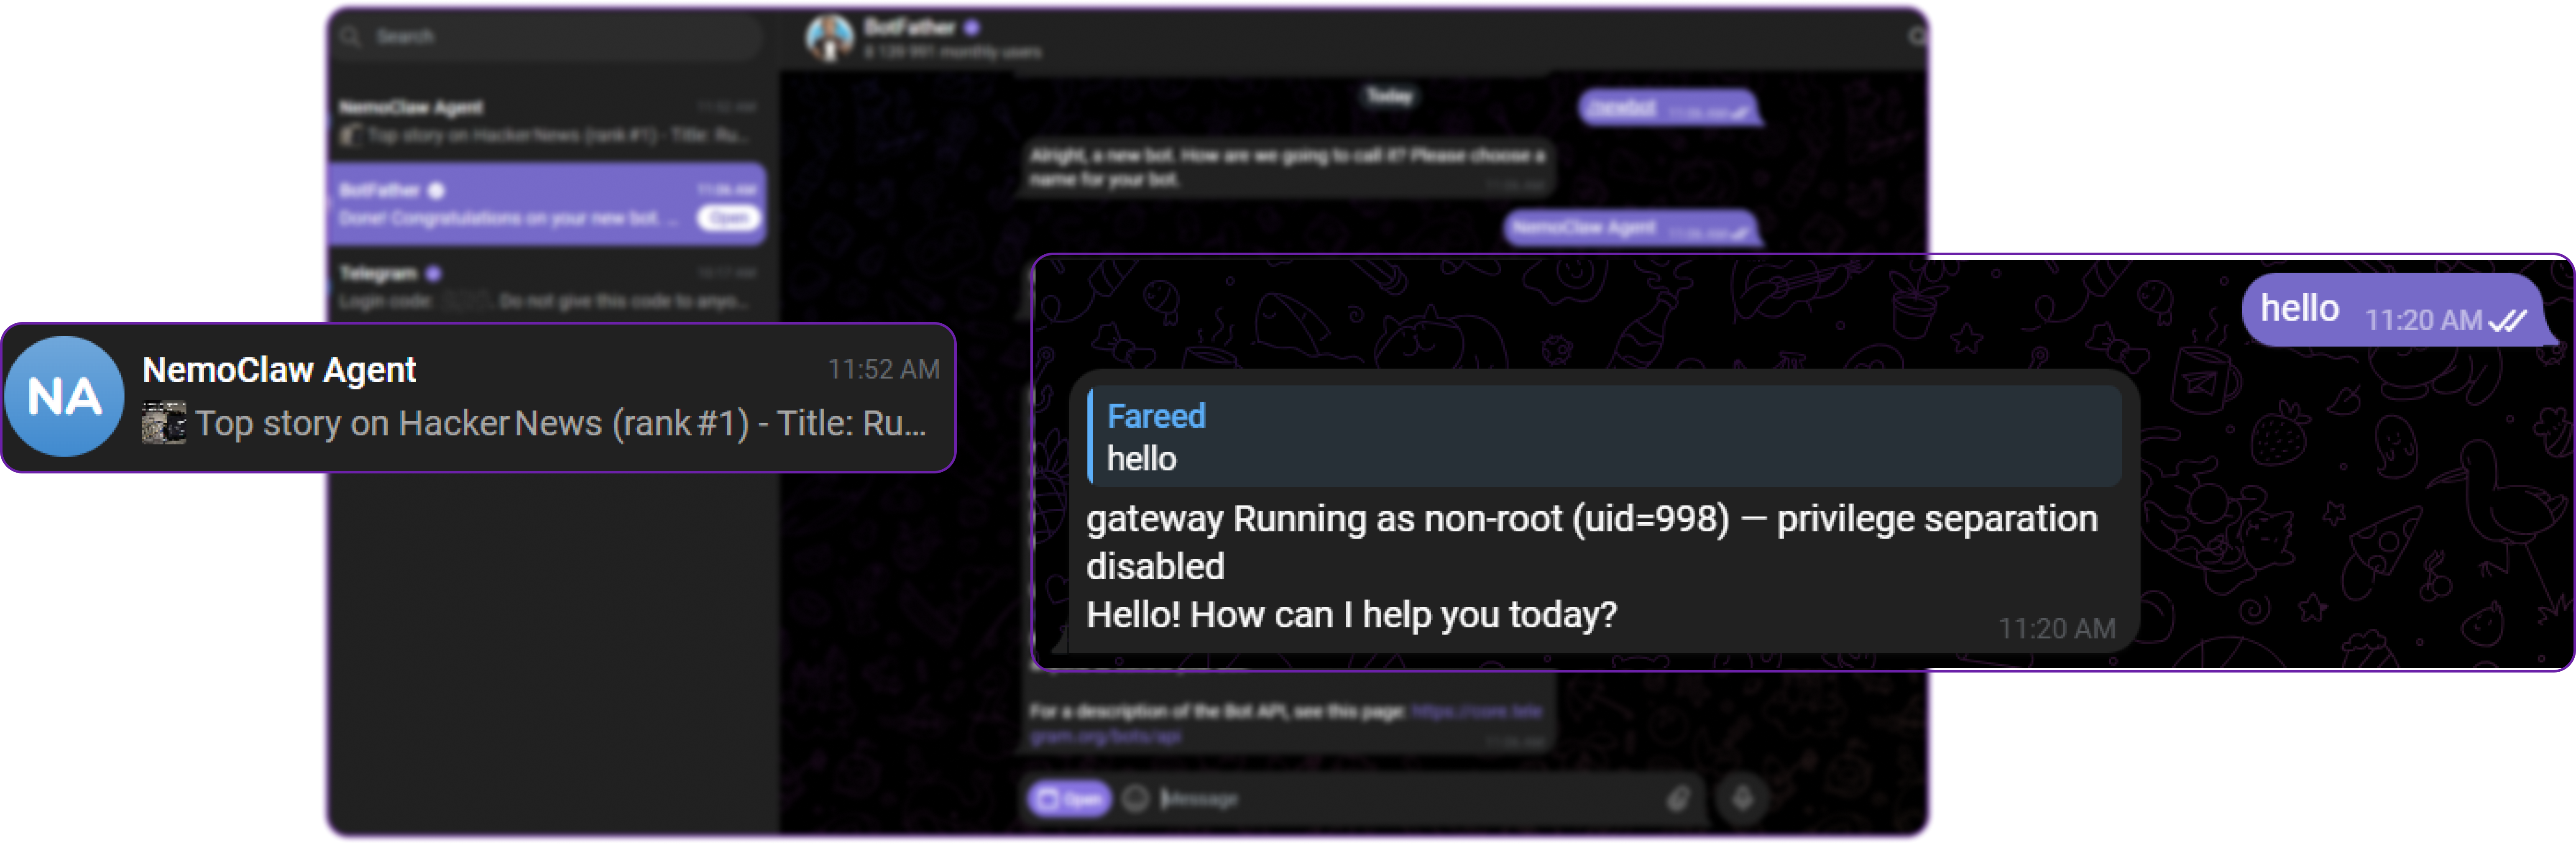
Our bot has successfully responded to our message, which confirms that the Telegram bridge is working and can communicate with the OpenClaw agent inside the sandbox but there exists a known issue where SSH gateway debug messages leak into the bot responses. We will fix this in the next step.
Step 3: Fix the Gateway Message Bug
The Telegram bridge in NemoClaw v0.1.0 has a known bug where SSH gateway debug output (gateway Running as non-root (uid=998) — privilege separation disabled) leaks into bot responses. We need to patch this before starting the bridge.
Open the bridge script in nano:
# Open the Telegram bridge script in nano
nano ~/.nemoclaw/source/scripts/telegram-bridge.js
Press Ctrl+_ (underscore) to jump to a line number, type 137, and press Enter. You should see a line that looks like this:
l.trim() !== "",Replace that line with these three lines:
l.trim() !== "" &&
!l.includes("privilege separation") &&
!l.includes("Running as non-root"),
This adds two extra filters that strip out the SSH gateway debug messages before they reach Telegram.
This error basically means that the Telegram bridge is picking up debug messages from the SSH gateway process, which is expected to run in the background. However, these messages are not relevant to the bot's responses and can be confusing. By adding these filters, we ensure that only clean responses from the agent are sent to Telegram.
Save the file with Ctrl+O, press Enter, then exit with Ctrl+X.
Step 4: Start the Telegram Bridge
Back on the host terminal (not inside the sandbox), set the required environment variables and start the bridge:
# Set your Telegram bot token (paste the real token from BotFather)
export TELEGRAM_BOT_TOKEN="YOUR_TOKEN_HERE"

# Required for the bridge startup but can be skipped for local Ollama setups
export NVIDIA_API_KEY="skip"

# Start the Telegram bridge and auxiliary services
nemoclaw start
You should see output confirming the bridge started:
[services] telegram-bridge started (PID XXXXX)
[services] cloudflared not found — no public URL. Install: brev-setup.sh or manually.
The cloudflared not found warning is harmless. It only applies to creating a public URL tunnel, which is not needed for the Telegram bot.
Important: If you see telegram-bridge already running, it means an old process is still active. Kill it and restart:
# Kill the old bridge processes
kill $(pgrep -f telegram-bridge)

# Start the bridge again with fresh environment variables
export TELEGRAM_BOT_TOKEN="YOUR_TOKEN_HERE"
export NVIDIA_API_KEY="skip"
nemoclaw start
Test the Telegram Bot with Agentic Tasks
Open Telegram on your phone, find your bot, and send a test message:
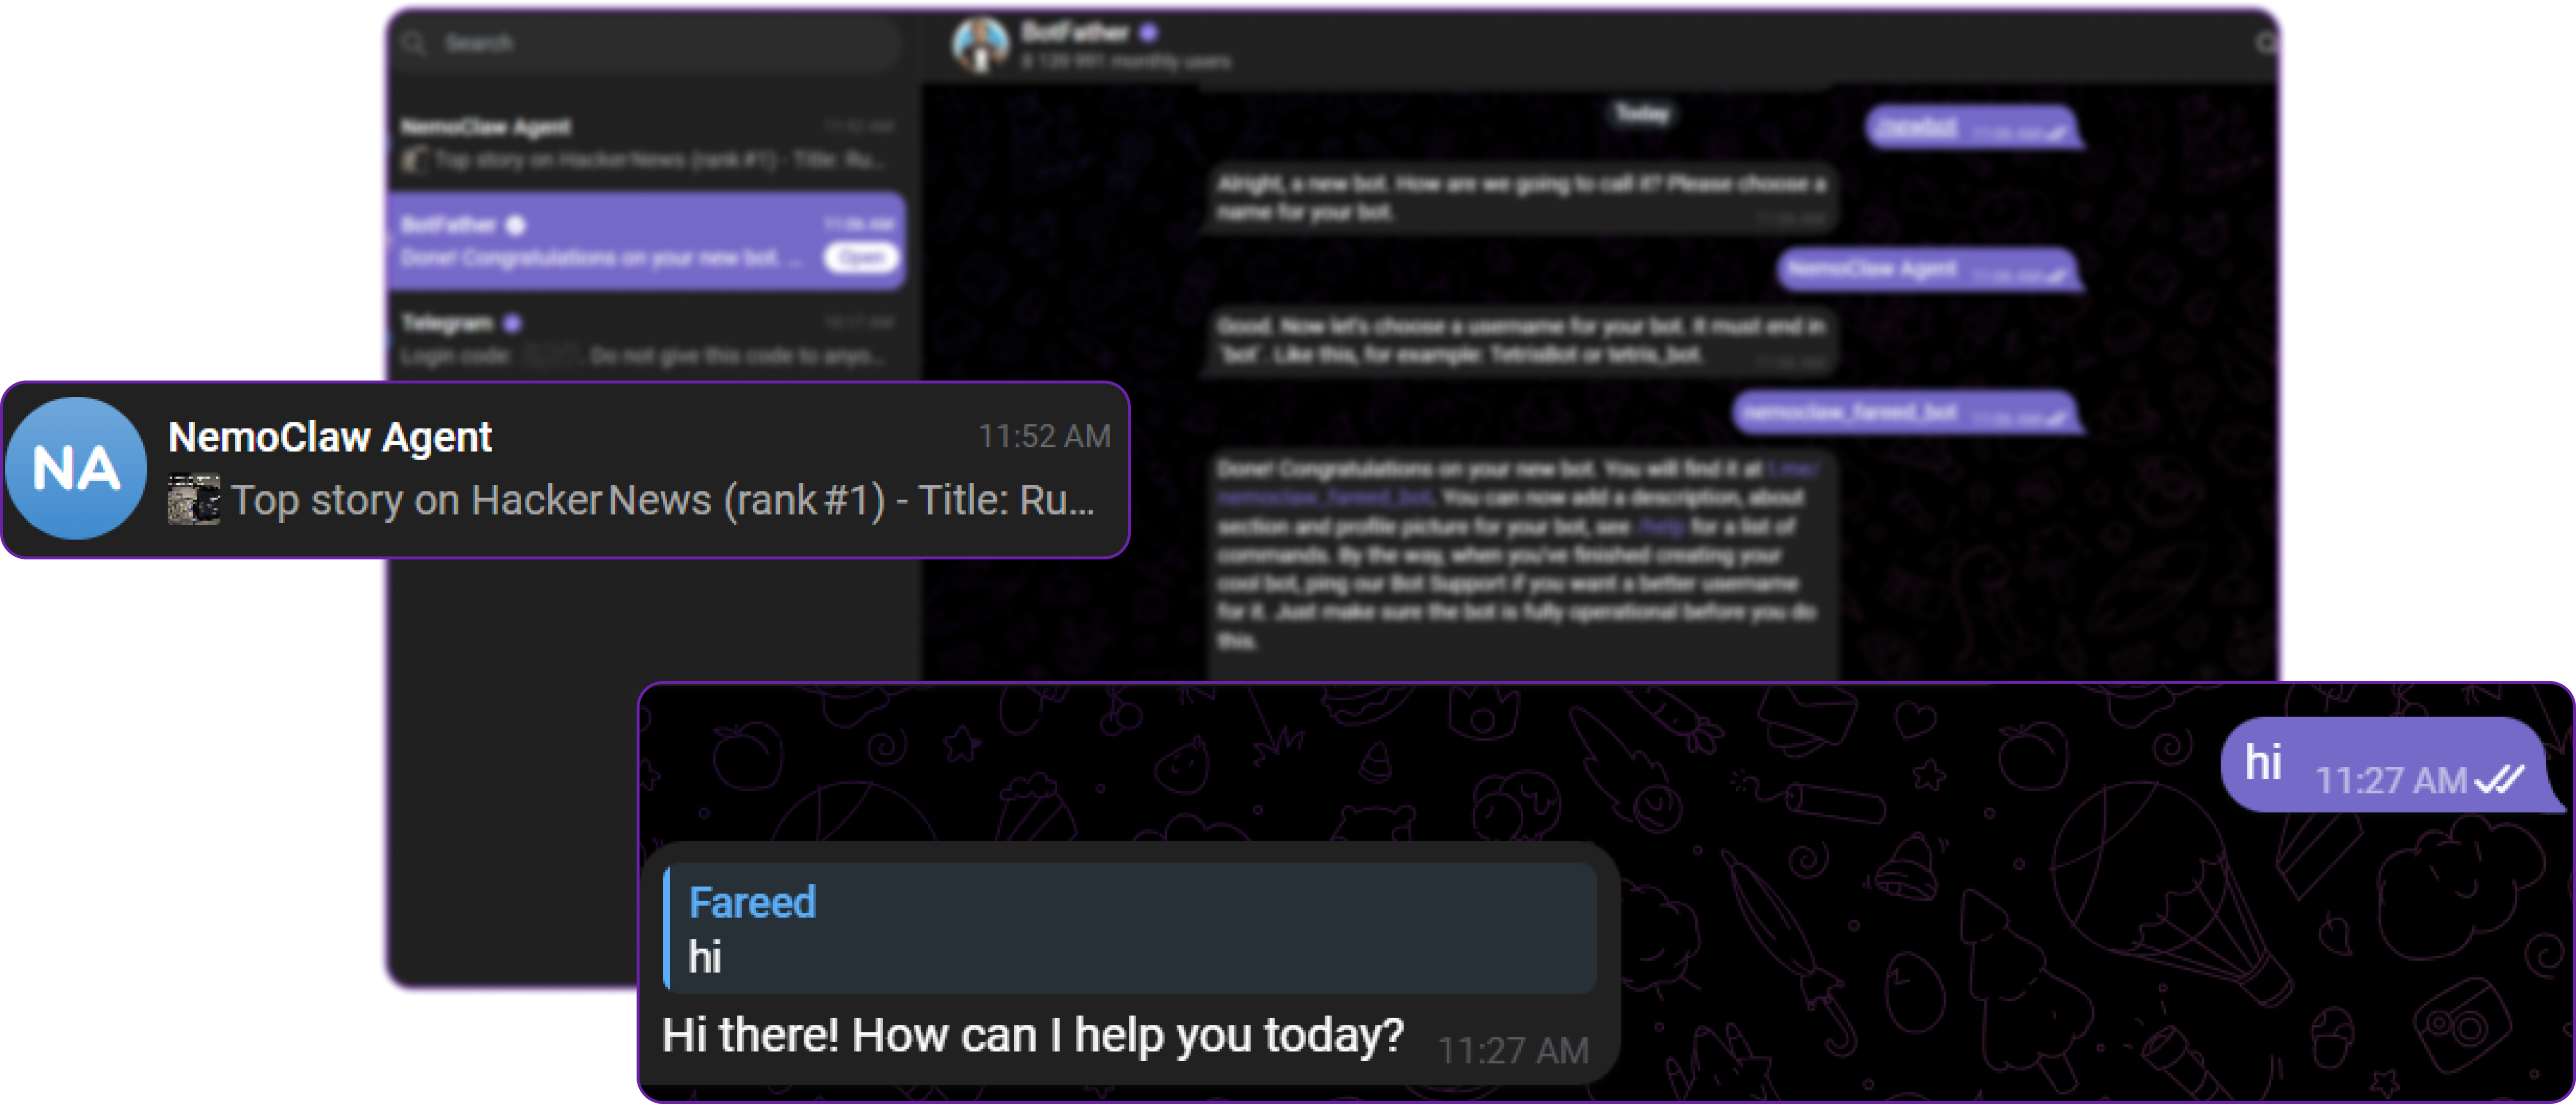
The bot replies with a clean response and no debug messages. If you see the gateway Running as non-root message, it means the old bridge process is still running. Kill it and restart as shown in the previous step.
Now you can try sending more complex messages that require the agent to perform tasks. For example, try asking it to fetch and summarize live data:
Fetch the top stories from news.ycombinator.com and summarize themThe agent will fetch live data from Hacker News, parse the HTML, and return a clean summary directly to your Telegram chat.
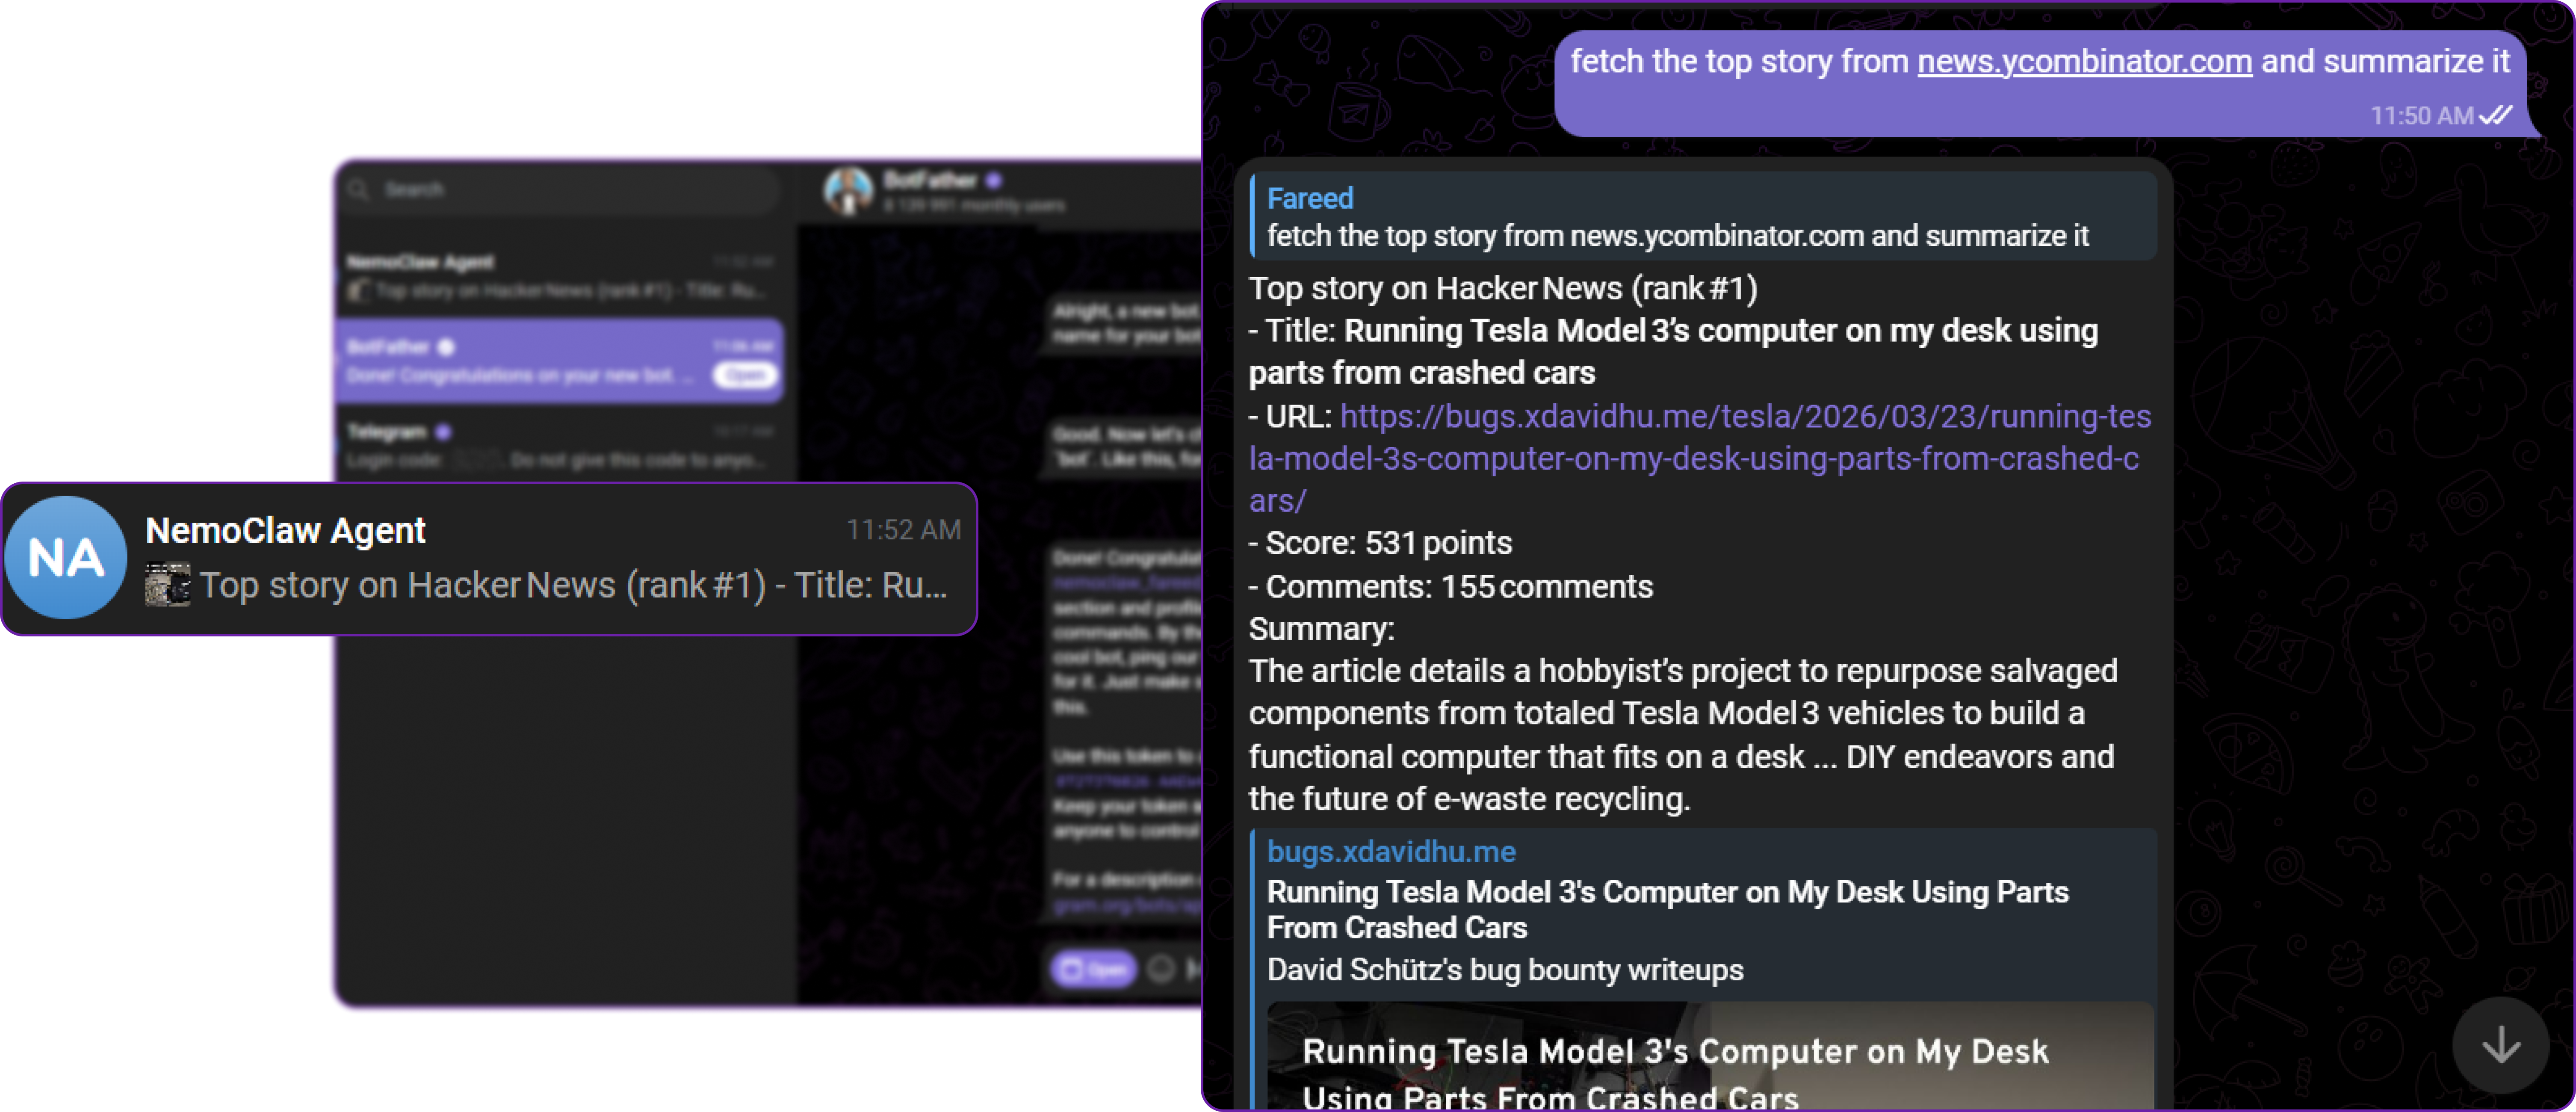
You can see that the agent successfully performed the task of fetching and summarizing the Hacker News front page, and the response is clean without any debug message leaks and also a properly formatted summary with markdown, which confirms that the Telegram bridge is working correctly and can route messages to the agent inside the sandbox.
Prompting Tips for Nemotron 3 Nano: This model works better with natural language requests than raw shell commands. Instead of asking it to run curl -s https://example.com | grep title, phrase it naturally: "Fetch the page at example.com and extract the title." The agent figures out the correct commands on its own.
Here are some more examples to try:
- "What is my system's GPU and how much memory does it have?"
- "Check if port 8080 is in use on this machine"
- "Write a Python script that generates a random password and save it to /tmp/password.py"
Each of these will work through the Telegram bot, with the agent executing real commands inside the sandbox and returning the results.
Restarting After VM Hibernation
If you hibernate your Hyperstack VM and restore it later, you need to restart the services:
# Start Ollama (it should auto-start, but verify)
sudo systemctl start ollama

# Verify the model is loaded
curl -s http://localhost:11434/api/tags | head -n 5

# Set your environment variables again
export TELEGRAM_BOT_TOKEN="YOUR_TOKEN_HERE"
export NVIDIA_API_KEY="skip"

# Start NemoClaw services
nemoclaw start

# Open the monitoring TUI in a second terminal (optional)
openshell term
This way, you can preserve your entire setup and quickly get back to experimenting without needing to reconfigure anything.
Why Deploy NemoClaw on Hyperstack?
Hyperstack is a cloud platform designed to accelerate AI and machine learning workloads. Here is why it is a strong choice for deploying NemoClaw:
-
GPU Availability: Hyperstack provides on-demand access to GPUs like the L40 and RTX A6000 with 48 GB VRAM, which comfortably fits the Nemotron 30B model for local inference or even H100/A100 for more demanding workloads.
-
Ephemeral Storage: Hyperstack VM flavors include large ephemeral disks (up to 725 GB) specifically designed for storing large model weights without consuming root disk space.
-
Docker Pre-Installed: The Ubuntu CUDA images come with Docker pre-installed and ready to use, which NemoClaw requires for its OpenShell sandbox.
-
Cost-Effective: You pay only for the resources you use. When you are done experimenting, hibernate the VM to stop compute charges while preserving your entire setup.
-
Easy SSH Access: Public IPs and SSH keypair management make it easy to connect from your local terminal and manage the VM remotely.
Get Started with NemoClaw. Launch a VM on Hyperstack Today.

FAQs
What is NemoClaw?
NemoClaw is NVIDIA's open source reference stack that adds kernel-level sandboxing, network policy controls, and audit trails to OpenClaw. It wraps OpenClaw with the NVIDIA OpenShell runtime so AI agents can run autonomously with security guardrails. It was announced at GTC on March 16, 2026 and is currently in alpha.
What hardware is required for NemoClaw?
NemoClaw itself requires 4 vCPU, 8 GB RAM, 20 GB disk, and Docker. For running the Nemotron 3 Nano 30B model locally with Ollama, you need a GPU with at least 24 GB of VRAM (such as an RTX A6000, L40, or RTX 4090). The model occupies approximately 18 GB of VRAM during inference.
Does NemoClaw work with models other than Nemotron?
Yes. NemoClaw supports any model available through Ollama. Other recommended models include qwen3.5:27b (fast local reasoning, approximately 18 GB VRAM), glm-4.7-flash (reasoning and code generation, approximately 25 GB VRAM), and cloud models like nemotron-3-super:cloud via NVIDIA endpoints.
Is NemoClaw production-ready?
No. NemoClaw is in alpha as of March 2026. APIs, configuration schemas, and runtime behaviour are subject to breaking changes. NVIDIA recommends using it for experimentation and early feedback only.
What is OpenClaw?
OpenClaw is a free, open-source personal AI agent created by Peter Steinberger. It runs locally on your own device and connects to messaging platforms like Telegram, WhatsApp, Slack, and Discord. Unlike chatbots that just respond to text, OpenClaw can execute shell commands, manage files, send emails, and run autonomous workflows. NemoClaw adds a security layer on top of OpenClaw so these powerful capabilities run inside an isolated sandbox with policy controls.
Subscribe to Hyperstack!
Enter your email to get updates to your inbox every week

